Gateway API是Kubernetes中用于对服务网络流量进行建模的一系列资源。它的目标是建立一套表现力强、易扩展、面向角色的服务网络模型。本文介绍如何使用Gateway API访问服务。
前提条件
确保集群为1.24及以上版本。
已安装Gateway API组件。具体操作,请参见管理组件。
说明1.24及以上版本的集群已默认安装Gateway API组件。
背景信息
ACK 1.24及以上版本集群默认安装Gateway API组件相关的CRD资源。您可以通过安装支持Gateway API的网关来使用Gateway API的相关特性。关于Gateway API的更多说明,请参见Gateway API。
使用流程
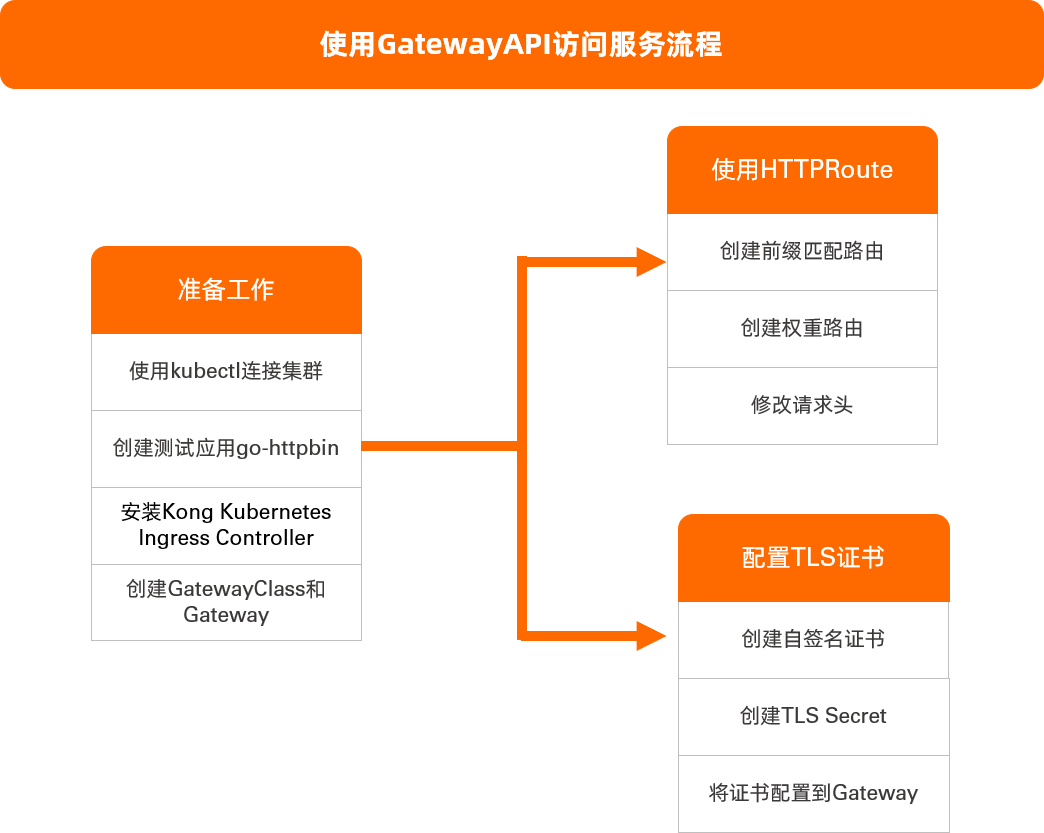
准备工作
创建测试应用go-httpbin。
使用以下内容,创建httpbin.yaml。
apiVersion: apps/v1
kind: Deployment
metadata:
  name: go-httpbin
  namespace: default
spec:
  replicas: 1
  selector:
    matchLabels:
      app: go-httpbin
  template:
    metadata:
      labels:
        app: go-httpbin
        version: v1
    spec:
      containers:
        - image: specialyang/go-httpbin:v3
          args:
            - "--port=8090"
            - "--version=v1"
          imagePullPolicy: Always
          name: go-httpbin
          ports:
            - containerPort: 8090
---
apiVersion: v1
kind: Service
metadata:
  name: go-httpbin
  namespace: default
spec:
  ports:
    - port: 80
      targetPort: 8090
      protocol: TCP
  selector:
    app: go-httpbin
执行以下命令,创建go-httpbin应用。
kubectl apply -f httpbin.yaml
安装Kong Kubernetes Ingress Controller。
ACK中未提供支持Gateway API的网关组件,本文以kubernetes-ingress-controller网关为例。
执行以下命令,安装Kong Kubernetes Ingress Controller。
说明Kong Kubernetes Ingress Controller会使用LoadBalancer类型的kong-proxy Service向外暴露服务,创建的CLB实例会产生额外的费用。关于CLB实例的计费说明,请参见CLB计费概述。
kubectl create -f https://raw.githubusercontent.com/Kong/kubernetes-ingress-controller/v2.8.0/deploy/single/all-in-one-dbless.yaml创建完成的资源将会放置在kong命名空间下。
验证Kong Kubernetes Ingress Controller是否安装成功。
执行以下命令,查看Service的LoadBalancer IP。
kubectl get svc -n kong kong-proxy预期输出:
NAME         TYPE           CLUSTER-IP      EXTERNAL-IP    PORT(S)                      AGE
kong-proxy   LoadBalancer   172.16.19.238   47.14.**.**  80:31611/TCP,443:30936/TCP     10s
在返回结果中获取
EXTERNAL IP。执行以下命令,访问Kong Kubernetes Ingress Controller。
curl http://<EXTERNAL-IP>预期输出:
{"message":"no Route matched with those values"}
访问Kong Kubernetes Ingress Controller时,返回
{"message":"no Route matched with those values"},表明安装Kong Kubernetes Ingress Controller成功。
创建GatewayClass和Gateway。
使用以下内容,创建gateway.yaml。
apiVersion: gateway.networking.k8s.io/v1beta1
kind: GatewayClass
metadata:
  name: kong
  annotations:
    konghq.com/gatewayclass-unmanaged: 'true'
spec:
  controllerName: konghq.com/kic-gateway-controller
---
apiVersion: gateway.networking.k8s.io/v1beta1
kind: Gateway
metadata:
  name: kong
spec:
  gatewayClassName: kong
  listeners:
  - name: proxy
    port: 80
    protocol: HTTP
  - name: proxy-ssl
    port: 443
    protocol: HTTPS
执行以下命令,创建GatewayClass和Gateway。
kubectl apply -f gateway.yaml执行以下命令,查看Gateway外部端点。
kubectl get gateway kong预期输出:
NAME   CLASS   ADDRESS        PROGRAMMED   AGE
kong   kong    47.14.**.**              68s
返回以上结果,表明创建GatewayClass和Gateway成功。
使用HTTPRoute
以下介绍如何使用HTTPRoute,
功能一:创建前缀匹配路由
使用HTTPRoute的前缀匹配路由能力,使仅前缀正确的请求路由到应用。
使用以下内容,创建demo-route.yaml。
apiVersion: gateway.networking.k8s.io/v1beta1
kind: HTTPRoute
metadata:
  name: demo-route
spec:
  parentRefs: # 引用Gateway资源。
    - group: gateway.networking.k8s.io
      kind: Gateway
      name: kong
  hostnames:
    - example.com # host设置为example.com
  rules:
    - matches: # 匹配规则为前缀匹配路径。
        - path:
            type: PathPrefix
            value: /
      backendRefs: # 后端为类型为Service,名称go-httpbin,端口80。
        - kind: Service
          name: go-httpbin
          port: 80
执行以下命令,创建HTTPRoute资源。
kubectl apply -f demo-route.yaml执行以下命令,访问go-httpbin应用。
curl http://example.com/version --resolve example.com:80:<EXTERNAL-IP>预期输出:
version:v1返回以上结果,表明访问go-httpbin应用成功,创建前缀匹配路由成功。
功能二:创建权重路由
使用HTTPRoute的权重路由能力,使流量按照权重比例路由到应用。
创建测试应用new-nginx和old-nginx。
使用以下内容,创建nginx.yaml。
apiVersion: apps/v1
kind: Deployment
metadata:
  name: old-nginx
spec:
  replicas: 1
  selector:
    matchLabels:
      run: old-nginx
  template:
    metadata:
      labels:
        run: old-nginx
    spec:
      containers:
      - image: registry.cn-hangzhou.aliyuncs.com/acs-sample/old-nginx
        imagePullPolicy: Always
        name: old-nginx
        ports:
        - containerPort: 80
          protocol: TCP
      restartPolicy: Always
---
apiVersion: v1
kind: Service
metadata:
  name: old-nginx
spec:
  ports:
  - port: 80
    protocol: TCP
    targetPort: 80
  selector:
    run: old-nginx
  sessionAffinity: None
  type: NodePort
---
apiVersion: apps/v1
kind: Deployment
metadata:
  name: new-nginx
spec:
  replicas: 1
  selector:
    matchLabels:
      run: new-nginx
  template:
    metadata:
      labels:
        run: new-nginx
    spec:
      containers:
      - image: registry.cn-hangzhou.aliyuncs.com/acs-sample/new-nginx
        imagePullPolicy: Always
        name: new-nginx
        ports:
        - containerPort: 80
          protocol: TCP
      restartPolicy: Always
---
apiVersion: v1
kind: Service
metadata:
  name: new-nginx
spec:
  ports:
  - port: 80
    protocol: TCP
    targetPort: 80
  selector:
    run: new-nginx
  sessionAffinity: None
  type: NodePort
执行以下命令,创建new-nginx和old-nginx。
kubectl apply -f nginx.yaml
创建HTTPRoute资源。
执行以下命令,创建demo-weight.yaml。
apiVersion: gateway.networking.k8s.io/v1beta1 kind: HTTPRoute metadata: name: demo-weight spec: parentRefs: # 引用Gateway资源。 - group: gateway.networking.k8s.io kind: Gateway name: kong hostnames: - weight.example.com # host设置为weight.example.com rules: - matches: # 匹配规则为前缀匹配路径。 - path: type: PathPrefix value: / backendRefs: # 设置后端以及对应权重,权重不为百分比形式,无需等于100。 - kind: Service name: old-nginx port: 80 weight: 1 # 设置old-nginx的权重为1。 - kind: Service name: new-nginx port: 80 weight: 1 # 设置new-nginx的权重为1。weight:权重比例,例如本文设置old-nginx的weight为1,new-nginx的weight为1,表明流量按照1∶1的比例路由到old-nginx和new-nginx。
执行以下命令,创建HTTPRoute资源。
kubectl apply -f demo-weight.yaml
多次执行以下命令,访问new-nginx和old-nginx应用。
curl http://weight.example.com/ --resolve weight.example.com:80:<EXTERNAL-IP>预期输出:
old
new
old
new
old
new
可以看到流量按照1∶1的比例路由到new-nginx和old-nginx两个应用中,表明创建权重路由成功。
功能三:修改请求头
使用HTTPRoute的filter能力,可以在请求或者回复阶段对请求头进行额外处理。本文以给发送到后端的请求添加请求头为例。关于filter能力的更多介绍,请参见HTTPRoute。
创建HTTPRoute资源。
执行以下命令,创建demo-filter.yaml。
apiVersion: gateway.networking.k8s.io/v1beta1
kind: HTTPRoute
metadata:
  name: demo-filter
spec:
  parentRefs: # 引用Gateway资源。
    - group: gateway.networking.k8s.io
      kind: Gateway
      name: kong
  hostnames:
    - filter.example.com # host设置为filter.example.com。
  rules:
    - matches: # 匹配规则为前缀匹配路径。
        - path:
            type: PathPrefix
            value: /
      filters:
        - type: RequestHeaderModifier # 添加请求头my-header: foo。
          requestHeaderModifier:
            add:
              - name: my-header
                value: foo
      backendRefs: # 后端为类型为Service,名称go-httpbin,端口80。
        - kind: Service
          name: go-httpbin
          port: 80
执行以下命令,创建HTTPRoute资源。
kubectl apply -f demo-filter.yaml
执行以下命令,访问go-httpbin应用。
curl http://filter.example.com/ --resolve filter.example.com:80:<EXTERNAL-IP>预期输出:
headers: {
    // ...
    "My-Header": [
      "foo"
    ],
    // ...
}
可以看到访问go-httpbin应用时,返回结果中包含
My-Header:foo请求头,表明修改请求头成功。
配置TLS证书
执行以下命令,通过OpenSSL创建自签名证书。
openssl req -subj '/CN=example.com' -new -newkey rsa:2048 -sha256 \ -days 365 -nodes -x509 -keyout server.key -out server.crt \ -addext "subjectAltName = DNS:example.com" \ -addext "keyUsage = digitalSignature" \ -addext "extendedKeyUsage = serverAuth" 2> /dev/null; openssl x509 -in server.crt -subject -noout生成的证书和私钥位于当前目录的server.crt和server.key文件中。
执行以下命令,使用server.crt和server.key文件创建TLS Secret。
kubectl create secret tls example.com --key server.key --cert server.crt预期输出:
secret/example.com created将证书配置到Gateway。
执行以下命令,创建gateway1.yaml。
apiVersion: gateway.networking.k8s.io/v1beta1
kind: Gateway
metadata:
  name: kong
spec:
  gatewayClassName: kong
  listeners:
  - name: proxy
    port: 80
    protocol: HTTP
  - name: proxy-ssl
    port: 443
    protocol: HTTPS
    tls: # 配置TLS。
      mode: Terminate
      certificateRefs: # 引用所创建的secret。
        - kind: Secret
          name: example.com
执行以下命令,将证书配置到Gateway。
kubectl apply -f gateway1.yaml
执行以下命令,验证配置TLS证书是否成功。
openssl s_client -servername example.com -connect <EXTERNAL-IP>:443返回结果中包含
CN = example.com,表明配置TLS证书成功。
相关文档
- 本页导读 (1)