本文讲解设备开发者如何通过天猫精灵已认证的Inside+IoT模组上开发产品功能,并将设备连接到天猫精灵AI平台设备和生活物联网平台。当您的设备需要同时支持Inside语音控制其他设备的能力和自身IoT的控制能力时(以下简称Inside + IoT),请参考该文档进行开发,平台当前仅支持TG6000A芯片。
创建产品
在生活物联网平台创建产品
- 创建产品。
参见创建产品,并按如下要求设置参数。
- 选择节点类型为设备
- 选择是否接入网关为否
- 选择连网方式为WiFi
- 选择数据格式为ICA标准数据格式(Alink JSON)
- 产品功能定义。
参见功能概述来定义产品的功能。
- 调试设备。
- 选择模组,支持的语音芯片暂未列入列表,请选择其他即可。
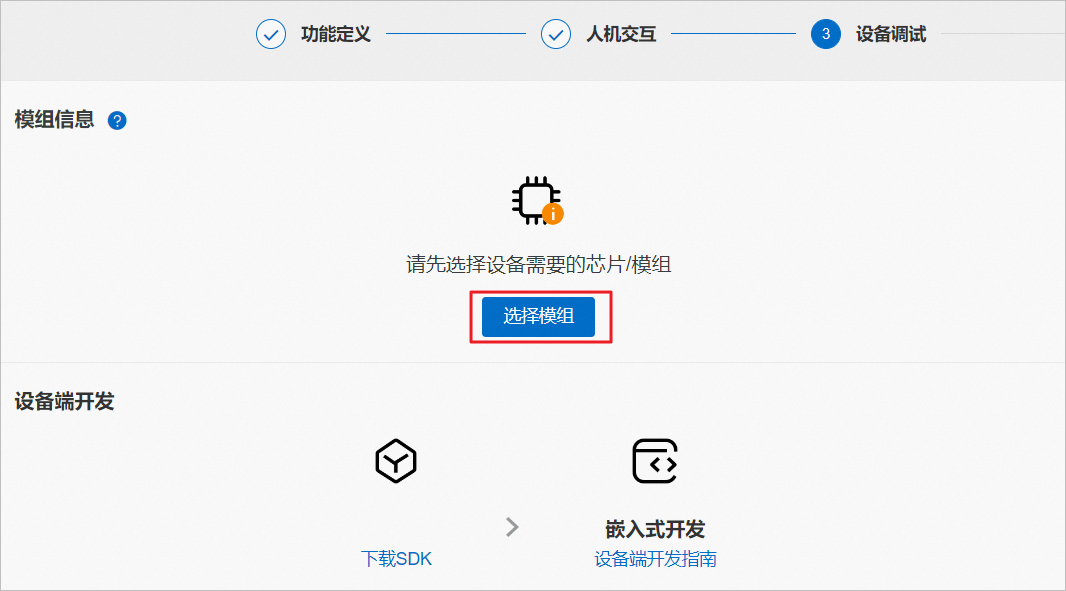
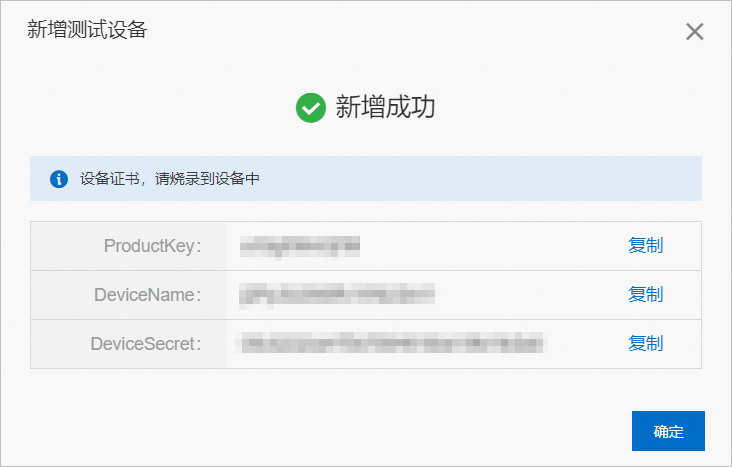
- 新增测试设备,并获取设备证书。详细操作参见新增测试设备。
- 选择模组,支持的语音芯片暂未列入列表,请选择其他即可。
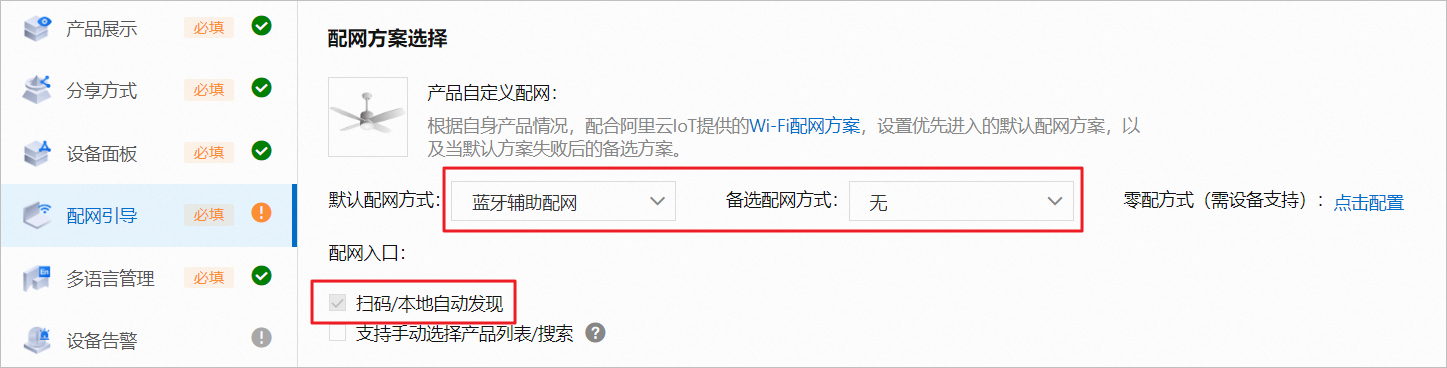
- 在产品的人机交互页面,可打开使用公版App控制产品的开关,使用生活物联网平台提供的云智能App对设备进行控制。App参数的配置请参见配置人机交互。配网方案选择请配置“蓝牙辅助配网”,配网入口选择“扫码/本地自动发现”。
- 在批量投产页面确认设备信息。说明 设备开发结束之后才会投产,开发阶段请不要单击完成开发。
在天猫精灵AI平台创建产品
请参考文档天猫精灵AI平台快速入门进行Inside语音产品创建和定义。
产品关联
设备端开发
获取SDK代码及编译
请参考搭建芯片开发环境(TG6000A)进行芯片开发环境搭建和代码下载编译。
为节省ROM、RAM空间,请您在编译时使能AIOT_LIVING_SDK模块加入编译。
具体配置方法:在代码根目录build.sh 文件中设置export CONFIG_AIOT_LIVING_SDK=0宏的值为1, 其中build.sh 脚本由aligenieSDK/scripts/build_TG6000A.sh 在repo sync时拷贝生成,可以直接更改该文件提交到您的代码仓库中, 因为repo sync不会自动拷贝覆盖,请手动拷贝到根目录中。
export CONFIG_AIOT_LIVING_SDK=1使能后AIOT Living SDK将加入编译,其中AIoTSDK目录、thirdparty_app目录相关代码将加入编译,从而支持设备具备自身IoT的被控能力,使您的设备可以具备使用云智能App或自有品牌App进行设备控制和查看设备状态的能力。
其中AIoTSDK目录为该芯片平台适配层代码与AIoT Living SDK相关静态库;thirdparty_app为您的设备应用层代码,包含部分Inside + IoT配网业务流程逻辑,请合入代码时谨慎处理。
烧写固件到模组
请参考搭建芯片开发环境(TG6000A)文档中的烧录方式进行固件烧录。
产品功能开发
- 配置设备IoT身份信息。
设备激活凭证写入,您可以将您的IoT设备身份信息写入设备存储介质中,并通过下述方案实现读取的相关代码并传入AIoT Living SDK中。
在应用示例代码thirdparty_app/vendor.c的代码中有参考读取设备信息的方式,设备开发者可以参考。
vendor_set_dev_meta_info( )函数中有调用vendor_get_product_id、vendor_get_product_key、vendor_get_product_secret、vendor_get_device_name、vendor_get_device_secret等函数获取IoT身份信息,实现上述函数可以完成设备身份的获取。设备开发者将设备身份信息设置到程序之后,可以将代码进行编译并遵循模组商提供的烧写工具将固件写入模组,并将模组上电。
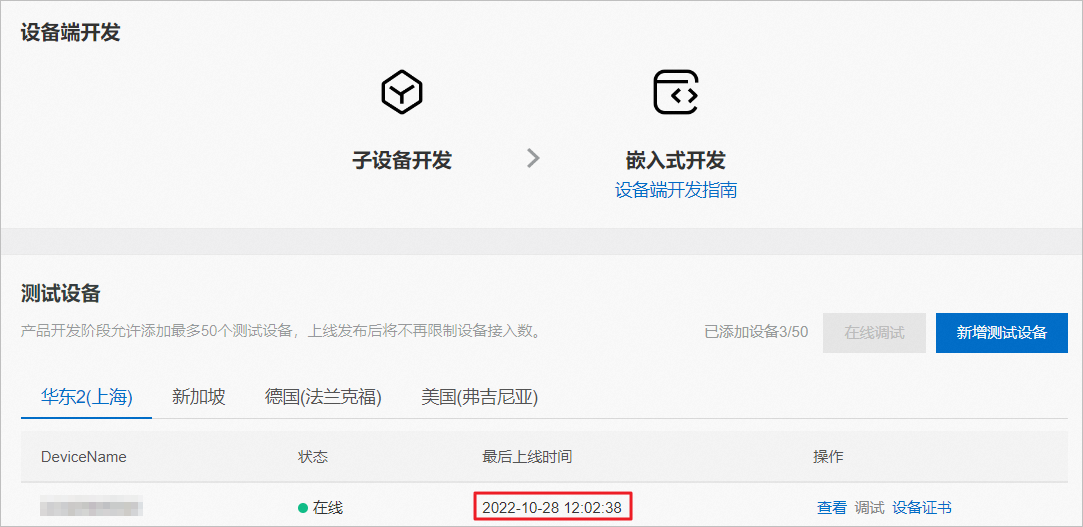
如果模组可以正常连接生活物联网平台,在生活物联网平台的设备调试页面可以看到该设备已激活在线,以及设备连接到生活物联网平台的时间信息。
- 配置设备语音能力身份信息。请参考设备产品入网指南写入Inside身份信息。
- 上报产品属性。产品的属性发生变化时,需要将变化后的数值上报到生活物联网平台。属性变化的检测以及上报是由设备开发者定义和实现的。
如下示例代码对应的产品具有一个
LightSwitch的属性,类型为bool,还具有一个RGBColor的属性,类型为复合型。用户可以参照该代码上报产品的属性变化。void user_post_property(void) { static int example_index = 0; int res = 0; user_example_ctx_t *user_example_ctx = user_example_get_ctx(); char *property_payload = "NULL"; if (example_index == 0) { /* Normal Example */ property_payload = "{\"LightSwitch\":1}"; example_index++; } else if (example_index == 1) { /* Wrong Property ID */ property_payload = "{\"LightSwitchxxxx\":1}"; example_index++; } else if (example_index == 2) { /* Wrong Value Format */ property_payload = "{\"LightSwitch\":\"test\"}"; example_index++; } else if (example_index == 3) { /* Wrong Value Range */ property_payload = "{\"LightSwitch\":10}"; example_index++; } else if (example_index == 4) { /* Missing Property Item */ property_payload = "{\"RGBColor\":{\"Red\":45,\"Green\":30}}"; example_index++; } else if (example_index == 5) { /* Wrong Params Format */ property_payload = "\"hello world\""; example_index++; } else if (example_index == 6) { /* Wrong Json Format */ property_payload = "hello world"; example_index = 0; } res = IOT_Linkkit_Report(user_example_ctx->master_devid, ITM_MSG_POST_PROPERTY, (unsigned char *)property_payload, strlen(property_payload)); EXAMPLE_TRACE("Post Property Message ID: %d", res); } - 上报产品事件。如果产品定义了事件,当事件发生时也需要向云端发送事件。事件的检测以及上报由设备开发者实现。
例如产品定义了一个标识符为
Error的事件,该事件还有一个标识符为ErrorCode的输出参数。如下示例代码描述了如何向物联网平台发送一个事件。void user_post_event(void) { static int example_index = 0; int res = 0; user_example_ctx_t *user_example_ctx = user_example_get_ctx(); char *event_id = "Error"; char *event_payload = "NULL"; if (example_index == 0) { /* Normal Example */ event_payload = "{\"ErrorCode\":0}"; example_index++; } else if (example_index == 1) { /* Wrong Property ID */ event_payload = "{\"ErrorCodexxx\":0}"; example_index++; } else if (example_index == 2) { /* Wrong Value Format */ event_payload = "{\"ErrorCode\":\"test\"}"; example_index++; } else if (example_index == 3) { /* Wrong Value Range */ event_payload = "{\"ErrorCode\":10}"; example_index++; } else if (example_index == 4) { /* Wrong Value Range */ event_payload = "\"hello world\""; example_index++; } else if (example_index == 5) { /* Wrong Json Format */ event_payload = "hello world"; example_index = 0; } res = IOT_Linkkit_TriggerEvent(user_example_ctx->master_devid, event_id, strlen(event_id), event_payload, strlen(event_payload)); EXAMPLE_TRACE("Post Event Message ID: %d", res); }示例代码中的定义了系统的各种事件处理函数,处理产品回调函数。示例代码如下所示。
    /* Register Callback */
    IOT_RegisterCallback(ITE_CONNECT_SUCC, user_connected_event_handler);
    IOT_RegisterCallback(ITE_DISCONNECTED, user_disconnected_event_handler);
    IOT_RegisterCallback(ITE_RAWDATA_ARRIVED, user_down_raw_data_arrived_event_handler);
    IOT_RegisterCallback(ITE_SERVICE_REQUST, user_service_request_event_handler);
    IOT_RegisterCallback(ITE_PROPERTY_SET, user_property_set_event_handler);
    IOT_RegisterCallback(ITE_PROPERTY_GET, user_property_get_event_handler);
    IOT_RegisterCallback(ITE_REPORT_REPLY, user_report_reply_event_handler);
    IOT_RegisterCallback(ITE_TRIGGER_EVENT_REPLY, user_trigger_event_reply_event_handler);
    IOT_RegisterCallback(ITE_TIMESTAMP_REPLY, user_timestamp_reply_event_handler);
    IOT_RegisterCallback(ITE_INITIALIZE_COMPLETED, user_initialized);
    IOT_RegisterCallback(ITE_FOTA, user_fota_event_handler);
    IOT_RegisterCallback(ITE_COTA, user_cota_event_handler);
关于回调函数的说明如下。
事件 回调函数原型 事件触发条件说明 ITE_CONNECT_SUCC int callback(void);与云端连接成功时 ITE_DISCONNECTED int callback(void);与云端连接断开时 ITE_RAWDATA_ARRIVED int callback(const int devid, const unsigned char *payload, const int payload_len);Linkkit收到raw data数据时 ITE_SERVICE_REQUEST int callback(const int devid, const char _serviceid, const int serviceid_len, const char request, const int request_len, char _response, int *response_len);Linkkit收到服务(同步/异步)调用请求时 ITE_PROPERTY_SET int callback(const int devid, const char *request, const int request_len);Linkkit收到属性设置请求时 ITE_PROPERTY_GET int callback(const int devid, const char _request, const int request_len, char _response, int response_len);Linkkit收到属性获取的请求时 ITE_REPORT_REPLY int callback(const int devid, const int msgid, const int code, const char *reply, const int reply_len);Linkkit收到上报消息的应答时 ITE_TRIGGER_EVENT_REPLY int callback(const int devid, const int msgid, const int code, const char eventid, const int eventid_len, const char message, const int message_len);Linkkit收到事件上报消息的应答时 ITE_TIMESTAMP_REPLY int callback(const char *timestamp);当Linkkit收到查询时间戳请求的应答时 ITE_TOPOLIST_REPLY int callback(const int devid, const int msgid, const int code, const char * payload, const int payload_len);Linkkit收到查询拓扑关系请求的应答时 ITE_PERMIT_JOIN int callback(const char * product_key, const int time);Linkkit收到允许子设备入网的请求时 ITE_INITIALIZE_COMPLETED int callback(const int devid);设备初始化完成时 ITE_FOTA int callback(int type, const char *version);Linkkit收到可用固件的通知时 ITE_COTA int callback(int type, const char config_id, int config_size, const char get_type, const char sign, const char sign_method, const char *url);Linkkit收到可用远程配置文件的通知时 - 主循环处理。
IOT_Linkkit_Yield必须周期调用,用于linkkit业务处理。代码示例代码如下,示例代码用于示例上报所有的属性、事件等,在实际产品开发时需要将其修改为设备商自己的逻辑。time_begin_sec = user_update_sec(); while (1) { IOT_Linkkit_Yield(USER_EXAMPLE_YIELD_TIMEOUT_MS); time_now_sec = user_update_sec(); if (time_prev_sec == time_now_sec) { continue; } if (max_running_seconds && (time_now_sec - time_begin_sec > max_running_seconds)) { EXAMPLE_TRACE("Example Run for Over %d Seconds, Break Loop!\n", max_running_seconds); break; } /* Post Property Example */ if (time_now_sec % 11 == 0 && user_master_dev_available()) { user_post_property(); } /* Post Event Example */ if (time_now_sec % 17 == 0 && user_master_dev_available()) { user_post_event(); } /* Device Info Update Example */ if (time_now_sec % 23 == 0 && user_master_dev_available()) { user_deviceinfo_update(); } /* Device Info Delete Example */ if (time_now_sec % 29 == 0 && user_master_dev_available()) { user_deviceinfo_delete(); } /* Post Raw Example */ if (time_now_sec % 37 == 0 && user_master_dev_available()) { user_post_raw_data(); } time_prev_sec = time_now_sec; }设备商完成自己物模型功能的代码编写之后,可以将固件编译出来并根据相关模组的烧写方法把固件烧写到模组上进行功能验证和调试。
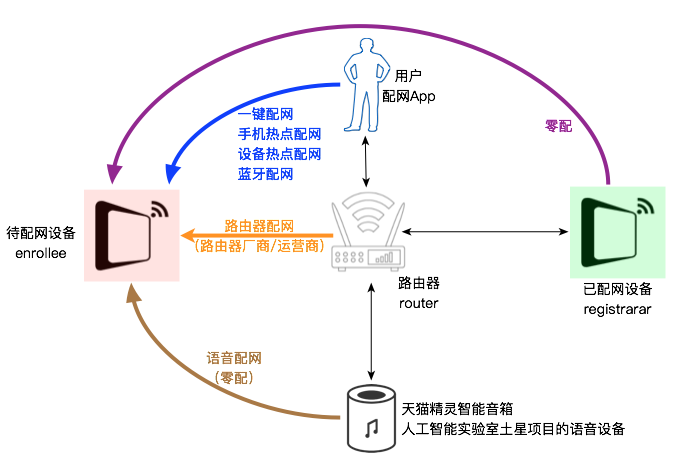
Wi-Fi配网
配网支持如下所示。
- 蓝牙配网(ble-config):借助BT/BLE为设备配网
当前Inside+IoT方案配网仅支持蓝牙辅助配网方案,请勿使用其他配网方案,代码中已默认配置为蓝牙辅助配网方式。通过蓝牙辅助配网您可以一次配网绑定天猫精灵AI平台设备和生活物联网平台设备身份,从而使设备同时具备天猫精灵语音能力和IoT设备的身份。
static void start_netmgr(void *p)
{

    /*
     * register event callback to detect event of AWSS
     */
    iotx_event_regist_cb(linkkit_event_monitor);
    netmgr_start(true);
    aos_task_exit(0);
}
详细的开发过程如下步骤所示。
- 配网对外披露的API列表。
#ifndef __IOT_EXPORT_AWSS_H__ #define __IOT_EXPORT_AWSS_H__ #if defined(__cplusplus) /* If this is a C++ compiler, use C linkage */ extern "C" { #endif /** * @brief start Wi-Fi setup service * * @retval -1 : Wi-Fi setup fail * @retval 0 : sucess * @note: awss_config_press must been called to enable Wi-Fi setup service */ int awss_start(); /** * @brief stop wifi setup service * * @retval -1 : failure * @retval 0 : sucess * @note * if awss_stop is called before exit of awss_start, awss and notify will stop. * it may cause failutre of awss and device bind. */ int awss_stop(); /** * @brief make sure user touches device belong to themselves * * @retval -1 : failure * @retval 0 : sucess * @note: AWSS dosen't parse awss packet until user touch device using this api. */ int awss_config_press(); /** * @brief start Wi-Fi setup service with device ap * * @retval -1 : failure * @retval 0 : sucess * @note * 1. if awss_stop or awss_dev_ap_stop is called before exit of awss_dev_ap_start * awss with device ap and notify will stop, it may cause failutre of device ap * and device bind. * 2. awss_dev_ap_start doesn't need to call awss_config_press to been enabled. */ int awss_dev_ap_start(); /** * @brief stop Wi-Fi setup service with device ap * * @retval -1 : failure * @retval 0 : sucess * @note * if awss_dev_ap_stop is called before exit of awss_dev_ap_start * awss with device ap and notify will stop, it may cause failutre of device ap */ int awss_dev_ap_stop(); /** * @brief report token to cloud after Wi-Fi setup success * * @retval -1 : failure * @retval 0 : sucess */ int awss_report_cloud(); /** * @brief report reset to cloud. * * @retval -1 : failure * @retval 0 : sucess * @note * device will save reset flag if device dosen't connect cloud, device will fails to send reset to cloud. * when connection between device and cloud is ready, device will retry to report reset to cloud. */ int awss_report_reset(); enum awss_event_t { AWSS_START = 0x1000, // AWSS start without enbale, just supports device discover AWSS_ENABLE, // AWSS enable AWSS_LOCK_CHAN, // AWSS lock channel(Got AWSS sync packet) AWSS_CS_ERR, // AWSS AWSS checksum is error AWSS_PASSWD_ERR, // AWSS decrypt passwd error AWSS_GOT_SSID_PASSWD, // AWSS parse ssid and passwd successfully AWSS_CONNECT_ADHA, // AWSS try to connnect adha (device discover, router solution) AWSS_CONNECT_ADHA_FAIL, // AWSS fails to connect adha AWSS_CONNECT_AHA, // AWSS try to connect aha (AP solution) AWSS_CONNECT_AHA_FAIL, // AWSS fails to connect aha AWSS_SETUP_NOTIFY, // AWSS sends out device setup information (AP and router solution) AWSS_CONNECT_ROUTER, // AWSS try to connect destination router AWSS_CONNECT_ROUTER_FAIL, // AWSS fails to connect destination router. AWSS_GOT_IP, // AWSS connects destination successfully and got ip address AWSS_SUC_NOTIFY, // AWSS sends out success notify (AWSS sucess) AWSS_BIND_NOTIFY, // AWSS sends out bind notify information to support bind between user and device AWSS_ENABLE_TIMEOUT, // AWSS enable timeout(user needs to call awss_config_press again to enable awss) AWSS_RESET = 0x3000, // Linkkit reset success (just got reset response from cloud without any other operation) }; #if defined(__cplusplus) /* If this is a C++ compiler, use C linkage */ } #endif #endif - 在应用代码中调用配网,目前蓝牙辅助配网已配置好。
- 使用云智能App或集成云智能AppSDK的品牌App进行设备发现配网。
云端解绑与恢复出厂默认设置通知
设备被解绑后,云端会下发一个解绑事件通知:{"identifier":"awss.BindNotify","value":{"Operation":"Unbind"}} 设备收到此消息可以做重置配网、清空本地数据等处理。
如果通过App将设备恢复出厂默认设置,云端会下发一个Reset事件通知:{"identifier":"awss.BindNotify","value":{"Operation":"Reset"}} 设备收到此消息可以做重置配网、清空本地数据等处理。设备开发者可以结合具体产品类型,决定收到解绑和恢复出厂默认设置通知后做哪些清空操作。
可以参考示例代码example/smart_outlet/smart_outlet_main.c中notify_msg_handle函数,做如下改动。
static int notify_msg_handle(const char *request, const int request_len)
{
    ....

    if (!strcmp(item->valuestring, "awss.BindNotify")) {
        cJSON *value = cJSON_GetObjectItem(request_root, "value");
        if (item == NULL || !cJSON_IsObject(value)) {
            cJSON_Delete(request_root);
            return -1;
        }
        cJSON *op = cJSON_GetObjectItem(value, "Operation");
        if (op != NULL && cJSON_IsString(op)) {
            if (!strcmp(op->valuestring, "Bind")) {
                EXAMPLE_TRACE("Device Bind");
                vendor_device_bind();
            }
            if (!strcmp(op->valuestring, "Unbind")) {
                EXAMPLE_TRACE("Device unBind");
                vendor_device_unbind();
            }
            if (!strcmp(op->valuestring, "Reset")) {
                EXAMPLE_TRACE("Device Reset");
                vendor_device_reset();
            }
        }
    }

    ....
}
设备重置
建议产品设计一个reset按键用于清除设备上的配置,将设备恢复到出厂状态。应用示例代码中也有reset CLI命令用于进行恢复出厂设置重新进入配网模式,可参考do_awss_cmd_reset()相关实现。
在复位时需要同时重置天猫精灵AI平台设备和生活物联网平台的身份,在linkkit_reset() 函数中包含了两部分的解绑和复位代码。
开发OTA
若使能了OTA功能,请参考文档OTA开发教程进行开发。