当您需要在多个服务间实现全链路的灰度发布时,可以通过配置TrafficLabel来识别流量特征,将网关入口流量分为正常流量和灰度流量。灰度流量特征会在请求调用链经过的各个服务间进行传递,从而实现全链路灰度发布。本文介绍如何通过TrafficLabel实现微服务的全链路灰度发布。
前提条件
已添加集群到ASM实例。具体操作,请参见添加集群到ASM实例。
已创建ASM网关。具体操作,请参见创建入口网关。
功能介绍
灰度发布有多种实现方式,例如基于ASM完成蓝绿和灰度发布。该灰度方式偏重于单个服务的发布,通过使用Istio原生提供的VirtualService标签路由和权重分流进行实现。某些场景下,仅限于两个服务间的灰度不能满足需求。
ASM基于流量打标和标签路由功能,提供全链路灰度功能,帮助您解决多个服务同时发布灰度版本的问题。当业务进行功能灰度验证时,将入口流量分为正常流量和灰度流量,对请求流量进行流量特征识别。若请求流量为灰度流量,则将请求灰度的应用服务。该场景不再是简单的按流量比例灰度分发到后端不同的版本,而且灰度流量特征会在请求调用链经过的各个服务间进行传递。更多信息,请参见流量标签TrafficLabel说明。
配置说明
您可以单击配置文件,直接下载部署示例及相关配置文件。示例中应用服务调用链路如下:
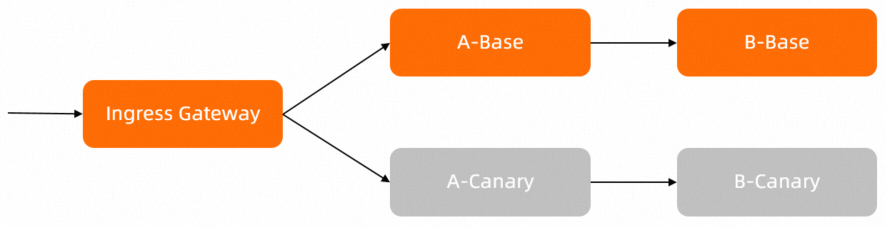
本示例服务中的应用A在调用B时,已包含传播HTTP标头my-trace-id的代码实现逻辑。更多信息,请参见配置文件中的src/mock-abc/go/main.go。
如果您使用其他的应用示例,请确保在调用中包含传播HTTP标头的逻辑,后续的功能依赖于这个传播的HTTP标头。
步骤一:在ACK集群下部署示例应用
步骤二:初始化路由规则配置
使用以下内容,创建routing.yaml文件。
使用ASM实例的KubeConfig,执行以下命令,配置路由。
kubectl apply -n default -f routing.yaml验证服务访问是否可以连通。
执行以下命令,设置环境变量。
xxxx为上一步获取的IP。export ASM_GATEWAY_IP=xxxx执行以下命令,验证服务访问是否可以连通。
for i in {1..200}; do curl -H'my-asm-prefer-tag: version-base' -H'my-trace-id: x000'$i http://${ASM_GATEWAY_IP}/; echo; sleep 1; done;预期输出:
-> mocka(version: canary, ip: 172.17.0.129)-> mockb(version: base, ip: 172.17.0.70) -> mocka(version: base, ip: 172.17.0.132)-> mockb(version: base, ip: 172.17.0.70) -> mocka(version: base, ip: 172.17.0.132)-> mockb(version: canary, ip: 172.17.0.54) -> mocka(version: canary, ip: 172.17.0.129)-> mockb(version: canary, ip: 172.17.0.54) -> mocka(version: canary, ip: 172.17.0.129)-> mockb(version: base, ip: 172.17.0.70) -> mocka(version: base, ip: 172.17.0.132)-> mockb(version: base, ip: 172.17.0.70) -> mocka(version: canary, ip: 172.17.0.129)-> mockb(version: canary, ip: 172.17.0.54)预期输出表明从ASM入口网关到应用服务A,以及从应用A调用B的过程,负载均衡是随机的路由策略。 通过
curl命令指定的my-asm-prefer-tag或者其他请求头都不会改变随机路由的策略。
步骤三:为示例应用设置流量标签
ASM支持通过TrafficLabel CRD设置流量标签,然后根据流量标签将流量路由到不同的工作负载。更多信息,请参见流量标签TrafficLabel说明。
使用以下内容,创建trafficlabel.yaml文件。
配置说明如下:
TrafficLabel
trafficlabel-ns配置针对命名空间default下所有的应用服务生效,即示例中部署的mocka和mockb服务;TrafficLabelingressgateway针对网关ingressgateway生效。用于区分版本的请求头为
my-asm-prefer-tag,因此getExternalInboundRequestHeader中的第一个参数对应设置为my-asm-prefer-tag。请您根据实际情况进行修改。传播的HTTP标头为
my-trace-id,因此getExternalInboundRequestHeader中的第二个参数对应设置为my-trace-id。请您根据实际情况进行修改。
使用ASM实例的KubeConfig,执行以下命令,部署TrafficLabel。
kubectl apply -f trafficlabel.yaml
步骤四:配置标签路由规则
您可以通过配置标签路由规则,控制流量的走向。
一、验证服务提供侧的灰度
验证应用A→B的调用是否符合预期,其中包括流向A的灰度流量打到灰度版本,以及Base流量打到Base版本。
配置应用B的基于流量标签的路由规则后,流量示意图如下。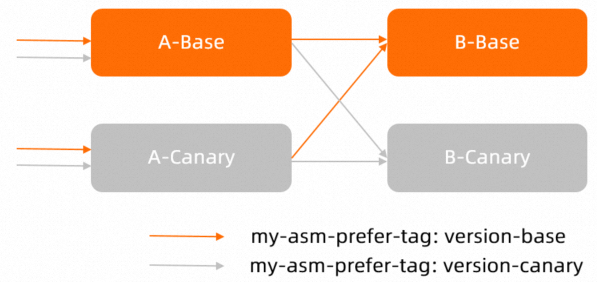
使用以下内容,创建vs-tf-mockb.yaml文件。
apiVersion: networking.istio.io/v1beta1 kind: VirtualService metadata: name: vs-mockb spec: hosts: - mockb http: - route: - destination: host: mockb subset: $asm-labels-sample执行以下命令,在A服务侧生效路由规则。
kubectl apply -n default -f vs-tf-mockb.yaml执行以下命令,验证流向A的灰度流量打到灰度版本。
for i in {1..200}; do curl -H'my-asm-prefer-tag: version-canary' -H'my-trace-id: x000'$i http://${ASM_GATEWAY_IP}/; echo; sleep 1; done;预期输出:
-> mocka(version: canary, ip: 172.17.0.129)-> mockb(version: canary, ip: 172.17.0.54) -> mocka(version: base, ip: 172.17.0.132)-> mockb(version: canary, ip: 172.17.0.54) -> mocka(version: base, ip: 172.17.0.132)-> mockb(version: canary, ip: 172.17.0.54) -> mocka(version: canary, ip: 172.17.0.129)-> mockb(version: canary, ip: 172.17.0.54) -> mocka(version: canary, ip: 172.17.0.129)-> mockb(version: canary, ip: 172.17.0.54) -> mocka(version: base, ip: 172.17.0.132)-> mockb(version: canary, ip: 172.17.0.54)执行以下命令,验证流向A的Base流量打到Base版本。
for i in {1..200}; do curl -H'my-asm-prefer-tag: version-base' -H'my-trace-id: x000'$i http://${ASM_GATEWAY_IP}/; echo; sleep 1; done;预期输出:
-> mocka(version: canary, ip: 172.17.0.129)-> mockb(version: base, ip: 172.17.0.70) -> mocka(version: base, ip: 172.17.0.132)-> mockb(version: base, ip: 172.17.0.70) -> mocka(version: base, ip: 172.17.0.132)-> mockb(version: base, ip: 172.17.0.70) -> mocka(version: canary, ip: 172.17.0.129)-> mockb(version: base, ip: 172.17.0.70) -> mocka(version: base, ip: 172.17.0.132)-> mockb(version: base, ip: 172.17.0.70) -> mocka(version: canary, ip: 172.17.0.129)-> mockb(version: base, ip: 172.17.0.70) -> mocka(version: canary, ip: 172.17.0.129)-> mockb(version: base, ip: 172.17.0.70) -> mocka(version: base, ip: 172.17.0.132)-> mockb(version: base, ip: 172.17.0.70)预期输出表明入口流量访问A服务未流向指定版本。您需要配置A服务的基于流量标签的路由规则。具体操作,请参见下一步。
二、验证全链路灰度
配置A服务的TrafficLabel路由vs-tf-mocka.yaml,在ASM网关侧生效。预期结果为入口请求灰度流量打到A的灰度版本,Base流量打到A的Base版本,并传递到B服务。
配置应用A的基于流量标签的路由规则后,流量示意图如下。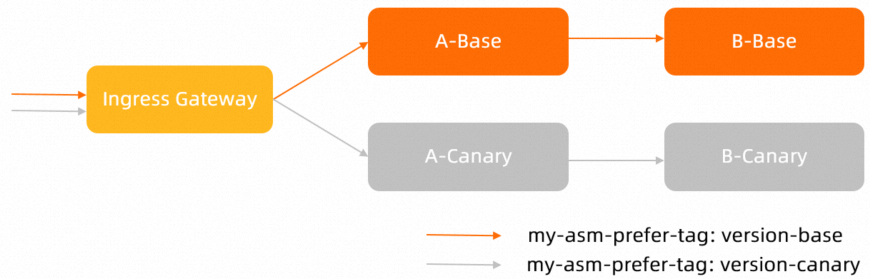
使用以下示例,创建文件vs-tf-mocka.yaml。
apiVersion: networking.istio.io/v1beta1 kind: VirtualService metadata: name: vs-gateway-mocka spec: gateways: - simple-gateway hosts: - "*" http: - route: - destination: host: mocka subset: $asm-labels-sample执行以下命令,在ASM网关侧生效路由规则。
kubectl apply -n default -f vs-tf-mocka.yaml执行以下命令,验证入口请求灰度流量打到A的灰度版本。
for i in {1..200}; do curl -H'my-asm-prefer-tag: version-canary' -H'my-trace-id: x000'$i http://${ASM_GATEWAY_IP}/; echo; sleep 1; done;预期输出:
-> mocka(version: canary, ip: 172.17.0.69)-> mockb(version: canary, ip: 172.17.0.130) -> mocka(version: canary, ip: 172.17.0.69)-> mockb(version: canary, ip: 172.17.0.130) -> mocka(version: canary, ip: 172.17.0.69)-> mockb(version: canary, ip: 172.17.0.130) -> mocka(version: canary, ip: 172.17.0.69)-> mockb(version: canary, ip: 172.17.0.130) -> mocka(version: canary, ip: 172.17.0.69)-> mockb(version: canary, ip: 172.17.0.130) -> mocka(version: canary, ip: 172.17.0.69)-> mockb(version: canary, ip: 172.17.0.130) -> mocka(version: canary, ip: 172.17.0.69)-> mockb(version: canary, ip: 172.17.0.130)执行以下命令,验证Base流量打到A的Base版本,并传递到B服务。
for i in {1..200}; do curl -H'my-asm-prefer-tag: version-base' -H'my-trace-id: x000'$i http://${ASM_GATEWAY_IP}/; echo; sleep 1; done;预期输出:
-> mocka(version: base, ip: 172.17.0.90)-> mockb(version: base, ip: 172.17.0.93)
-> mocka(version: base, ip: 172.17.0.90)-> mockb(version: base, ip: 172.17.0.93)
-> mocka(version: base, ip: 172.17.0.90)-> mockb(version: base, ip: 172.17.0.93)
-> mocka(version: base, ip: 172.17.0.90)-> mockb(version: base, ip: 172.17.0.93)
-> mocka(version: base, ip: 172.17.0.90)-> mockb(version: base, ip: 172.17.0.93)
-> mocka(version: base, ip: 172.17.0.90)-> mockb(version: base, ip: 172.17.0.93)
-> mocka(version: base, ip: 172.17.0.90)-> mockb(version: base, ip: 172.17.0.93)
三、验证路由权重
当在应用A上配置基于权重与基于流量标签的路由规则后,流量示意图如下。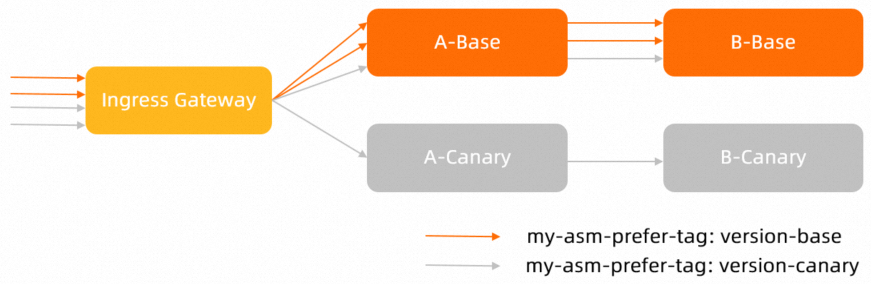
使用以下内容,创建vs-tf-mocka-90-10.yaml文件。
apiVersion: networking.istio.io/v1beta1 kind: VirtualService metadata: name: vs-gateway-mocka spec: gateways: - simple-gateway hosts: - "*" http: - route: - destination: host: mocka subset: version-base weight: 90 - destination: host: mocka subset: $asm-labels-sample weight: 10执行以下命令,在ASM网关侧生效路由规则。
kubectl apply -n default -f vs-tf-mocka-90-10.yaml执行以下命令,验证入口请求灰度流量打到应用A的版本。
for i in {1..200}; do curl -H'my-asm-prefer-tag: version-canary' -H'my-trace-id: x000'$i http://${ASM_GATEWAY_IP}/; echo; sleep 1; done;预期输出:
-> mocka(version: base, ip: 172.17.0.90)-> mockb(version: canary, ip: 172.17.0.130) -> mocka(version: base, ip: 172.17.0.90)-> mockb(version: canary, ip: 172.17.0.130) -> mocka(version: base, ip: 172.17.0.90)-> mockb(version: canary, ip: 172.17.0.130) -> mocka(version: base, ip: 172.17.0.90)-> mockb(version: canary, ip: 172.17.0.130) -> mocka(version: base, ip: 172.17.0.90)-> mockb(version: canary, ip: 172.17.0.130) -> mocka(version: base, ip: 172.17.0.90)-> mockb(version: canary, ip: 172.17.0.130) -> mocka(version: base, ip: 172.17.0.90)-> mockb(version: canary, ip: 172.17.0.130) -> mocka(version: base, ip: 172.17.0.90)-> mockb(version: canary, ip: 172.17.0.130) -> mocka(version: base, ip: 172.17.0.90)-> mockb(version: canary, ip: 172.17.0.130) -> mocka(version: canary, ip: 172.17.0.69)-> mockb(version: canary, ip: 172.17.0.130)由预期输出得到,入口请求灰度流量约90%左右流向应用A的Base版本,10%左右流向到Canary版本。在上述生效的路由规则中,90%的请求进入应用A的Base版本,剩下的10%请求按照指定的请求头
my-asm-prefer-tag的值来决定去向,而请求命令中指定version-canary为请求头my-asm-prefer-tag的值,即这10%的请求将流向Canary版本。执行以下命令,验证入口请求的Base版本流量全部转到应用A的Base版本。
for i in {1..200}; do curl -H'my-asm-prefer-tag: version-base' -H'my-trace-id: x000'$i http://${ASM_GATEWAY_IP}/; echo; sleep 1; done;预期输出:
-> mocka(version: base, ip: 172.17.0.90)-> mockb(version: base, ip: 172.17.0.93) -> mocka(version: base, ip: 172.17.0.90)-> mockb(version: base, ip: 172.17.0.93) -> mocka(version: base, ip: 172.17.0.90)-> mockb(version: base, ip: 172.17.0.93) -> mocka(version: base, ip: 172.17.0.90)-> mockb(version: base, ip: 172.17.0.93) -> mocka(version: base, ip: 172.17.0.90)-> mockb(version: base, ip: 172.17.0.93) -> mocka(version: base, ip: 172.17.0.90)-> mockb(version: base, ip: 172.17.0.93) -> mocka(version: base, ip: 172.17.0.90)-> mockb(version: base, ip: 172.17.0.93) -> mocka(version: base, ip: 172.17.0.90)-> mockb(version: base, ip: 172.17.0.93) -> mocka(version: base, ip: 172.17.0.90)-> mockb(version: base, ip: 172.17.0.93) -> mocka(version: base, ip: 172.17.0.90)-> mockb(version: base, ip: 172.17.0.93)上述生效的路由规则中,90%的请求进入Base版本,剩下的10%请求按照指定的请求头
my-asm-prefer-tag的值来决定去向,而请求命令中指定version-base为请求头my-asm-prefer-tag的值,即这10%的请求将流向Base版本。