文档

使用云助手在Windows实例中安装Python

更新时间:

Python支持多种编程范式,包括面向对象、命令式、函数式和过程式编程风格。因其丰富的标准库、强大的第三方库生态系统以及跨平台特性而广受欢迎,被广泛应用于Web开发、自动化运维、数据科学与分析、桌面应用开发等领域。本文介绍如何使用云助手在Windows实例中安装Python。

前提条件

  • ECS实例的状态必须为运行中(Running)。

  • ECS实例分配了固定公网IP或绑定了EIP。

  • 2017年12月01日之前购买的ECS实例,需手动安装云助手Agent。具体操作,请参见安装云助手Agent

    说明

    2017年12月01日及之后使用公共镜像创建的ECS实例,默认预装了云助手Agent,无需再次安装。

  • Windows操作系统版本为Windows Server 2012/2016/2019及更高版本。

操作步骤

重要

本操作适用于该Windows实例未安装任何版本的Python环境。

  1. 登录ECS管理控制台

  2. 在左侧导航栏,选择运维与监控 > 云助手

  3. 在页面左侧顶部,选择目标资源所在的资源组和地域。地域

  4. 在页面右上角,单击创建/执行命令

  5. 创建执行命令页面,设置如下参数,未提及的参数保持默认即可。

    命令

    说明

    命令来源

    选择输入命令内容,即创建一个新命令。

    命令类型

    选择PowerShell

    命令内容

    请粘贴以下命令到命令内容框中。

    说明

    本操作以安装Python 3.9.5为例,您可以根据需要,将$pythonVersion后的版本号替换成您需要安装的Python版本。

    $currentDir = $PSScriptRoot
    Set-Location $currentDir
    # Check the OS version
    $OSversion = [Environment]::OSVersion.Version
    if ($OSversion.Major -lt 6 -and $OSversion.Minor -lt 1) {
         throw "This scrip is not supported on Windows 2008 or lower"
    }
    $Arch =([Array](Get-WmiObject -Query "select AddressWidth from Win32_Processor"))[0].AddressWidth
    if ($Arch -ne "64") {
        throw "Only 64-bit system architecture is supported"
    }
    function Check-Env() {
        $curPath = [environment]::GetEnvironmentVariable('path')    
        if ($curPath -match $pythonKey) {
            Write-Host "System already installed $pythonKey, please check"
            exit
        }
    }
    function Download-File($file_url, $file_path) {
        if (Test-Path $file_path) { return; }
        [System.Net.ServicePointManager]::SecurityProtocol=[System.Net.SecurityProtocolType]::Tls12
        Invoke-WebRequest -Uri $file_url  -OutFile $file_path -UseBasicParsing
        if (! $?) { throw "$file_url download to $file_path error" }
    }
    function Clear-File($file_path) {
        if (Test-Path $file_path) {
            Remove-Item -Path $file_path -Force -ErrorAction:SilentlyContinue
            if (! $?) {
                throw "Clear $file_path error, please check"
            }
        }
    }
    # install python for all users
    function Install-Python() {
        if ($pythonVersion.StartsWith("2")) {
            & cmd /c msiexec /i $pythonFile /quiet /norestart ADDLOCAL=ALL
        } else {
            & cmd /c $pythonFile /quiet InstallAllUsers=1 Include_launcher=0 PrependPath=1
        }
        if ($LASTEXITCODE -ne 0) {
            throw "Install $pythonKey error"
        }
    }
    function main() {
        Write-Host "Check system environment"
        Check-Env
        Write-Host "Download python $pythonVersion install package"
        Download-File $pythonUrl $pythonFile
        Write-Host "Install python $pythonVersion"
        Install-Python
        Write-Host "Clear python $pythonVersion install package"
        Clear-File $pythonFile
        Write-Host "Install python $pythonVersion success"
    }
    # define python version
    $pythonVersion = "3.9.5" 
    $pythonUrl = "https://npm.taobao.org/mirrors/python/${pythonVersion}/python-${pythonVersion}.amd64.msi"
    $pythonKey = "python2"
    if ($pythonVersion.StartsWith("3")) {
        $pythonUrl = "https://npm.taobao.org/mirrors/python/${pythonVersion}/python-${pythonVersion}-amd64.exe"
      $pythonKey = "python3"
    }
    $pythonFile = [io.path]::Combine($currentDir, $pythonUrl.Split('/')[-1])
    ###
    main

    执行计划

    选择立即执行

    执行用户

    输入system。

    执行路径

    自定义命令的执行路径。如不设置,Windows系统默认路径为:C:\Windows\system32

    超时时间

    设置命令在实例中的超时时间,当执行命令的任务超时后,云助手将强制终止任务进程。

    单位为秒,默认为60秒,建议超时时间设置为600,具体时间可根据网络情况调整。

  6. 选择实例选择托管实例区域,选中需要执行命令的目标实例。

    说明

    托管实例是云助手托管的非阿里云服务器,更多信息,请参见阿里云托管实例

  7. 单击执行

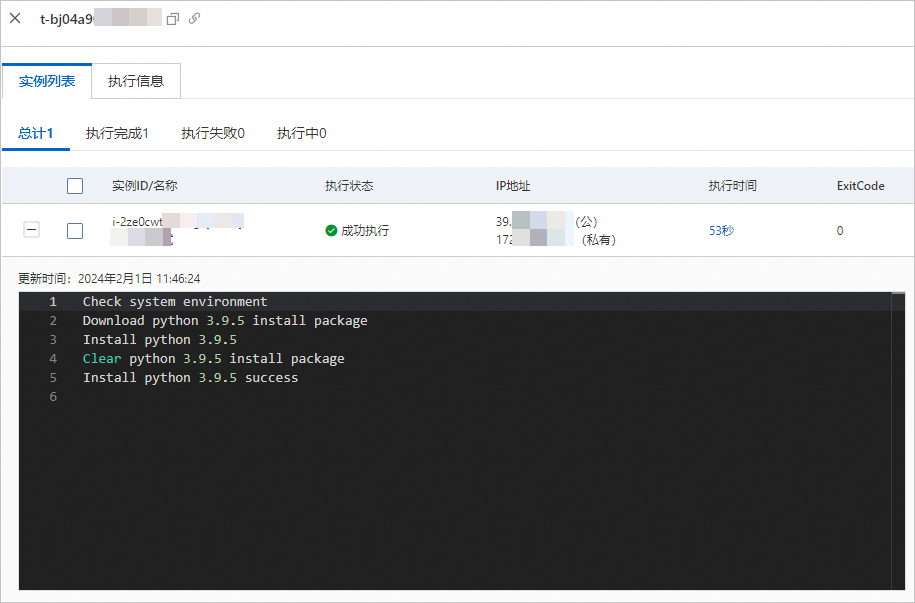
    在弹出的执行详情面板中,当系统显示如下所示时,说明任务执行成功。

    安装Python..png

  8. 查看Python是否安装成功。

    1. 远程连接Windows实例。

      具体操作,请参见通过密码或密钥认证登录Windows实例

    2. 打开Windows PowerShell命令终端。

    3. 执行以下命令,查看Python版本。

      python.exe -V

      当系统显示Python版本时,说明Python已安装成功。2023-06-06_10-58-24..png

相关文档

使用云助手还可以做很多自动化运维工作,更多信息,请参见DevOps自动化运维实践

  • 本页导读 (1)
文档反馈