
本文是支付确认、实时活动通知等语音播报场景的最佳实践。
前提条件
请先确保已在EMAS控制台完成项目和应用的创建,若尚未完成,请详见快速入门。
已阅读接入对应SDK,具体请参见Android SDK接入、iOS SDK配置、HarmonyOS SDK接入。
各系统语音播报方式及限制一览
系统 | 方式 | 限制 |
安卓 | 消息透传+TTS语音合成 |
|
阿里云自有通道通知+TTS语音合成 | ||
iOS | 扩展通知+音频拼接 |
|
消息透传+AVSpeechSynthesizer语音合成 |
| |
静默通知+AVSpeechSynthesizer语音合成(不推荐) |
说明 静默通知的详细限制请参考静默通知官方文档。 | |
鸿蒙 | 扩展通知+TTS语音合成 |
|
安卓语音播报
安卓可以通过阿里云自有通道推送通知或消息,并在客户端相应回调中获取收到的文本信息,然后利用原生的TextToSpeech API将其转换为语音进行播放,从而实现语音播报功能。
方式一:消息透传+TTS语音合成
服务端推送参数配置
服务端透传消息时,需要指定为阿里云自有通道,并且透传语音播报内容:
PushRequest pushRequest = new PushRequest();
...
pushRequest.setSendChannels("accs");
pushRequest.setPushType("MESSAGE");
pushRequest.setBody("${语音播报内容}");
...
客户端实现语音播报
客户端收到透传消息后,需要在回调中拦截消息获取语音播报内容,之后使用TTS引擎来进行语音播报。您可以选择使用原生的TextToSpeech API或者第三方TTS引擎。具体步骤如下:
1. 封装TTS引擎并初始化
首先封装TTS引擎,提供初始化方法以及语音播报方法:
object TTSManager {

    private var mTextToSpeech: TextToSpeech? = null

    fun init(context: Context){
        if (Build.VERSION.SDK_INT >= Build.VERSION_CODES.LOLLIPOP) {
            mTextToSpeech = TextToSpeech(context) {
                if (it == TextToSpeech.SUCCESS) {
                    val languageCode = mTextToSpeech?.setLanguage(Locale.CHINESE)
                    if (languageCode == TextToSpeech.LANG_NOT_SUPPORTED || languageCode == TextToSpeech.LANG_MISSING_DATA) {
                        //语音包未安装或者不支持
                        mTextToSpeech?.language = Locale.US
                    }
                    mTextToSpeech?.setPitch(1.0f)
                    mTextToSpeech?.setSpeechRate(1.0f)
                }
            }
        }
    }

    fun speak(text: String) {
        if (mTextToSpeech?.isSpeaking == true) {
            mTextToSpeech?.stop()
        }
        mTextToSpeech?.speak(text, TextToSpeech.QUEUE_FLUSH, null, "")
    }

}public class TTSManager {
private TextToSpeech mTextToSpeech;
private TTSManager(){}
private static class SingletonHolder{
private static final TTSManager INSTANCE = new TTSManager();
}
public static TTSManager getInstance(){
return SingletonHolder.INSTANCE;
}
public void init(Context context) {
if (Build.VERSION.SDK_INT >= Build.VERSION_CODES.LOLLIPOP) {
mTextToSpeech = new TextToSpeech(context, status -> {
if (status == TextToSpeech.SUCCESS) {
int result = mTextToSpeech.setLanguage(Locale.CHINA);
if (result == TextToSpeech.LANG_MISSING_DATA || result == TextToSpeech.LANG_NOT_SUPPORTED) {
mTextToSpeech.setLanguage(Locale.US);
}
mTextToSpeech.setPitch(1.0f);
mTextToSpeech.setSpeechRate(1.0f);
}
});
}
}
public void speak(String text) {
if (mTextToSpeech != null) {
if (mTextToSpeech.isSpeaking()) {
mTextToSpeech.stop();
}
mTextToSpeech.speak(text, TextToSpeech.QUEUE_FLUSH, null, "");
}
}
}在
Application中调用TTS引擎初始化方法:
class MyApplication : Application() {
    override fun onCreate() {
        super.onCreate()
        // 初始化 TTS 引擎
        TTSManager.init(this)
    }
}public class MyApplication extends Application {
@Override
public void onCreate() {
super.onCreate();
// 初始化 TTS 引擎
TTSManager.getInstance().init(this);
}
}在
AndroidManifest.xml中注册MyApplication类:
<application
    android:name="MyApplication">
</application>
2. 在透传消息的接收回调中进行语音播报
参考MessageReceiver/AliyunMessageIntentService相关接口集成MessageReceiver或AliyunMessageIntentService。以MessageReceiver为例,您需要在onMessage回调中获取透传消息中的语音播报内容,再调用TTS引擎的语音播报方法:
class MyMessageReceiver: MessageReceiver() {
    override fun onMessage(context: Context?, cPushMessage: CPushMessage?) {
        cPushMessage?.let {
            TTSManager.speak(it.content)
        }
    }
}public class MyMessageReceiver extends MessageReceiver {
@Override
protected void onMessage(Context context, CPushMessage cPushMessage) {
if (cPushMessage != null) {
TTSManager.getInstance().speak(cPushMessage.getContent());
}
}
}方式二:阿里云自有通道通知+TTS语音合成
服务端推送参数配置
服务端推送通知时,需要指定为阿里云自有通道,并且使用AndroidExtParameters字段传递语音播报内容:
PushRequest pushRequest = new PushRequest();
...
pushRequest.setSendChannels("accs");
pushRequest.setPushType("NOTICE");
pushRequest.setAndroidExtParameters("{\"ttsContent\":\"${语音播报内容}\"}");
...
客户端实现语音播报
客户端收到通知后,需要在回调中拦截通知获取语音播报内容,之后使用TTS引擎来进行语音播报。您可以选择使用原生的TextToSpeech API或者第三方TTS引擎。具体步骤如下:
1. 封装TTS引擎并初始化
步骤请参考方式一中的1. 封装TTS引擎并初始化小节。
2. 在通知的接收回调中进行语音播报
参考MessageReceiver/AliyunMessageIntentService相关接口集成MessageReceiver或AliyunMessageIntentService。以MessageReceiver为例,您需要在onNotification回调中获取通知中的语音播报内容,再调用TTS引擎的语音播报方法:
class MyMessageReceiver: MessageReceiver() {
    override fun onNotification(
        context: Context?,
        title: String?,
        content: String?,
        extra: MutableMap<String, String>?
    ) {
        extra?.apply {
            if (containsKey("ttsContent")) {
                val ttsContent = get("ttsContent")
                if (!TextUtils.isEmpty(ttsContent)) {
                    TTSManager.speak(ttsContent!!)
                }
            }
        }
    }
}public class MyMessageReceiver extends MessageReceiver {
@Override
protected void onNotification(Context context, String title, String content, Map<String, String> map) {
if (map != null && map.containsKey("ttsContent")){
String ttsContent = map.get("ttsContent");
if (!TextUtils.isEmpty(ttsContent)) {
TTSManager.getInstance().speak(ttsContent);
}
}
}
}iOS语音播报
iOS可以通过扩展通知、消息透传、静默通知(不推荐)三种方式实现语音播报功能。
方式一:扩展通知+音频拼接
服务端推送参数配置
服务端推送通知时,使用iOSExtParameters字段传递语音播报内容,同时设置iOSMutableContent为true:
PushRequest pushRequest = new PushRequest();
...
pushRequest.setPushType("NOTICE");
pushRequest.setIOSExtParameters("{\"playVoiceText\":\"${语音播报内容}\"}");
pushRequest.setIOSMutableContent(true);
...
客户端实现语音播报
客户端需要提前在Bundle中内置基本音频文件。当收到通知时,您需要在通知扩展的回调中拦截通知获取语音播报内容,之后根据语音播报内容拼接对应的音频文件,输出到App Group共享目录中,再将本次推送的声音标识sound指定为拼接后的音频文件,从而进行语音播报。具体步骤如下:
1. 集成Notification Service Extension
Notification Service Extension是iOS 10.0推出的新功能
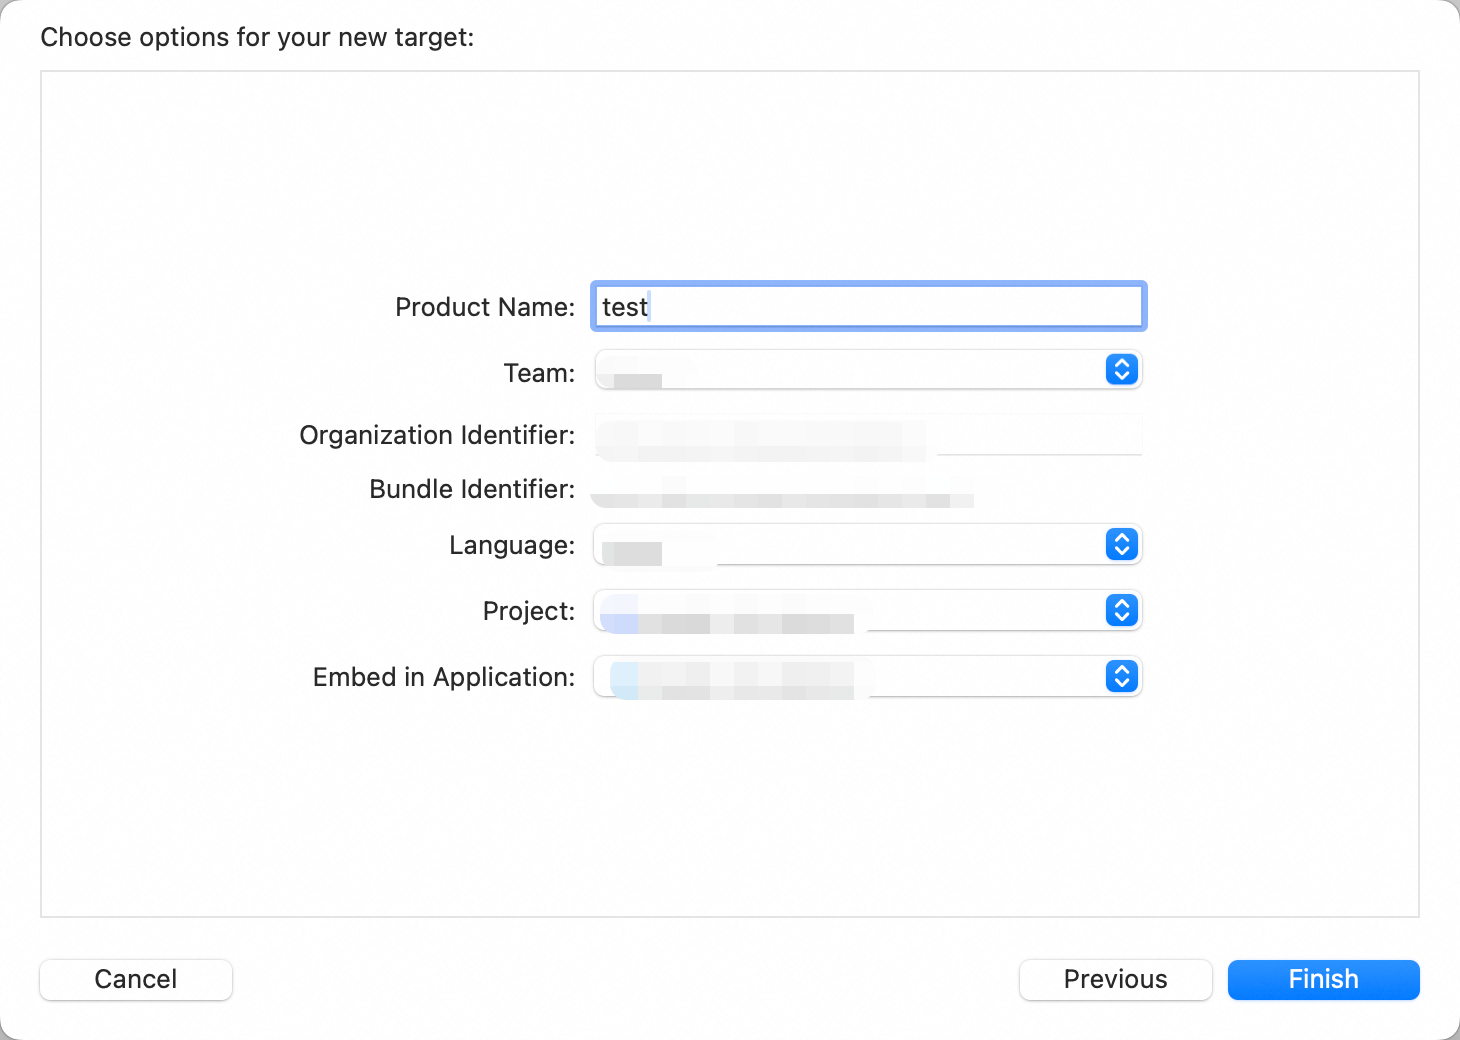
打开 Xcode,在菜单中选择 File -> New -> Target -> Notification Service Extension:
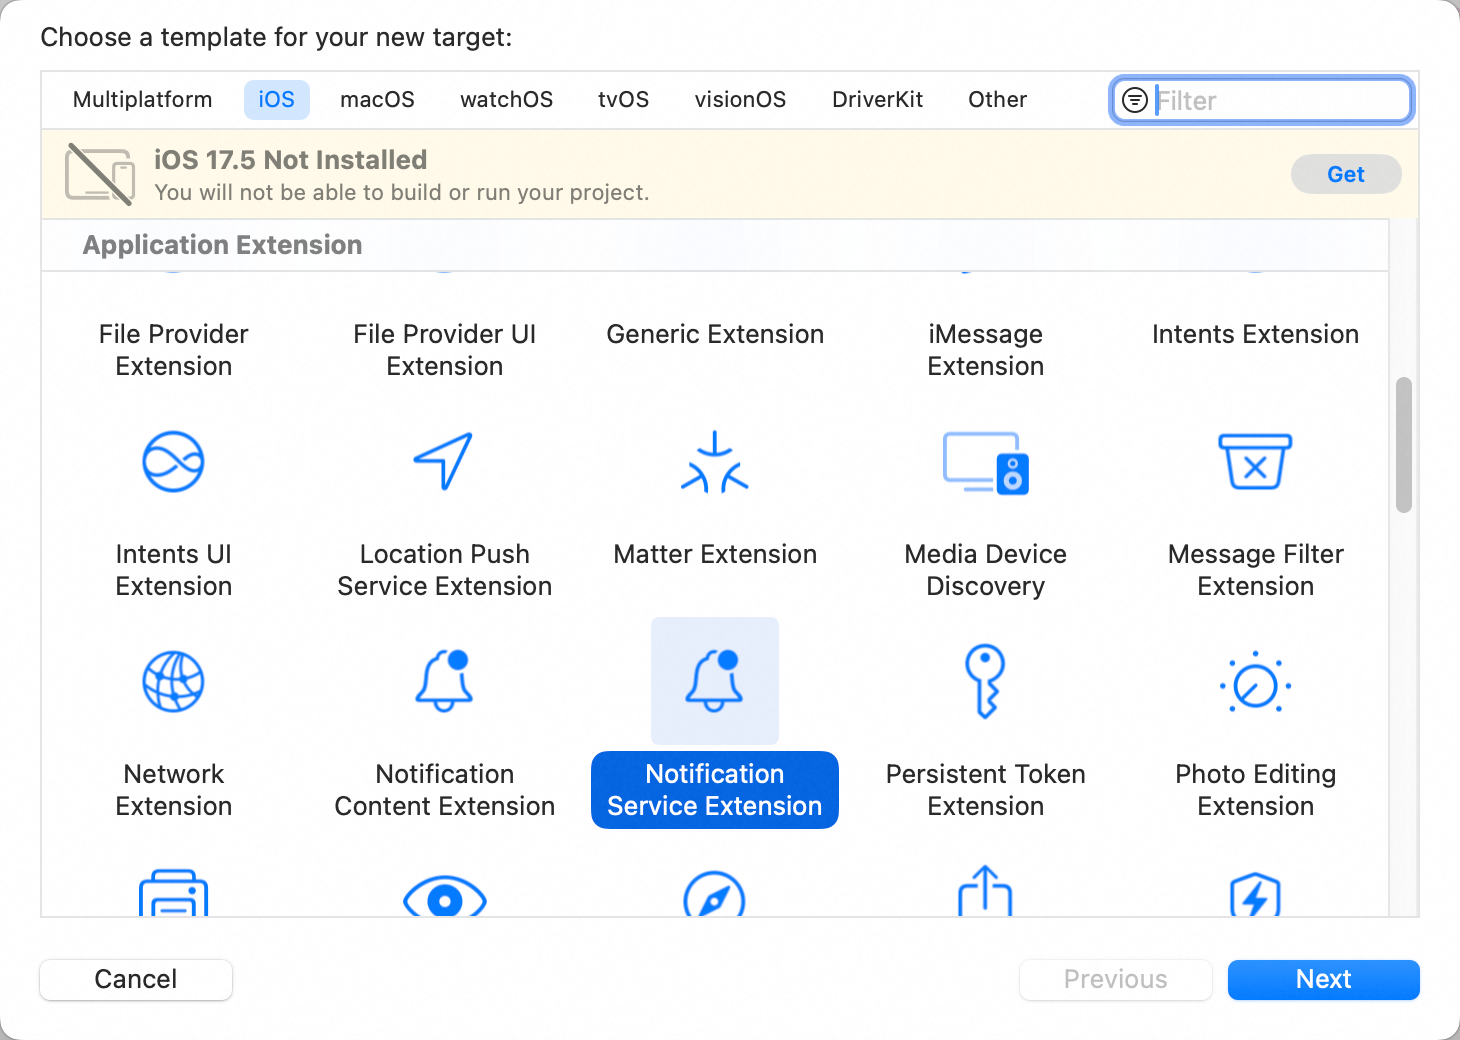
进行命名,点击Finish完成创建:
创建完成后,会自动生成
NotificationService.m文件。
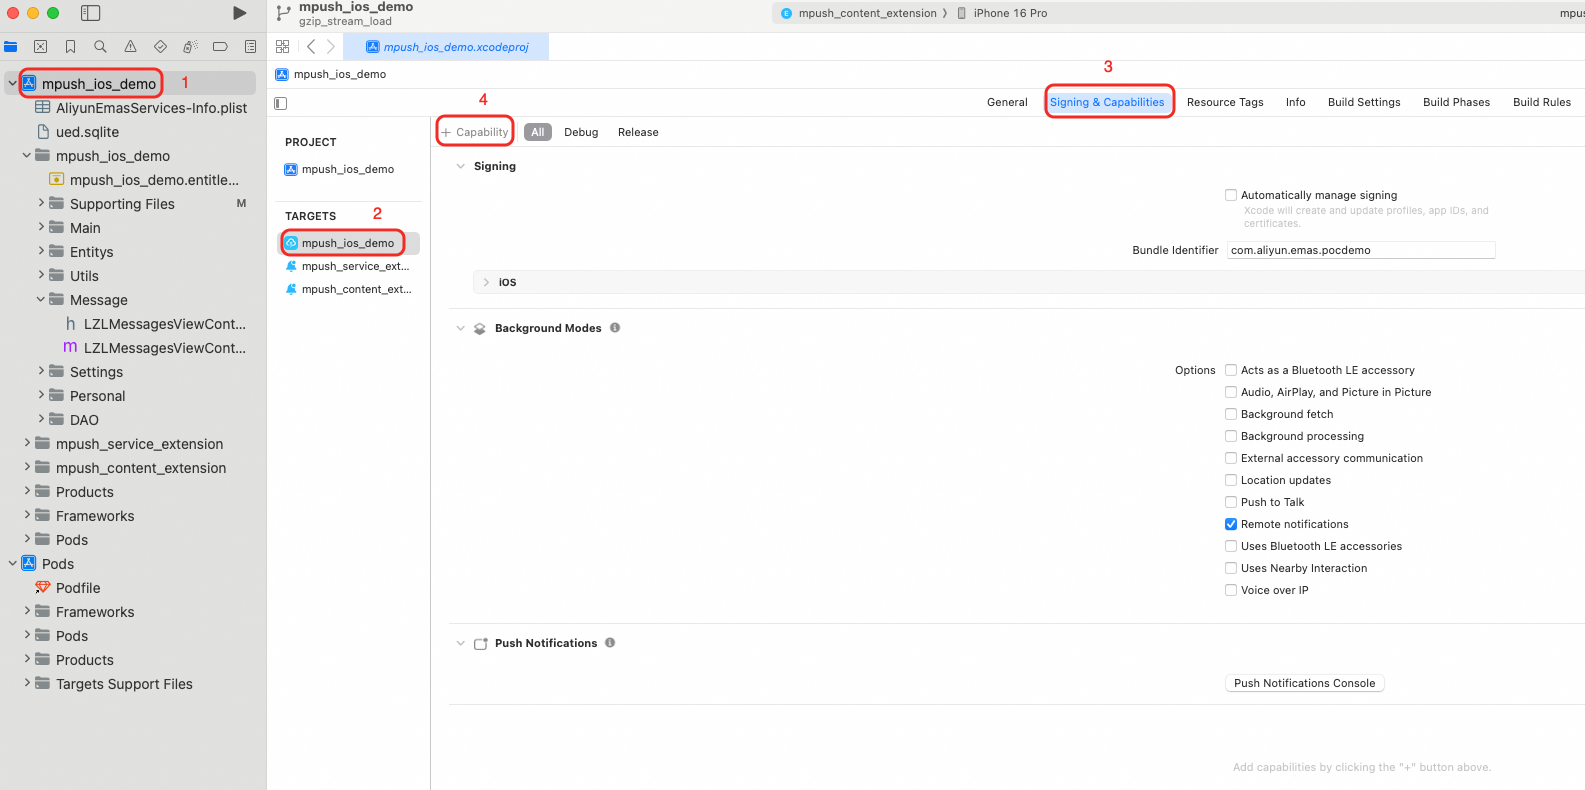
2. 设置APP Group
APP Group的设置请参考Configuring app groups。步骤如下:
打开 Xcode,选择 Project -> Targets -> Signing & Capabilities -> 左上角的 + Capability:
Capabilities中搜索添加APP Groups:
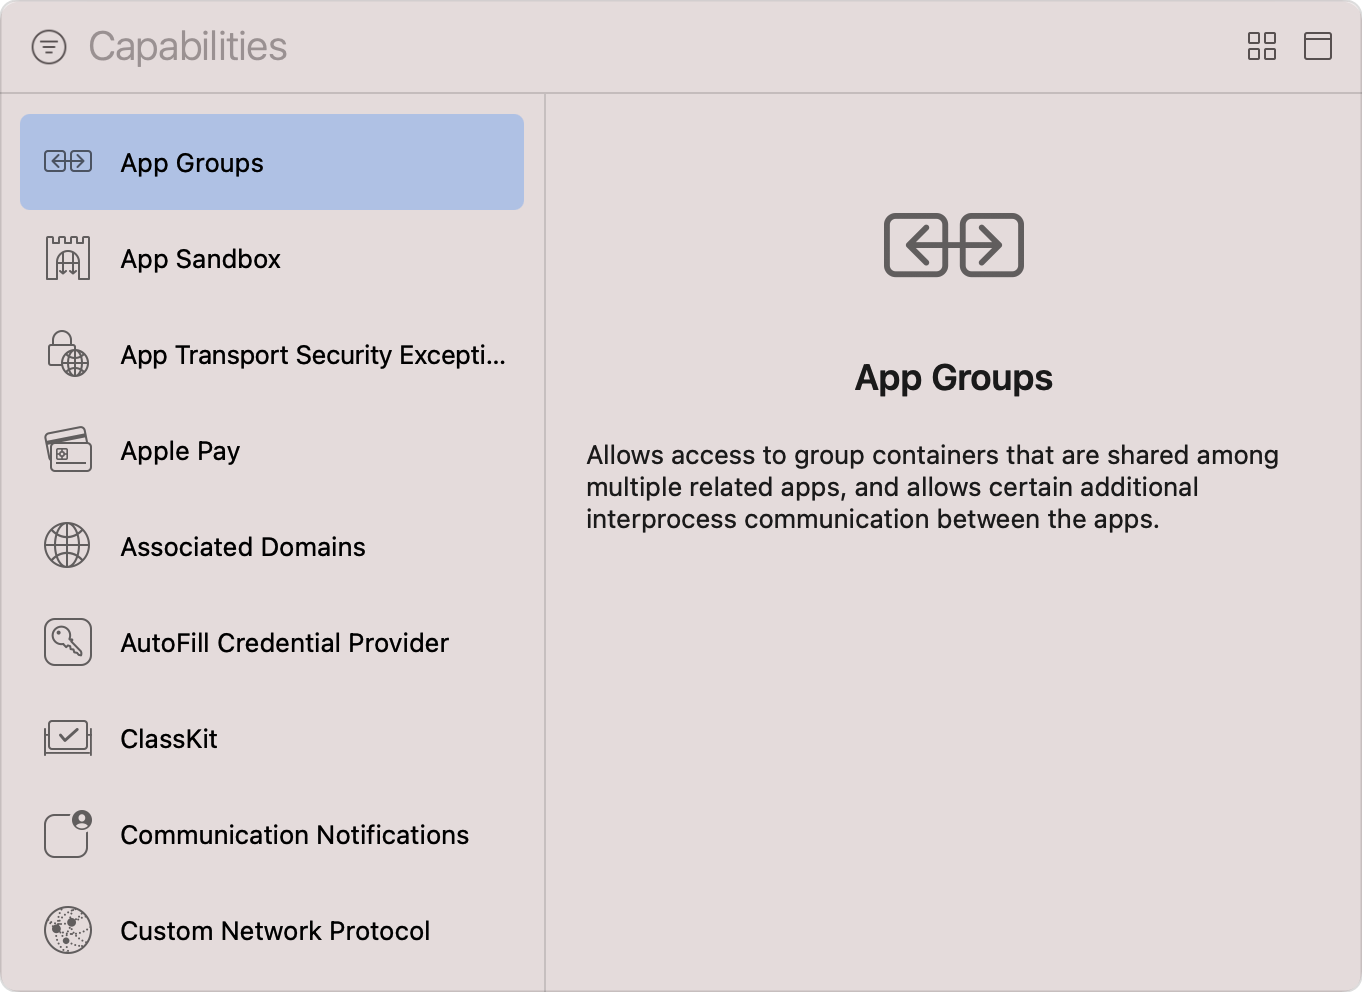
在APP Groups列表中点击 + 按钮,输入您的APP Group名称,点击 OK:


3. 在Bundle中内置音频文件
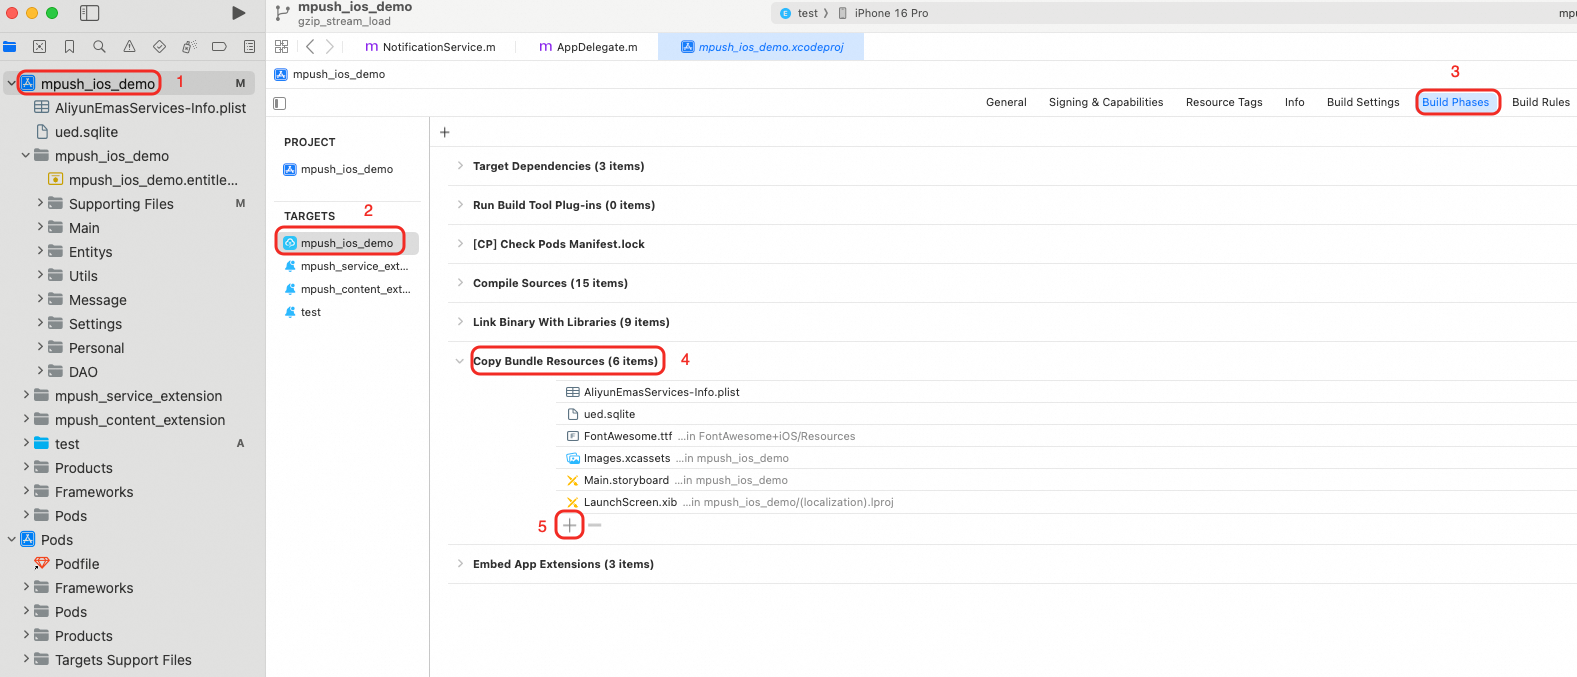
您需要自己在Bundle中内置需要播放的基本音频文件,如(到账,0-9,元,点)。
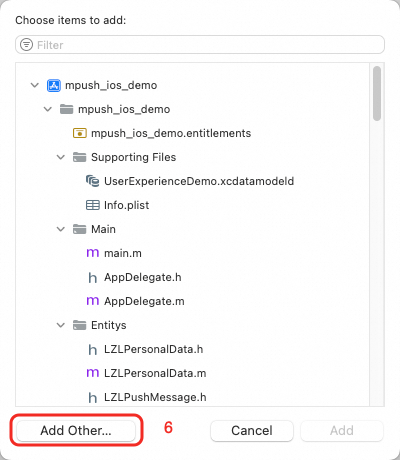
打开 Xcode,选择 Project -> Targets -> Build Phases -> Copy Bundle Resources -> 点击 + 按钮 -> 点击 Add Other -> 选择音频文件即可。
4. 根据语音播报内容拼接音频文件
下面的示例代码中,makeMp3FromExt方法会根据传入的数字拼接Bundle中的文件。例如传入参数cnt为15,此时会拼接Bundle中的"1.mp3" + "5.mp3",并将拼接后的音频文件写入APP Group共享目录中。
#import "ApnsHelper.h"

static NSString * const GroupName = @"group.com.example.mygroup"; // 替换为您的 App Group 标识符

@implementation ApnsHelper

+ (NSString *)makeMp3FromExt:(double)cnt {
    NSURL *containerURL = [[NSFileManager defaultManager] containerURLForSecurityApplicationGroupIdentifier:GroupName];
    NSString *basePath = [[[containerURL absoluteString] stringByReplacingOccurrencesOfString:@"file://" withString:@""] stringByAppendingPathComponent:@"Library/Sounds/"];
    return [self mergeVoiceWithLibPath:basePath count:cnt];
}

+ (NSString *)mergeVoiceWithLibPath:(NSString *)libPath count:(double)cnt {
    [self clearFiles:libPath];

    NSMutableArray *nums = [NSMutableArray array];
    int tmp = (int)cnt;
    while (tmp > 0) {
        [nums insertObject:[NSString stringWithFormat:@"%d", tmp % 10] atIndex:0];
        tmp /= 10;
    }

    NSMutableData *mergeData = [NSMutableData data];
    for (NSString *num in nums) {
        NSURL *mp3Url = [[NSBundle mainBundle] URLForResource:num withExtension:@"mp3"];
        if (mp3Url) {
            NSData *data = [NSData dataWithContentsOfURL:mp3Url];
            if (data) {
                [mergeData appendData:data];
            }
        }
    }

    if ([mergeData length] == 0) {
        return @"";
    }

    if (![[NSFileManager defaultManager] fileExistsAtPath:libPath]) {
        NSError *error = nil;
        [[NSFileManager defaultManager] createDirectoryAtPath:libPath withIntermediateDirectories:YES attributes:nil error:&error];
        if (error) {
            NSLog(@"创建Sounds文件失败 %@", libPath);
        }
    }

    NSString *fileName = [NSString stringWithFormat:@"%d.mp3", [self now]];
    NSURL *fileUrl = [NSURL fileURLWithPath:[libPath stringByAppendingPathComponent:fileName]];
    NSError *writeError = nil;
    [mergeData writeToURL:fileUrl options:NSDataWritingAtomic error:&writeError];
    if (writeError) {
        NSLog(@"合成mp3文件失败 %@", fileUrl);
    }
    return fileName;
}

+ (void)clearFiles:(NSString *)libPath {
    BOOL isDir = NO;
    if ([[NSFileManager defaultManager] fileExistsAtPath:libPath isDirectory:&isDir] && isDir) {
        NSError *error = nil;
        NSArray *list = [[NSFileManager defaultManager] contentsOfDirectoryAtPath:libPath error:&error];
        if (error) {
            NSLog(@"获取目录内容失败:%@", error.localizedDescription);
            return;
        }
        int before = [self now] - 12 * 60 * 60 * 1000; //12 hour ago
        for (NSString *file in list) {
            NSString *timeStr = [file stringByReplacingOccurrencesOfString:@".mp3" withString:@""];
            int time = [timeStr intValue];
            if (time < before) {
                NSURL *fileUrl = [NSURL fileURLWithPath:[libPath stringByAppendingPathComponent:file]];
                NSError *removeError = nil;
                [[NSFileManager defaultManager] removeItemAtURL:fileUrl error:&removeError];
                if (removeError) {
                    NSLog(@"删除过期mp3失败");
                }
            }
        }
    }
}

+ (int)now {
    return (int)([[NSDate date] timeIntervalSince1970] * 1000);
}

@end
5. 在通知扩展的接收回调中进行语音播报
在NotificationService.m的didReceiveNotificationRequest回调中拦截通知获取语音播报内容,调用音频拼接方法makeMp3FromExt,接着将本次推送的声音标识sound指定为拼接后的音频文件,从而进行语音播报:
@implementation NotificationService

- (void)didReceiveNotificationRequest:(UNNotificationRequest *)request
                   withContentHandler:(void (^)(UNNotificationContent * _Nonnull))contentHandler {
    // 获取要播报的内容
    NSString *text = self.bestAttemptContent.userInfo[@"playVoiceText"];
    double cnt = [text doubleValue];
    NSString *soundName = [ApnsHelper makeMp3FromExt:cnt];
    UNNotificationSound *sound = [UNNotificationSound soundNamed:soundName];
    self.bestAttemptContent.sound = sound;
    self.contentHandler(self.bestAttemptContent);
}

@end方式二:消息透传+AVSpeechSynthesizer语音合成
服务端推送参数配置
服务端透传消息时,需要透传语音播报内容:
PushRequest pushRequest = new PushRequest();
...
pushRequest.setPushType("MESSAGE");
pushRequest.setBody("${语音播报内容}");
...
客户端实现语音播报
客户端收到透传消息后,需要在回调中拦截消息获取语音播报内容,之后使用AVSpeechSynthesizer来进行语音播报,具体步骤如下:
1. 封装AVSpeechSynthesizer
@interface Tool()<AVSpeechSynthesizerDelegate>

@property (nonatomic, strong) AVSpeechSynthesizer *synthesizer;
@property (nonatomic, strong) NSMutableArray<NSString *> *textQueue;

@end

@implementation Tool

+ (instancetype)sharedManager {
    static Tool *sharedInstance = nil;
    static dispatch_once_t onceToken;
    dispatch_once(&onceToken, ^{
        sharedInstance = [[self alloc] init];
    });
    return sharedInstance;
}

- (instancetype)init {
    self = [super init];
    if (self) {
        _synthesizer = [[AVSpeechSynthesizer alloc] init];
        _synthesizer.delegate = self;
        _textQueue = [NSMutableArray array];
    }
    return self;
}

- (void)enqueueTextForSpeech:(NSString *)text {
    [self.textQueue addObject:text];
    [self playNextTextIfAvailable];
}

- (void)playNextTextIfAvailable {
    if (!self.synthesizer.isSpeaking && self.textQueue.count > 0) {
        NSString *nextText = [self.textQueue firstObject];
        [self.textQueue removeObjectAtIndex:0];

        AVSpeechUtterance *utterance = [[AVSpeechUtterance alloc] initWithString:nextText];
        utterance.voice = [AVSpeechSynthesisVoice voiceWithLanguage:@"zh-CN"];
        utterance.rate = 0.5f;
        utterance.pitchMultiplier = 1.0;

        [self.synthesizer speakUtterance:utterance];
    }
}

#pragma mark - AVSpeechSynthesizerDelegate

- (void)speechSynthesizer:(AVSpeechSynthesizer *)synthesizer didFinishSpeechUtterance:(AVSpeechUtterance *)utterance {
    [self playNextTextIfAvailable];
}

@end
2. 在透传消息的接收回调中进行语音播报
参考推送通道监听接口,在onMessageReceived回调中获取透传消息中的语音播报内容,再调用AVSpeechSynthesizer的语音播报方法:
#pragma mark Receive Message
/**
 *    @brief    注册推送消息到来监听
 */
- (void)registerMessageReceive {
    [[NSNotificationCenter defaultCenter] addObserver:self
                                             selector:@selector(onMessageReceived:)
                                                 name:@"CCPDidReceiveMessageNotification"
                                               object:nil];
}

/**
 *    处理到来推送消息
 */
- (void)onMessageReceived:(NSNotification *)notification {
    NSLog(@"Receive one message!");

    CCPSysMessage *message = [notification object];
    NSString *title = [[NSString alloc] initWithData:message.title encoding:NSUTF8StringEncoding];
    NSString *body = [[NSString alloc] initWithData:message.body encoding:NSUTF8StringEncoding];
    NSLog(@"Receive message title: %@, content: %@.", title, body);

    [[Tool sharedManager] enqueueTextForSpeech:body];
}
方式三:静默通知+AVSpeechSynthesizer语音合成(不推荐)
服务端推送参数配置
服务端推送静默通知时,使用iOSExtParameters字段传递语音播报内容,同时设置iOSSilentNotification为true:
PushRequest pushRequest = new PushRequest();
...
pushRequest.setPushType("NOTICE");
pushRequest.setIOSExtParameters("{\"playVoiceText\":\"${语音播报内容}\"}");
pushRequest.setiOSSilentNotification("true");
...
客户端实现语音播报
客户端收到静默通知后,需要在静默通知的回调中拦截静默通知获取语音播报内容,之后使用AVSpeechSynthesizer来进行语音播报,具体步骤如下:
1. 勾选Remote notifications
参考iOS静默通知添加Background Modes并勾选Remote notifications。
2. 封装AVSpeechSynthesizer
步骤请参考方式二中的1. 封装AVSpeechSynthesizer小节。
3. 在静默通知的接收回调中进行语音播报
在didReceiveRemoteNotification回调中获取静默通知中的语音播报内容,再调用AVSpeechSynthesizer的语音播报方法:
@implementation AppDelegate

/// 静默通知回调方法
- (void)application:(UIApplication *)application didReceiveRemoteNotification:(NSDictionary *)userInfo fetchCompletionHandler:(void (^)(UIBackgroundFetchResult))completionHandler {
    NSLog(@"Receive one notification.");

    NSString *text = userInfo[@"playVoiceText"];
    if (text && text.length > 0) {
        NSLog(@"要播报的内容:%@", text);
        [[Tool sharedManager] enqueueTextForSpeech:text];
    }

    completionHandler(UIBackgroundFetchResultNewData);
}

@end
鸿蒙语音播报
方式一:扩展通知+TTS语音合成
鸿蒙可以通过通知扩展消息传递语音播报内容,并在客户端使用原生TTS API合成语音。
服务端推送参数配置
服务端推送通知时,使用HarmonyExtensionExtraData字段传递语音播报内容,同时设置HarmonyExtensionPush为true:
PushRequest pushRequest = new PushRequest();
...
pushRequest.setPushType("NOTICE");
pushRequest.setHarmonyExtensionExtraData("${语音播报内容}");
pushRequest.setHarmonyExtensionPush("true");
...
客户端实现语音播报
客户端收到通知后,需要在通知扩展消息的回调中拦截通知获取语音播报内容,之后使用TTS来进行语音播报,具体步骤如下:
1. 创建TTS引擎实例
参考文本转语音,创建TTS引擎实例:
import { textToSpeech } from '@kit.CoreSpeechKit';
import { BusinessError } from '@kit.BasicServicesKit';

let ttsEngine: textToSpeech.TextToSpeechEngine;

// 设置创建引擎参数
let extraParam: Record<string, Object> = {"style": 'interaction-broadcast', "locate": 'CN', "name": 'EngineName'};
let initParamsInfo: textToSpeech.CreateEngineParams = {
  language: 'zh-CN',
  person: 0,
  online: 1,
  extraParams: extraParam
};

// 调用createEngine方法
textToSpeech.createEngine(initParamsInfo, (err: BusinessError, textToSpeechEngine: textToSpeech.TextToSpeechEngine) => {
  if (!err) {
    console.info('Succeeded in creating engine');
    // 接收创建引擎的实例
    ttsEngine = textToSpeechEngine;
  } else {
    console.error(`Failed to create engine. Code: ${err.code}, message: ${err.message}.`);
  }
});
2. 在通知扩展消息的接收回调中进行语音播报
参考通知扩展消息,在通知扩展消息的接收回调中解析得到ExtensionNotification类的一个实例,其中的extensionExtraData字段即为服务端HarmonyExtensionExtraData参数传递的语音播报内容。之后调用TTS引擎的语音播报接口:
// 设置播报相关参数
let extraParam: Record<string, Object> = {"queueMode": 0, "speed": 1, "volume": 2, "pitch": 1, "languageContext": 'zh-CN',
"audioType": "pcm", "soundChannel": 3, "playType": 1 };
let speakParams: textToSpeech.SpeakParams = {
  requestId: '123456', // requestId在同一实例内仅能用一次,请勿重复设置
  extraParams: extraParam
};

// 调用播报方法
// 开发者可以通过修改speakParams主动设置播报策略
// 假设extensionNotification为通知扩展消息的接收回调中解析得到的ExtensionNotification类的一个实例
ttsEngine.speak(extensionNotification.extensionExtraData, speakParams);