Node SDK 接入指南
智作工坊 SpeedPix Node SDK,提供简洁易用的 AI 图像生成和处理工作流接口。
资源链接
资源 | 链接 | 描述 |
NPM 包 | 最新版本和历史版本 | |
开源仓库 | 源码、Issue、贡献代码 |
查看 API 文档
授权
获取 API 凭据
创建应用获取
app_key和app_secret
调用 OpenAPI
准备 Node.js 环境
# 确保 Node.js 14+
node --version

# 确保 npm 或 yarn
npm --version
配置环境变量
# 设置 API 凭据(推荐方式)
export SPEEDPIX_APP_KEY="your-app-key"
export SPEEDPIX_APP_SECRET="your-app-secret"

export SPEEDPIX_ENDPOINT="https://openai.edu-aliyun.com"  # 可选,默认值
安装依赖
# NPM
npm install speedpix

# Yarn
yarn add speedpix
准备一个已经发布的工作流
在智作工坊控制台中:
参考 工作流管理
创建或选择一个 AI 工作流,可以将以下示例工作流拖入工作流编辑器
这是一个将输入商品图变成白底图的工作流 SDK 测试案例.json,该工作流会自动从用户输入图片抽取商品主体,然后根据用户输入文本生成商品白底图
示范参数:
输入文本
输入图片
输出结果
测试文本


发布工作流并获取
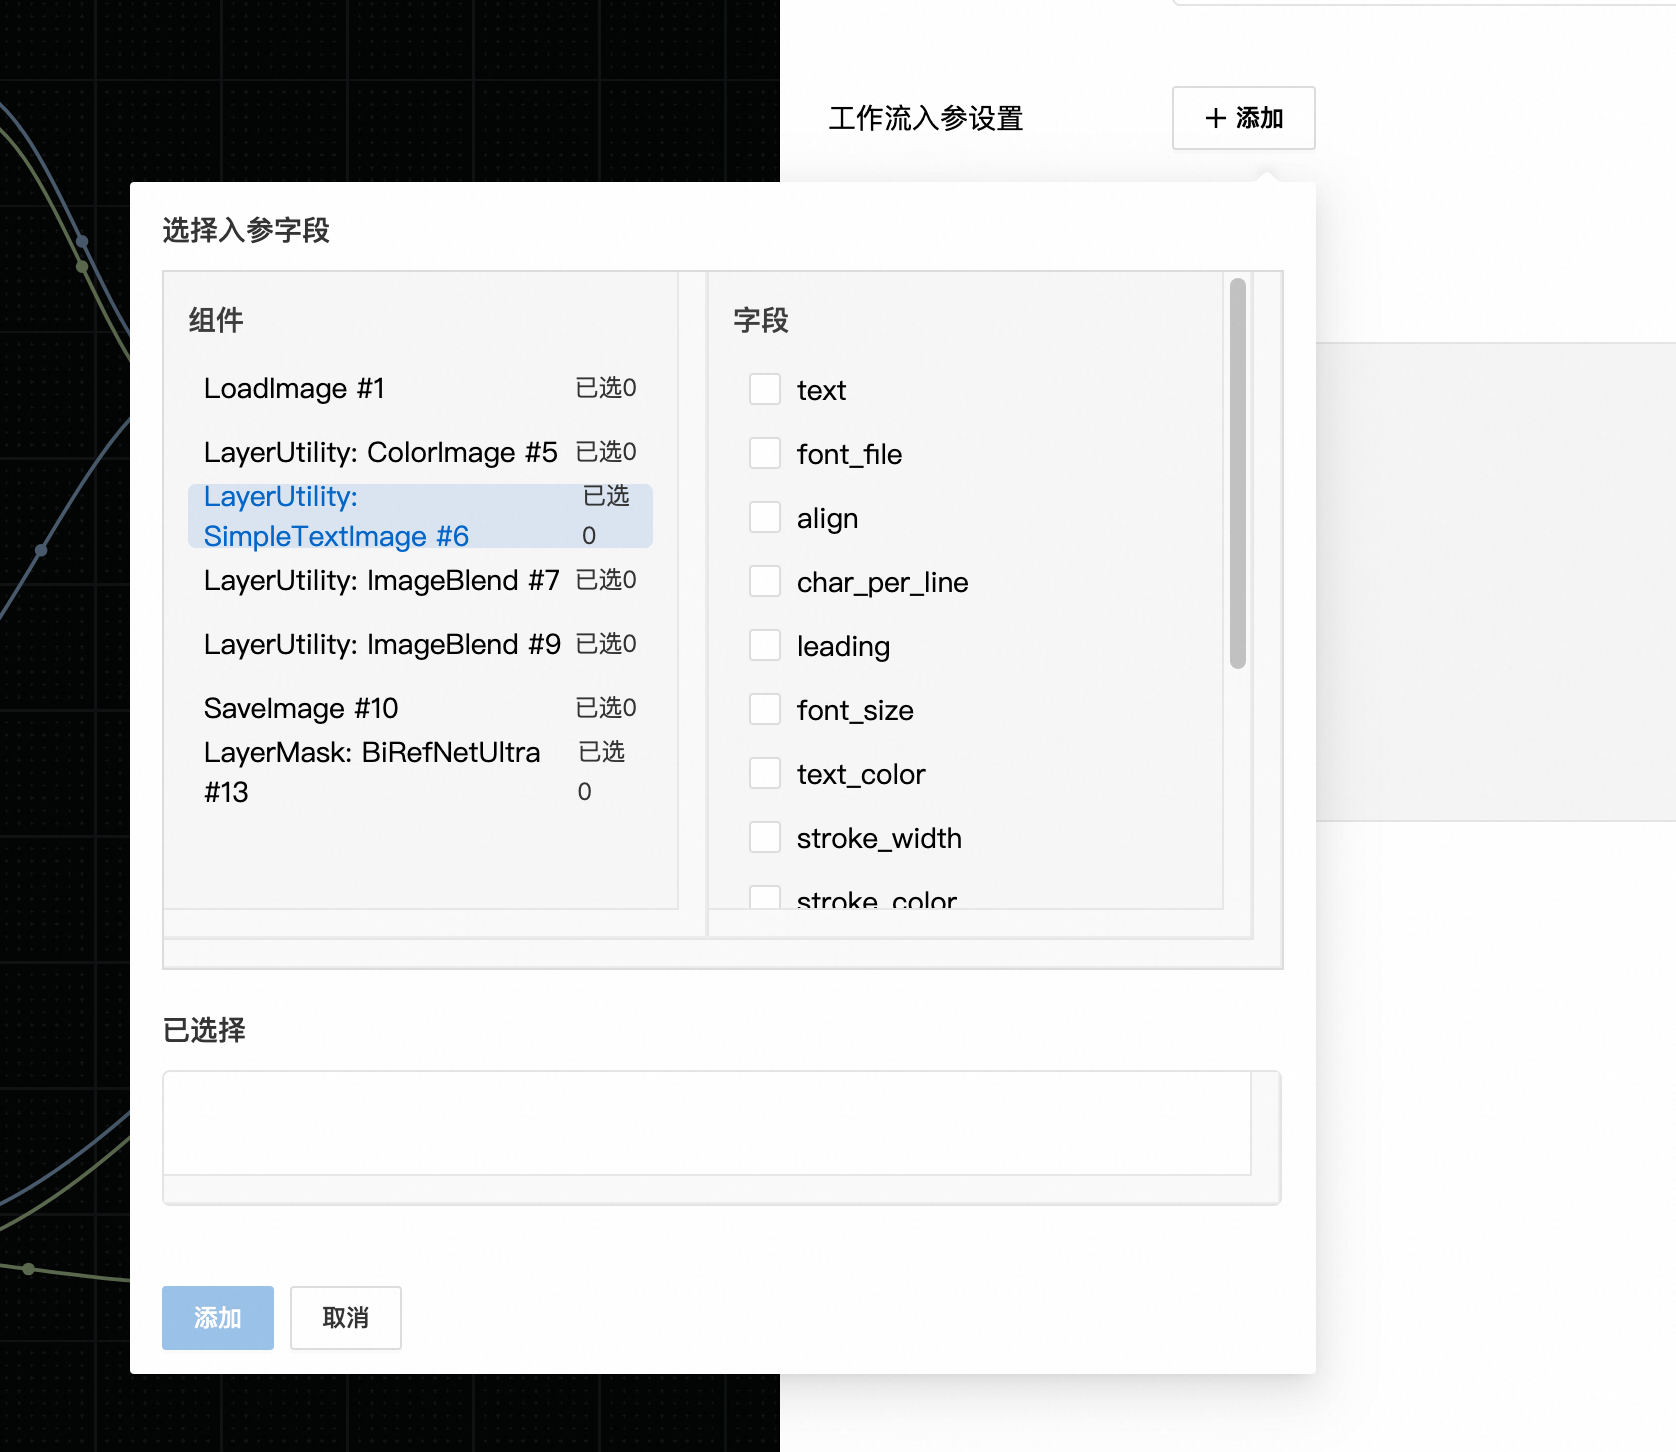
workflow_id发布时选择 #1 号节点的 image 字段以及 #6 号节点的 text 作为输入字段

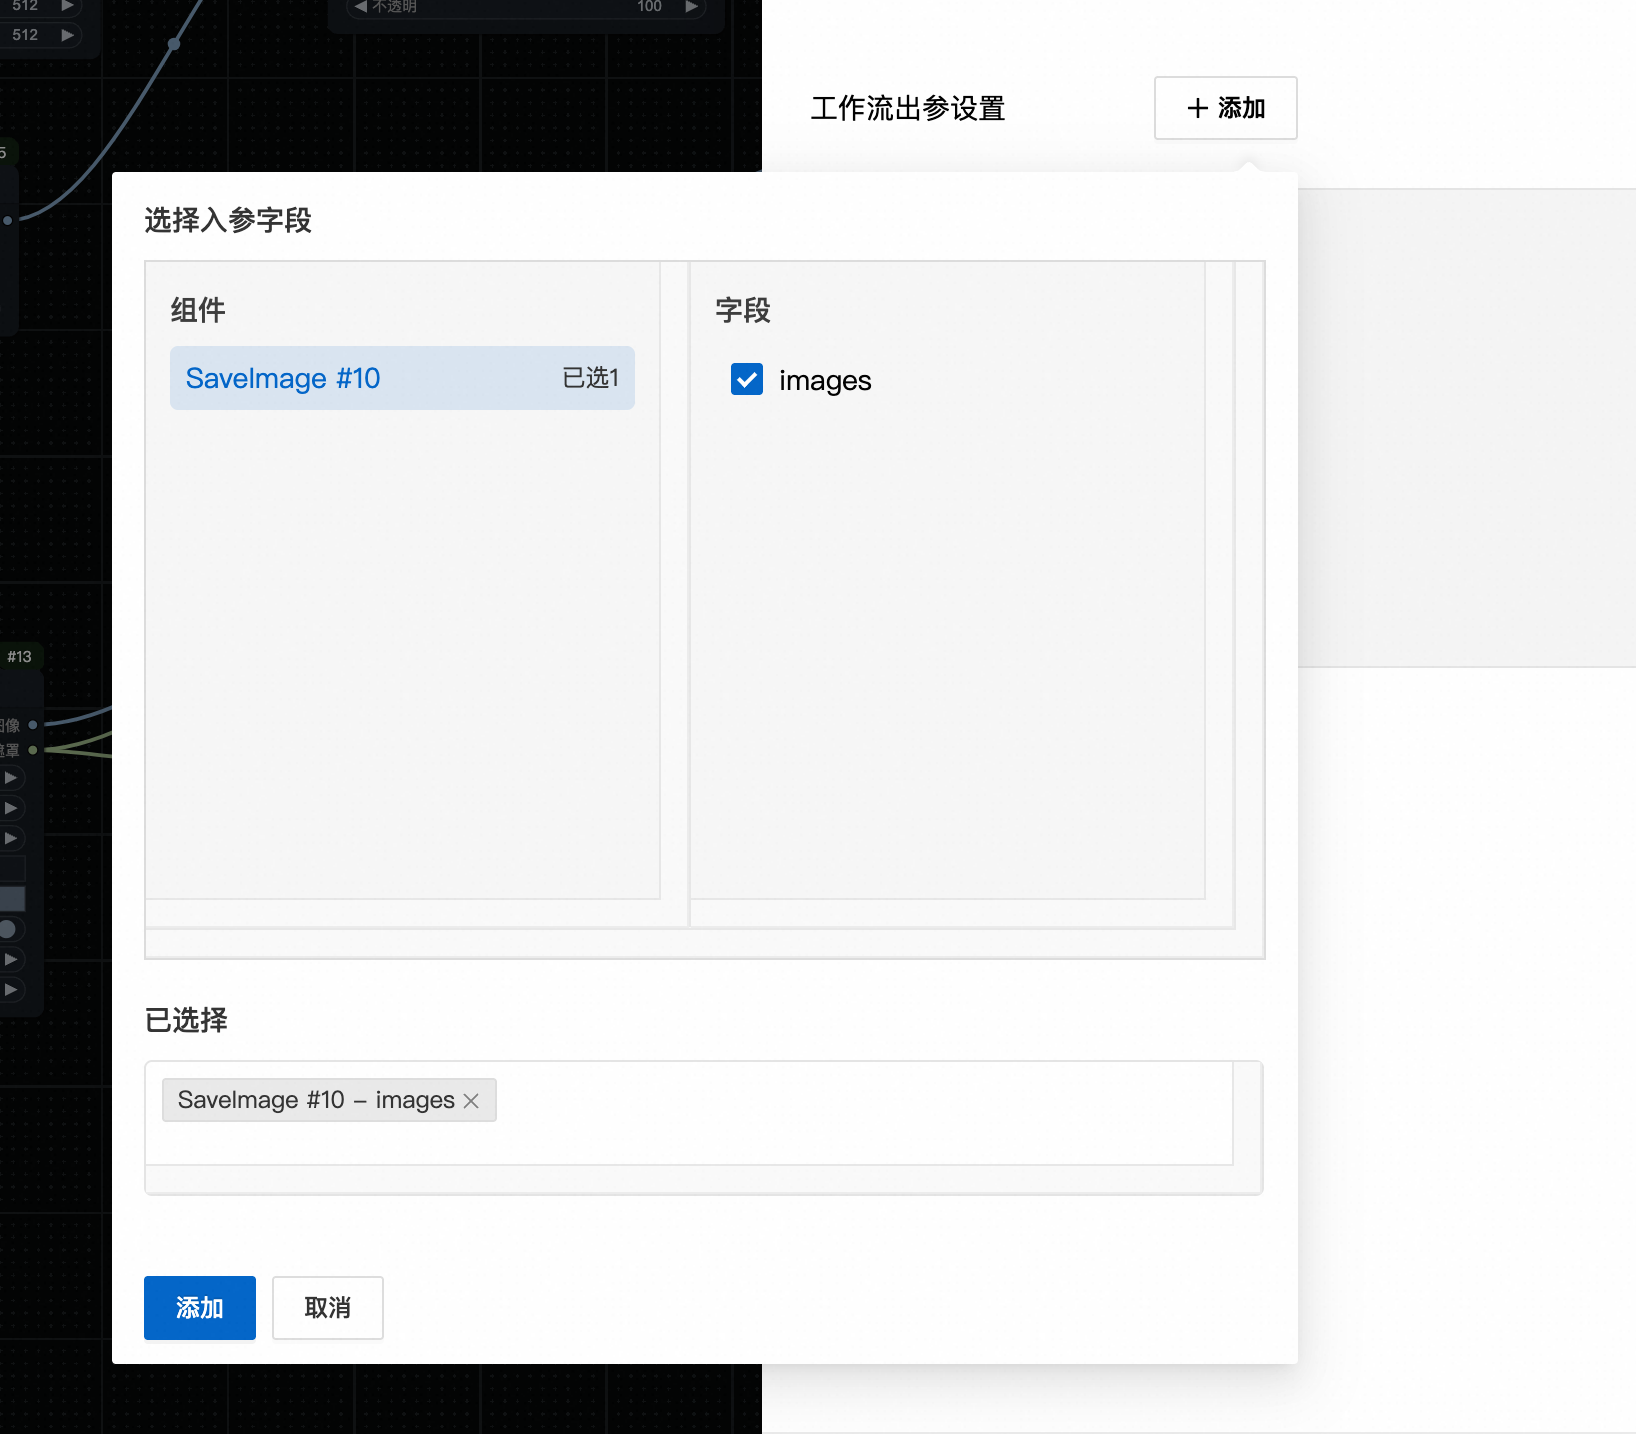
选择 #10 号节点的 images 作为输出字段

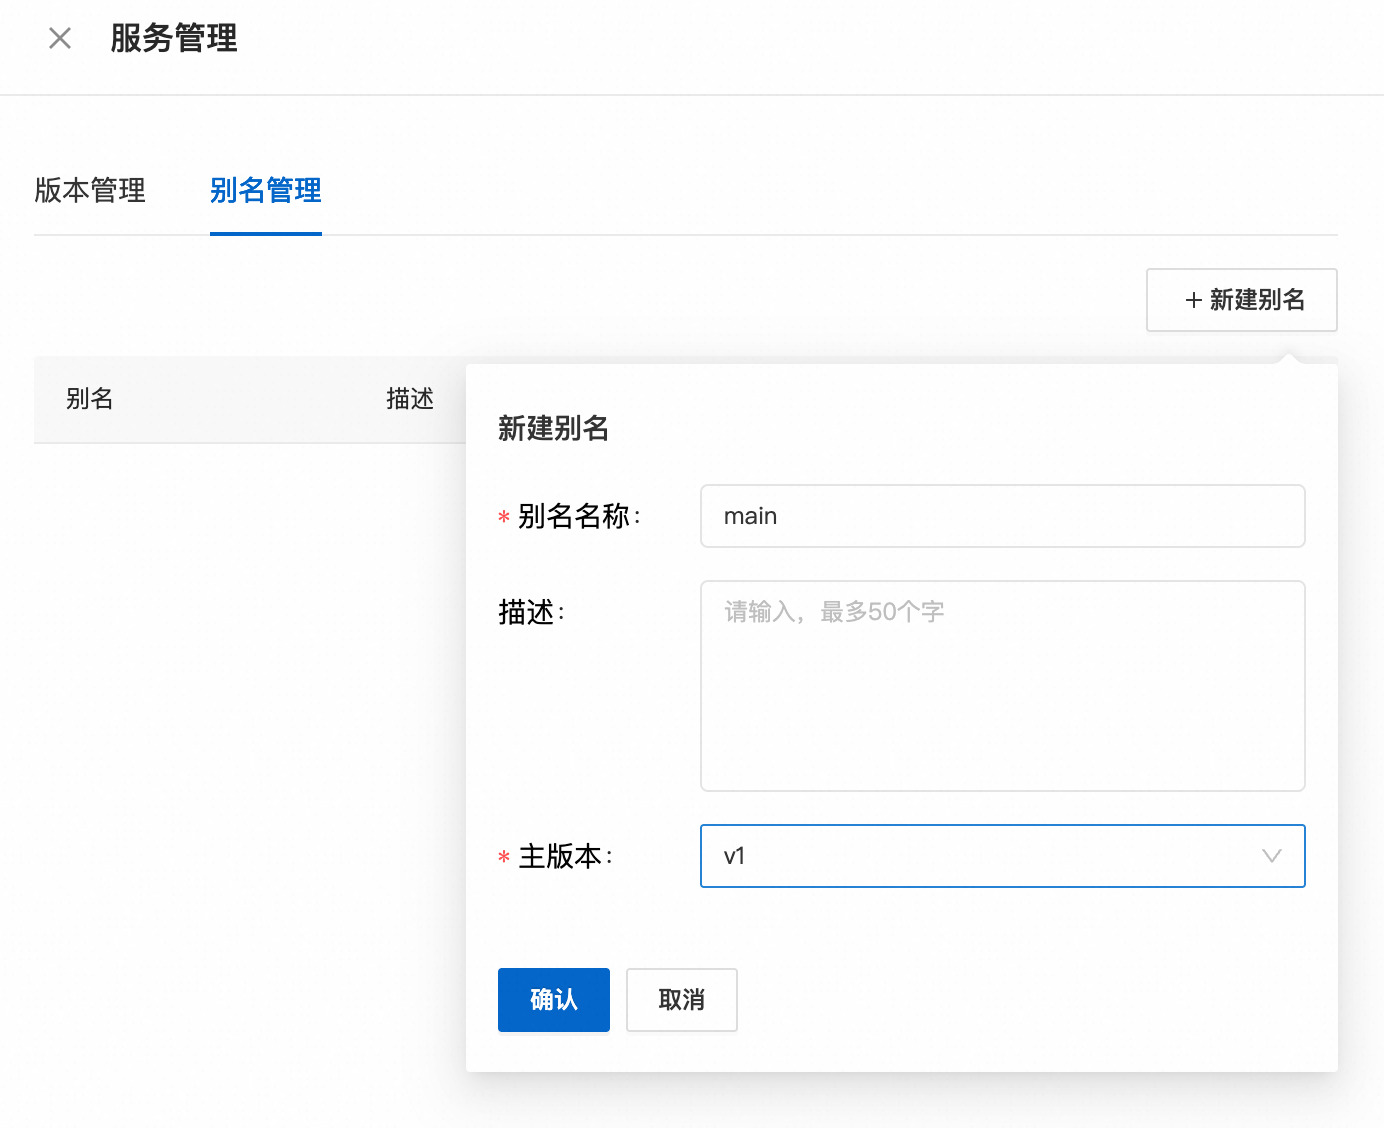
点击提交发布,此时会产生一个 v1 版本,点击右侧别名管理,新建一个 main 别名,映射到 v1 版本,后续我们可以使用该别名调用该工作流,如果需要更新版本,只用在这里切换别名即可,不用代码层变更。

记录工作流的输入、输出格式要求
复制示例代码
CommonJS (推荐)
const speedpix = require("speedpix");

async function main() {
    try {
        // 运行 AI 工作流(自动从环境变量读取配置)
        const output = await speedpix.run("your-workflow-id", {
            input: {
                text: "阿里云",
                image: "./input.jpg", // 本地文件路径,SDK会自动上传
            },
            aliasId: "main", // 版本别名,默认为 "main"
        });

        // 保存结果
        if (output?.images?.url) {
            await output.images.url.save("result.png");
            console.log("图片已保存为 result.png");
        }
    } catch (error) {
        console.error("错误:", error.message);
    }
}

main();
ES Module
import SpeedPix from "speedpix";

const client = new SpeedPix(); // 自动从环境变量读取配置

const output = await client.run("your-workflow-id", {
    input: {
        text: "阿里云",
        image: "./input.jpg", // 本地文件路径,SDK会自动上传
    },
    aliasId: "main",
});

if (output?.images?.url) {
    await output.images.url.save("result.png");
    console.log("图片已保存为 result.png");
}
TypeScript
import SpeedPix from "speedpix";

async function main() {
  const client = new SpeedPix();

  const output = await client.run("your_workflow_id", {
    input: {
      text: "阿里云",
      image: "./input.jpg", // 本地文件路径,SDK会自动上传
    },
    aliasId: "main",
  });

  if (output?.images?.url) {
    await output.images.url.save("result.png");
  }
}

// 运行主函数
main().catch((error) => {
  console.error("发生错误:", error);
  process.exit(1);
});
执行测试
# 运行测试脚本
node quickstart.js

# 验证安装
npm list speedpix

# 检查生成的文件
ls -la result.png
资源配置
共享算力 vs 独享资源
智作工坊支持两种资源类型:
共享算力:默认使用,成本较低,适合一般业务场景
独享资源:推荐对延迟和成功率敏感的业务使用,提供更稳定的性能保障
配置方式
默认情况下,如果不指定 resourceConfigId,系统会使用共享算力资源。如果您对延迟和成功率有较高要求,推荐配置独享资源。
const SpeedPix = require("speedpix");
const client = new SpeedPix({
  appKey: "your-app-key",
  appSecret: "your-app-secret"
});

// 使用共享算力(默认)
const output1 = await client.run("workflow-id", {
  input: {
    prompt: "一个美丽的风景"
  },
  aliasId: "main"
  // 不指定 resourceConfigId 时自动使用共享算力
});

// 使用独享资源
const output2 = await client.run("workflow-id", {
  input: {
    prompt: "一个美丽的风景"
  },
  aliasId: "main",
  resourceConfigId: "your-dedicated-resource-id"  // 指定独享资源ID
});

// 通过 createPrediction 指定独享资源
const prediction = await client.predictions.create({
  workflowId: "workflow-id",
  input: {
    prompt: "一个美丽的风景"
  },
  aliasId: "main",
  resourceConfigId: "your-dedicated-resource-id"
});
相关文档
SDK API 完整参数说明
1. 构造函数 - new SpeedPix()
SDK 支持灵活的初始化方式,认证参数(appKey/appSecret)必须成对提供:
// 方式1:无参数(推荐,使用环境变量)
const client = new SpeedPix();

// 方式2:基础配置
const client = new SpeedPix({
    appKey: "your-app-key",
    appSecret: "your-app-secret"
});

// 方式3:完整配置
const client = new SpeedPix({
    appKey: "your-app-key",
    appSecret: "your-app-secret",
    endpoint: "https://custom-endpoint.com",  // 可选
    timeout: 60,  // 可选,60秒超时
    useFileOutput: true  // 可选
});
参数说明:
参数 | 类型 | 必需 | 默认值 | 说明 |
| string | 是 | 环境变量 | 应用密钥 |
| string | 是 | 环境变量 | 应用密码 |
| string | 否 |
| API 端点地址 |
| string | 否 |
| 用户代理字符串 |
| number | 否 |
| 请求超时时间(秒) |
| boolean | 否 |
| 是否将URL输出转换为FileOutput对象 |
| string | 否 |
| 文件编码策略: |
认证参数规则:
appKey和appSecret必须成对提供(要么都设置,要么都不设置)如果不提供,将自动从环境变量
SPEEDPIX_APP_KEY和SPEEDPIX_APP_SECRET读取其他可选参数在认证参数之后定义
2. 运行工作流 - client.run()
const output = await client.run(workflowId, options)参数说明:
参数 | 类型 | 必需 | 默认值 | 说明 |
| string | 是 | - | 工作流 ID |
| object | 是 | - | 工作流输入参数 |
| string | 否 |
| 版本别名 |
| string | 否 | - | 版本 ID(与aliasId二选一) |
| boolean | 否 |
| 是否等待完成 |
| string | 否 | - | 资源配置 ID |
| boolean | 否 |
| 是否随机化种子 |
| boolean | 否 |
| 是否返回临时文件 |
| number | 否 |
| 轮询间隔(毫秒) |
| AbortSignal | 否 | - | 取消信号 |
文件路径自动处理:
SDK 会自动识别
input中的文件路径参数支持相对路径(如
./image.jpg)和绝对路径自动上传文件并替换为可访问的 URL
支持常见格式:jpg, png, gif, bmp, webp, mp4, mov 等
示例:
// 基础用法
const output = await client.run("workflow-123", {
    input: {
        prompt: "生成图片",
        image: "./source.jpg",           // 自动上传
        strength: 0.8,
        steps: 20
    }
});

// 高级用法
const output = await client.run("workflow-123", {
    input: {
        prompt: "风格转换",
        source_image: "./input.jpg",
        style_image: "/Users/you/style.png",
        control_image: "./control.jpg"
    },
    aliasId: "v2.1",
    resourceConfigId: "gpu-config-1",
    pollingInterval: 2000,  // 2秒轮询一次
    randomiseSeeds: true
});

// 异步执行(不等待)
const prediction = await client.run("workflow-123", {
    input: { prompt: "复杂任务" },
    wait: false
});
console.log(`任务ID: ${prediction.id}`);
const result = await prediction.wait();
3. 预测管理 - client.predictions
3.1 创建预测 - predictions.create()
const prediction = await client.predictions.create(options)参数说明:
参数 | 类型 | 必需 | 说明 |
| string | 是 | 工作流 ID |
| object | 是 | 输入参数 |
| string | 否 | 版本别名 |
| string | 否 | 版本 ID |
| string | 否 | 资源配置 ID |
| boolean | 否 | 是否随机化种子 |
| boolean | 否 | 是否返回临时文件 |
| AbortSignal | 否 | 取消信号 |
3.2 获取预测 - predictions.get()
const prediction = await client.predictions.get(predictionId, options)3.3 取消预测 - predictions.cancel()
const prediction = await client.predictions.cancel(predictionId, options)示例:
// 创建预测
const prediction = await client.predictions.create({
    workflowId: "workflow-123",
    input: {
        prompt: "生成图片",
        image: "./input.jpg"
    },
    aliasId: "main"
});

// 获取预测状态
const updated = await client.predictions.get(prediction.id);

// 取消预测
if (updated.status === "starting") {
    await client.predictions.cancel(prediction.id);
}
4. 文件管理 - client.files
4.1 上传文件 - files.create()
const file = await client.files.create(fileInput, options)参数说明:
参数 | 类型 | 必需 | 说明 |
| string | Buffer | ReadableStream | 是 | 文件路径、Buffer或流 |
| string | 否 | 自定义文件名 |
| string | 否 | MIME类型(自动检测) |
| AbortSignal | 否 | 取消信号 |
示例:
// 上传本地文件
const file1 = await client.files.create("./image.jpg");

// 上传Buffer
const buffer = fs.readFileSync("./image.jpg");
const file2 = await client.files.create(buffer, {
    filename: "custom-name.jpg",
    contentType: "image/jpeg"
});

// 上传流
const stream = fs.createReadStream("./video.mp4");
const file3 = await client.files.create(stream);

// 使用上传的文件
const output = await client.run("workflow-123", {
    input: {
        image: file1.accessUrl,  // 使用文件URL
        prompt: "处理图片"
    }
});
5. 预测对象方法
5.1 等待完成 - prediction.wait()
const result = await prediction.wait(options)参数说明:
参数 | 类型 | 默认值 | 说明 |
| number |
| 轮询间隔(毫秒) |
| AbortSignal | - | 取消信号 |
5.2 重新加载 - prediction.reload()
const updated = await prediction.reload(options)6. 文件输出对象 - FileOutput
当 useFileOutput: true 时,URL输出会自动转换为FileOutput对象:
// FileOutput 方法
await output.images.url.save("result.png");        // 保存到本地
const buffer = await output.images.url.read();     // 读取为Buffer
const url = output.images.url.toString();          // 获取URL字符串
const json = output.images.url.toJSON();           // 序列化为JSON
7. 全局函数
7.1 模块级运行 - speedpix.run()
const speedpix = require("speedpix");
const output = await speedpix.run(workflowId, options);
使用默认客户端(从环境变量配置)。
7.2 设置默认客户端 - setDefaultClient()
const { setDefaultClient } = require("speedpix");
const customClient = new SpeedPix({ timeout: 30000 });
setDefaultClient(customClient);
8. 错误处理
try {
    const output = await client.run("workflow-id", { input: {...} });
} catch (error) {
    if (error instanceof SpeedPix.SpeedPixError) {
        console.log("API错误:", error.message);
        console.log("错误码:", error.errorCode);
        console.log("调用ID:", error.apiInvokeId);
    } else if (error instanceof SpeedPix.PredictionError) {
        console.log("预测错误:", error.message);
        console.log("预测ID:", error.prediction?.id);
    }
}
9. MIME类型检测
SDK提供了内置的文件类型检测功能:
const { detectMimeTypeFromBuffer, getContentType } = require("speedpix");

// 从Buffer检测
const buffer = fs.readFileSync("./image.jpg");
const mimeType = detectMimeTypeFromBuffer(buffer);

// 从文件名检测
const contentType = getContentType("image.jpg", buffer);
更多使用方式
// 方式1:最简单(推荐新手,使用环境变量)
const speedpix = require("speedpix");
const output = await speedpix.run("workflow-id", {
    input: {
        prompt: "test",
        image: "./input.jpg"    // 文件路径会自动上传并转换
    }
});

// 方式2:实例化客户端(显式配置认证)
const SpeedPix = require("speedpix");
const client = new SpeedPix({
    appKey: "your-app-key",
    appSecret: "your-app-secret"
});
const output = await client.run("workflow-id", {
    input: {
        prompt: "test",
        reference: "/path/to/ref.png"  // 支持绝对路径
    }
});

// 方式3:完全控制(高级用户)
const client = new SpeedPix({
    appKey: "your-app-key",
    appSecret: "your-app-secret",
    timeout: 120  // 2分钟超时
});
const prediction = await client.run("workflow-id", {
    input: {
        prompt: "test",
        controlnet: "./control.jpg"    // ControlNet输入文件
    },
    wait: false  // 不等待,立即返回
});
const result = await prediction.wait();  // 手动等待完成
文件上传示例
当工作流需要文件输入时(如 image、path、file 等参数):
上传本地文件
const SpeedPix = require("speedpix");

async function uploadExample() {
    const client = new SpeedPix();

    // 1. 上传本地文件
    const file = await client.files.create("./input-image.jpg");

    // 2. 在工作流中使用文件URL
    const output = await client.run("your-workflow-id", {
        input: {
            image: file.accessUrl,  // 使用上传后的文件URL
            prompt: "处理这张图片"
        },
        aliasId: "main"
    });

    // 3. 保存结果
    if (output?.images?.url) {
        await output.images.url.save("processed-result.png");
        console.log("处理后的图片已保存");
    }
}

uploadExample();
多文件上传
const SpeedPix = require("speedpix");

async function multiFileExample() {
    const client = new SpeedPix();

    // 上传多个文件
    const backgroundImage = await client.files.create("./background.jpg");
    const maskImage = await client.files.create("./mask.png");

    const output = await client.run("your-workflow-id", {
        input: {
            background_image: backgroundImage.accessUrl,
            mask_image: maskImage.accessUrl,
            prompt: "替换背景"
        },
        aliasId: "main"
    });

    if (output?.images?.url) {
        await output.images.url.save("composite-result.png");
    }
}

multiFileExample();
常见文件参数示例
// 根据工作流的输入要求,文件参数可能是:
const input = {
    // 图片类型
    image: file.accessUrl,
    input_image: file.accessUrl,
    background_image: file.accessUrl,

    // 路径类型
    image_path: file.accessUrl,
    file_path: file.accessUrl,

    // 文件类型
    file: file.accessUrl,
    input_file: file.accessUrl,

    // 配合文本提示
    prompt: "your text prompt",
    negative_prompt: "unwanted elements"
};
完整示例:图像处理流程
端到端图像处理示例
const SpeedPix = require("speedpix");
const fs = require("fs");

async function completeExample() {
    try {
        const client = new SpeedPix();

        // 检查输入文件是否存在
        if (!fs.existsSync("./input.jpg")) {
            console.log("请准备一个名为 input.jpg 的图片文件");
            return;
        }

        console.log("正在上传文件...");
        const inputFile = await client.files.create("./input.jpg");
        console.log("文件上传成功:", inputFile.id);

        console.log("正在处理图像...");
        const output = await client.run("your-workflow-id", {
            input: {
                image: inputFile.accessUrl,
                prompt: "enhance the image quality, make it more vivid",
                strength: 0.8,
                guidance_scale: 7.5
            },
            aliasId: "main"
        });

        console.log("处理完成!");

        // 保存所有输出
        if (output?.images?.url) {
            await output.images.url.save("enhanced-output.png");
            console.log("增强后的图片已保存为: enhanced-output.png");
        }

        // 如果有多个输出
        if (output?.preview?.url) {
            await output.preview.url.save("preview.png");
            console.log("预览图已保存为: preview.png");
        }

    } catch (error) {
        console.error("处理失败:", error.message);

        if (error instanceof SpeedPix.SpeedPixTimeoutError) {
            console.log("处理超时,请稍后重试");
        } else if (error instanceof SpeedPix.SpeedPixError) {
            console.log("API 错误,请检查参数配置");
        }
    }
}

completeExample();