本文介绍了使用低代码集成(含UI)方式接入互动直播iOS端后,自定义扩展开发的方法。
前提条件
您已经完成了互动直播iOS端集成。
扩展方法
一、如何自定义主播侧的起播页面?

二、如何自定义直播间内页面?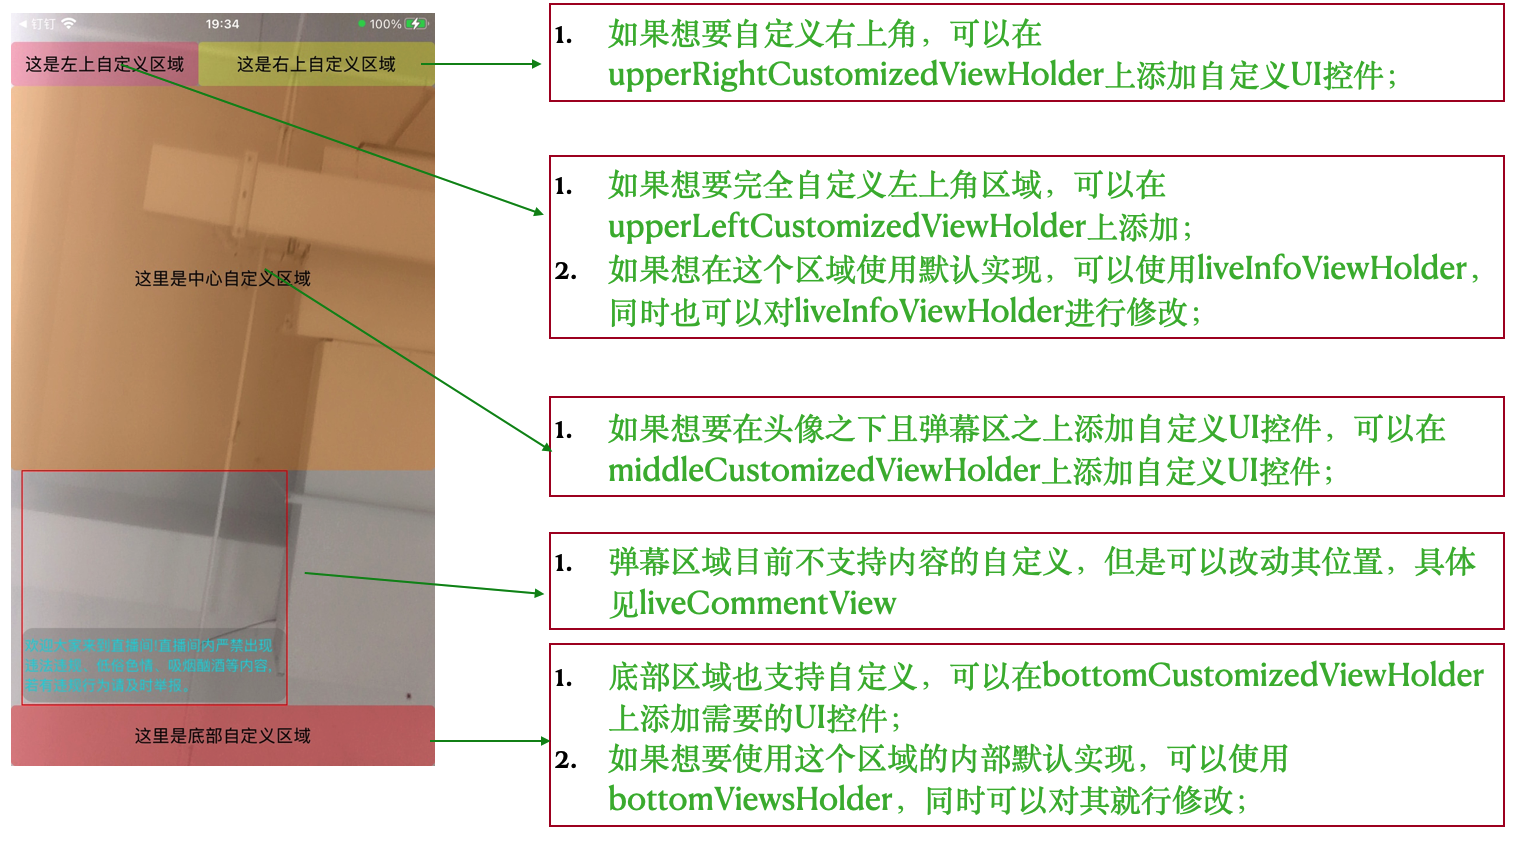 三、如何在直播间页面添加商品卡片?
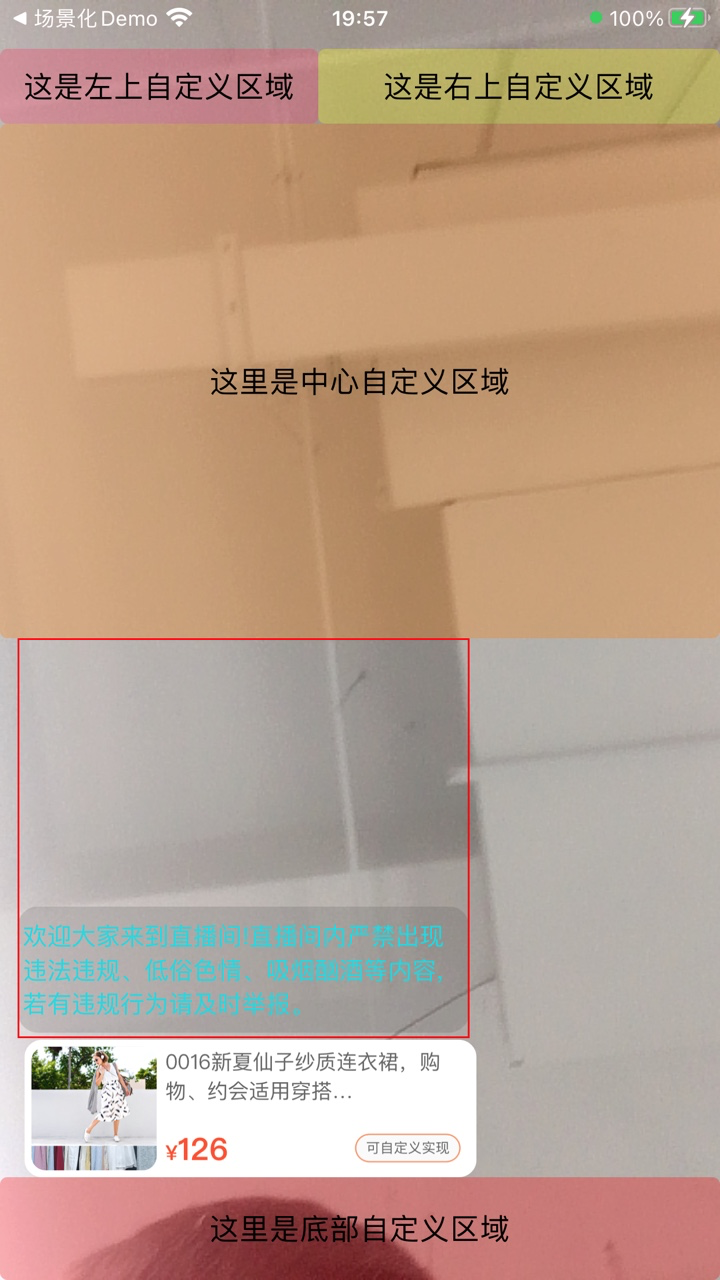
// 分两步,第一步,先自定义个商品卡片view并以bottomCustomizedViewHolder的上边沿作为商品卡片的下边边界
UIView* goodsCardView = [[UIImageView alloc] initWithImage:[UIImage imageNamed:@"直播-商品卡片"]];
[liveRoomVC.view addSubview:goodsCardView];
[goodsCardView mas_makeConstraints:^(MASConstraintMaker * _Nonnull make) {
make.bottom.equalTo(liveRoomVC.bottomCustomizedViewHolder.mas_top);
     make.left.equalTo(liveRoomVC.view).with.offset(14);
     make.height.mas_equalTo(80);
     make.width.mas_equalTo(260);
}];

//第二步,把直播弹幕 liveCommentView往上移动,宽、高、左边沿坐标保持不变,如下
[self.liveRoomVC.liveCommentView mas_remakeConstraints:^(MASConstraintMaker * _Nonnull make) {
   make.left.equalTo(self.liveRoomVC.view).with.offset(liveRoomVC.liveCommentView.frame.origin.x);
   make.bottom.equalTo(goodsCardView.mas_top);
   make.height.mas_equalTo(liveRoomVC.liveCommentView.bounds.size.height);
   make.width.mas_equalTo(liveRoomVC.liveCommentView.bounds.size.width);
}];
效果如下图所示
 四、如何在底部自定义区域自定义输入框后响应键盘的弹出和收起?
//首先,需要监听系统键盘弹出和收起的事件
[[NSNotificationCenter defaultCenter] addObserver:self selector:@selector(keyBoardWillShow:) name:UIKeyboardWillShowNotification object:nil];
[[NSNotificationCenter defaultCenter] addObserver:self selector:@selector(keyBoardWillHide:) name:UIKeyboardWillHideNotification object:nil];

//收到键盘弹出系统notification时,如下处理,commentInputField就是自定义的输入框
- (void)keyBoardWillShow:(NSNotification *) note {
    // 获取用户信息
    NSDictionary *userInfo = [NSDictionary dictionaryWithDictionary:note.userInfo];
    // 获取键盘高度
    CGFloat keyBoardHeight = [[userInfo objectForKey:UIKeyboardFrameEndUserInfoKey] CGRectValue].size.height;
    // 获取键盘动画时间
    CGFloat animationTime  = [[userInfo objectForKey:UIKeyboardAnimationDurationUserInfoKey] floatValue];

    // 定义好动作
    void (^animation)(void) = ^void(void) {
        if(self.commentInputField.isEditing){
            // 输入框进行简单的位移变换,往上移动
            self.commentInputField.transform = CGAffineTransformMakeTranslation(0, -keyBoardHeight);
            self.commentInputField.layer.cornerRadius = 2;
            self.commentInputField.backgroundColor = [UIColor colorWithWhite:1 alpha:0.3];

           //注意,使用remake
            [self.commentInputField mas_remakeConstraints:^(MASConstraintMaker *make) {
                make.left.equalTo(...); //重新调整输入框的左侧,通常是靠近屏幕左侧
                make.right.equalTo(...); //重新调整输入框的右侧侧,通常是靠近屏幕右侧侧
                make.bottom.equalTo(self).with.offset(-3); //重新调整输入框的底部边沿,这个-3就是比键盘高3个单位
                make.height.mas_equalTo(40); //重新调整输入框的高度
            }];
        }
    };

    if (animationTime > 0) {
        [UIView animateWithDuration:animationTime animations:animation];
    } else {
        animation();
    }
}

//收到键盘收起系统notification时,如下处理,commentInputField就是自定义的输入框
- (void)keyBoardWillHide:(NSNotification *) note {
    // 获取用户信息
    NSDictionary *userInfo = [NSDictionary dictionaryWithDictionary:note.userInfo];
    // 获取键盘动画时间
    CGFloat animationTime  = [[userInfo objectForKey:UIKeyboardAnimationDurationUserInfoKey] floatValue];

    // 定义好动作
    void (^animation)(void) = ^void(void) {
        // 输入框还原位移
        self.commentInputField.transform = CGAffineTransformIdentity;
        self.commentInputField.backgroundColor = [UIColor colorWithRed:0 green:0 blue:0 alpha:0.3];
        self.commentInputField.layer.cornerRadius = 20;
        //恢复输入框的原来位置
        [self.commentInputField mas_remakeConstraints:^(MASConstraintMaker *make) {
            make.bottom.equalTo(self).with.offset(-9);
            make.left.equalTo(self).with.offset(10);
            make.right.equalTo(self.shareButton.mas_left).with.offset(-50);
            make.height.mas_equalTo(40);
        }];
    };

    if (animationTime > 0) {
        [UIView animateWithDuration:animationTime animations:animation];
    } else {
        animation();
    }
}
反馈
- 本页导读 (1)
文档反馈