本文介绍如何将多码识别组件接入到 iOS 客户端。多码识别支持基于 mPaaS 框架接入、基于已有工程且使用 mPaaS 插件接入以及基于已有工程且使用 CocoaPods 接入三种接入方式。您可以参考 接入方式介绍,根据实际业务情况选择合适的接入方式。
前置条件
您已经根据您的接入方式,将扫一扫组件 SDK 添加至工程。更多信息,请参见以下内容:
添加 SDK
根据您采用的接入方式,请选择相应的添加方式。
使用 mPaaS Xcode Extension。此方式适用于采用了 基于 mPaaS 框架接入或 基于已有工程且使用 mPaaS 插件接入的接入方式。
单击 Xcode 菜单项 Editor> mPaaS> 编辑工程> 升级基线,切换工程到定制基线
cp_change_28238或基线 10.2.3.5 以上版本。说明如果 升级基线不可点,请确保工程配置文件已经导入,参考前置条件。
选择 扫码,保存后点击 开始编辑,即可完成添加。
使用 cocoapods-mPaaS 插件。此方式适用于采用了 基于已有工程且使用 CocoaPods 接入的接入方式。
在
Podfile文件中,修改 mPaaS_baseline 为
cp_change_28238或基线 10.2.3.5 以上版本。使用
mPaaS_pod "mPaaS_ScanCode"添加扫码组件依赖。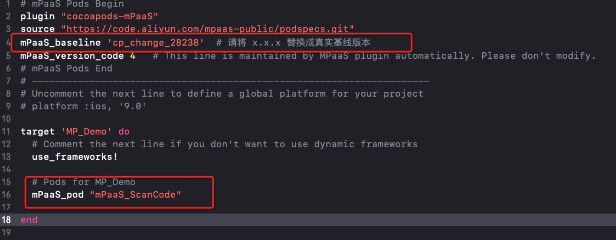
单击此处查看如何使用 CocoaPods,根据需要在命令行中执行
pod install或pod update即可完成接入。
使用 SDK
打开默认扫码页面
本文将结合 扫一扫 官方 Demo 介绍如何在定制基线 cp_change_28238 或 10.2.3.5 以上版本的基线中使用扫一扫多码识别默认 UI SDK。
唤起默认扫码页面并处理扫描结果。
 #import <TBScanSDK/TBScanSDK.h>

 @interface MPScanDemoVC()

 @property(nonatomic, strong) TBScanViewController *scanVC;

 @end

- (void)defaultScan {

   // 是否显示相册入口
   [MPScanCodeAdapterInterface sharedInstance].shoulShowAlbum = NO;

   TBScanViewController *vc = [[MPScanCodeAdapterInterface sharedInstance] createDefaultScanPageWithallback:^(id  _Nonnull result, BOOL keepAlive) {
       // 处理扫描结果
       UIAlertView *alert = [[UIAlertView alloc] initWithTitle:@"" message:result[@"resp_result"] delegate:self cancelButtonTitle:@"OK" otherButtonTitles:nil, nil];
        alert.tag = 1999;
        [alert show];
    }];

     // 设置扫码类型
     vc.scanType =  ScanType_Default_Code;

    [self.navigationController pushViewController:vc animated:YES];
    self.scanVC =  vc;
}
多码识别,持续扫码。
- (void)alertView:(UIAlertView *)alertView clickedButtonAtIndex:(NSInteger)buttonIndex {
    // 持续扫码
    [self.scanVC resumeCaptureSession];
}
自定义 UI 的使用方式
本文将结合 扫一扫 官方 Demo 介绍如何在自定义 UI 下使用扫一扫多码识别 SDK。
自定义继承 TBScanViewController 的 ViewController
#import <UIKit/UIKit.h>

NS_ASSUME_NONNULL_BEGIN

@interface MPScanCodeViewController : TBScanViewController<TBScanViewControllerDelegate>

@end

NS_ASSUME_NONNULL_END
初始化自定义扫码 ViewController
//自定义扫码入口
- (void)customScanAction
{
    MPScanCodeViewController *vc = [[MPScanCodeViewController alloc] initWithConfig:@{}];
    [self.navigationController pushViewController:vc animated:YES];
}
@implementation MPScanCodeViewController
- (instancetype)initWithConfig:(NSDictionary *)config
{
if (self = [super initWithConfig:config])
{
self.delegate = self;
self.scanType = ScanType_All_Code;
}
return self;
}初始化自定义扫码的 ViewController 只能使用 -(instancetype)initWithConfig:(NSDictionary *)config; 方式。
自定义扫码框
- (void)buildContainerView:(UIView*)containerView
{
    // 自定义扫码框 view
    UIView* bg = [[UIView alloc] initWithFrame:containerView.bounds];
    [containerView addSubview:bg];
    CGRect rect = [MPScanCodeViewController constructScanAnimationRect];
    UIView* view = [[UIView alloc] initWithFrame:rect];
    view.backgroundColor = [UIColor orangeColor];
    view.alpha = 0.5;
    [bg addSubview:view];
}
处理扫码结果
用户根据自己业务场景进行处理。
#pragma mark TBScanViewControllerDelegate

-(void)didFind:(NSArray<TBScanResult*>*)resultArray
{
    TBScanResult *result = resultArray.firstObject;
    NSString* content = result.data;
    if (result.resultType == TBScanResultTypeQRCode) {
        content = [NSString stringWithFormat:@"qrcode:%@, hiddenData:%@, TBScanQRCodeResultType:%@", result.data, result.hiddenData, [result.extData objectForKey:TBScanResultTypeQRCode]];
        NSLog(@"subType is %@, ScanType_QRCode is %@", @(result.subType), @(ScanType_QRCode));
    } else if (result.resultType == TBScanResultTypeVLGen3Code) {
        content = [NSString stringWithFormat:@"gen3:%@", result.data];
        NSLog(@"subType is %@, ScanType_GEN3 is %@", @(result.subType), @(ScanType_GEN3));
    } else if (result.resultType == TBScanResultTypeGoodsBarcode) {
        content = [NSString stringWithFormat:@"barcode:%@", result.data];
        NSLog(@"subType is %@, EAN13 is %@", @(result.subType), @(EAN13));
    } else if (result.resultType == TBScanResultTypeDataMatrixCode) {
        content = [NSString stringWithFormat:@"dm:%@", result.data];
        NSLog(@"subType is %@, ScanType_DATAMATRIX is %@", @(result.subType), @(ScanType_DATAMATRIX));
    } else if (result.resultType == TBScanResultTypeExpressCode) {
        content = [NSString stringWithFormat:@"express:%@", result.data];
        NSLog(@"subType is %@, ScanType_FASTMAIL is %@", @(result.subType), @(ScanType_FASTMAIL));
    }
    dispatch_async(dispatch_get_main_queue(), ^{
        UIAlertView *alert = [[UIAlertView alloc] initWithTitle:@"" message:content delegate:self cancelButtonTitle:@"OK" otherButtonTitles:nil, nil];
        alert.tag = 9999;
        [alert show];
    });
}- 本页导读 (0)