ExternalDNS为Kubernetes的入口和服务配置外部DNS服务器,帮您使用公共DNS服务器来发现Kubernetes资源。ExternalDNS是从Kubernetes API中检索资源列表(如Service、Ingress等资源),以确定所需的DNS记录信息。本文介绍如何在ACK集群中部署和使用ExternalDNS服务,并通过示例验证其功能特性。
步骤一:配置RAM权限
对ACK集群的Worker RAM角色授予对应的RAM权限,操作步骤如下:
登录容器服务管理控制台,在左侧导航栏选择集群列表。
在集群列表页面,单击目标集群名称,然后在左侧导航栏,选择集群信息。
在集群信息页面的基本信息页签下,单击Worker RAM角色右侧的链接,前往RAM控制台创建权限策略。
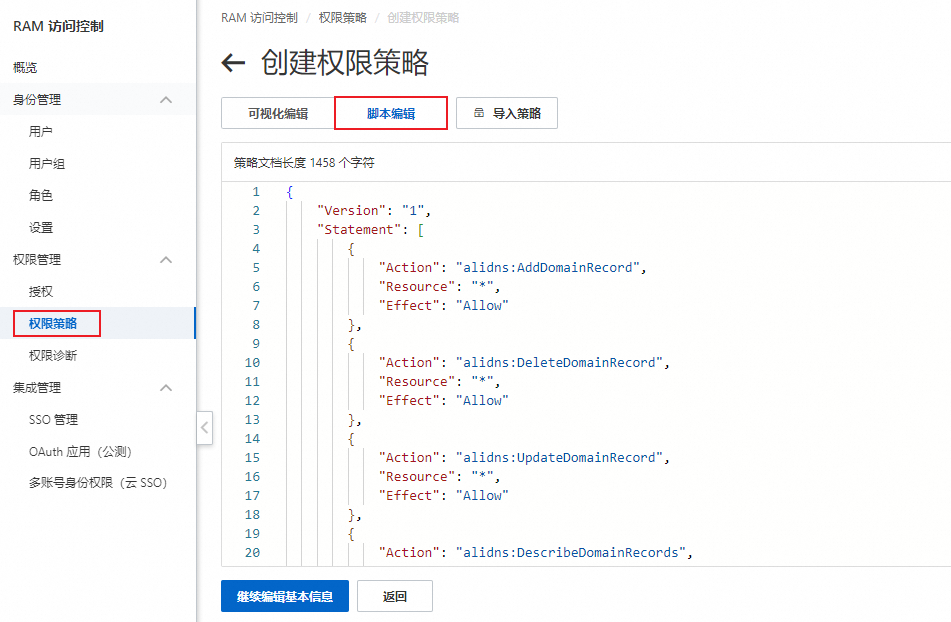
在左侧导航栏,单击权限策略。然后在权限策略页面单击创建权限策略。

在创建权限策略页面,单击脚本编辑页签,将如下自定义授权策略的内容拷贝到编辑框中。
单击确定,输入策略名称后单击确定即可创建自定义策略。
在左侧导航栏单击角色,然后单击目标Worker RAM角色操作列下的新增授权,然后单击所有策略类型下拉框中的自定义策略,选中已创建好的自定义策略,然后单击确认新增授权。
步骤二:部署ExternalDNS服务
在集群列表页面,单击目标集群名称,然后在左侧导航栏,选择。
在Helm页面,单击创建。参考如下信息完成基本信息配置。
参数
示例值
应用名
external-dns
命名空间
kube-system
来源
默认为应用市场
Chart
应用场景:选择全部。
支持架构:选择amd64。
搜索框:搜索external-dns。
选中external-dns,单击下一步。
在参数配置页面,选择Chart 版本,并根据实际需求选择合适的
alibabaCloudZoneType以及policy。然后单击确定。alibabaCloudZoneType:external-dns使用的DNS服务。默认为public。public:使用阿里云公共DNS服务。private:使用阿里云PrivateZone服务。
policy:集群内Service同步到PrivateZone的DNS记录的策略。upsert-only:同步写入或更新,不同步删除。sync:同步写入、更新、删除。
# public or private
alibabaCloudZoneType: public

# upsert-only or sync
# upsert-only would prevent ExternalDNS from deleting any records, omit to enable full synchronization
# sync would delete records once target service or ingress are released
policy: upsert-only
步骤三:使用ExternalDNS服务
ExternalDNS只支持LoadBalancer类型的Service和Ingress配置使用。
为Service配置阿里云公共DNS服务
登录云解析DNS控制台,获取公共域名信息。
说明确保域名符合规范且完成实名认证。
根据已有经过实名认证的域名,创建测试应用。
apiVersion: v1 kind: Service metadata: name: nginx annotations: external-dns.alpha.kubernetes.io/hostname: nginx.<公共域名> # <公共域名>是您经过实名认证的域名。 spec: type: LoadBalancer ports: - port: 80 name: http targetPort: 80 selector: app: nginx --- apiVersion: apps/v1 kind: Deployment metadata: labels: app: nginx name: nginx spec: replicas: 1 selector: matchLabels: app: nginx template: metadata: labels: app: nginx spec: containers: - image: nginx name: nginx说明其中
external-dns.alpha.kubernetes.io/hostname用来配置需挂载的DNS名称,ExternalDNS会自动创建IP对应的DNS记录。测试应用创建完成后,稍等片刻即可在云解析DNS控制台看到自动添加的DNS记录。
测试DNS解析结果。
curl nginx.****.com预期输出:
<!DOCTYPE html>
<html>
<head>
<title>Welcome to nginx!</title>
<style>
html { color-scheme: light dark; }
body { width: 35em; margin: 0 auto;
font-family: Tahoma, Verdana, Arial, sans-serif; }
</style>
</head>
<body>
<h1>Welcome to nginx!</h1>
<p>If you see this page, the nginx web server is successfully installed and
working. Further configuration is required.</p>

<p>For online documentation and support please refer to
<a href="http://nginx.org/">nginx.org</a>.<br/>
Commercial support is available at
<a href="http://nginx.com/">nginx.com</a>.</p>

<p><em>Thank you for using nginx.</em></p>
</body>
</html>
为Ingress配置阿里云公共DNS服务
登录云解析DNS控制台,获取公共域名信息。
说明确保域名符合规范且完成实名认证。
根据已有经过实名认证的域名,创建测试应用。
apiVersion: v1 kind: Service metadata: name: nginx spec: type: LoadBalancer ports: - port: 80 name: http targetPort: 80 selector: app: nginx --- apiVersion: apps/v1 kind: Deployment metadata: labels: app: nginx name: nginx spec: replicas: 1 selector: matchLabels: app: nginx template: metadata: labels: app: nginx spec: containers: - image: nginx name: nginx --- apiVersion: networking.k8s.io/v1 kind: Ingress metadata: name: nginx spec: ingressClassName: nginx rules: - host: nginx-ing.<公共域名> # <公共域名>是您经过实名认证的域名。 http: paths: - backend: service: name: nginx port: number: 80 path: / pathType: ImplementationSpecific说明其中
host用来配置需挂载的DNS名称,ExternalDNS会自动创建IP对应的DNS记录。测试应用创建完成后,稍等片刻即可在云解析DNS控制台看到自动添加的DNS记录。
使用以下命令,测试DNS解析结果。
curl nginx-ing.****.com预期输出:
<!DOCTYPE html>
<html>
<head>
<title>Welcome to nginx!</title>
<style>
html { color-scheme: light dark; }
body { width: 35em; margin: 0 auto;
font-family: Tahoma, Verdana, Arial, sans-serif; }
</style>
</head>
<body>
<h1>Welcome to nginx!</h1>
<p>If you see this page, the nginx web server is successfully installed and
working. Further configuration is required.</p>

<p>For online documentation and support please refer to
<a href="http://nginx.org/">nginx.org</a>.<br/>
Commercial support is available at
<a href="http://nginx.com/">nginx.com</a>.</p>

<p><em>Thank you for using nginx.</em></p>
</body>
</html>
为Service配置阿里云PrivateZone服务
如果使用阿里云DNS提供PrivateZone功能,需确保4中alibabaCloudZoneType值为private,且PrivateZone对应的私有域名已关联VPC,操作步骤如下:
登录云解析DNS控制台。
在左侧导航栏单击内网域名解析,然后在内网域名解析 (PrivateZone和自建DNS),单击添加域名(Zone),然后在添加内置权威域名 (Zone)侧边栏中,输入内置权威域名 (Zone),并单击确定。
找到目标Zone,单击其操作列下的解析记录,手动添加一条记录,有解析记录后才能关联VPC。

关于PrivateZone解析记录支持的记录类型及使用说明,请参见PrivateZone解析记录支持的记录类型。
在添加完解析记录后,单击其操作列下的生效范围设置,在生效于阿里云VPC内网下拉框选择目标集群对应的VPC信息后,再单击确定进行关联。
验证域名解析。
在目标集群创建测试应用。
apiVersion: v1 kind: Service metadata: name: nginx annotations: external-dns.alpha.kubernetes.io/hostname: nginx.<Zone名称> #<Zone名称>是您在PrivateZone页面添加的Zone名称。 service.beta.kubernetes.io/alibaba-cloud-loadbalancer-address-type: "intranet" # 私网类型的负载均衡。 spec: type: LoadBalancer ports: - port: 80 name: http targetPort: 80 selector: app: nginx --- apiVersion: apps/v1 kind: Deployment metadata: labels: app: nginx name: nginx spec: replicas: 1 selector: matchLabels: app: nginx template: metadata: labels: app: nginx spec: containers: - image: registry.cn-hangzhou.aliyuncs.com/acs-sample/nginx:latest name: nginx说明其中
external-dns.alpha.kubernetes.io/hostname为PrivateZone的域名,ExternalDNS会自动创建IP对应的DNS记录。测试应用创建完成后,稍等片刻即可在云解析DNS控制台看到自动添加的DNS记录。

测试DNS解析结果。
curl nginx.****预期输出:
<!DOCTYPE html>
<html>
<head>
<title>Welcome to nginx!</title>
<style>
html { color-scheme: light dark; }
body { width: 35em; margin: 0 auto;
font-family: Tahoma, Verdana, Arial, sans-serif; }
</style>
</head>
<body>
<h1>Welcome to nginx!</h1>
<p>If you see this page, the nginx web server is successfully installed and
working. Further configuration is required.</p>

<p>For online documentation and support please refer to
<a href="http://nginx.org/">nginx.org</a>.<br/>
Commercial support is available at
<a href="http://nginx.com/">nginx.com</a>.</p>

<p><em>Thank you for using nginx.</em></p>
</body>
</html>
为Ingress配置阿里云PrivateZone服务
登录云解析DNS控制台。
在左侧导航栏单击内网域名解析,然后在内网域名解析 (PrivateZone和自建DNS),单击添加域名(Zone),然后在添加内置权威域名 (Zone)侧边栏中,输入内置权威域名 (Zone),并单击确定。
找到目标Zone,单击其操作列下的解析记录,手动添加一条记录,有解析记录后才能关联VPC。

关于PrivateZone解析记录支持的记录类型及使用说明,请参见PrivateZone解析记录支持的记录类型。
在添加完解析记录后,单击其操作列下的生效范围设置,在生效于阿里云VPC内网下拉框选择目标集群对应的VPC信息后,再单击确定进行关联。
验证域名解析。
在目标集群创建测试应用。
apiVersion: v1 kind: Service metadata: name: nginx annotations: service.beta.kubernetes.io/alibaba-cloud-loadbalancer-address-type: "intranet" #私网类型的负载均衡。 spec: type: LoadBalancer ports: - port: 80 name: http targetPort: 80 selector: app: nginx --- apiVersion: apps/v1 kind: Deployment metadata: labels: app: nginx name: nginx spec: replicas: 1 selector: matchLabels: app: nginx template: metadata: labels: app: nginx spec: containers: - image: registry.cn-hangzhou.aliyuncs.com/acs-sample/nginx:latest name: nginx --- apiVersion: networking.k8s.io/v1 kind: Ingress metadata: name: nginx spec: ingressClassName: nginx rules: - host: nginx-ing.<Zone名称> # <Zone名称>是您在PrivateZone页面添加的Zone名称。 http: paths: - backend: service: name: nginx port: number: 80 path: / pathType: ImplementationSpecific测试应用创建完成后,稍等片刻即可在云解析DNS控制台看到自动添加的DNS记录。

测试DNS解析结果。
curl nginx-ing.****预期输出:
<!DOCTYPE html>
<html>
<head>
<title>Welcome to nginx!</title>
<style>
html { color-scheme: light dark; }
body { width: 35em; margin: 0 auto;
font-family: Tahoma, Verdana, Arial, sans-serif; }
</style>
</head>
<body>
<h1>Welcome to nginx!</h1>
<p>If you see this page, the nginx web server is successfully installed and
working. Further configuration is required.</p>

<p>For online documentation and support please refer to
<a href="http://nginx.org/">nginx.org</a>.<br/>
Commercial support is available at
<a href="http://nginx.com/">nginx.com</a>.</p>

<p><em>Thank you for using nginx.</em></p>
</body>
</html>
