Mount statically provisioned NAS volumes
Mount statically provisioned NAS volumes to applications in ACS clusters to enable shared, persistent storage across multiple pods. This topic shows you how to create a PersistentVolumeClaim (PVC) backed by a File Storage NAS file system and deploy an application that verifies both data sharing and data persistence.
Limitations
NAS is a distributed file system service that features shared access, scalability, high reliability, and high performance. NAS is suitable for scenarios where data sharing and high IOPS are required. For more information, see Storage overview.
SMB not supported: Only the NFS protocol is supported. NAS file systems using the Server Message Block (SMB) protocol cannot be mounted.
Same virtual private cloud (VPC) required: All pods sharing a NAS file system must be in the same VPC. Cross-VPC mounting is not supported.
NFSv3 only: Only NFSv3 can be used to mount a NAS file system.
Usage notes
Data synchronization: NAS is a shared storage service. When multiple pods write to the same NAS file system concurrently, your application must handle data synchronization to avoid conflicts.
Avoid `securityContext.fsgroup`: Do not add
securityContext.fsgroupto your application's YAML. NAS enforces its own permission model on the file system. Whenfsgroupis set, Kubernetes recursively changes directory ownership at pod startup — this conflicts with NAS permission enforcement and causes the mount to fail.You cannot grant permissions to the root directory (
/) of a NAS file system. The user account and user group of the directory cannot be modified.Do not delete the mount target: After mounting a NAS file system, deleting its mount target can cause an operating system hang on the affected nodes.
Prerequisites
Before you begin, ensure that you have:
An ACS cluster with at least one running node
A NAS file system and a mount target in the same VPC and vSwitch as your cluster pods — if you don't have these, complete the next section first
Create a NAS file system and mount target
Skip this section if a NAS file system and a mount target in the same VPC and vSwitch as your pods already exist.
Get the VPC ID and vSwitch ID used by your pods.
kubectl get cm -n kube-system eci-profile -o yamlThe
vpcIdandvSwitchIdsfields contain the values you need.Log on to the NAS console and create a file system.
On the File System List page, click Create File System, then select Create General-purpose NAS File System or Create Extreme NAS File System.
Important: General-purpose and Extreme NAS file systems differ in mounting connectivity, the number of file systems, and supported protocols. For details, see General-purpose NAS file systems and Extreme NAS file systems.
Configure the file system parameters and click Buy Now. This example uses a General-purpose NAS file system. Set the following parameters to ensure the file system is accessible from your pods:
Parameter Value Region The region where your ACS cluster resides Zone The zone matching your pod's vSwitch (obtained in step 1) ProtocolType NFS — SMB is not supported VPC and VswitchId The VPC and vSwitch used by your pods (obtained in step 1) For all parameters, see Create a file system.
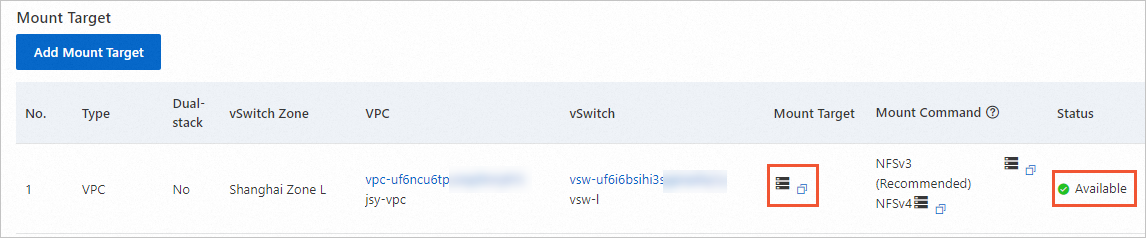
Verify the mount target is available.
On the File System List page, click the file system ID.
In the left navigation pane, click Mount Targets.
Confirm that a mount target in the Available state exists and copy its domain name.
The system automatically creates a mount target for General-purpose NAS file systems. For Extreme NAS file systems, create a mount target manually. For details, see Manage mount targets.
Mount a statically provisioned NAS volume
Step 1: Create a PVC
The PVC uses Alibaba Cloud-specific CSI annotations to reference the NAS mount target and pass mount options directly — no separate PersistentVolume (PV) manifest is required.
Create a file named
nas-pvc.yamlwith the following content:Annotation / field Required Description csi.alibabacloud.com/mountpointYes The NAS directory to mount. Set to the mount target domain name to mount the root directory ( /), or append a subdirectory path (e.g.,**-**.cn-hangzhou.nas.aliyuncs.com:/mydir) to mount a specific subdirectory. The subdirectory is created automatically if it does not exist.csi.alibabacloud.com/mount-optionsNo Mount options passed to the NFS client. The recommended value is nolock,tcp,noresvport:nolockavoids NFS lock conflicts across pods;tcpuses TCP for reliable transfers;noresvportimproves reconnection stability.accessModesYes Set to ReadWriteManyto allow multiple pods to read from and write to the volume simultaneously.storageYes The storage capacity requested for the PVC. This value also determines the NAS volume size. kind: PersistentVolumeClaim apiVersion: v1 metadata: name: nas-pvc annotations: csi.alibabacloud.com/mountpoint: *******-mw***.cn-shanghai.nas.aliyuncs.com csi.alibabacloud.com/mount-options: nolock,tcp,noresvport spec: accessModes: - ReadWriteMany resources: requests: storage: 20Gi storageClassName: alibaba-cloud-nasReplace
csi.alibabacloud.com/mountpointwith the domain name of your NAS mount target.Create the PVC.
kubectl create -f nas-pvc.yamlVerify the PVC and its auto-created PV.
kubectl get pvExpected output — a PV is automatically created and bound to the PVC:
NAME                                       CAPACITY   ACCESS MODES   RECLAIM POLICY   STATUS   CLAIM             STORAGECLASS        REASON   AGE
nas-ea7a0b6a-bec2-4e56-b767-47222d3a****   20Gi       RWX            Retain           Bound    default/nas-pvc   alibaba-cloud-nas            1m58s
kubectl get pvcExpected output — the PVC is in
Boundstatus:NAME STATUS VOLUME CAPACITY ACCESS MODES STORAGECLASS VOLUMEATTRIBUTESCLASS AGE nas-pvc Bound nas-ea7a0b6a-bec2-4e56-b767-47222d3a**** 20Gi RWX alibaba-cloud-nas <unset> 2m14s
Step 2: Deploy an application with the NAS volume mounted
Create a file named
nas-test.yamlwith the following content. This Deployment creates two nginx pods, each with the NAS volume mounted at/data.apiVersion: apps/v1 kind: Deployment metadata: name: nas-test labels: app: nginx spec: replicas: 2 selector: matchLabels: app: nginx template: metadata: labels: app: nginx alibabacloud.com/compute-class: general-purpose alibabacloud.com/compute-qos: default alibabacloud.com/acs: "true" spec: containers: - name: nginx image: mirrors-ssl.aliyuncs.com/nginx:stable-alpine ports: - containerPort: 80 volumeMounts: - name: pvc-nas mountPath: /data volumes: - name: pvc-nas persistentVolumeClaim: claimName: nas-pvcCreate the Deployment.
kubectl create -f nas-test.yamlConfirm the pods are running.
kubectl get pod | grep nas-testExpected output:
nas-test-****-***a   1/1     Running   0          40s
nas-test-****-***b   1/1     Running   0          40s
Check the mount path contents.
kubectl exec nas-test-****-***a -- ls /dataThe command returns the contents of the NAS mount directory. No output is expected at this point — the directory is empty by default.
Verify data sharing and persistence
With the Deployment running two pods sharing a NAS file system, perform the following tests to confirm the mount is working correctly.
Verify data sharing
Data sharing means a file written by one pod is immediately visible to another pod accessing the same NAS volume.
Create a file in one pod.
kubectl exec nas-test-****-***a -- touch /data/test.txtRead the file from the other pod.
kubectl exec nas-test-****-***b -- ls /dataExpected output — the file created in the first pod is visible from the second:
test.txt
Verify data persistence
Data persistence means the data in a NAS volume survives pod restarts and Deployment rollouts.
Restart the Deployment.
kubectl rollout restart deploy nas-testAfter the rollout completes, confirm the new pods are running.
kubectl get pod | grep nas-testExpected output:
nas-test-****-***c   1/1     Running   0          67s
nas-test-****-***d   1/1     Running   0          49s
Check that the file still exists in the recreated pod.
kubectl exec nas-test-****-***c -- ls /dataExpected output — the file persists across the Deployment rollout:
test.txt