Configure and implement data masking
Data Security Center (DSC) supports static and dynamic data masking to help you mask sensitive data in databases. This topic describes how to implement static and dynamic data masking.
Data masking methods
Static data masking
You can create a data masking task to mask, encrypt, or replace sensitive data using masking algorithms. The masked data is then saved to a specified destination.

Dynamic data masking
Dynamic data masking is more flexible than static data masking because you can call the ExecDatamask API to directly mask specified data. The size of the data that you can mask in a single call must be less than 2 MB.

Billing
If the cloud service that hosts the data you want to mask uses the pay-as-you-go billing method, you are charged for the amount of data that the service reads or writes.
Prerequisites
DSC must be authorized to access the data asset that contains the data you want to mask. For more information, see Asset Authorization.
If you want to store masked data in the tables of ApsaraDB RDS, PolarDB for Xscale (PolarDB-X), MaxCompute, PolarDB, ApsaraDB for OceanBase, or AnalyticDB for MySQL, in the tables of self-managed databases, or in Object Storage Service (OSS) buckets, DSC must be authorized to access the destination data asset and connect to it using an account that has read and write permissions. For more information, see General Database Authorization, MaxCompute Authorization, and ECS-hosted Self-managed Database Authorization.
Static data masking
Create a data masking task
If you mask data directly in a production environment, your database performance may be affected.
You can create a data masking task to specify the scope and rules for data masking.
Log on to the Data Security Center console.
In the navigation pane on the left, click Data Desensitization.
On the Static Data Masking page, on the Task Configuration tab, click Add Masking Task.
Follow the instructions in the wizard to configure the data masking task.
Configure Basic Task Information, and click Next.
NoteYou can specify any name for the task.
Configure the source file information for data masking, and click Next.
RDS Tables/PolarDB-X Tables/MaxCompute Tables/PolarDB Tables/OceanBase Tables/ADB-MySQL Tables/Self-managed Database Tables
Data masking source configuration item
Required
Configuration description
Types of data storage
Yes
Set the data storage type for the data masking file to RDS Tables/PolarDB-X Tables/MaxCompute Tables/PolarDB Tables/OceanBase Tables/ADB-MySQL Tables/Self-managed Database Tables.
Source Product
Yes
The service that provides the source table for data masking. Valid values: RDS, PolarDB-X, OceanBase, MaxCompute, ADB-MySQL, PolarDB, or Self-managed Database.
Source Database/Project Name
Yes
Select the project that holds the table with the desensitized data.
Source table name
Yes
Select the name of the table that contains the data to mask.
Source partition
No
You can configure Source Partition only when Source Product is set to MaxCompute.
Enter the name of the partition that contains the data to mask. Leave this parameter empty to mask all sensitive data in the table.
You can specify partitions when you create a MaxCompute table. Partitions define different logical divisions of a table. When you query data, you can specify partitions to improve query efficiency. For more information, see Partition.
Sample SQL
No
When Source Product is set to RDS, PolarDB-X, OceanBase, or Self-managed Database, you can configure Sampling SQL.
Enter an SQL statement to specify the scope of the data to mask. If you leave this parameter empty, the service masks all data in the source table.
OSS files
ImportantOnly structured files in TXT, CSV, XLSX, and XLS formats can be masked.
Data masking source configuration item
Required
Configuration description
Types of data storage
Yes
Set the data storage type for the masking file to OSS files.
File source
Yes
The source of the OSS file. Valid values are Local Upload and OSS Bucket.
Upload files
Yes
If you set File Source to Local Upload, click Select A Local File to upload the file that you want to desensitize.
Source OSS Bucket
Yes
If you set File source to OSS Bucket, select the OSS Bucket that contains the source file from the drop-down list. You can also enter a keyword to search for and select the OSS Bucket.
Source file names
Yes
If File source is OSS Bucket, enter the name of the source file. The file name must include a file extension.
Single file masking: Enter the name of the source file. For example, test.csv.
Batch file masking: Enable the wildcard feature by clicking the Enable Wildcard switch. The system uses the same rule to mask all specified files. The files must have the same format and column structure.
Use an asterisk (*) to specify a batch of source files for masking. This feature supports prefix matching only. For example, test*.xls matches all XLS files that start with test.
Source file description
No
If you set File Source to Uploaded Local File, you can enter a description for the OSS source file.
Separator selection
No
A column delimiter is required for CSV and TXT files. Select the delimiter that is used in the source file. Valid values:
Semicolon ";" (macOS/Linux Default).
Comma "," (Windows Default).
Operator '|'.
Table contains header rows
No
Select whether the source file has a header row.
Select one of the following methods to configure the masking algorithm, and then click Next.
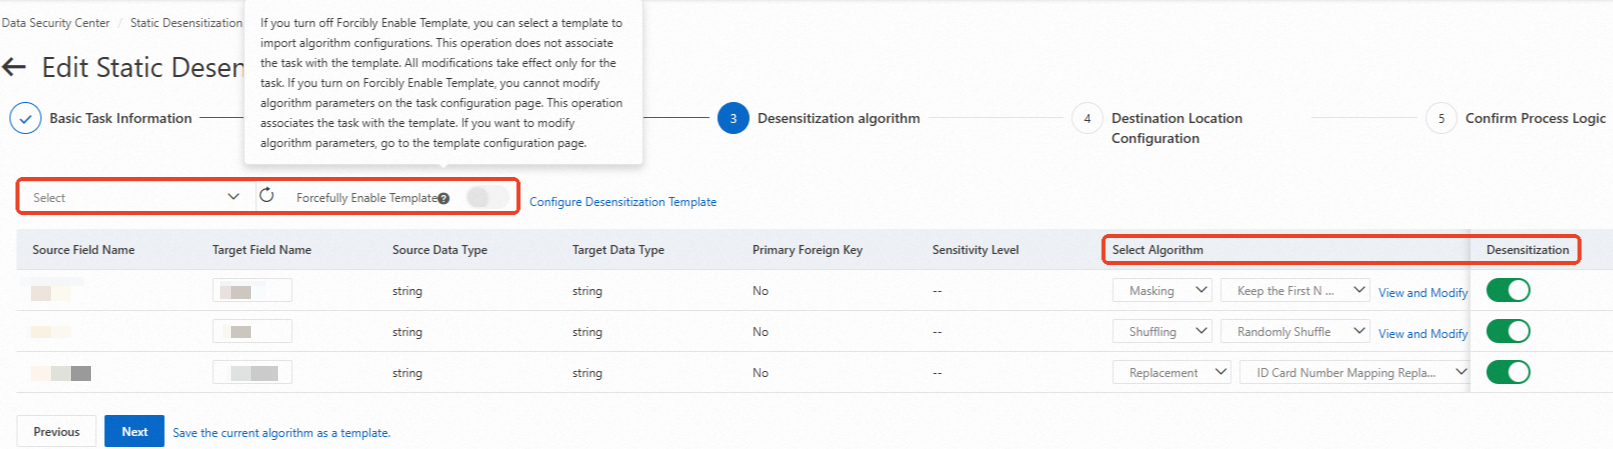
Select a configured data masking template above the data list. Based on the template configuration, the Data Masking switch is automatically enabled and the Algorithm Selection is configured for the corresponding fields in the source field list.
The settings in the rule list of the data masking template must match the source fields that you want to mask. Otherwise, the data masking template does not take effect. For more information, see Configure data masking templates and algorithms.
In the source field list, locate the source field to mask, enable the Desensitization Switch, and set the Algorithm Selection.
Click View/Modify Parameters for the selected data masking algorithm to view and edit its rules. For the syntax of partitions in the algorithm rules, see the Partition Syntax Reference Table.
NoteIf Force Enable Template is enabled, you cannot modify algorithm parameters on the current page. You must modify the relevant template rule.
If the data source is an RDS instance, enable the data watermark switch, configure the watermark field, algorithm, and description, and then click Next.
After you embed a data watermark, you can extract it to trace the source of a data leak. For more information, see the Extract a watermark from data section in this topic.
For example, an employee needs to export order data. An administrator sets the watermark to "Exported specific data to the employee on YYYY-MM-DD" and adds it to the data during the export. If a data leak occurs, the administrator can retrieve the leaked data and extract the watermark to identify the employee as the source of the leak.
For more information about watermark limits, see Watermark limits.

Configure the destination to store the masked data and click Test. After the write permission test passes, click Next.
ImportantThe account that DSC uses to connect to the destination data asset must have write permission.

Confirm the processing logic.
Parameter
Required
Description
Trigger Method
Yes
The method used to run the data masking task. The following options are available:
Manual only: Run the data masking task manually.
Scheduled only: Run the data masking task automatically at a scheduled time. You can set the task to run at a fixed time hourly, daily, weekly, or monthly.
Manual + Scheduled: Run the data masking task manually by clicking Start. The task also runs automatically at a scheduled time. You can set the task to run at a fixed time hourly, daily, weekly, or monthly.
Enable Incremental Masking
No
Specifies whether to enable incremental masking. If you enable this feature, each task masks only the data added after the previous task was completed. You must select a field in the source data that increments over time to serve as the incremental column. Examples include a creation time field or an auto-increment ID.
ImportantIncremental masking is supported only for RDS databases.
Shard Field
No
When DSC performs static data masking, it divides the source data into shards based on specified fields. This allows for concurrent processing to improve masking efficiency. You can select one or more shard fields as needed.
Incremental masking is supported only for RDS databases. We recommend that you use a primary key or a unique index as the shard field.
If you do not select a shard field, DSC uses the primary key by default.
ImportantIf the source data does not have a primary key, you must specify a shard field. Otherwise, the data masking task fails.
Specifying too many shard fields can affect query performance and data accuracy. Use this option with caution.
Table Name Conflict Resolution
Yes
The method used to handle a table name conflict. Options:
Delete the target table and create a new table with the same name.
Append new data to the target table. We recommend that you select this option.
Row Conflict Resolution
Yes
The method used to handle a row conflict. Options:
Keep conflicting rows in the target table and discard the new data. We recommend that you select this option.
Delete conflicting rows in the target table and insert the new data.
Click Submit.
Run and view a data masking task
If you set the trigger method for the data masking task to Manual Only, you must manually run the task. If you set it to Scheduled Only, the task is automatically run at a specific point in time. If you set it to Manual + Scheduled, you can run the task manually or automatically.
On the Static Data Masking tab, click the Task Configurations tab. Find the data masking task that you created and click Start in the Actions column to run the task.

On the Static Data Masking tab, click the Task Status tab to view the progress and status of the data masking task.


Troubleshoot the errors that occur in a data masking task
If a data masking task fails, you can refer to the following table to troubleshoot the error.
Execution failure prompt | Cause |
The data masking task cannot be found. The task may have been deleted or closed. | The data masking task may have been deleted or disabled. A task is disabled if its switch in the Actions column is turned off. |
The scheduling settings for the scheduled task are invalid. | The specified daily running time is invalid. |
The source instance cannot be found. | The instance that contains the source table does not exist. |
The target instance for data masking cannot be found. | The destination instance may have been deleted, or the authorization for the instance may have been revoked. |
The source table cannot be found. | The source table may have been deleted, or the authorization for the source instance may have been revoked. |
The parameters for the masking algorithm are invalid. | The parameters for the algorithm were entered incorrectly. |
A column in the source table is empty. | The column for the source partition field contains no data. |
Failed to write data to the destination table. | The write operation failed due to invalid destination settings. |
Failed to query data from the source table. | The data was not found in the source table. |
Failed to create the destination table. | The destination table may not exist at the specified location. |
Primary key not found. | The RDS source table is missing a primary key. |
The MaxCompute partition field configured for the task is invalid. | The source partition in the source configuration or the destination partition in the destination configuration is invalid. |
Modify or delete a data masking task
You cannot modify or delete a data masking task that is pending execution or is running.
Modify a data masking task
To modify the settings of a data masking task, find the task and click Modify in the Actions column.
Delete a data masking task
ImportantAfter a data masking task is deleted, it cannot be restored. Proceed with caution.
To delete a data masking task, find the task and click Delete in the Actions column. In the dialog box that appears, click OK.
Extract a watermark from data
If a data leak occurs after a watermark is embedded in your data, DSC can extract the watermark from the leaked data. DSC reads the watermark to trace the data flow and identify the organization or user responsible for the data leak. The embedded watermark does not affect the use of the distributed data.
You can extract watermarks only from data in RDS.
The watermarking feature has the following characteristics:
Security: The watermark is not lost even if the data is modified. This ensures that the watermark can be accurately identified.
Transparency: The watermark embedded in the raw data is imperceptible and does not affect the use of the data.
Detectability: The watermark can be extracted from data fragments to trace the data source. The tracing success rate is high.
Robustness: The complete watermark information can be extracted even after a malicious attack.
Low error rate: Precisely designed rules for watermark extraction minimize the probability of errors in data tracing.
You can perform the following steps to extract a watermark:
On the Static Data Masking tab, click the Watermark Extraction tab.
On the Watermark Extraction tab, specify the data source information.
Parameter
Description
Source product
The product that contains the source file with the masked data. Currently, only RDS is supported.
Source database/project name
Required. The project that contains the source table with the watermark.
Source table name
Required. The source table that contains the watermark.
Click Extract watermark.
The extracted watermark appears in the text box below the Extract watermark button.
Click Copy results to copy the extracted watermark information.
Dynamic data masking
You can call the ExecDatamask operation to implement dynamic data masking. When you call this operation, you must specify the ID of a data masking template. You can obtain the template ID from the Masking Configurations tab of the Data Desensitization page in the Data Security Center (DSC) console. Alternatively, you can create a new data masking template and use its ID. For more information, see Configure a data masking template.

Limits
When you call the ExecDatamask operation to dynamically mask data, the value of the Data request parameter must be less than 2 MB.
View call records for the dynamic data masking API
Log on to the Data Security Center console.
In the navigation pane on the left, click Data Desensitization.
On the Data Desensitization page, click the Dynamic Desensitization tab.
On the Dynamic Desensitization page, view the call records of the ExecDatamask operation.
NoteIf you use the same account and IP address to call the operation multiple times, only one record is retained, and the number of calls is recorded in the Cumulative Number Of Calls field.