Manage policy sets
A policy set is a logical collection of policies. After you bind a policy set to an AI Gateway, the gateway intercepts and evaluates every request that passes through it. This topic describes how to manage policy sets in the Alibaba Cloud Agent Identity console. The operations include creating a policy set, adding policies, binding a gateway, monitoring policy enforcement, unbinding a gateway, and deleting a policy set.
Policy set overview
A policy set provides the following core functions:
Organize policies: Group related policies together, for example the policies that manage access to a specific MCP service, so that you can manage and maintain them in one place.
Enforce access control: After a policy set is associated with an AI Gateway, all agent invocation requests that pass through the gateway are intercepted and evaluated by the policies in the policy set, and an Allow or Deny decision is returned.
A policy set has the following key attributes:
Name: Specified when the policy set is created. The name is globally unique and cannot be changed. Use a naming convention that clearly reflects the business purpose, for example
app-prod-permissions.Policy set ARN: The globally unique resource identifier of the policy set, in the format
acs:agentidentity:{region}:{account_id}:policyset/{policy_set_name}.Associated gateways: The AI Gateways associated with the policy set. A policy set can be bound to multiple AI Gateways, but an AI Gateway can be bound to only one policy set at a time.
The typical workflow is as follows: create a policy set, add policies to the policy set, bind the policy set to an AI Gateway in observe mode, verify the policy evaluation results in the AI Gateway logs, and then switch to enforce mode.
Prerequisites
Before you start, take note of the following items:
Permissions — (Recommended) Attach the
AliyunAgentIdentityFullAccess(manage policy sets) andAliyunAPIGFullAccess(bind, unbind, and query AI Gateways) system policies to the RAM user or RAM role that you use.AI Gateway — The gateway that you bind must be the same as the gateway that you specify in the policy resource configuration.
Quotas — The number of policy sets that you can create is limited, and the number of policies that a policy set can contain is limited. For more information, see Limits.
Allow policies — A policy set must contain at least one policy whose effect is Allow. Otherwise, all requests are denied.
Create a policy set
Create a policy set so that you can add specific policies to it later.
Log on to the AgentIdentity console.
In the left-side navigation pane, choose Permissions > Policy Sets.
Click Create Policy Set.
On the Create Policy Set page, enter the policy set name and a description (optional), and then click Create Policy Set.
The policy set appears in the policy set list.NoteThe policy set name cannot be changed after the policy set is created.
Add a policy to a policy set
After you create a policy set, add specific policy rules to it to define the access control logic.
In the policy set list, find the target policy set and click its name.
On the policy set details page, click Edit Policy Content on the Policy Content tab.
If the policy set contains no policies, the editor automatically adds a policy and prefills the policy name. Otherwise, click Add Policy.
On the policy editing page, configure the following settings:
Policy Name: Prefilled in the format
Policy_{xxxxx}by default.Description (optional): The description of the policy.
Policy Statement: The policy statement settings are described in the following table.
Configuration item Options Description Effect Allow / Deny The authorization effect of the policy, which determines whether matching requests are allowed or denied. Principal All Principals, Specified Principal, Workload Identity, OAuth User, Custom User The subjects to which the policy applies. For details, see Principal options. Resource Specified Gateway Resource The target AI Gateway resource that the policy controls. After you specify and bind a gateway, all requests that pass through the gateway are intercepted for authorization evaluation. Action All Actions, Specified Actions The specific MCP service tools that the policy allows or denies. For details, see Action options. Condition Specified Condition (optional) The additional conditions under which the policy takes effect, configured as key-value pairs. A single policy supports multiple conditions, and the conditions are in a logical AND relationship. To use an inverse exclusion condition (
unless), switch to the script editor. For more information aboutunless, see Policy description.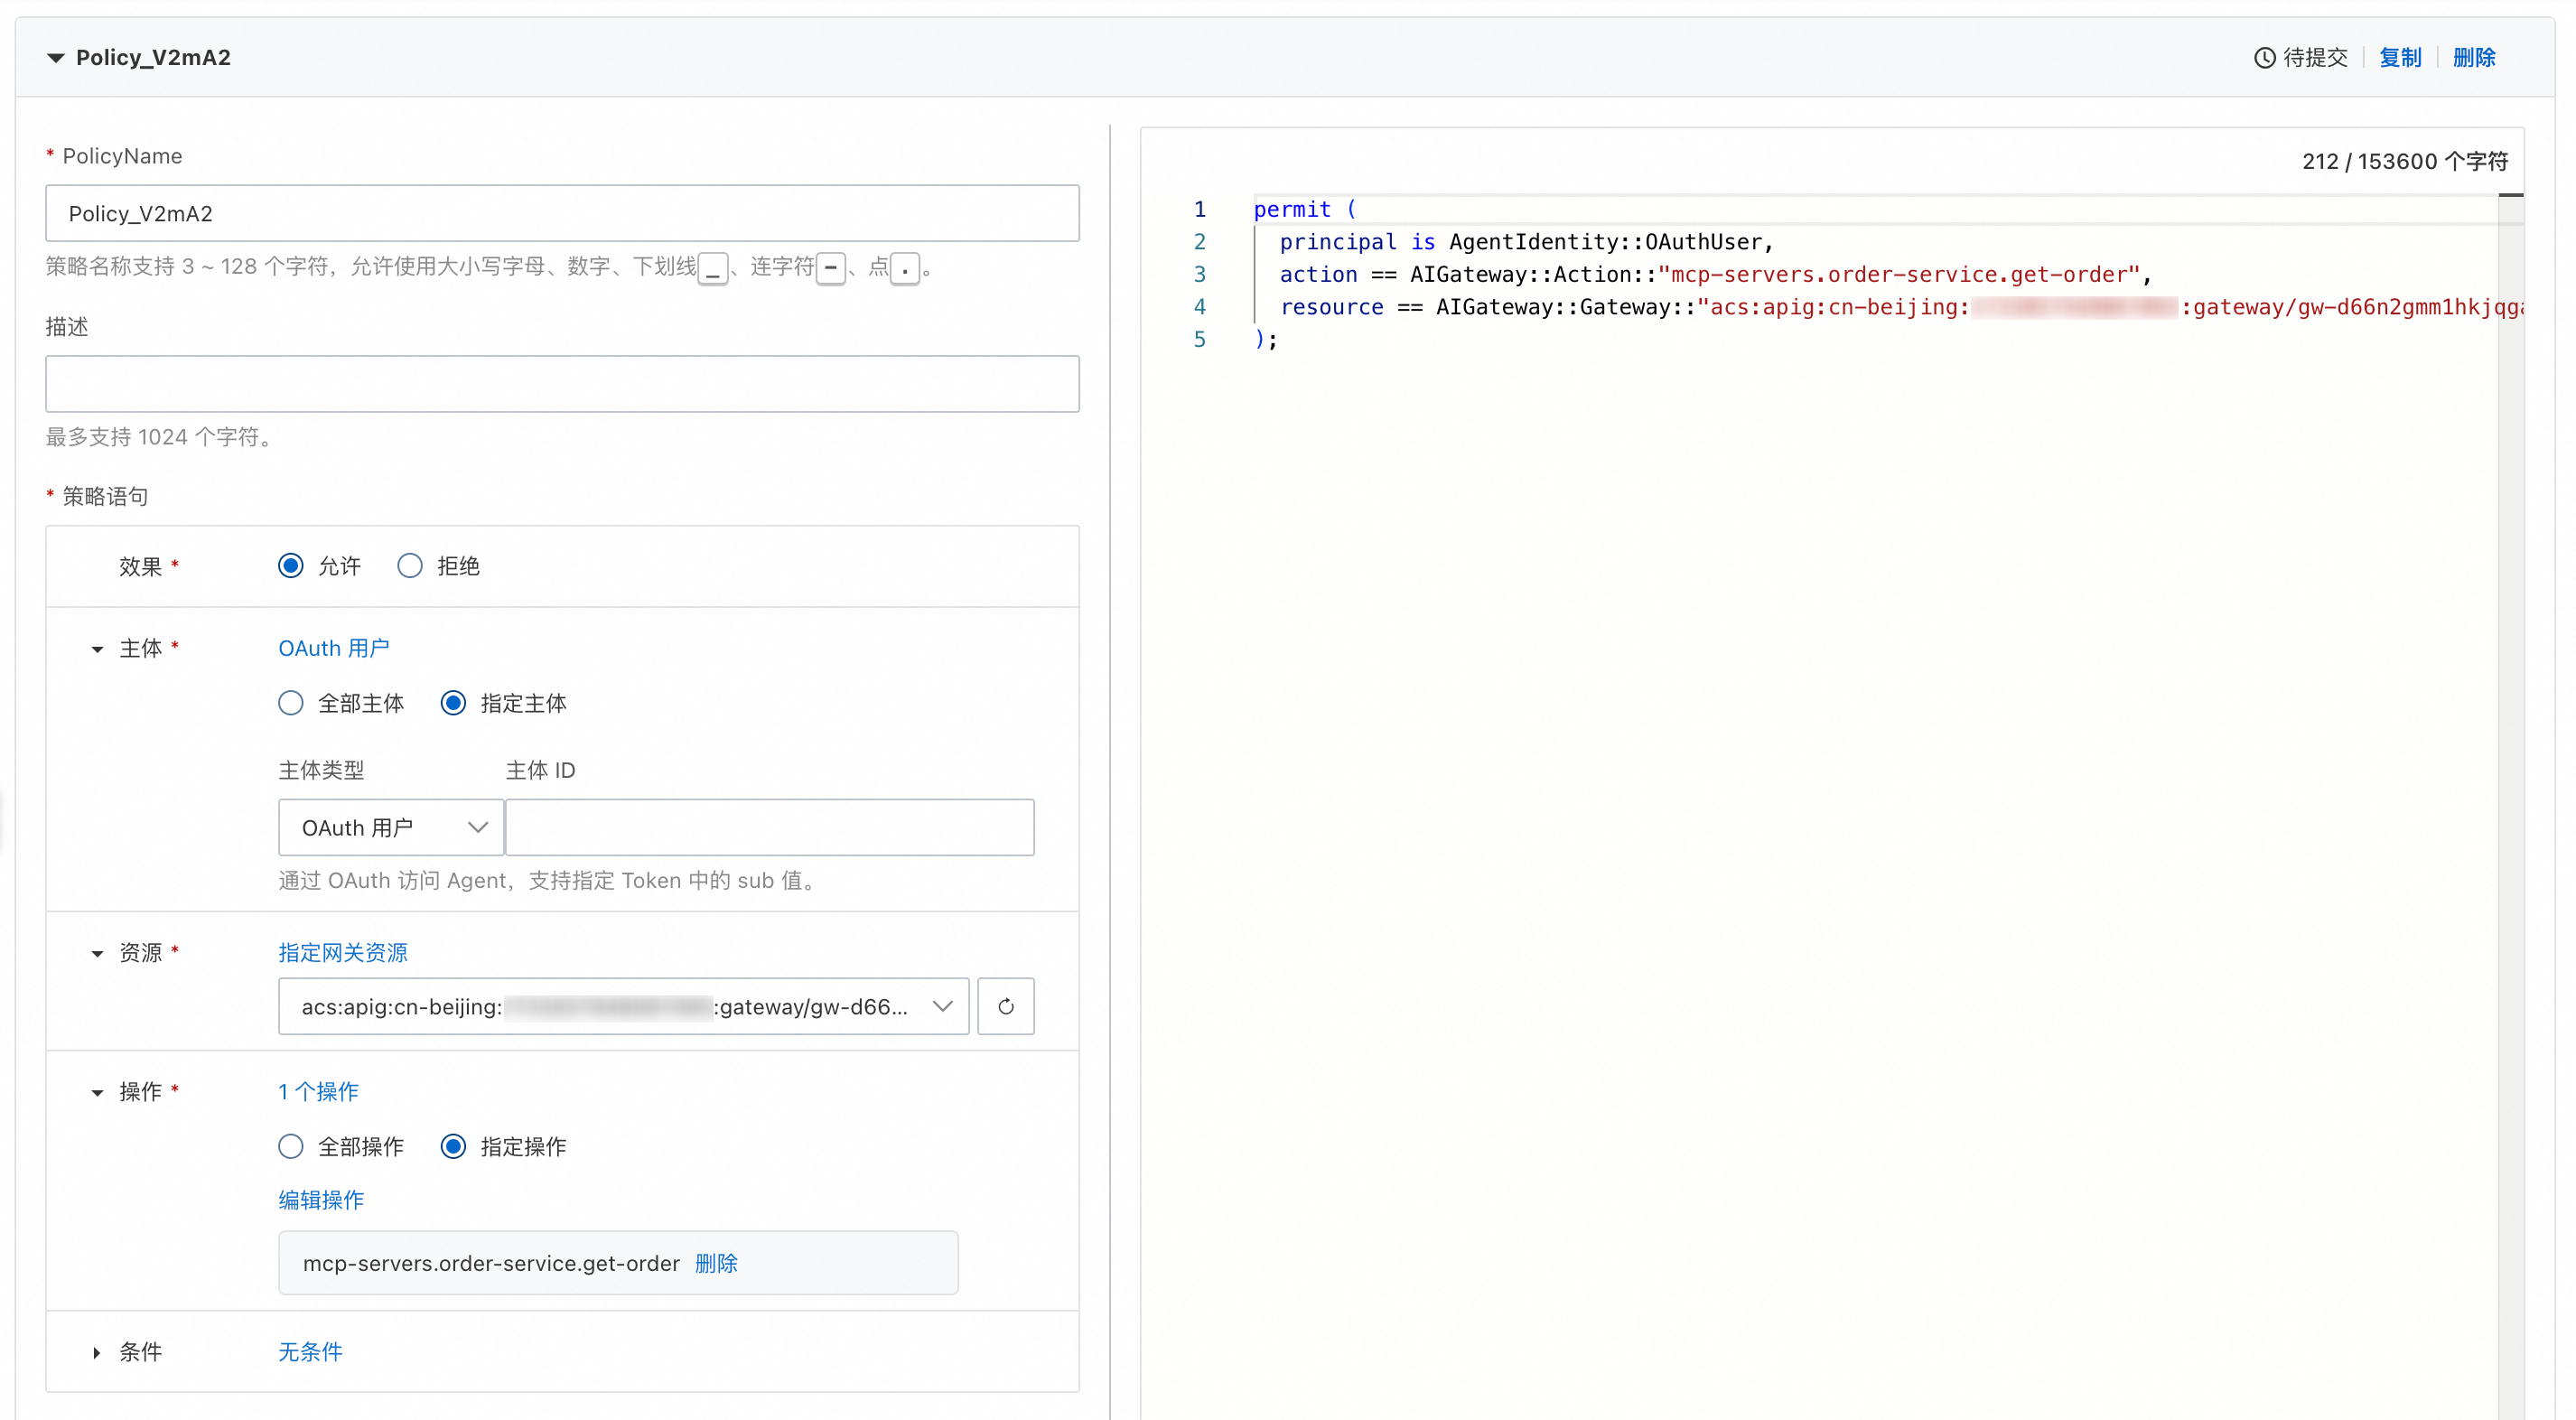
Click Submit to complete the policy creation.
For details about the policy structure and syntax, see Policy description.
Principal options
A principal consists of a Principal Type and a Principal ID. When you specify a principal type and omit the principal ID, the policy applies to all subjects of that type. When you specify a principal ID, the principal scope is limited to the subjects that match the principal ID. A single policy can specify only one principal type, or a single subject under that principal type when you specify a principal ID.
When you select OAuth User as the specified principal, you can further specify:
User Pool: Select the target user pool to limit the policy scope to the users in that user pool.
Specification Method: Select how to further narrow the principal scope:
Principal ID or Name: Enter the ID or name of a user to match the policy exactly to that user.
Role: Select a role in the user pool. The policy applies to all users who have that role, which implements role-based access control (RBAC).
Action options
An action consists of three levels, gateway, service, and tool, separated by ., for example mcp-servers.order-service.create-order. The following are supported:
Specify multiple actions at the same time, for example:
mcp-servers.order-service.create-ordermcp-servers.order-service.get-order
Specify only the gateway or service level to allow or deny all tools under that level, for example:
Allow all MCP service tools under a gateway:
mcp-serversAllow all tools under a specified MCP service:
mcp-servers.order-service
Bind an AI Gateway to a policy set
The policies in a policy set apply to the live traffic of an AI Gateway only after you bind the policy set to the gateway.
In the policy set list, find the target policy set and click its name.
On the policy set details page, click the Associated Gateways tab, and then click Bind Gateway.
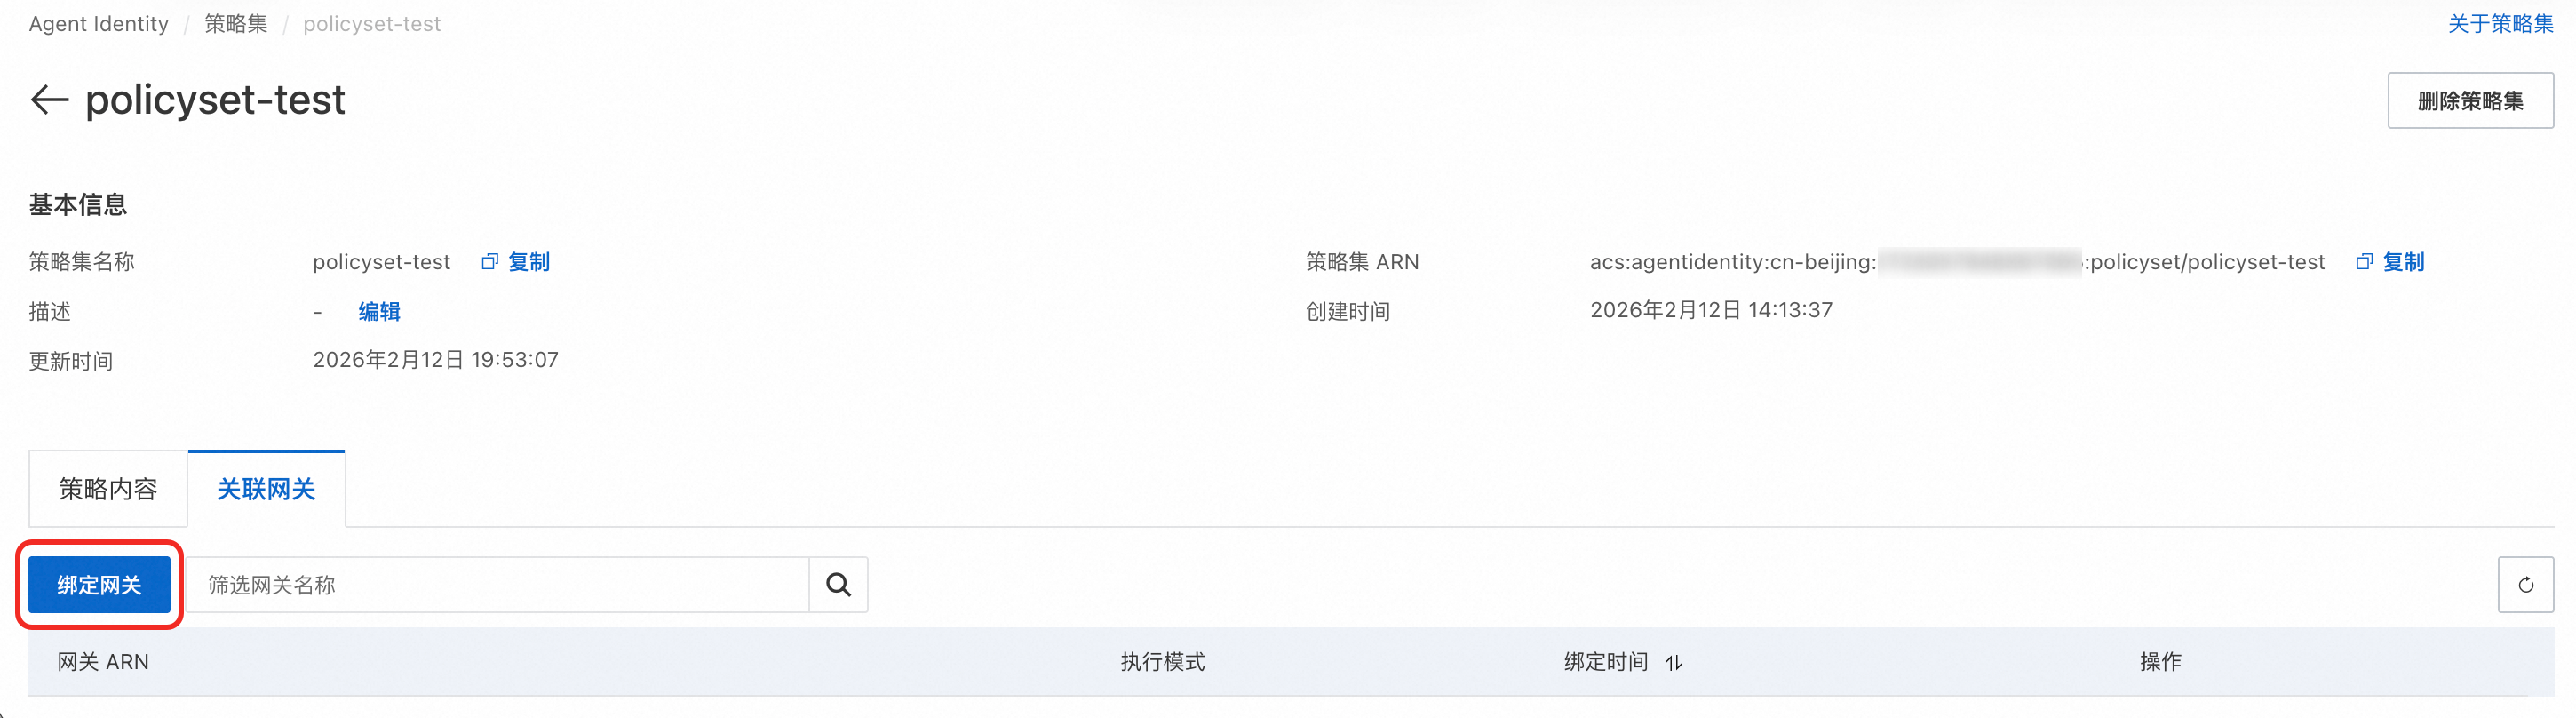
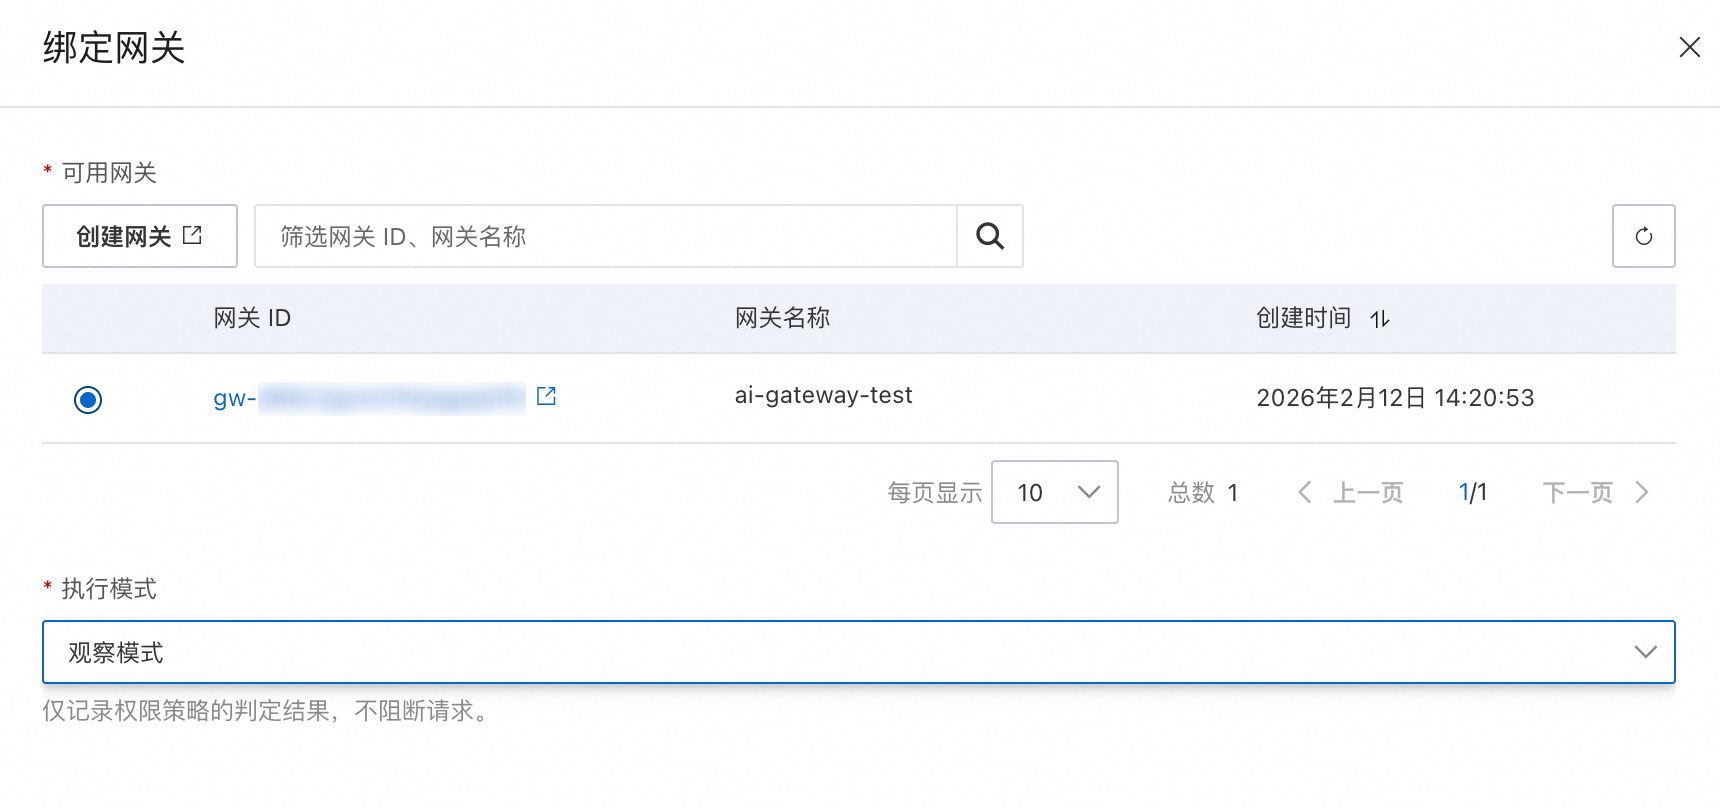
In the Bind Gateway panel, configure the following settings:
Select Gateway: Select the AI Gateway to which you want to apply this policy set from the gateway list. The gateway must be the same as the gateway that you specified in the policy resource configuration.
Enforcement Mode: Select how the policy set works on the gateway.
Observe Mode: Only records policy evaluation results and does not intercept any requests. This mode is mainly used to test and verify that policy evaluation results meet expectations. (Recommended) When you apply a policy set to a production environment, set the mode to observe mode first to make sure that the policy changes do not affect your normal business.
Enforce Mode: Strictly enforces policy evaluation results. Denied requests are intercepted by the gateway, and the caller receives an error response with status code 403.
Click Bind Gateway. The binding task automatically creates and binds the associated dependencies, such as gateway services, gateway service policies, and gateway plugins, and completes the binding between the policy set and the gateway.
After the binding is complete, verify that the policies work as expected by using the plugin logs. For more information, see Monitor policy enforcement.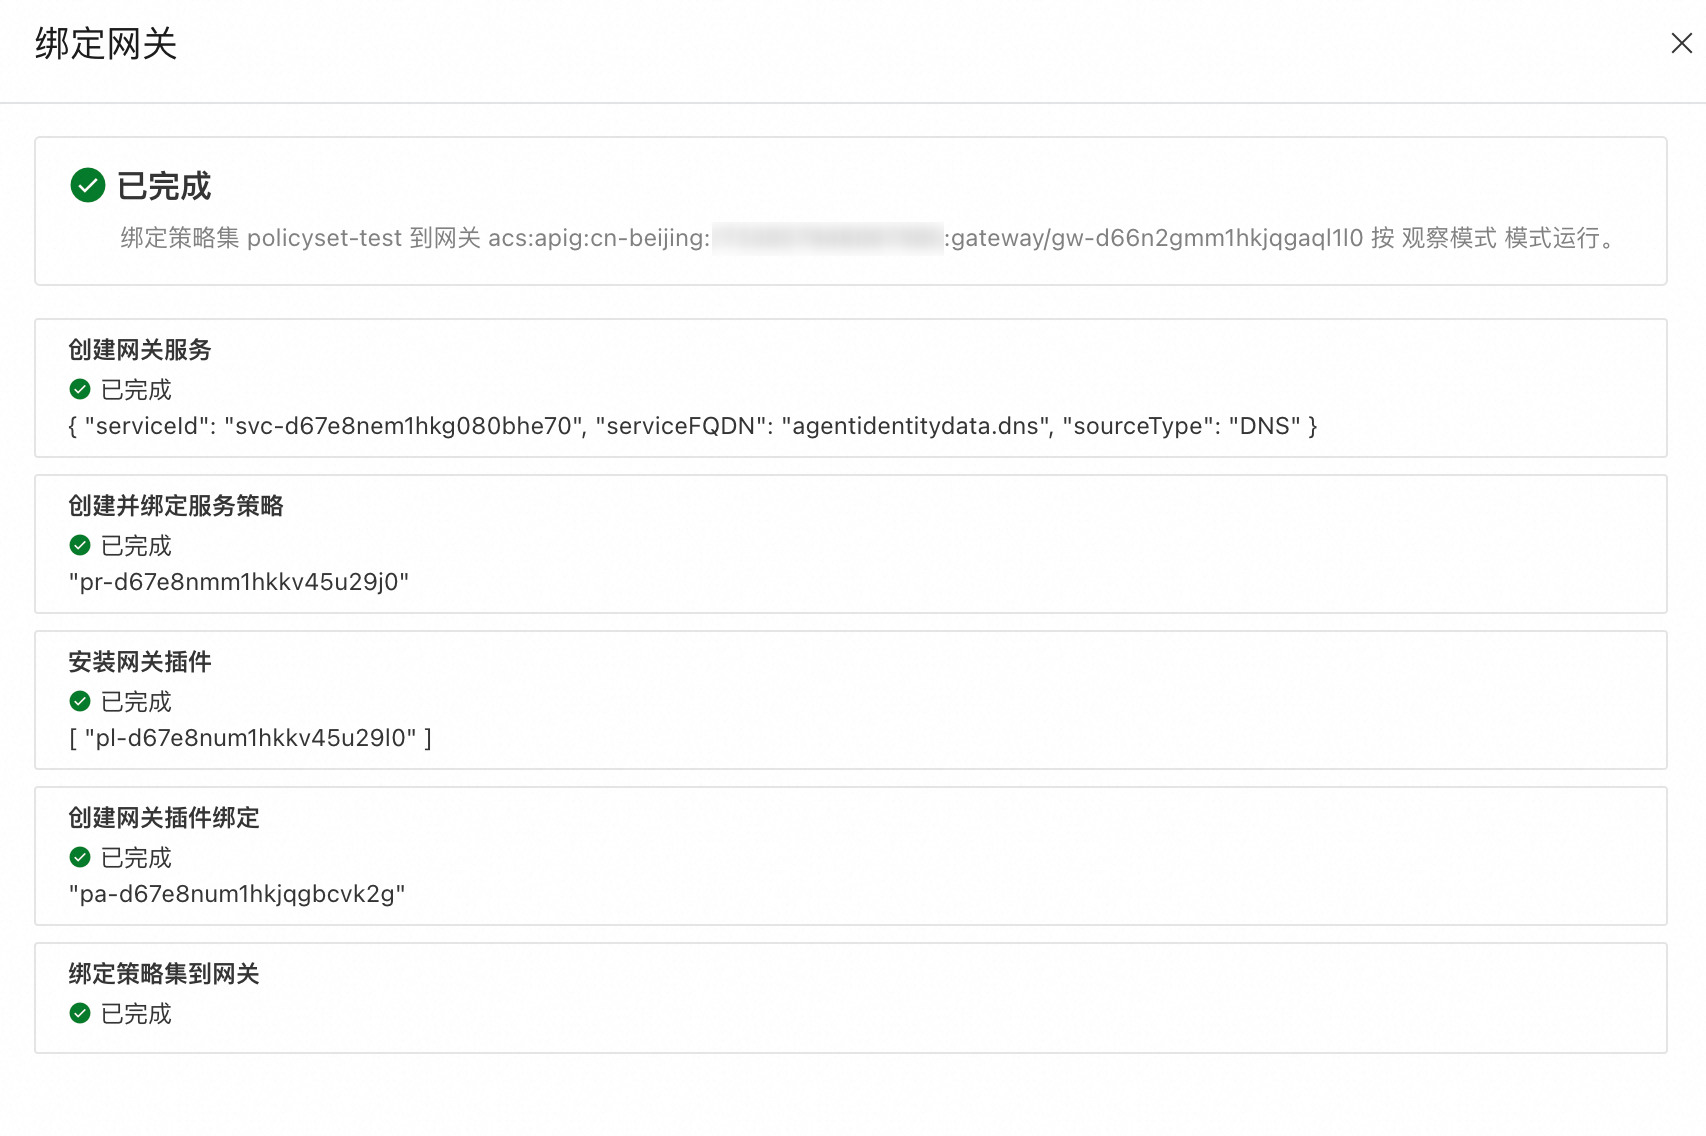
Monitor policy enforcement
After a policy set is bound to an AI Gateway, you can monitor policy enforcement through the logs of the AgentIdentity Authorization plugin on the AI Gateway, for example to confirm whether a request hit the expected policy and to check the final authorization decision. The typical use cases of these logs are:
In observe mode: Before you switch to enforce mode, use the logs to compare the actual evaluation results with the expected results and confirm that the policy changes do not affect your normal business.
In enforce mode: Locate intercepted requests, analyze the denial reasons, and troubleshoot access exceptions or security events.
View plugin logs
Log on to the AI Gateway console.
In the left-side navigation pane, choose AI Gateway > Instances.
In the instance list, click the ID of the AI Gateway instance that is bound to the policy set to go to the instance details page.
In the left-side navigation pane, click Plugins. In the plugin list, click AgentIdentity Authorization.
On the plugin details page, click the Logs tab to query authorization logs.
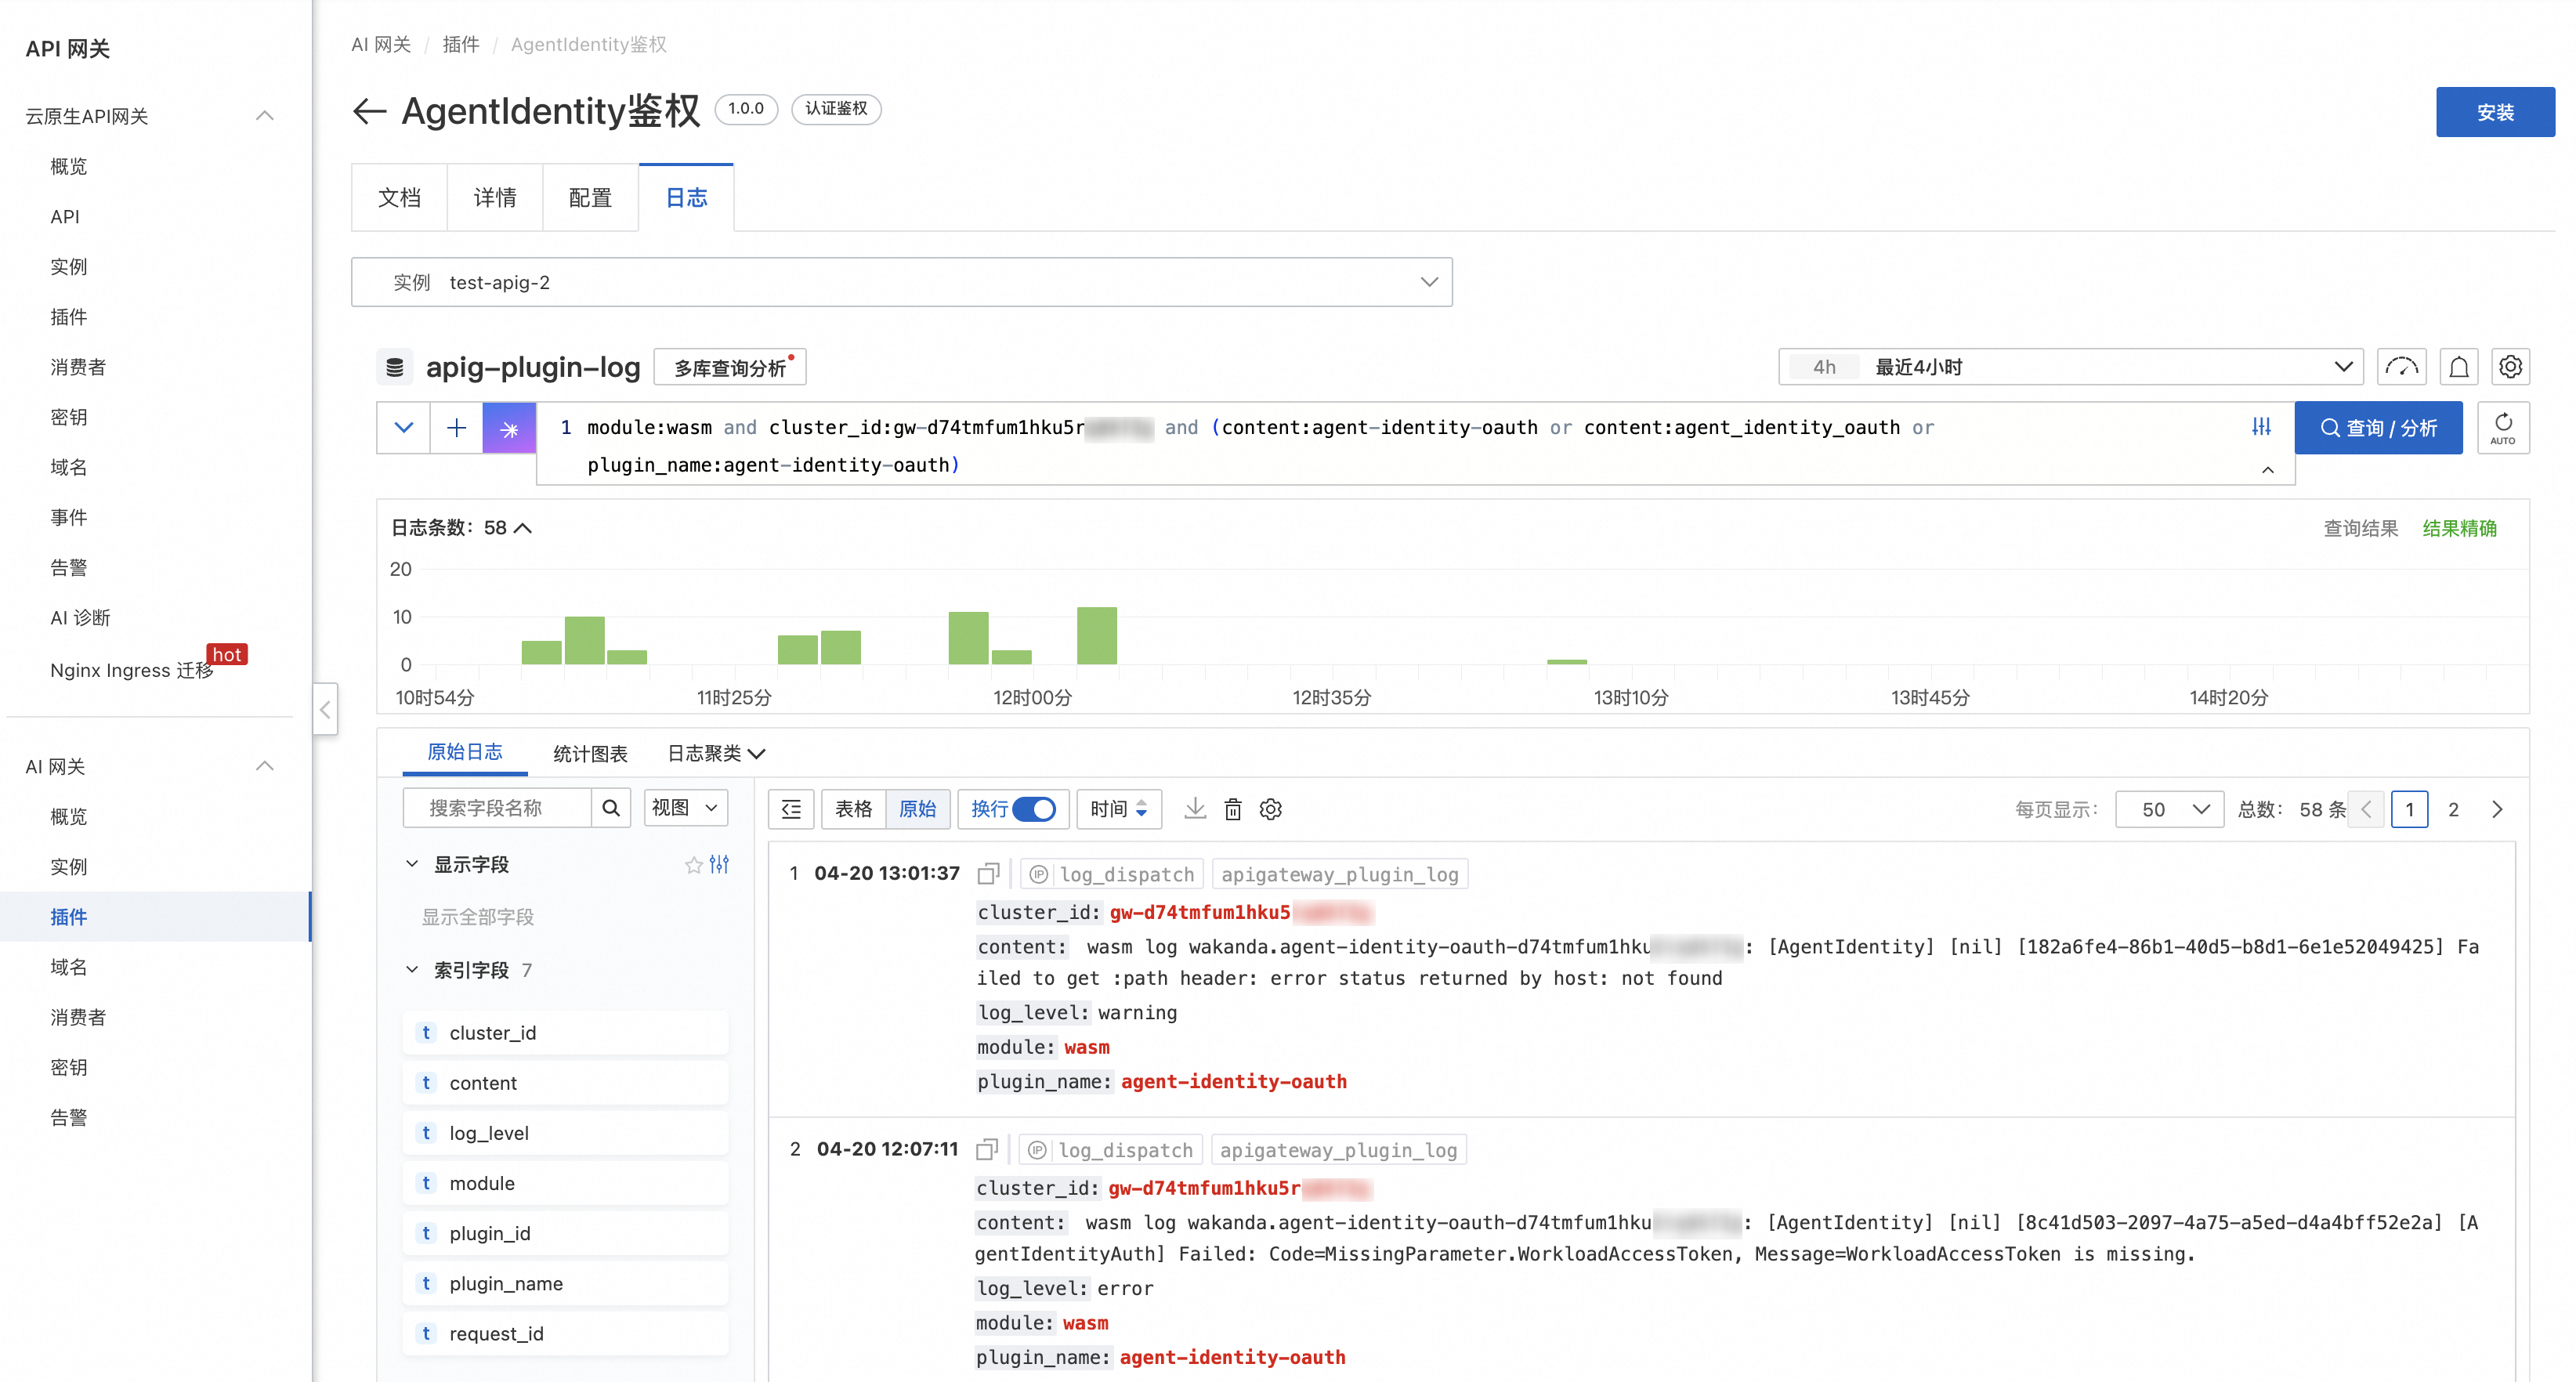
Log fields and queries
Different enforcement modes and authorization results correspond to different log fields. You can build queries based on these fields to filter the target logs quickly:
| Enforcement Mode | Authorization result | Log field | Description |
| Observe mode | Allow | authz_observe_allow | Only the evaluation result is recorded. The request is still allowed to pass. |
| Observe mode | Deny | authz_observe_deny | Only the evaluation result is recorded. The request is still allowed to pass. |
| Enforce mode | Allow | — | No log is generated when authorization succeeds. |
| Enforce mode | Deny | authz_trace_deny | The request is intercepted by the gateway, and the caller receives a 403 response. |
The general query template is as follows. Replace <ai-gateway-instance-id> with the actual AI Gateway instance ID and <authz_field> with the corresponding log field from the preceding table:
module:wasm and cluster_id:<ai-gateway-instance-id> and (content:agent-identity-oauth or content:agent_identity_oauth or plugin_name:agent-identity-oauth) and content:<authz_field>Log examples
The log structure is the same in all scenarios. The main fields are described as follows:
allow: The final authorization result of the request.trueindicates that the request is allowed, andfalseindicates that the request is denied.enforcementMode: The enforcement mode of the policy set on the gateway.LOG_ONLYcorresponds to observe mode, andENFORCEcorresponds to enforce mode.decidingPolicySetArn: The ARN of the policy set that determined the final authorization result.
Observe mode + access allowed (reasons: The names of the policies that were hit. This field is populated when the request is allowed, or when the request is explicitly denied because it hit a configured deny policy. If this value is empty for a denied request, no allow policy was hit and the request is denied by default.authz_observe_allow)
{
  "authz_observe_allow": {
    "allow": true,
    "costMs": 198,
    "decidingPolicySetArn": "acs:agentidentity:cn-beijing:173305794806****:policyset/<policy-set-name>",
    "enforcementMode": "LOG_ONLY",
    "reasons": ["<policy-name-that-allows-access>"],
    "requestId": "3D53F4DE-810C-5E38-8055-4FB4CC15****"
  }
}
Observe mode + access denied (authz_observe_deny)
{
  "authz_observe_deny": {
    "allow": false,
    "costMs": 129,
    "decidingPolicySetArn": "acs:agentidentity:cn-beijing:173305794806****:policyset/<policy-set-name>",
    "enforcementMode": "LOG_ONLY",
    "reasons": [],
    "requestId": "ACB16D26-6500-5E5B-966E-659345C2****"
  }
}
Enforce mode + access denied (authz_trace_deny)
{
  "authz_trace_deny": {
    "allow": false,
    "costMs": 154,
    "decidingPolicySetArn": "acs:agentidentity:cn-beijing:173305794806****:policyset/<policy-set-name>",
    "enforcementMode": "ENFORCE",
    "reasons": [],
    "requestId": "A7FC6D61-A922-5AEC-873C-6951F81E****"
  }
}
Unbind an AI Gateway
Before you delete a policy set or replace the policy set of a gateway, unbind the gateway first.
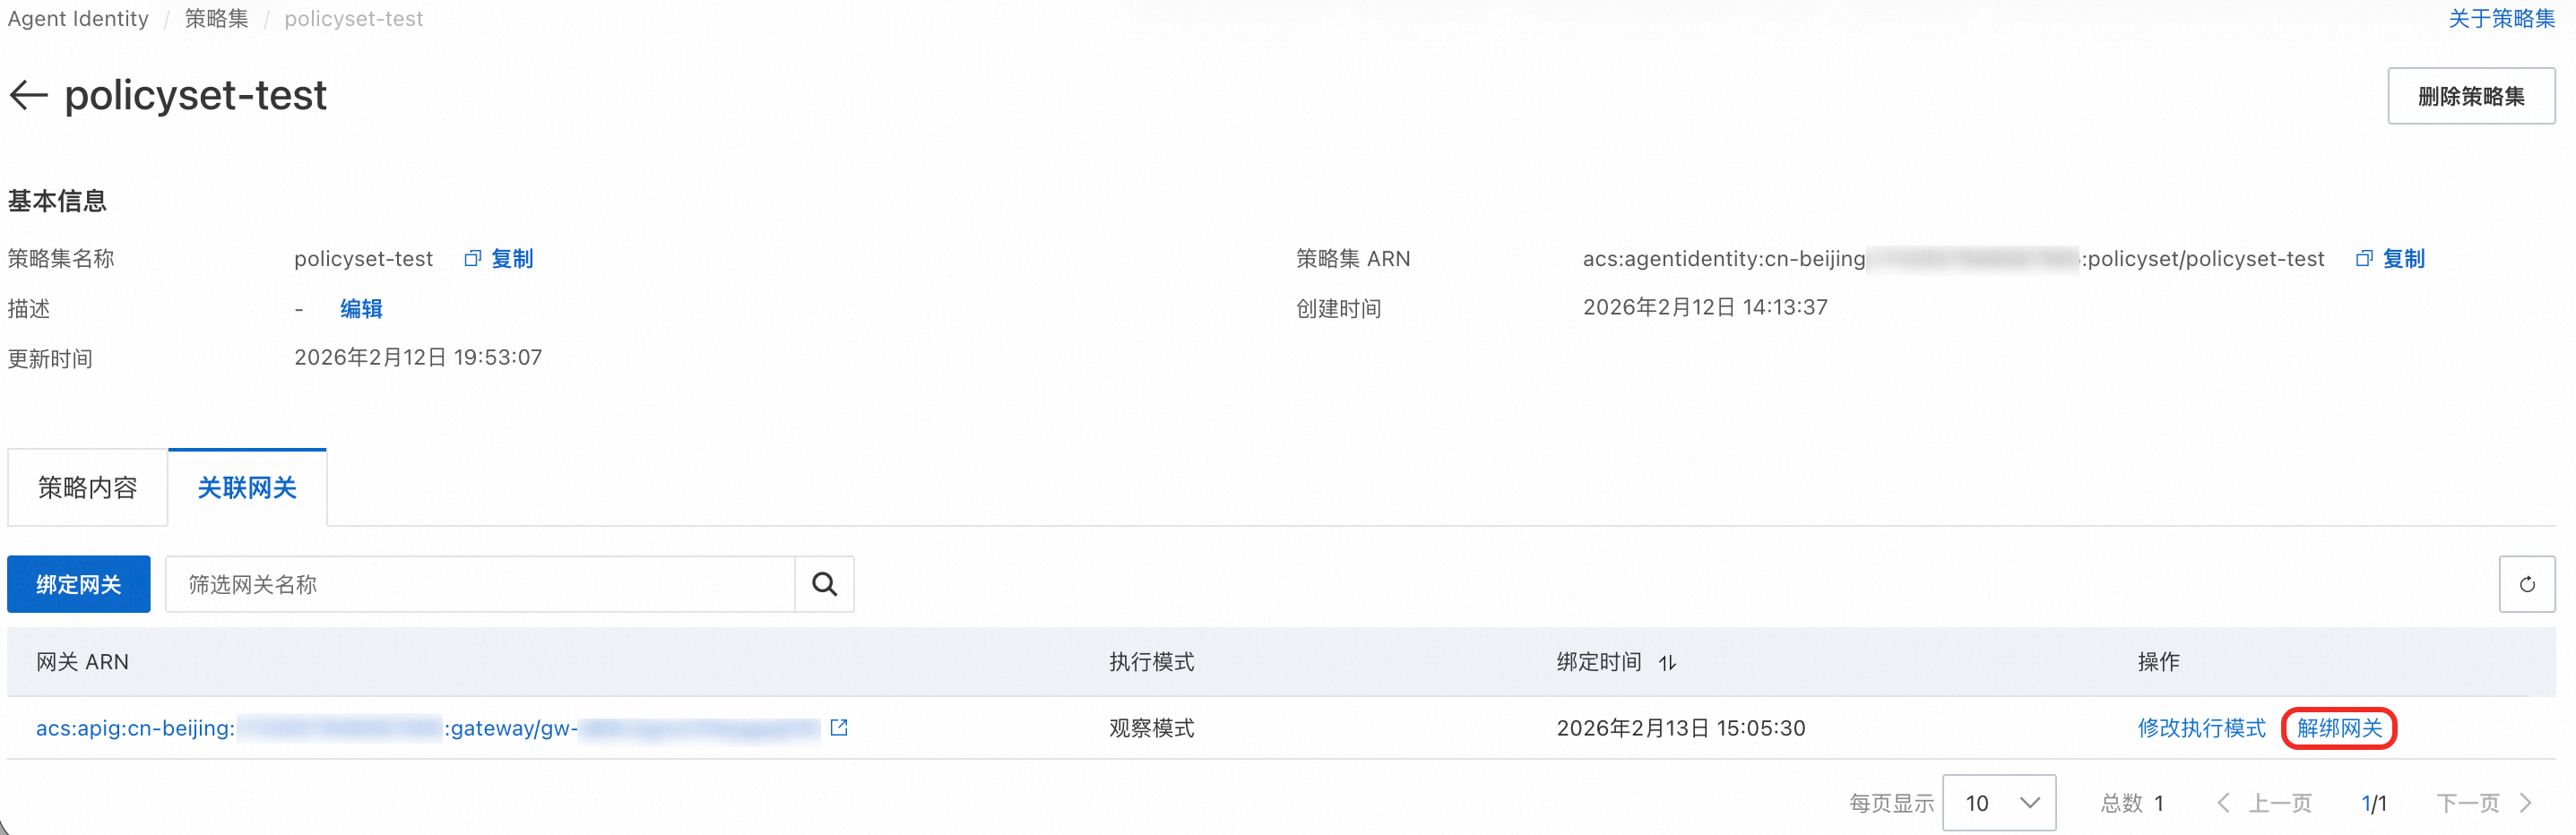
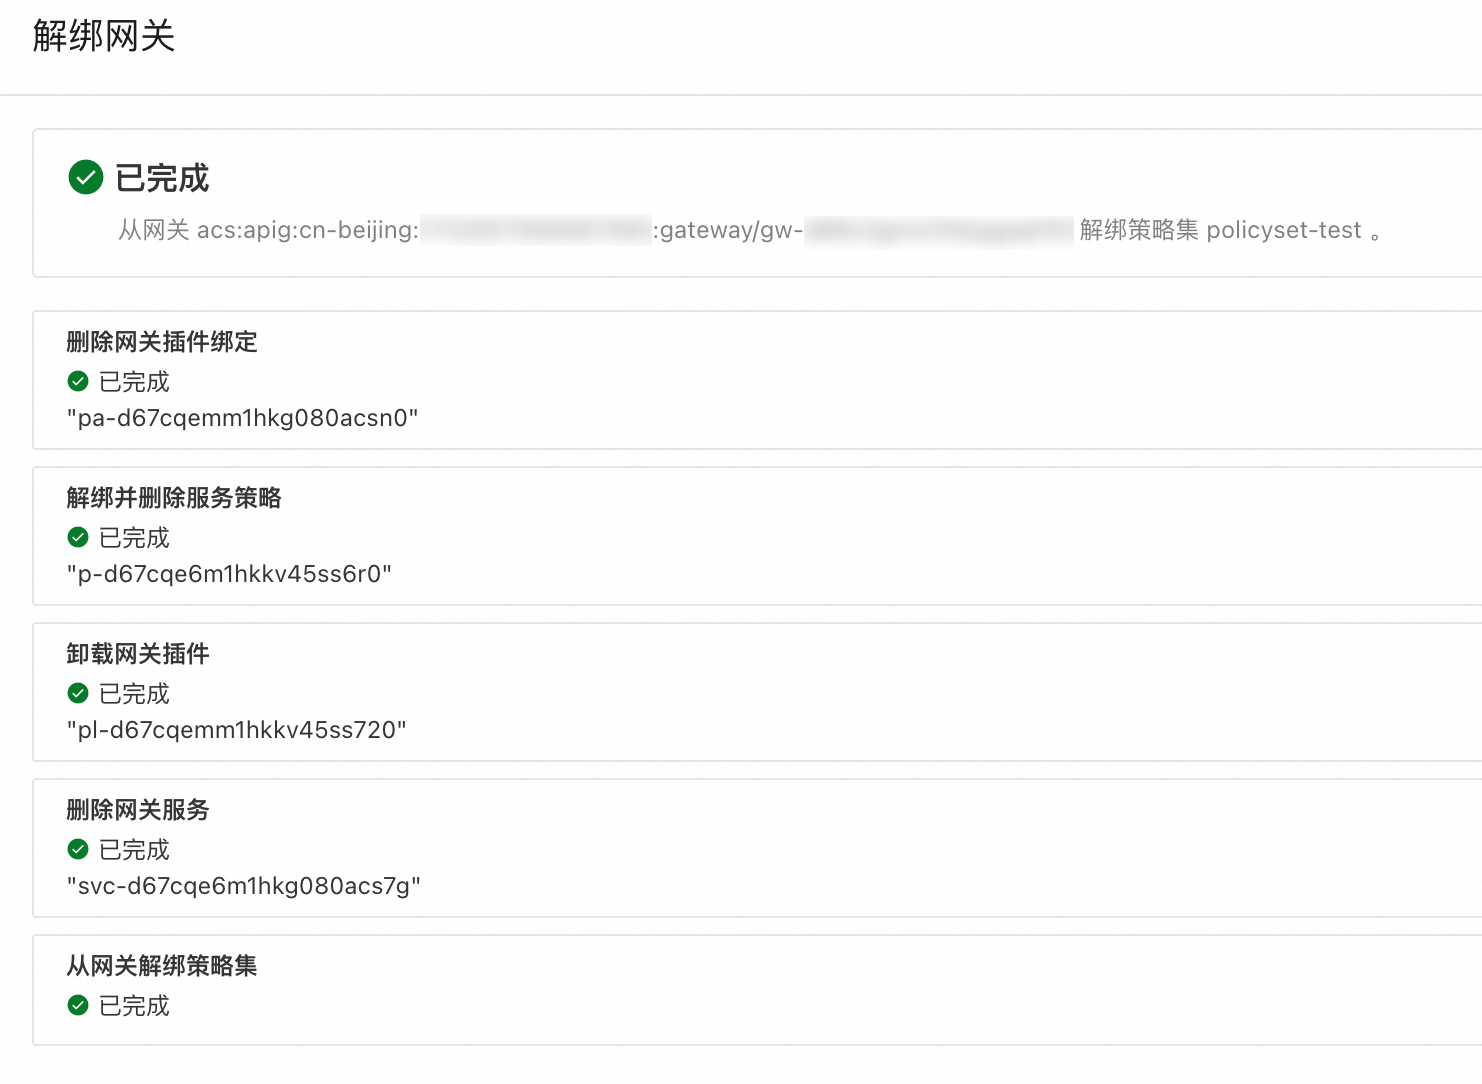
When you unbind a gateway, the unbinding task automatically unbinds and deletes the associated dependencies, such as gateway plugins, gateway service policies, and gateway services.
In the policy set list, find the target policy set that is bound to a gateway and click its name.
On the policy set details page, click the Associated Gateways tab.
In the list of associated gateways, find the gateway that you want to unbind and click Unbind Gateway in the Actions column.

In the confirmation dialog box, enter the gateway ARN and then click Unbind Gateway. The unbinding task completes the unbinding between the policy set and the gateway.
Delete a policy set
Delete a policy set that is no longer needed.
Before you delete a policy set, make sure that the following conditions are met:
The policy set is unbound from all AI Gateways.
The policy set contains no policies.
In the policy set list, find the target policy set.
Click Delete Policy Set in the Actions column.
In the confirmation dialog box that appears, enter the policy set name and then click Delete Policy Set.
The policy set is removed from the policy set list.