Quick Start for AnalyticDB for PostgreSQL on CloudBox
This topic describes how to create, connect to, and use an AnalyticDB for PostgreSQL on CloudBox instance.
Step 1: Create an instance
Before you begin, you must create an AnalyticDB for PostgreSQL on CloudBox instance.
- Log on to the AnalyticDB for PostgreSQL console.
In the upper-right corner of the page, click Create Instance to open the buy page.
If you create an instance for the first time, you must create a service-linked role. In the Create Service Linked Role dialog box, click OK.
- On the instance purchase page, configure the following parameters:
Configuration Item Description Product Type Select Pay-as-you-go. Region and Zone Select the custom Region and Zone for CloudBox. Network Type This is fixed to VPC. VPC and vSwitch Select an available VPC and vSwitch. If no VPC or vSwitch is available in the current zone, follow the on-screen instructions to go to the VPC console and create them. After you create them, return to the AnalyticDB for PostgreSQL purchase page and click the
 icon to refresh.
Instance Resource Type Select Storage-elastic Mode. Instance Edition Select High-availability Edition. Number of master nodes This is fixed to 1. Node specifications (segment) Select the specifications for compute nodes. Number of nodes (segment) Select the number of compute nodes. Increasing the number of nodes can linearly improve performance. Storage Disk Type Select the disk type for data storage. Encryption Type Select Unencrypted or Disk Encryption. Node Storage Capacity (segment) The storage capacity for each node in the instance. The storage capacity can range from 50 GB to 4000 GB and must be a multiple of 50. Click Buy Now.
On the Confirm Order page, confirm the parameter settings, agree to the Terms of Service, and click Activate Now.
Click Management Console to return to the Instance List page.
NoteInstance initialization for AnalyticDB for PostgreSQL takes 5 to 20 minutes. You can perform subsequent operations only when the instance is in the Running state.
Step 2: Create an initial account
Before you connect to the database, you must create an initial account for the AnalyticDB for PostgreSQL instance.
- Log on to the AnalyticDB for PostgreSQL console.
- In the upper-left corner of the console, select a region.
- Find the instance that you want to manage and click the instance ID.
In the left-side navigation pane, click Account Management.
On the Account Management page, click Create Account in the upper-right corner.
In the Create Account panel, specify the Account and New Password parameters as prompted, and then confirm the password.
Click OK.
Step 3: Log on to the database
Log on to the database to manage your data. This topic uses Data Management Service (DMS) as an example to show how to log on to the database.
- Log on to the AnalyticDB for PostgreSQL console.
- In the upper-left corner of the console, select a region.
- Find the instance that you want to manage and click the instance ID.
Click Log On to Database in the upper-right corner.
Optional:The first time you use DMS, you must authorize DMS to access AnalyticDB for PostgreSQL resources. Click Go to RAM role authorization and grant permissions. For more information, see Authorize DMS to access cloud resources.
In the Log on to Database Instance dialog box, specify Database Account and Database password.
Click Login.
On the SQL Console tab, execute SQL statements to manage data.
Step 4: Write data
After you log on to the database, you can perform operations such as creating, retrieving, updating, and deleting data. This section guides you through creating a table and writing one million rows of test data.
- Create a test table named
customer.The statement to create the table is as follows:CREATE TABLE CUSTOMER(id int, name varchar, md5 varchar) DISTRIBUTED BY (id) ; - Create a function to generate random test data.The statement to create the function is as follows:
CREATE OR REPLACE FUNCTION f_random_str(length INTEGER) RETURNS character varying AS $$ DECLARE result varchar(50); BEGIN SELECT array_to_string(ARRAY(SELECT chr((65 + round(random() * 25)) :: integer) FROM generate_series(1,length)), '') INTO result; return result; END; $$ LANGUAGE plpgsql; - Insert one million rows of random test data.The statement to insert the test data is as follows:
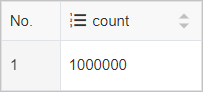
INSERT INTO customer SELECT *, f_random_str(5), md5(random()::text) FROM generate_series(1, 1000000); - Query the total number of rows in the
customertable.The query statement is as follows:SELECT count() FROM customer;The following example shows the returned result: