Tutorial: Build an image-based search system
This tutorial shows how to quickly build an image-based search system with an AnalyticDB for PostgreSQL vector database.
Background information
Image-based search has a wide range of applications. For example, you can take a photo of a product and upload it to an e-commerce platform to find similar items. You can also paste a screenshot from a movie into a search engine to find information about the film. This technology can even rapidly locate a specific person from a massive photo library. While this might seem complex, the powerful vector retrieval capabilities of an AnalyticDB for PostgreSQL vector database let you easily build your own image-based search system with simple SQL.
How image-based search works
Image-based search, also known as reverse image search, is a type of content-based image retrieval technology. When you query with an image, the system searches a large database and returns the most visually similar records. For example, a product search returns items that are identical or similar to the main object in the query image. A facial recognition search returns other images of the same person based on their facial features.
An image-based search application consists of two core modules:
Feature extraction module: Extracts visual characteristics from an image and converts them into a high-dimensional feature vector. In this vector space, images with similar content have feature vectors that are closer to each other.
Vector retrieval module: Efficiently searches a massive collection of feature vectors to find the top-k records closest to the query feature vector.
The following figure shows the workflow of image-based search.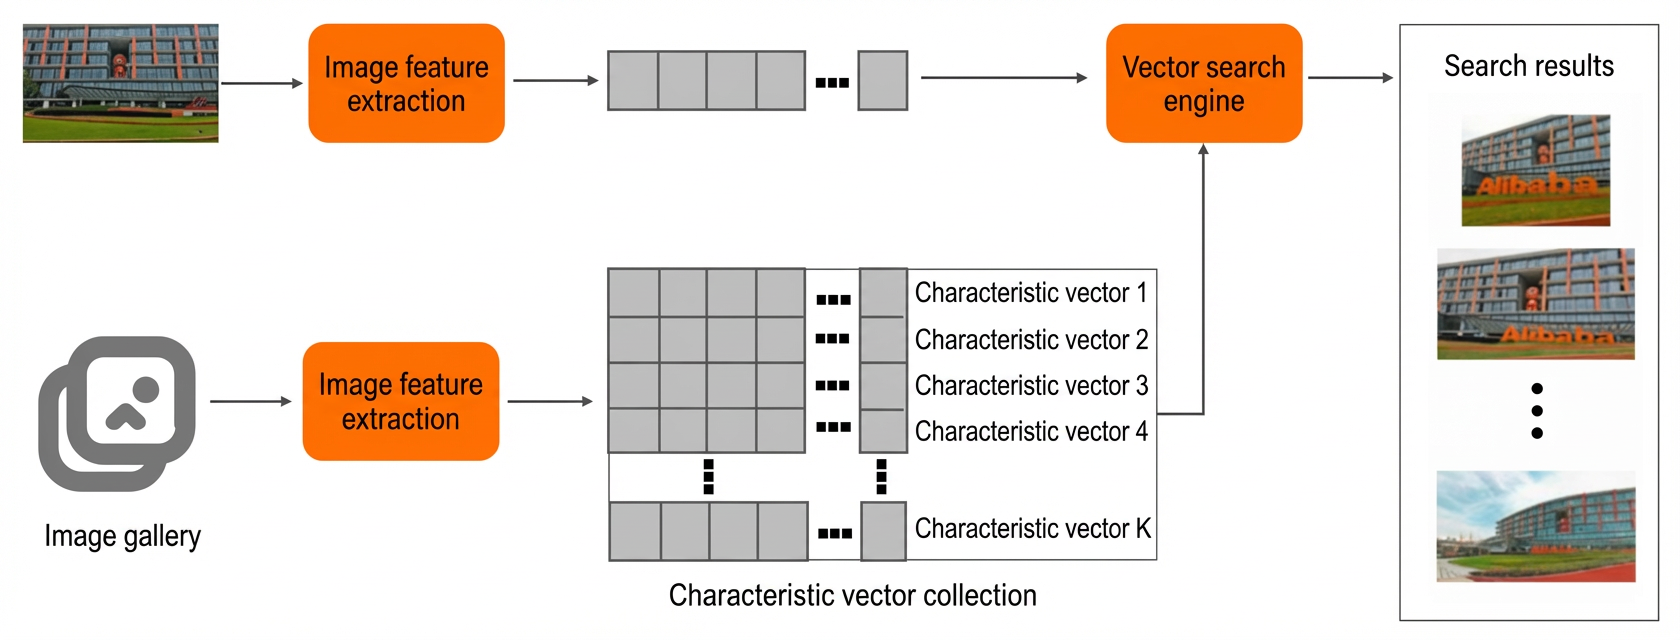
Image feature extraction
Most modern feature extraction algorithms use deep learning models, such as VGG, ResNet, or Transformer, as a backbone network to generate features. Common methods for feature generation include:
The simplest method is to use the output from the layer immediately preceding the classification layer of a model like VGG as the image features. However, this approach often results in a lower recall rate in image-based search scenarios.
A second method involves applying specialized pooling methods, such as RMAC or GeM, to the features from an intermediate layer of the model, and then reducing their dimensionality to obtain the final features.
A third method is to fine-tune a pre-trained model on a target dataset with a specially designed loss function to extract features. For example, a feature extraction model for image-based product search is typically trained on a product dataset to more accurately extract the visual features of different items.
You can select the most appropriate method for your use case to extract image features and generate feature vectors.
Vector retrieval
Vector retrieval, also known as nearest neighbor search (NNS), is the process of finding the k records in a large dataset that are closest to a given query vector. The brute-force approach calculates the distance between the query vector and every other vector in the database, but is too slow and computationally expensive for large-scale applications.
In practice, systems use approximate nearest neighbor (ANN) search. ANN algorithms leverage the data's distribution to quickly find vectors that are likely to be the nearest neighbors, trading a small amount of accuracy for a significant increase in speed.
Common ANN methods include:
Methods based on locality-sensitive hashing (LSH).
Methods based on product quantization.
Graph-based methods.
Implementation with AnalyticDB for PostgreSQL
Step 1: Extract feature vectors
This tutorial uses the following tools:
Programming language: Python 3.8
Deep learning framework: PyTorch
Dataset: CIFAR-100, which contains 100 classes, each with 600 images.
Feature extraction network: A pre-trained SqueezeNet model. SqueezeNet is a lightweight network that outputs 1,000-dimensional feature vectors.
We recommend running the following code snippets sequentially in a Jupyter Notebook.
Create a Python environment.
# We recommend using Anaconda to create a new Python environment.
conda create -n adbpg_env python=3.8
conda activate adbpg_env

pip install torchvision
pip install matplotlib
pip install psycopg2cffi
Download and preprocess the CIFAR-100 dataset.
import torch
import torchvision

from torchvision.transforms import (
    Compose,
    Resize,
    CenterCrop,
    ToTensor,
    Normalize
)

preprocess = Compose([
    Resize(256),
    CenterCrop(224),
    ToTensor(),
    Normalize(mean=[0.485, 0.456, 0.406], std=[0.229, 0.224, 0.225]),
])

DATA_DIRECTORY = "/Users/XXX/Desktop/vector/CIFAR"
datasets = {
    "CIFAR100": torchvision.datasets.CIFAR100(DATA_DIRECTORY, transform=preprocess, download=True)
}
(Optional) View the downloaded dataset.
import numpy as np
import matplotlib.pyplot as plt
from mpl_toolkits.axes_grid1 import ImageGrid

def show_images_from_full_dataset(dset, num_rows, num_cols, indices):
    im_arrays = np.take(dset.data, indices, axis=0)
    labels = map(dset.classes.__getitem__, np.take(dset.targets, indices))

    fig = plt.figure(figsize=(10, 10))
    grid = ImageGrid(
        fig,
        111,
        nrows_ncols=(num_rows, num_cols),
        axes_pad=0.3)
    for ax, im_array, label in zip(grid, im_arrays, labels):
        ax.imshow(im_array)
        ax.set_title(label)
        ax.axis("off")

dataset = datasets["CIFAR100"]
show_images_from_full_dataset(dataset, 4, 8, [i for i in range(0, 32)])
Use the SqueezeNet 1.1 model to generate feature vectors for all images in batches and save them to a file. In this tutorial, the feature vector file is stored at
/Users/XXX/Desktop/vector/features/CIFAR100/features.# Prepare the data. BATCH_SIZE = 100 dataloader = torch.utils.data.DataLoader(dataset, batch_size=BATCH_SIZE) # Download the model. model = torchvision.models.squeezenet1_1(pretrained=True).eval() # Extract the feature vectors and write them to the file specified by features_file_path. features_file_path = "/Users/XXX/Desktop/vector/features/CIFAR100/features" feature_file = open(features_file_path, 'w') img_id = 0 for batch_number, batch in enumerate(dataloader): with torch.no_grad(): batch_imgs = batch[0] # 0: images batch_labels = batch[1] # 1: labels vector_values = model(batch_imgs).tolist() for i in range(len(vector_values)): img_label = dataset.classes[batch_labels[i].item()] # print(img_label) feature_file.write(str(img_id) + "|" + img_label + "|") vector_value = vector_values[i] assert len(vector_value) == 1000 for j in range(len(vector_value)): if j == 0: feature_file.write("{") feature_file.write(str(vector_value[j]) + ",") elif j == len(vector_value) - 1: feature_file.write(str(vector_value[j])) feature_file.write("}") else: feature_file.write(str(vector_value[j]) + ",") feature_file.write("\n") img_id = img_id + 1 print("Finished extracting feature vectors for batch: ", batch_number) feature_file.close()The feature vector for a single image is in the following format:
[2.67548513424756,2.186723470687866,2.376999616622925,2.3993351459503174,2.833254337310791,
4.141584873199463,1.0177937746047974,2.0199387073516846,2.436871512298584,1.465838789939880,
4,10.196249008178711,3.3932418823242188,6.087968826293945,7.661309242248535,7.66005373001098,
6,5.481011390686035,7.513026237487795,5.552321434020996,4.685927867889404,5.635070323944092,...]
Step 2: Import and query data
Create a table and add a vector index. This tutorial uses the
psycopg2cffilibrary in Python to connect to the database.ImportantIf the vector engine feature is not enabled for your instance, submit a ticket.
import os
import psycopg2cffi

# Note: You can set temporary environment variables by using the following code.
# os.environ["PGHOST"] = "XX.XXX.XX.XXX"
# os.environ["PGPORT"] = "XXXXX"
# os.environ["PGDATABASE"] = "adbpg_test"
# os.environ["PGUSER"] = "adbpg_test"
# os.environ["PGPASSWORD"] = "adbpg_test"

connection = psycopg2cffi.connect(
    host=os.environ.get("PGHOST", "XX.XXX.XX.XXX"),
    port=os.environ.get("PGPORT", "XXXXX"),
    database=os.environ.get("PGDATABASE", "adbpg_test"),
    user=os.environ.get("PGUSER", "adbpg_test"),
    password=os.environ.get("PGPASSWORD", "adbpg_test")
)

cursor = connection.cursor()

# The SQL statement to create the table.
create_table_sql = """
CREATE TABLE IF NOT EXISTS public.image_search (
    id INTEGER NOT NULL,
    class TEXT,
    image_vector REAL[],
    PRIMARY KEY(id)
) DISTRIBUTED BY(id);
"""

# Change the storage format of the vector column to PLAIN.
alter_vector_storage_sql = """
ALTER TABLE public.image_search ALTER COLUMN image_vector SET STORAGE PLAIN;
"""

# The SQL statement to create the vector index.
create_indexes_sql = """
CREATE INDEX ON public.image_search USING ann (image_vector) WITH (dim = '1000', hnsw_m = '100', pq_enable='0');
"""

# Execute the preceding SQL statements.
cursor.execute(create_table_sql)
cursor.execute(alter_vector_storage_sql)
cursor.execute(create_indexes_sql)
connection.commit()
Import the feature vectors of the images from the dataset into the table.
import io

# Define a generator function to process the file line by line.
def process_file(file_path):
    with open(file_path, 'r') as file:
        for line in file:
            yield line

# The SQL statement to import data.
copy_command = """
COPY public.image_search (id, class, image_vector)
FROM STDIN WITH (DELIMITER '|');
"""

# The feature vector file of the images.
features_file_path = "/Users/XXX/Desktop/vector/features/CIFAR100/features"

# Execute the COPY command.
modified_lines = io.StringIO(''.join(list(process_file(features_file_path))))
cursor.copy_expert(copy_command, modified_lines)
connection.commit()
Select a feature vector from the file to perform a search. For example, search for the image with ID 4999.
def query_analyticdb(collection_name, vector_name, query_embedding, top_k=20):
# Find the most similar images to the query vector and calculate the similarity.
    query_sql = f"""
    SELECT id, class, l2_distance({vector_name},Array{query_embedding}::real[]) AS similarity
    FROM {collection_name}
    ORDER BY {vector_name} <-> Array{query_embedding}::real[]
    LIMIT {top_k};
    """

# Execute the query.
    connection = psycopg2cffi.connect(
        host=os.environ.get("PGHOST", "XX.XXX.XX.XXX"),
        port=os.environ.get("PGPORT", "XXXXX"),
        database=os.environ.get("PGDATABASE", "adbpg_test"),
        user=os.environ.get("PGUSER", "adbpg_test"),
        password=os.environ.get("PGPASSWORD", "adbpg_test")
    )

    cursor = connection.cursor()
    cursor.execute(query_sql)
    results = cursor.fetchall()

    return results

# Select a data record as the query.
def select_feature(file_path, expect_id):
    with open(file_path, 'r') as file:
        for line in file:
            datas = line.split('|')
            if datas[0] == str(expect_id):
                vec = '[' + datas[2][1:-2] + ']'
                return vec
    raise ValueError(f"No data is found for id={expect_id}")

file_path = "/Users/xxxx/Desktop/vector/features/CIFAR100/features"

# Select the image with an ID of 4999.
query_vector = select_feature(file_path, 4999)
# View this image.
# show_images_from_full_dataset(dataset, 1, 1, [4999], figsize=(1, 1))
# print(query_vector)

# Execute the query.
results = query_analyticdb("image_search", "image_vector", query_vector)
Display the images from the query results.
NoteThe vector database feature of AnalyticDB for PostgreSQL uses approximate nearest neighbor (ANN) search to accelerate queries.
# Obtain the image IDs from the results of the previous step.
indices = []
for item in results:
    indices.append(item[0])
print(indices)

# Display the images.
show_images_from_full_dataset(dataset, 4, 5, indices)