Learn how to configure a custom authentication and authorization service for your gateway.
Background
Servers typically rely on credentials (tokens) in client requests to secure communications for externally exposed APIs.
-
If your tokens are JSON Web Tokens (JWTs), you can validate their signatures anywhere by using a public key, without accessing a centralized authentication service.
-
If your tokens use a custom format, the server must call a centralized service to perform authentication and authorization checks. This process secures API communications. Cloud-native API Gateway supports this custom authentication and authorization method.
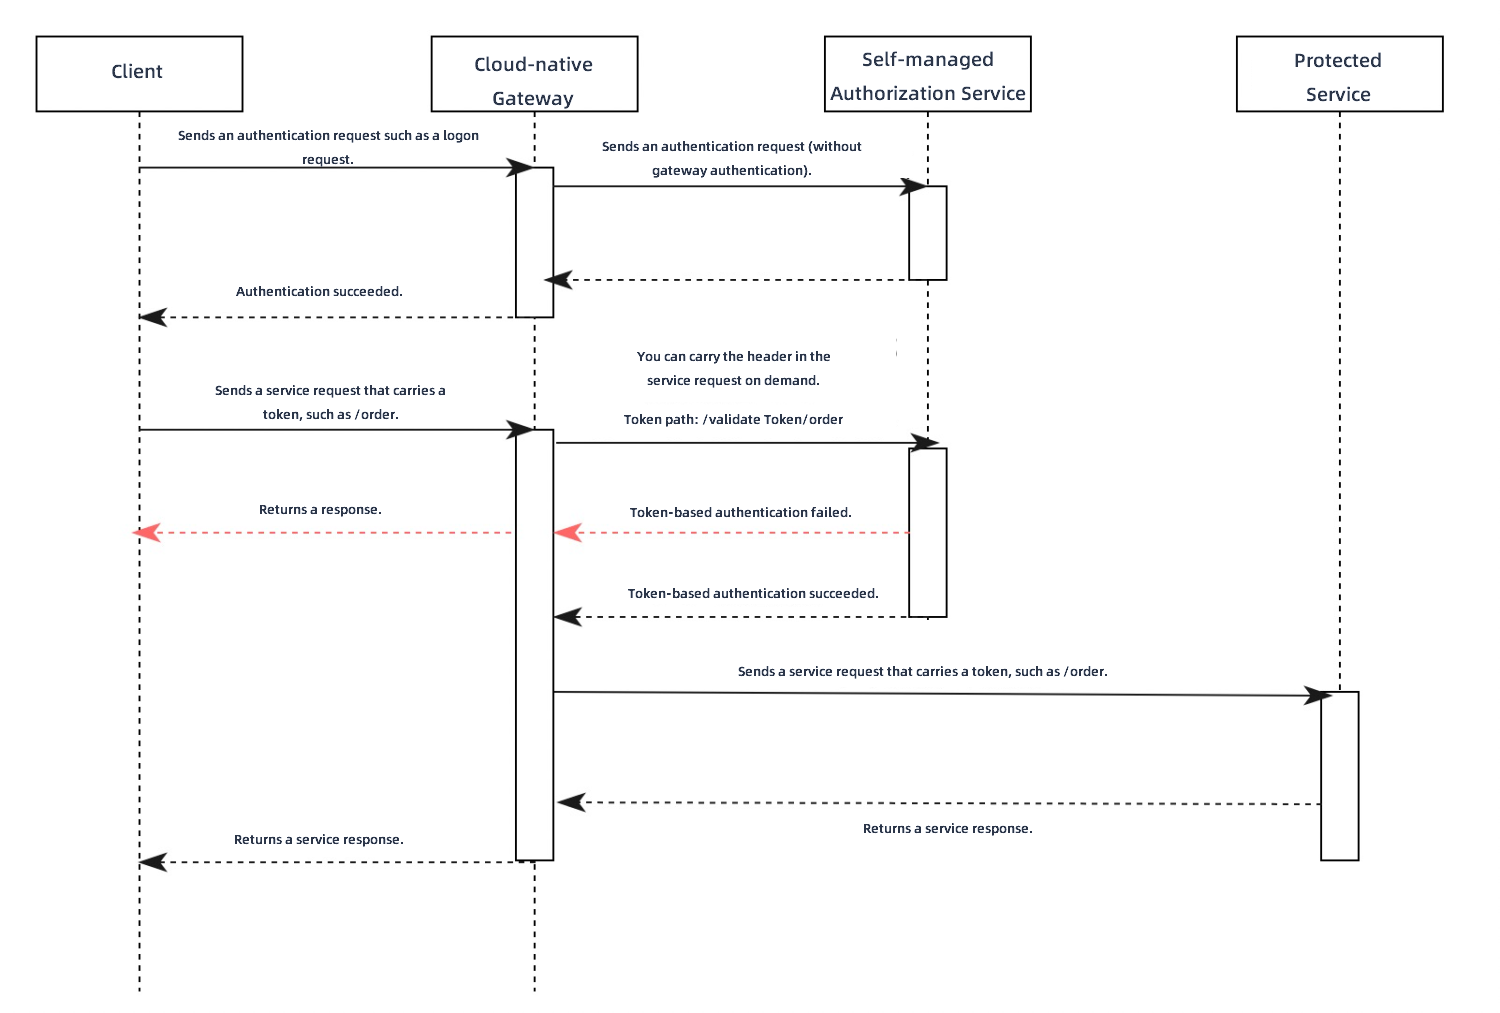
The following example illustrates the request processing flow after a Cloud-native API Gateway is integrated with a custom authentication service.
-
A client sends an authentication request, such as a login operation, to the gateway.
-
The gateway forwards the authentication request directly to the authentication service.
-
The authentication service validates the credentials in the request, such as a username and password. Upon successful validation, it returns a token to the gateway, which then relays the token to the client.
-
The client sends a business request, such as a request to the /order path to place an order. The request includes the token issued after successful authentication.
-
The gateway intercepts the path (including query parameters), HTTP method (such as GET or POST), and token from the original business request. It uses this information to construct a new request and sends it to the custom authentication service for authorization. On the gateway console, you must configure the HTTP header where the token is located. You can also allow the original request body to be included.
If the authentication API of the custom authentication service is /validateToken, the gateway forms the actual authorization request path by appending the original business request's path to the authentication API's path, resulting in /validateToken/order.
-
When the authentication service receives the authorization request, it can validate the token and check if the client is authorized to access the original request path.
-
If your authentication service can modify the HTTP status code in its response, you can use the status code to indicate the authorization result.
-
An HTTP status code of 200 indicates that the token is valid and authorized to access the backend resource. The gateway then forwards the original business request to the protected backend service. After receiving the response from the backend, the gateway forwards it to the client, completing the order placement operation.
-
An HTTP status code of 401 or 403 indicates that the token is invalid or unauthorized to access the backend resource. The gateway immediately returns the authentication service's response to the client, causing the order placement operation to fail.
-
-
If your authentication service must always return an HTTP status code of 200 due to business constraints, you can use the built-in HTTP header
x-mse-external-authz-check-result.-
If the authentication service returns a response with the
x-mse-external-authz-check-resultheader set totrue, it indicates the token is valid and has permission to access the backend resource. The gateway then forwards the original request to the protected backend service and relays the response back to the client, completing the order placement operation. -
If the authentication service returns a response with the
x-mse-external-authz-check-resultheader set tofalse, it indicates the token is invalid or does not have permission to access the backend resource. The gateway returns the authentication service's response directly to the client, causing the order placement operation to fail.
-
-
Create a custom authentication rule
Log on to the API Gateway console.
In the left-side navigation pane, click . In the top navigation bar, select a region.
-
On the Instance page, click the name of the target gateway instance.
-
In the left-side navigation pane, click .
-
On the Global Authentication page, click Create Authentication. In the Create Authentication panel, configure the parameters and click OK.
Parameter
Note: Custom Authentication Service
Enable
Specifies whether to enable authentication and authorization for the Cloud-native API Gateway.
Authentication Name
A custom name for the authentication and authorization rule.
Authentication Type
Select Custom Authentication Service.
Authentication Service
The backend service used for authentication and authorization. You can add services in service management. For more information, see Add a service.
Note-
Only services that use the HTTP protocol are supported. Services that use other protocols, such as Dubbo, are not supported.
-
If a Kubernetes Service has multiple ports, the first port is used by default. If you want to use a different port, create an additional Kubernetes Service in Container Service for Kubernetes (ACK) that exposes only the target port.
Authentication API
The path of the API provided by the authentication service. The gateway uses this path for prefix matching.
For example, if your authentication service is built on Spring MVC, exposes the authentication API /check, and you want to handle requests for paths starting with /check/, you can configure it as follows:
@RequestMapping("/check/")
public ResponseEntity<RestResult<String>> check(){}
Token Location
The location of the token in the request header, typically
AuthorizationorCookie. You can either Select from a list or Add Manually to set the token location.Allowed Headers in Authentication Rrequest
Specifies which headers from the original client request should be forwarded to the authentication service.
NoteThe
Host,Method,Path, andContent-Lengthheaders are included by default and do not need to be added manually.Allowed Headers in Authentication Response
Specifies which headers from the authentication service's response to add to the request sent to the backend service.
NoteIf a header specified here already exists in the client request, the gateway overwrites its value.
Allow Body in Authentication Request
Allow Body in Authentication Request: Includes the body of the original client request in the request sent to the authentication service.
Maximum Body Size: The maximum size of the request body that can be forwarded, in bytes.
Timeout Period
The maximum time, in seconds, to wait for a response from the authentication service. Default: 10.
Mode
Specifies the behavior when the authentication service is unavailable. Loose Mode and Strict Mode are supported. We recommend that you use Loose Mode.
-
Loose Mode: If the authentication service is unavailable (for example, the connection fails or the service returns a 5xx error), the gateway allows the client request to proceed.
-
Strict Mode: If the authentication service is unavailable (for example, the connection fails or the service returns a 5xx error), the gateway rejects the client request.
Simple Conditions
Next to Authorization, click Simple Conditions. This mode supports Whitelist Mode and Blacklist Mode.
-
Whitelist Mode: Requests that match the hosts and paths in the whitelist can bypass validation. All other hosts and paths require validation.
-
Blacklist Mode: Requests that match the hosts and paths in the blacklist require validation. All other hosts and paths can be accessed directly.
Click Rule Condition to set conditions based on the request domain, path, and headers.
-
Domain Name: The requested host domain.
-
Path: The requested API path.
-
Path Match Condition: The path can be matched by using exact match, prefix match, or regular expression match.
-
Exact Match: Enter a full path, for example, /app/v1/order.
-
Prefix Match: Enter a path prefix ending with an asterisk (*). For example, to match all requests starting with /app, enter /app/*.
-
Regular Expression Match: The syntax follows the Google RE2 standard. For more information, see RE2 Syntax.
Case sensitive: Makes path matching case-sensitive.
-
-
Header: The header of the request. Click Request Header to configure multiple headers. A logical AND operation is performed on the headers.
-
HeaderKey: The name of the header field.
-
Condition: The matching condition for the header.
-
Equals To: The value of the specified header is equal to the input value.
-
Does Not Equal To: The value of the specified header is not equal to the input value.
-
Exists: The specified header exists in the request.
-
Does Not Exist: The specified header does not exist in the request.
-
Contains: The value of the specified header contains the input value.
-
Excludes: The value of the specified header does not contain the input value.
-
Prefix: The value of the specified header starts with the input value.
-
Suffix: The value of the specified header ends with the input value.
-
Regular Expression Match: The value of the specified header matches the input regular expression. The syntax follows the Google RE2 standard. For more information, see RE2 Syntax.
-
-
Value: The value to match against the header field.
-
Complex Conditions
Next to Authorization, click Complex Conditions.
This mode allows you to define authorization rules by using a YAML configuration of Envoy's
permissiondata structure. You can create rules with combined AND, OR, and NOT logic. The gateway sends requests that match the configured conditions for authentication. Unmatched requests can access resources directly.Note-
For a complete description of the
permissiondata structure fields, see the official Envoy documentation. -
For configuration examples, see Complex condition authorization examples.
Return to the Global Authentication page. If the new rule appears in the list, it was created successfully.
-
View and manage authentication services
Log on to the API Gateway console.
In the left-side navigation pane, click . In the top navigation bar, select a region.
-
On the Instance page, click the name of the target gateway instance.
-
In the left-side navigation pane, click .
-
On the Authentication page, find the target authentication rule and click Description in the Actions column. You can view the Basic Information and Authentication Configuration, and manage the Authorization Information.
The Authentication Configuration section includes fields such as Authentication Service, Authentication API, Token Location, Timeout Period, Mode (such as Loose Mode), Allow Body in Authentication Request, Allowed Headers in Authentication Request, and Allowed Headers in Authentication Response. The Authorization Information section displays the current mode (such as Whitelist Mode). Multiple rule conditions have a logical "OR" relationship between them. The authorization rule list includes columns such as Request Domain, Request Path Matchers, case-sensitive, and Request Header Matchers.
In the Authorization Information section, click Create Authorization. In the dialog box that appears, enter the Request Domain Name and Request Path, select a Match Mode, and then click OK to add the authorization rule.
Related operations
-
Enable authentication and authorization: On the Global Authentication page, find the target rule and click Enable in the Actions column to activate it.
-
Disable authentication and authorization: On the Global Authentication page, find the target rule and click Close in the Actions column to deactivate it.
-
Edit authentication and authorization: On the Global Authentication page, find the target rule and click Edit in the Actions column to modify its configuration.
-
Delete authentication and authorization: On the Global Authentication page, find the target rule and click Delete in the Actions column to remove it.
You can delete an authentication and authorization rule only when it is disabled.
Complex condition authorization examples
Matching domain names with regex
In this example, the gateway performs authentication only for requests to the exampleA.com and exampleB.com domains that match the path prefix. Note that the regex field requires a full match, not a partial match.
A request to test.exampleA.com does not match the condition and can access resources without authentication.
-
The regular expression syntax follows the Google RE2 standard. For more information, see RE2 Syntax.
-
For a complete description of the
permissiondata structure fields, see the official Envoy documentation.
permissions:
# and_rules: Triggers authentication if all the following rules are met.
- and_rules:
    rules:
      - url_path:
          # Path prefix matching.
          path:
            prefix: /
      - header:
          # Regular expression matching.
          safe_regex_match:
            regex: "(exampleA\\.com|exampleB\\.com)"
          # The domain name can be obtained from the ":authority" header,
          # according to the HTTP pseudo-header specification.
          name: ":authority"
Combining AND, OR, and NOT conditions
This example meets the following conditions:
-
Requests with a path prefix of
exampleA.com/apirequire authentication, with the following exceptions:-
exampleA.com/api/appa/bbbdoes not require authentication. -
exampleA.com/api/appb/cccdoes not require authentication.
-
-
All requests under
exampleB.comrequire authentication, with the following exceptions:-
exampleB.com/api/appa/bbbdoes not require authentication. -
exampleB.com/api/appb/cccdoes not require authentication. -
Requests with a path prefix of
exampleB.com/api/appcdo not require authentication, with the following exceptions:-
exampleB.com/api/appc/bbb/cccrequires authentication. -
exampleB.com/api/appc/ccc/dddrequires authentication.
-
-
Corresponding YAML configuration:
permissions:
# or_rules: Triggers authentication if any of the following rules are met.
- or_rules:
    rules:
      # and_rules: This rule is met only if all the following sub-rules are met.
      # Rule 1
      - and_rules:
          rules:
            - url_path:
                path:
                  exact: /api/appc/bbb/ccc
            - header:
                exact_match: "exampleB.com"
                name: ":authority"
      # Rule 2
      - and_rules:
          rules:
            - url_path:
                path:
                  exact: /api/appc/ccc/ddd
            - header:
                exact_match: "exampleB.com"
                name: ":authority"
      - and_rules:
          rules:
            # Rule 3
            - url_path:
                path:
                  prefix: /api/
            # not_rule: Matches if the nested rule does not match.
            # Rule 4
            - not_rule:
                url_path:
                  path:
                    exact: /api/appa/bbb
            # Rule 5
            - not_rule:
                url_path:
                  path:
                    exact: /api/appb/ccc
            - header:
                exact_match: "exampleA.com"
                name: ":authority"
      - and_rules:
          rules:
            # Rule 6
            - url_path:
                path:
                  prefix: /
            # not_rule: Matches if the nested rule does not match.
            # Rule 7
            - not_rule:
                url_path:
                  path:
                    exact: /api/appa/bbb
            # Rule 8
            - not_rule:
                url_path:
                  path:
                    exact: /api/appb/ccc
            # Rule 9
            - not_rule:
                url_path:
                  path:
                    prefix: /api/appc/
            - header:
                exact_match: "exampleB.com"
                name: ":authority"