Service discovery with Nacos
API Gateway integrates with Nacos for service discovery, reducing system coupling and improving microservice manageability. As the unified entry point for client requests, API Gateway handles routing, forwarding, and security for your backend microservices. This topic explains the integration mechanism and walks you through creating, publishing, and calling a service-discovery API.
Overview
The workflow includes the following steps:
-
Create a VPC integration instance
-
Deploy a Nacos service and register a microservice application
-
Create an API group
-
Create a backend service
-
Create an API
-
Create an application and grant it permissions to call the API
-
Debug the API
How it works
Nacos serves as a service registry that receives registration requests from microservice instances and stores their metadata. API Gateway acts as a service subscriber, retrieving instance addresses and ports from Nacos. Based on this information, API Gateway distributes requests to backend microservice instances, enabling dynamic routing and load balancing.
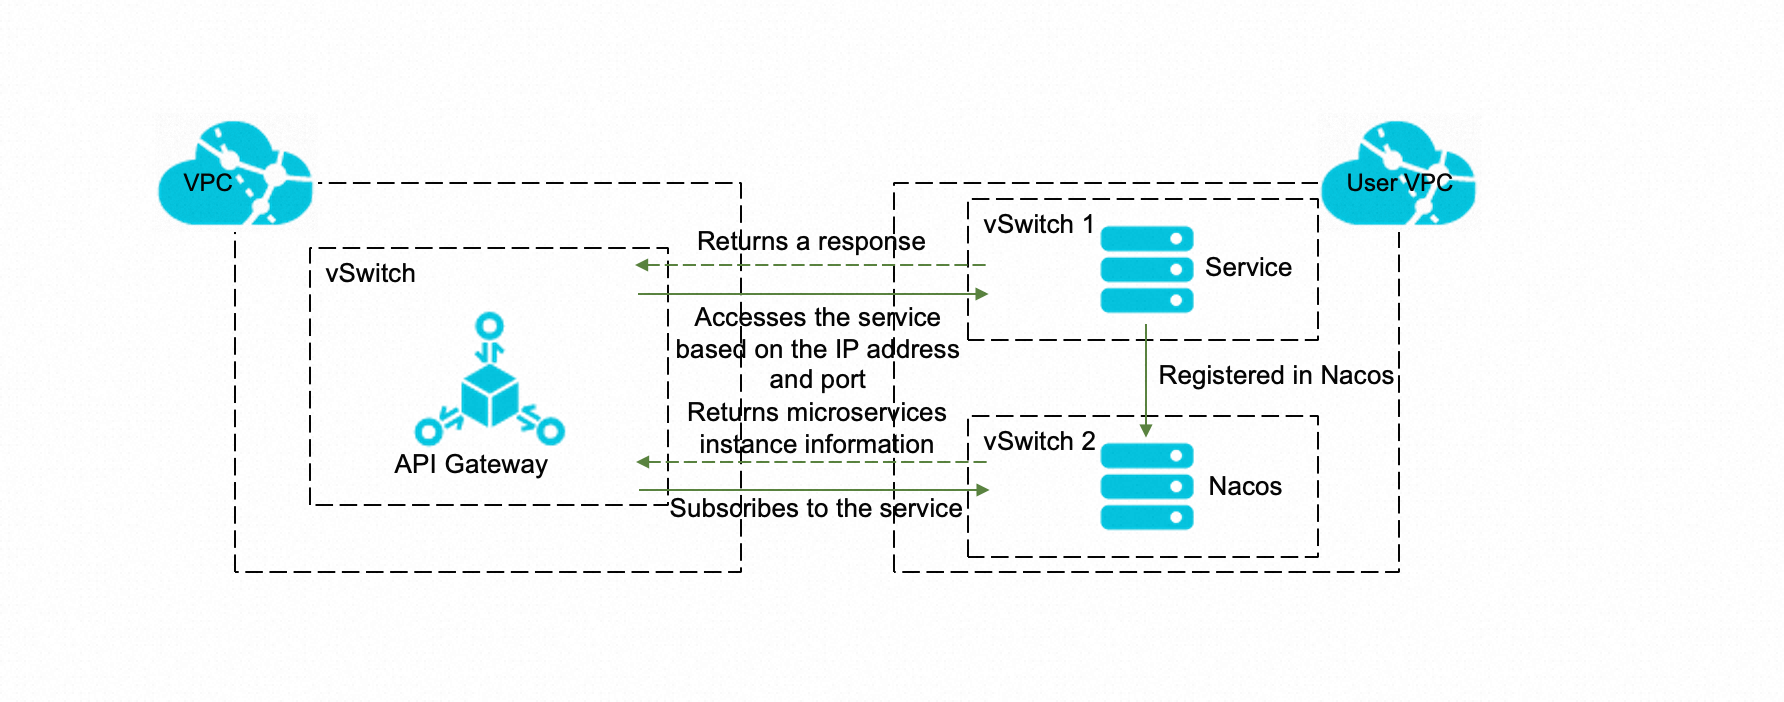
The following flowchart shows how API Gateway accesses a backend microservice.
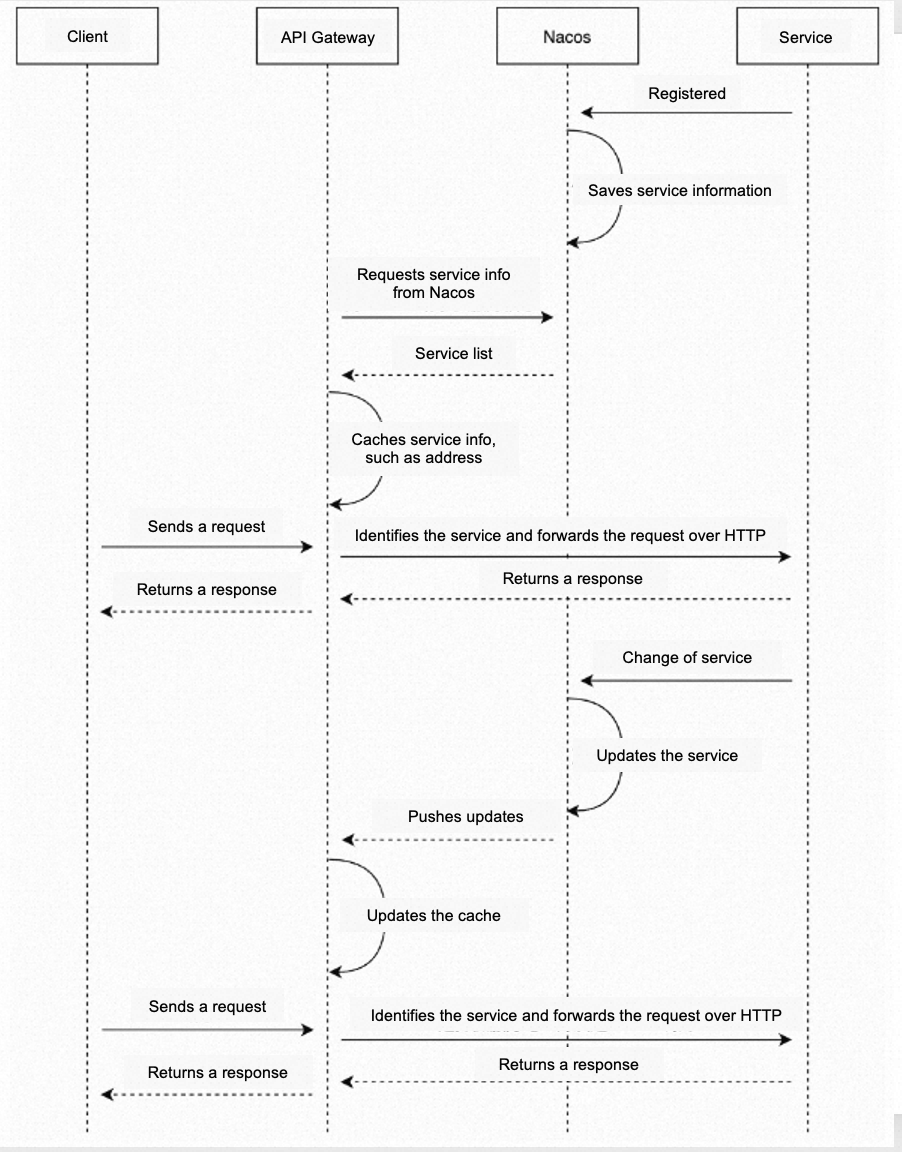
-
A service provider registers its microservice application with the Nacos server.
-
API Gateway sends a request to Nacos to obtain service instance information, including the IP address, port, and weight. To reduce network communication and improve response speed, API Gateway caches this information.
-
When a client request reaches API Gateway, the gateway first retrieves an available microservice instance address from its cache. The probability of an instance being selected is proportional to its weight. Then, the gateway sends an HTTP request to the selected instance's
IP:Port. After receiving the backend response, the gateway returns it to the client. -
If the microservice application information changes, for example, an instance goes offline or a new one is added, Nacos pushes the updated instance information to API Gateway. The gateway then updates its cache in real time to ensure its cache remains consistent with the Nacos registry.
-
When the client sends another request, API Gateway uses the latest microservice address information for routing and forwarding.
API Gateway can only communicate with Nacos and microservice instances over a private network. Therefore, when you create an API, the Nacos service address must be a private address. Otherwise, the gateway returns an error indicating an invalid Nacos address. Similarly, the backend addresses of the microservices registered in Nacos must also be private addresses. During an API call, if the gateway retrieves a public IP address for a microservice from Nacos, the request will fail, and the gateway will return the error code I504IA. If the gateway fails to retrieve any microservice backend address from Nacos, it returns the error code I504BA.
Step 1: Create a VPC integration instance
Standard dedicated instances cannot communicate over private networks. VPC integration instances bridge this gap by connecting directly to your VPC. For more information, see Create a VPC integration instance. When creating an instance, bind your VPC to the gateway instance. On the instance creation page, select an available User VPC ID and select the zone, vSwitch, and security group. After you complete the configuration, the gateway can access cloud resources in the specified vSwitch over the private network.
You also need to configure other parameters, such as the Billing Method (for example, Pay-As-You-Go), region and zone (for example, China (Beijing)), instance type (for example, api.s1.small), API Gateway Instance CIDR Block, HTTPS Security Policy (for example, HTTPS2_TLS1_0), Network Billing Type (for example, Pay-By-Traffic), and the Instance Name.
Step 2: Deploy Nacos and register an application
-
Deploy a Nacos service
The Nacos service must be deployed within the VPC, zone, and vSwitch you selected in Step 1. You can deploy a native Nacos service on an ECS instance within the selected vSwitch. This allows you to set the Nacos service address to "private IP address of the ECS instance:port of the Nacos service". When you create the ECS instance, select VPC for the network type, and ensure the VPC and vSwitch match the configuration from Step 1.
NoteFor more information, see Deploy Nacos and Create an ECS instance.
Alternatively, you can use Alibaba Cloud Microservices Engine (MSE) to create a Nacos service. When creating the service, select VPC as the network type and ensure the VPC and vSwitch match the configuration from Step 1. After the service is created, you can find its access address on the instance list page in the MSE console.
NoteFor more information, see Create a Nacos engine.
-
Register a microservice application
Your microservice application must also be deployed within the VPC, zone, and vSwitch you selected in Step 1. This ensures that the microservice can be successfully registered with Nacos and accessed by API Gateway. You can deploy your microservice application on an ECS instance created in the vSwitch specified in Step 1.
ImportantThe microservice application registered with Nacos must support HTTP calls.
Step 3: Create an API group
APIs are managed in API groups. You must create an API group before you can create APIs within it. Log on to the API Gateway console. In the navigation pane on the left, choose , and then click Create Group in the upper-right corner. In the dialog box that appears, enter the group information. For the instance, select the VPC integration instance you created in Step 1. You can specify a custom group name and BasePath. After the group is created, you can find it in the Group List. Click the group name to open the Group Details page, where you can bind a domain name, modify basic information, or change the instance type.
API Gateway automatically assigns a public second-level domain name to the API group for debugging purposes. Direct access to this domain name is limited to 1,000 calls per day in regions in the Chinese mainland and 100 calls per day in regions outside the Chinese mainland, including China (Hong Kong). We recommend that you bind a custom domain name to the group for production use.
Step 4: Create a backend service
Go to the API Gateway console. In the navigation pane on the left, choose . In the upper-right corner of the page, click Create Backend Service. In the dialog box that appears, enter a name for the backend service and select Service Discovery as the backend type. After the backend service is created, click its name in the Backend Service List to go to the details page.
Service-discovery APIs can only be created from an existing backend service, so you must create the backend service first.
In this example, select the RELEASE environment. You must create a backend service in an environment before you can publish an API to it. On the right side of the page, click Create to open the backend service configuration page.
Configure the following information for your Nacos service and microservice application:
-
NACOS Address: The private address of the Nacos service. Required. Enter the actual deployment address from Step 1.
-
namespace: The namespace of the microservice application. Required. Enter the namespace ID.
-
Group: The group to which the microservice application belongs. Required.
-
Service Name: The name of the microservice application. Required.
-
Authentication: The authentication method for Nacos. Required. Options: No Authentication, Account and Password Authentication, or key pair authentication.
-
Cluster: The cluster of the microservice application. Optional. Separate multiple cluster names with commas.
If authentication is enabled for your Nacos service, provide the corresponding credentials. For a native Nacos service with account and password authentication, select Account and Password Authentication and enter the credentials. If you use Alibaba Cloud Microservices Engine (MSE) to manage Nacos, select key pair authentication. First create a RAM user with read-only permissions on MSE resources, then enter the RAM user's AccessKey and SecretKey on the configuration page. If your Nacos service does not require authentication, select No Authentication.
For more information, see Nacos Authentication for native Nacos and Nacos client access authentication for MSE.
If you update the configuration of your Nacos service, you must also update the corresponding backend service configuration to ensure that API Gateway can still access the specified microservice application.
Step 5: Create an API
Go to the API Gateway console. In the navigation pane on the left, choose . On the Backend Service List page, find the backend service you created and click Create API in the Actions column.
-
Configure basic API information
Configure the basic information for your API, including the API group, name, security authentication method, type, and description. Select the API group you created earlier. For Security Authentication, select Alibaba Cloud APP. For AppCode Authentication, select Allow AppCode Authentication (Header & Query). You can specify a custom API name and description.
You can choose a different security authentication method based on your needs. If API Gateway does not need to perform security checks, select No Authentication.
-
Define the API request
Define how clients call your API by specifying the request type, protocol, path, HTTP method, request mode, and parameters. Configure the client request path and method according to your requirements.
-
Define the API backend service
Define how API Gateway maps client request parameters and routes the request to the backend service. For this example, select Use Existing Backend Service as the backend configuration, select Service Discovery as the backend service type, and then select the backend service you created earlier. Set the backend request path, method, and timeout as needed.
-
Define the response
Provide sample success and failure responses to generate API documentation for consumers. This step is optional for this tutorial, so you can click Create.
-
Publish the API
After you save the API, publish it. Changes to an API definition take effect only after being published to an environment. In this example, the backend service was configured only in the RELEASE environment, so publish the API to that environment. To publish to other environments, define the backend service for those environments first. Click Publish and follow the prompts to publish the API to the RELEASE environment.
Step 6: Create and authorize an application
An application (APP) represents the identity of an API caller. Because Alibaba Cloud APP authentication was selected when creating the API, you must create an application and authorize it to call the API before it can be accessed. For detailed steps, see Manage authorizations.
Step 7: Debug the API
API Gateway provides an online debugging feature. Use it to verify that your API is configured correctly before clients call it.
On the API list page, click the API you just created to go to its details page, and then click Debug API. If you defined input parameters for the API, you can enter different values on the Debug API page to test the API's behavior.
When you debug the API, make sure to select an authorized application and set Stage to the environment where the application is authorized. If you select an incorrect Stage, the debugging may fail.