Exchanges
An exchange routes messages from producers to one or more queues or discards them based on routing keys. Each exchange type applies different routing rules. You can create exchanges, view statistics, configure bindings, and send test messages in the Alibaba Cloud Message Queue for RabbitMQ console.
Create an exchange
Log on to the ApsaraMQ for RabbitMQ console. In the left-side navigation pane, click Instances.
In the top navigation bar of the Instances page, select the region where the instance that you want to manage resides. Then, in the instance list, click the name of the instance that you want to manage.
In the left-side navigation pane, click Exchanges.
-
On the Exchanges page, select a vhost from the Change drop-down list next to vhost, and then click Create Exchange.
-
In the Create Exchange panel, enter an Exchange Name, select a Type, specify whether the exchange is an internal exchange, and then click OK.
Parameter
Description
Exchange Name
The exchange name. Names prefixed with
amq.are reserved. For example,amq.testis invalid.Type
The exchange type. Valid values:
-
direct: Routes messages to queues whose binding key exactly matches the routing key.
-
topic: Similar to direct, but supports wildcard pattern matching between the routing key and the binding key.
-
fanout: Routes all messages to every bound queue, similar to a broadcast.
-
headers: Routes messages by matching message header attributes against binding attributes, both specified as key-value pairs. Does not use a routing key.
-
x-delayed-message: Set the x-delay header on a message to specify a delay in milliseconds. After the x-delay period elapses, the message is routed based on the exchange routing type specified in x-delayed-type.
-
x-consistent-hash: Hashes a routing key or header value and uses consistent hashing to distribute messages across queues.
x-delayed-type
Required when Type is
x-delayed-message. Specifies the routing type for the exchange.Hash value
Required when Type is
x-consistent-hash. Specifies the input type for the hash calculation. Valid values:-
Routing Key
-
Header Value: If selected, you must also specify the hash-header parameter.
hash-header
Required when Type is
x-consistent-hashand Hash value is Header Value. The header key used as input for the hash calculation.Internal
Whether the exchange is internal. Default: No. Valid values:
-
Yes: The exchange is internal and used only for exchange-to-exchange bindings.
-
No: The exchange is not internal and is used for exchange-to-queue bindings.
-
View statistics
You can view various metrics to identify and locate issues at the earliest opportunity.
-
On the Exchanges page, find the target exchange and click Details in the Actions column.
-
On the Exchange Details page, click the Monitoring and Alerting or Dashboard tab.
Available statistics depend on the instance edition:
-
Enterprise Edition and Enterprise Platinum Edition: You can view the metrics provided by Managed Service for Prometheus and Managed Service for Grafana. For information about the dashboard and metrics displayed on the dashboard, see Dashboard.
-
Standard Edition and Professional Edition: You can view the monitoring data provided by CloudMonitor. For information about metrics provided by CloudMonitor, see Monitoring and alerting.
NoteApsaraMQ for RabbitMQ no longer allows you to purchase Standard Edition instances. You can continue using existing Standard Edition instances.
-
Bind an exchange to a queue
Bind an exchange to a queue to route messages to it.
-
On the Exchanges page, find the target exchange and click Bound as Source in the Actions column.
-
On the Exchange Details page, click the Bound as Source tab, and then click Add Binding.
-
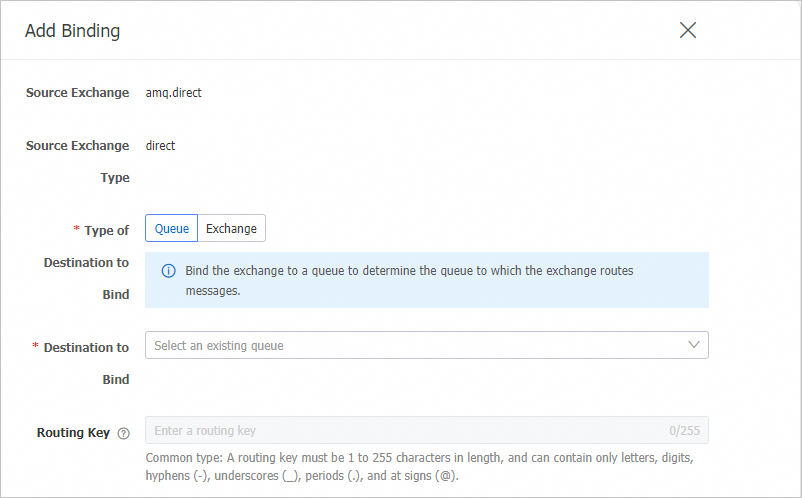
In the Add Binding panel, set Type of Destination to Bind to Queue, select a queue for Destination to Bind, set the Routing Key, and then click OK.
Note-
For x-consistent-hash exchanges, the Routing Key represents the queue weight and must be an integer from 1 to 20.
-
If a duplicate binding exists, only the first valid binding takes effect.
-
To change the weight of a bound queue, delete the existing binding and add a new one.
-
Bind an exchange to another exchange
Bind an exchange to another exchange as its destination. Messages are forwarded from the source to the destination based on routing rules.
-
On the Exchanges page, find the target exchange and click Bound as Source in the Actions column.
-
On the Exchange Details page, click the Bound as Source tab, and then click Add Binding.
-
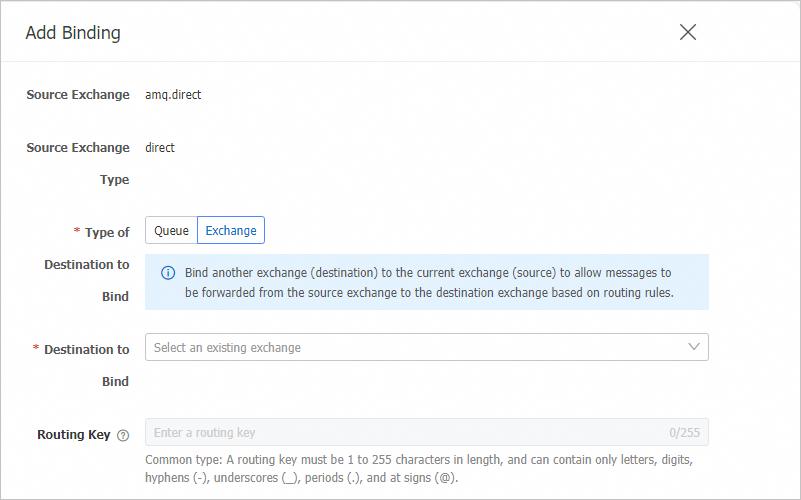
In the Add Binding panel, set Type of Destination to Bind to Exchange, select an exchange for Destination to Bind, set the Routing Key, and then click OK.
Bind an exchange as a destination
Bind a source exchange to the current exchange, making it the destination. Messages are forwarded from the source based on routing rules.
-
On the Exchanges page, find the target exchange and click Details in the Actions column.
-
On the Exchange Details page, click the Bound as Destination tab, and then click Add Binding.
-
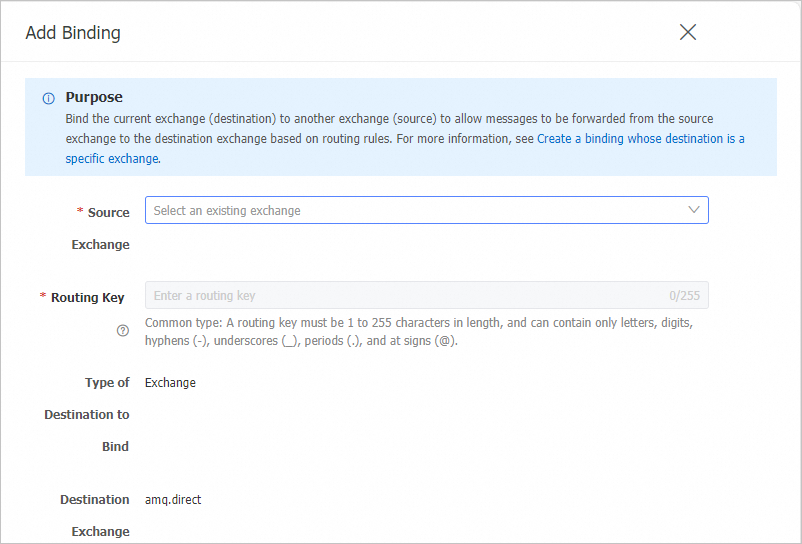
In the Add Binding panel, select a Source Exchange and enter a routing key in the Routing Key text box. The Type of Destination to Bind defaults to Exchange, and the Destination Exchange defaults to this exchange. Click OK.
Send a message
After creating a binding, you can send a test message from the console. The message is routed to the bound destination queue or exchange.
-
On the Exchanges page, find the target exchange and click Details in the Actions column.
-
On the Exchange Details page, click the Bound as Source or Bound as Destination tab.
-
In the list of bindings, find the target binding and click Send Message in the Actions column.
-
In the Send Message panel that appears, enter a Message ID and the Message Body, and then click OK.
Delete an exchange
-
Deleting an exchange is irreversible. Producers can no longer send messages to it, and all routing stops.
-
You cannot delete exchanges of the headers type.
-
You cannot delete the three built-in exchanges in a vhost:
amq.direct,amq.topic, andamq.fanout.
-
On the Exchanges page, click the name of the exchange you want to delete. On the Exchange Details page, click Delete in the upper-right corner.
-
In the Confirmation dialog box, read the message and click OK.