After you instrument an application by using SkyWalking and report trace data to Managed Service for OpenTelemetry, Managed Service for OpenTelemetry starts to monitor the application. You can view various monitoring data, such as application topology, traces, error transactions, slow transactions, and SQL analysis. This topic describes how to use the SkyWalking Go Agent to perform automatic instrumentation and report application data.
ARMS provides a commercially supported, self-developed agent for Go applications. This agent enables non-intrusive instrumentation and offers richer features and higher stability. For more information, see Start monitoring Go applications.
Prerequisites
-
Log on to the ARMS console. In the left-side navigation pane, click Integration Center.
-
On the Integration Center page, click the SkyWalking card in the Server-side Applications section.
-
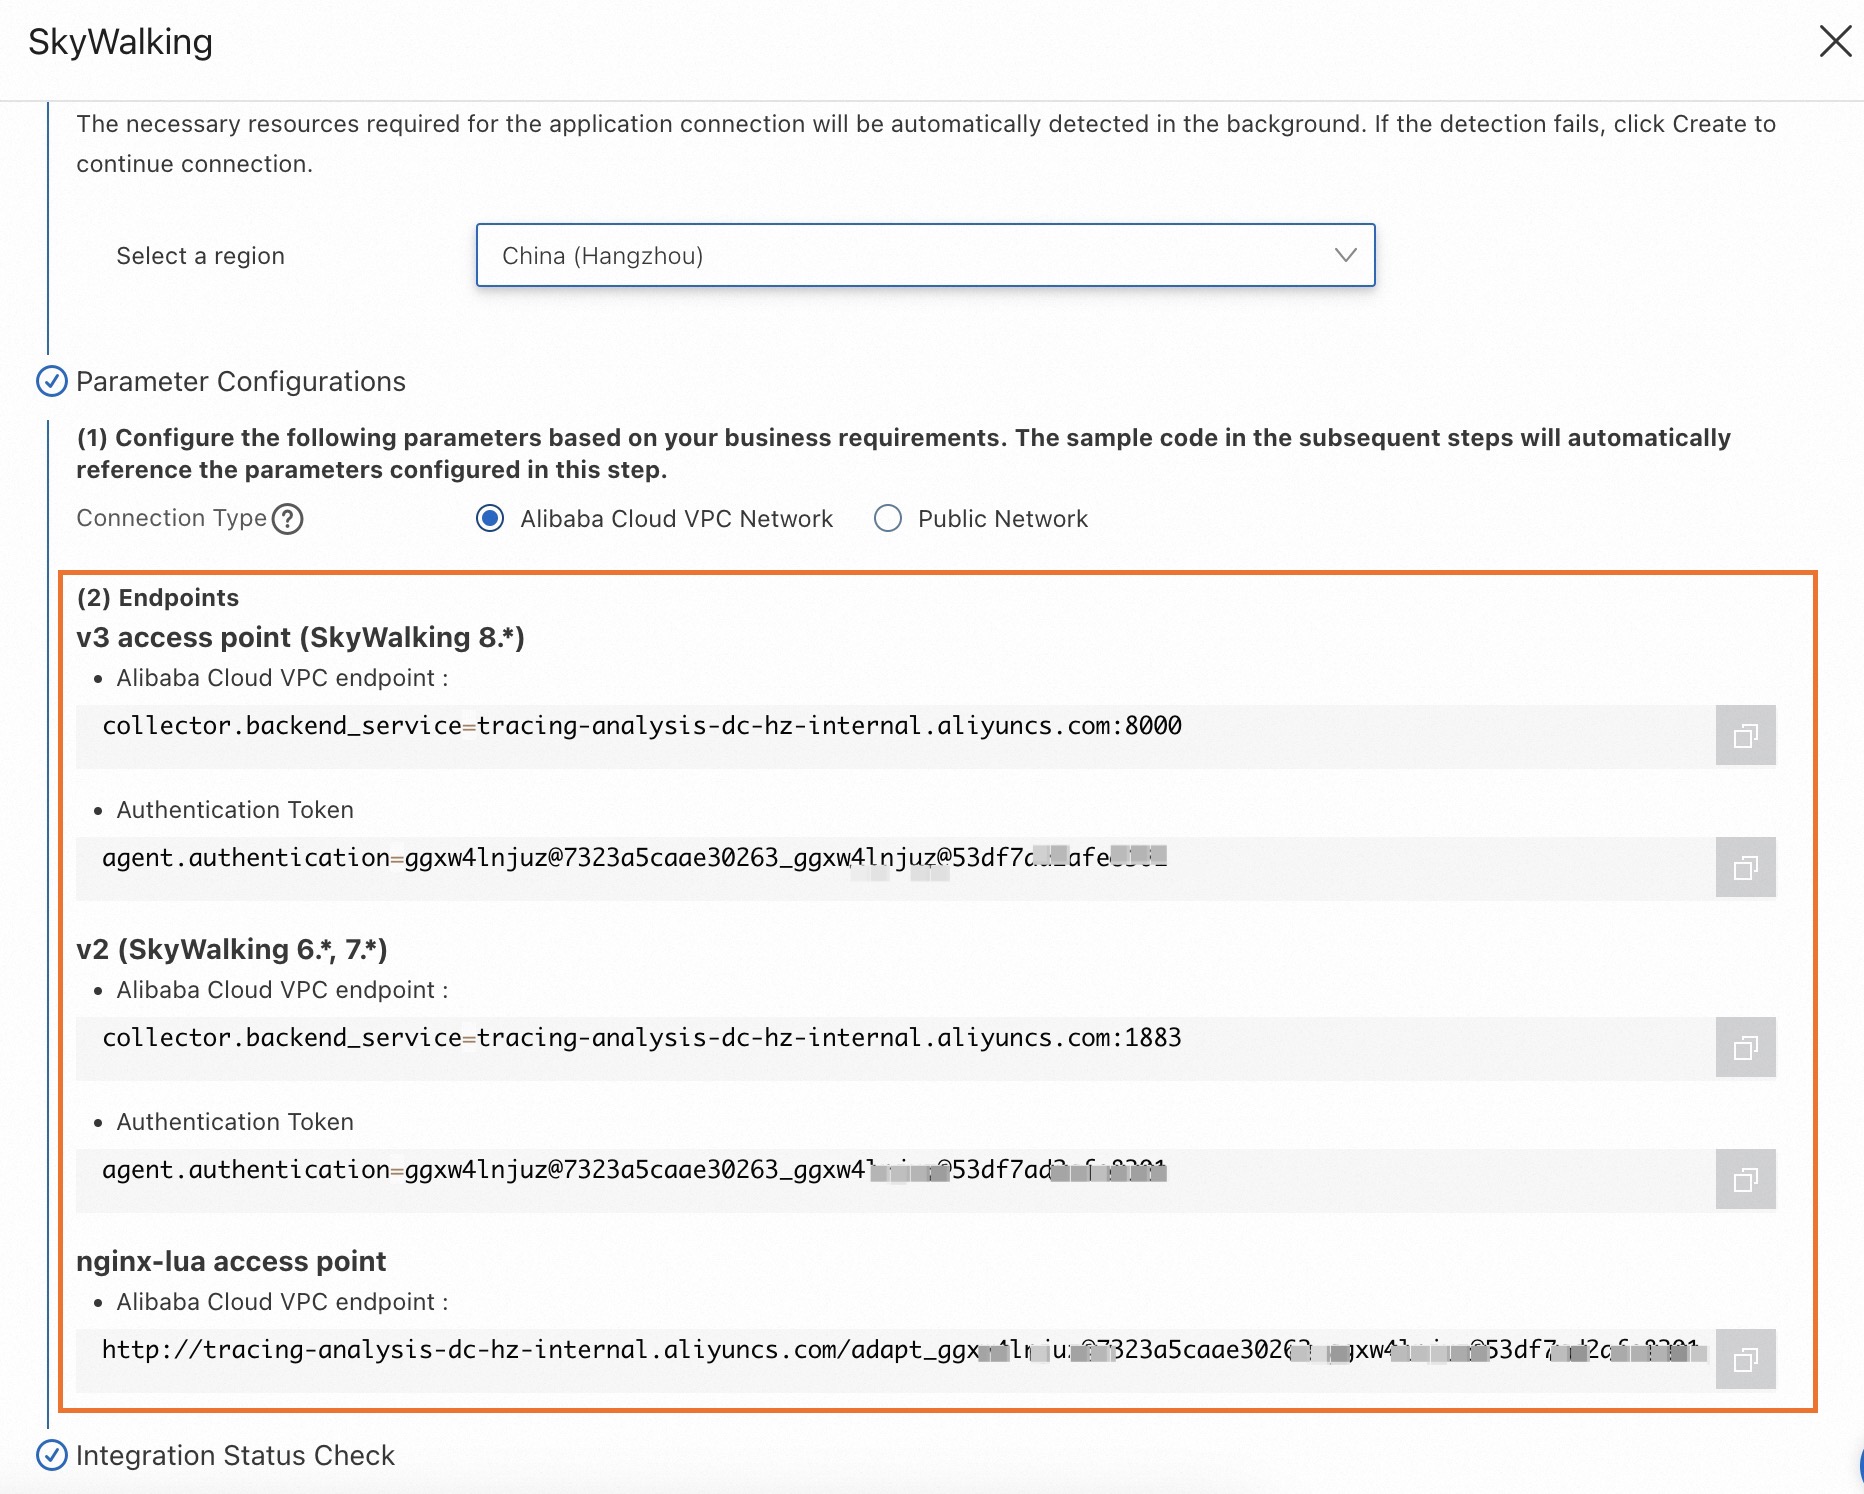
In the SkyWalking panel, click the Start Integration tab, and then select a region in which you want to report data.
NoteWhen you access a region for the first time, resources are automatically initialized there.
-
Configure the Connection Type parameter and copy an endpoint.
If your service is deployed on Alibaba Cloud and resides in the region that you selected, we recommend that you set this parameter to Alibaba Cloud VPC Network. Otherwise, set this parameter to Public Network.
Choosing an agent
Go2Sky is the official legacy SkyWalking Go agent. It is widely used but involves significant code intrusion. For this reason, the official community launched a new, non-intrusive agent named skywalking-go. This topic provides procedures for using both Go2Sky and skywalking-go agents to report data to the Managed Service for OpenTelemetry console.
Go2Sky
-
A legacy SkyWalking agent that is no longer maintained. The official community has moved it to the Retired section.
-
High code intrusion. You must add a hook to your project for each plug-in.
-
Widely used.
-
Supported instrumentation libraries:
skywalking-go
-
A new SkyWalking agent with ongoing official support.
-
Almost non-intrusive.
-
Easy to use. You only need to specify the skywalking-go agent by using the
-toolexecparameter when you compile your Go project. -
Less widely used than Go2Sky.
-
Supported instrumentation libraries:
Recommended agent
We recommend that you use the new skywalking-go agent for the following reasons:
-
Ease of use: The skywalking-go agent simplifies integration with non-intrusive, automatic instrumentation that can be completed in a few steps. In contrast, the Go2Sky agent requires manually adding a hook for each plug-in.
-
Community support: The official community no longer supports Go2Sky or accepts pull requests for Go2Sky.
-
Plug-in ecosystem: The official community continues to port plug-ins from Go2Sky to skywalking-go. Compared with Go2Sky, skywalking-go also supports instrumentation for the gRPC framework.
Sample project
Sample repository: SkyWalking Demo
Using the skywalking-go agent
-
Download the skywalking-go agent.
-
Build the agent.
cd skywalking-go && make build -
An executable is generated in the skywalking-go/bin directory.
The executable name depends on the operating system. For example, on macOS, the executable is skywalking-go-agent--darwin-amd64.
On Linux, use
skywalking-go-agent--linux-amd64. On Windows, useskywalking-go-agent--windows-amd64. -
Open your Go project and import the SkyWalking module into the main package.
Method 1
package main
import (
	_ "github.com/apache/skywalking-go"
)
Method 2
skywalking-go/bin/skywalking-go-agent--darwin-amd64 -inject path/to/your-project -
Configure the config.yaml file.
You can modify the skywalking-go/tools/go-agent/config/config.default.yaml file in the sample project.
You can set parameters in two ways. For example, to set the service name, use one of the following methods:
config.yaml
agent:
  service_name: ${SW_AGENT_NAME:<your_service_name>}
Environment variables
export SW_AGENT_NAME=<your_service_name>To connect to the Managed Service for OpenTelemetry console, you must set the following parameters:
-
service_name: ${SW_AGENT_NAME:Your_ApplicationName}: The service name. -
backend_service: ${SW_AGENT_REPORTER_GRPC_BACKEND_SERVICE:127.0.0.1:11800}: The endpoint for data reporting. -
authentication: ${SW_AGENT_REPORTER_GRPC_AUTHENTICATION:}: The authentication token.
By default, the skywalking-go agent automatically instruments all supported plug-ins. To exclude specific plug-ins, configure the
excludedparameter. For example:# To exclude the sql plug-in plugin: excluded: ${SW_AGENT_PLUGIN_EXCLUDES:sql} # To exclude multiple plug-ins, separate their names with commas plugin: excluded: ${SW_AGENT_PLUGIN_EXCLUDES:sql,gorm} -
-
Rebuild the project.
# You must use -toolexec. sudo go build -toolexec "path/to/skywalking-go-agent -config path/to/config.yaml" -a-
path/to/skywalking-go-agent: The absolute path of the executable from Step 3. -
path/to/config.yaml: The absolute path of the configuration file for the skywalking-go agent.
-
-
Start your project to begin reporting SkyWalking data to the Managed Service for OpenTelemetry console.
Reference
The following table describes key properties of the skywalking-go agent. A value of NULL indicates that no default is set.
|
Environment variable |
Description |
Default |
|
SW_AGENT_NAME |
The service name. |
NULL |
|
SW_AGENT_INSTANCE_NAME |
The instance name. |
Auto-generated |
|
SW_AGENT_SAMPLE |
The sampling rate. The value must be between 0 and 1. |
1 |
|
SW_AGENT_REPORTER_GRPC_BACKEND_SERVICE |
The backend gRPC endpoint for reporting monitoring data. |
127.0.0.1:11800 |
|
SW_AGENT_REPORTER_GRPC_AUTHENTICATION |
The authentication token for the backend gRPC endpoint. |
NULL |
|
SW_AGENT_PLUGIN_EXCLUDES |
The plug-ins to exclude. |
NULL |
Using the Go2Sky agent
-
Go2Sky supports two configuration methods: hard-coding parameters in your project or using environment variables for automatic configuration.
Hard-coding
### Import parameters by using reporter.WithParameter().
report, err := reporter.NewGRPCReporter(
    <your-backend-server-address>,
    reporter.WithAuthentication(<your-auth-token>))
Environment variables
### Currently, go2sky supports reading the following parameters from environment variables. SW_AGENT_AUTHENTICATION SW_AGENT_LAYER SW_AGENT_COLLECTOR_HEARTBEAT_PERIOD SW_AGENT_COLLECTOR_GET_AGENT_DYNAMIC_CONFIG_INTERVAL SW_AGENT_COLLECTOR_BACKEND_SERVICES SW_AGENT_COLLECTOR_MAX_SEND_QUEUE_SIZE SW_AGENT_PROCESS_STATUS_HOOK_ENABLE SW_AGENT_PROCESS_LABELS ### Configure an environment variable. The following example uses macOS. # Method 1: Write to a shell profile (persistent). vim ~/.bash_profile export SW_AGENT_COLLECTOR_BACKEND_SERVICES=<your-collector-address> source ~/.bash_profile # Method 2: Set in a terminal session (temporary; not available in a new terminal). export SW_AGENT_COLLECTOR_BACKEND_SERVICES=<your-collector-address> -
Set the service name to identify your application.
ServiceName := <your-service-name> tracer, err := go2sky.NewTracer(ServiceName, go2sky.WithReporter(report)) -
Add a Go2Sky plug-in hook.
Go2Sky provides plug-ins for many libraries, but you must manually instrument your source code. For details, see the Go2Sky-Plugins repository on GitHub. Each plug-in folder contains a README.md file with a simple usage example.
Example with the gin framework:
-
Go to the /gin directory and open the /gin/v3/README.md file.
-
Add the middleware hook: v3.Middleware(r, tracer).
package main
import (
	"log"
	"github.com/SkyAPM/go2sky"
	v3 "github.com/SkyAPM/go2sky-plugins/gin/v3"
	"github.com/SkyAPM/go2sky/reporter"
	"github.com/gin-gonic/gin"
)
func main() {
	// Use gRPC reporter for production
	re, err := reporter.NewLogReporter()
	if err != nil {
		log.Fatalf("new reporter error %v \n", err)
	}
	defer re.Close()
	tracer, err := go2sky.NewTracer("gin-server", go2sky.WithReporter(re))
	if err != nil {
		log.Fatalf("create tracer error %v \n", err)
	}
	gin.SetMode(gin.ReleaseMode)
	r := gin.New()
	//Use go2sky middleware with tracing
	r.Use(v3.Middleware(r, tracer))
	// do something
}
-
-
Restart the application.
Reference
The following table describes the Go2Sky agent properties. A value of NULL indicates that no default is set.
|
Environment variable |
Description |
Default |
|
SW_AGENT_NAME |
The service name. |
NULL |
|
SW_AGENT_LAYER |
The name of the layer to which the instance belongs. |
NULL |
|
SW_AGENT_INSTANCE_NAME |
The instance name. |
Randomly generated |
|
SW_AGENT_SAMPLE |
The sampling rate. A value of 1 indicates full sampling. |
1 |
|
SW_AGENT_COLLECTOR_BACKEND_SERVICES |
The backend endpoint to which the agent reports data. |
NULL |
|
SW_AGENT_AUTHENTICATION |
The authentication token for the backend to which the agent reports data. |
NULL |
|
SW_AGENT_COLLECTOR_HEARTBEAT_PERIOD |
The agent heartbeat reporting interval. Unit: second. |
20 |
|
SW_AGENT_COLLECTOR_GET_AGENT_DYNAMIC_CONFIG_INTERVAL |
The interval for fetching dynamic agent configuration. Unit: second. |
20 |
|
SW_AGENT_COLLECTOR_MAX_SEND_QUEUE_SIZE |
The buffer size of the queue used to send spans. |
30000 |
|
SW_AGENT_PROCESS_STATUS_HOOK_ENABLE |
Specifies whether to enable the process status hook. |
false |
|
SW_AGENT_PROCESS_LABELS |
The process labels. Separate multiple labels with commas (,). |
NULL |
FAQ
-
What do I do if I see the following error when using skywalking-go?
U-VF4VY9W5-1944:skywalking-go-test whlongxi$ skywalking-go/bin/skywalking-go-agent--darwin-amd64 -inject ../skywalking-go-test -all
2023/08/09 16:55:59 version is empty, please use the release version of skywalking-go
If the
injectmethod fails, import the SkyWalking module in the main package. -
Why does the Managed Service for OpenTelemetry console not show correct traces for cross-process calls reported by Go2Sky?
An incorrect trace usually indicates that the trace ID was not propagated correctly. You must create the correct spans.
Use the following two APIs to connect traces across processes:
-
CreateEntrySpan: Creates an entry span and extracts the trace context (including the trace ID) from an HTTP request.
-
CreateExitSpan: Creates an exit span and injects the trace context (including the trace ID) into an HTTP request.
// In a single process, create a span by using CreateLocalSpan.
span, ctx, err := tracer.CreateLocalSpan(context.Background())
subSpan, newCtx, err := tracer.CreateLocalSpan(ctx)
// Across processes, extract context from the HTTP request by using CreateEntrySpan, and inject context into the HTTP request by using CreateExitSpan.
span, ctx, err := tracer.CreateEntrySpan(r.Context(), "/api/login", func(key string) (string, error) {
    return r.Header.Get(key), nil
})
span, err := tracer.CreateExitSpan(req.Context(), "/service/validate", "tomcat-service:8080", func(key, value string) error {
		req.Header.Set(key, value)
		return nil
})
To connect traces end-to-end across processes, services must propagate the trace ID. Use the preceding APIs to inject the context into HTTP requests, ensuring it travels with the request.
-