This topic describes how to scan code and merge models in an environment where your applications and models support multiple branches.
Background information
When developing with BizWorks, you may need to modify a model after generating a scaffold. Modifying the model on the modeling platform and then regenerating the scaffold is inefficient and disruptive. The platform solves this by supporting bidirectional synchronization between metadata and code. Developers can use specific annotations to add, modify, or delete model metadata during development. After development, these changes are merged into the platform's metadata to finalize the model.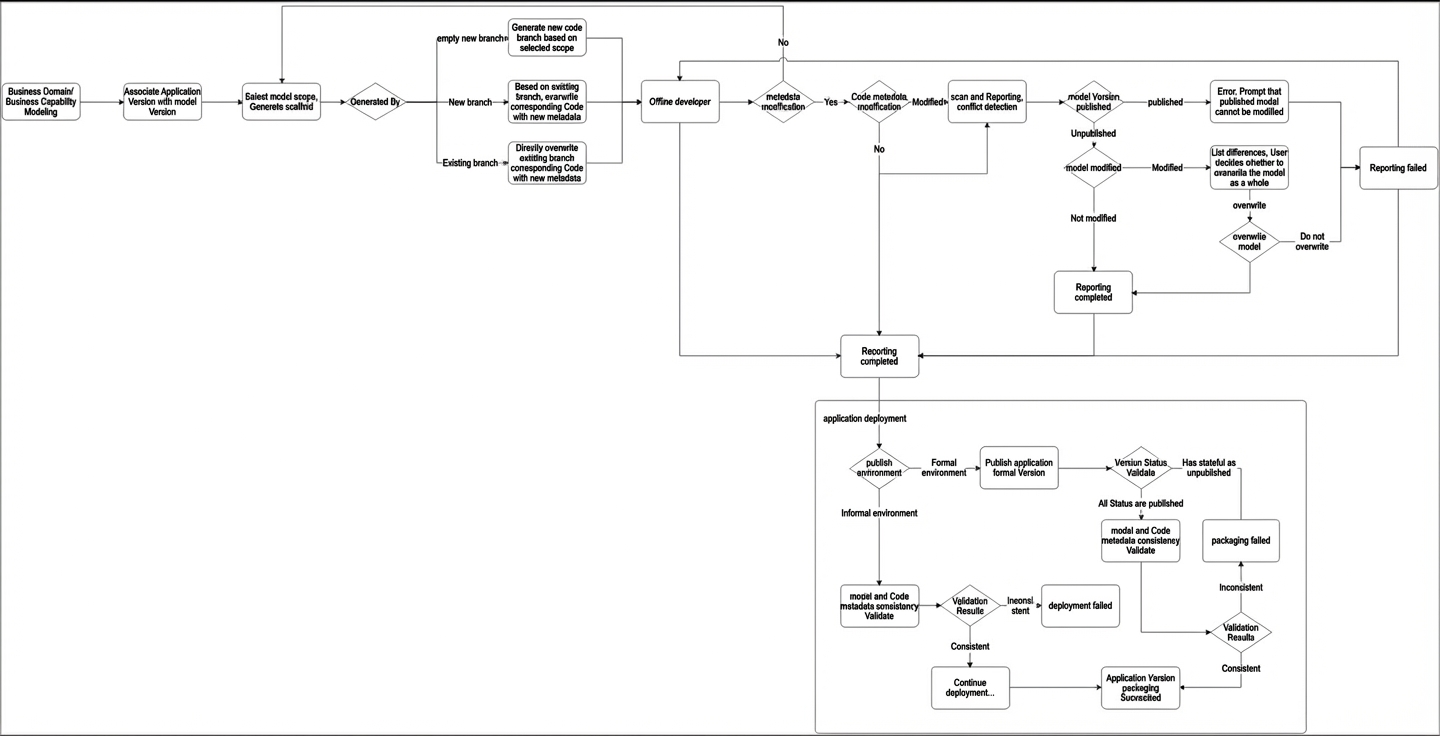
Published applications do not support code scanning, viewing model differences, or model merging.
Scan code
Log in to BizWorks, in the select Platform drop-down list selected microservice Development Platform.
Click the
 icon or the text box in the upper-right corner of the page. From the drop-down list, click the name of the project that you want to view and click the Applications tab. On the Applications page, click the name of the application that you want to view.
In the left-side navigation pane, choose .
On the Code Scan and Merge page, click Scan Code Branch.
In the Scan Code Branch dialog box, select a target code branch, enter remarks (optional), and then click Start Scan.
Scan successful: The branch status is updated to Scanned. You can then view differences or Merge.
Scan unsuccessful: The branch status is updated to Scan Failed. You can click Details next to the status to view the reason for the failure. The scan checks for the following issues:
The code cannot reference a bounded context that does not exist on the platform.
The code cannot contain unsupported data types.
View model differences
For branches with a status of Scanned, you can view model differences. This feature provides a visual comparison between the code model and the metadata model to help you identify discrepancies.
You can open the View Differences page in either of the following ways:
In the Actions column for the target branch, click View Differences.
In the Actions column for the target branch, click Merge, and then click View Differences in the merge model panel. In the Merge Model dialog box, the View Differences button is to the right of the target branch name and last scan time.
On the View Differences page, you can view the details of data differences between the code model and the metadata model.
The legend at the top of the dialog box explains the icons. A green dot indicates new data, a yellow dot indicates updated data, and a red dot indicates deleted data. An exclamation mark icon indicates that the code has modified a published bounded context or business capability process. You can select the Display only changed data checkbox to view only the nodes that have changed.
NoteIf an inherited parent object has a structural object annotation, the parent object is scanned and reported as a structural object, and the child object inherits from it.
The left side of the page displays the code model, and the right side displays the metadata model.
Model data is listed by bounded context.
Data is displayed in descending order of its creation time in the metadata model.
By default, all models are collapsed. You can click Expand All or the
 icon to expand nodes and drag the scrollbar to view all data.
Model data is categorized into the following three hierarchical types:
Hierarchy type
Description
Mutability
root node
A root node has no parent node but has child nodes. Only bounded context codes can be root nodes. A root node indicates that the application implements certain bounded contexts, which you can expand to view details.
No
intermediate node
An intermediate node is a child node of a root node or another intermediate node. It can also be a parent node to other intermediate nodes or leaf nodes. You can expand an intermediate node, though it may not have any child nodes.
No
leaf node
A leaf node is a child node of a root node or an intermediate node. A leaf node cannot be expanded and has no child nodes. It always contains a piece of data, such as a name or description.
Yes
Nodes are also categorized into two types based on whether they contain data:
Node type
Description
Mutability
grouping node
A grouping node does not contain data. These nodes are fixed and serve as text-only labels to categorize their child nodes, such as "domain object" or "domain service" under a bounded context.
No
data node
A data node contains data, such as a "bounded context code" or a "structural object code". It represents the code data itself and can be expanded to view related attributes or child nodes.
Yes
You can hover over the icon next to a node to view the change type in a tooltip.
Icon
Description

A published bounded context was modified in the code.

New data was added. If a parent node is new, all its child nodes are also new.
Data was updated.
For a leaf node, this icon appears only if the current data was updated.
For an expandable root node or intermediate node, this icon appears if any child node was added, updated, or deleted.
Data was deleted. If a parent node is deleted, all its child nodes are also deleted.


Merge models
For branches with a status of Scanned, you can merge the models.
In the Actions column for the target branch, click Merge.
On the Merge Model panel, review the merge rules and information. The panel displays the branch to be merged, the last scan time, and a View Differences link. The Key Data section lists the business domains and business capabilities. The merge rules are: models under development can be modified by code, published versions cannot be modified, and the latest scan result takes precedence. You can provide a merge description. When you are ready to proceed, click Start Merging.
In the confirmation dialog box, click Start Merging.
ImportantAfter the merge, the data from the code overwrites the data on the modeling platform.
You can view the merge status on the Code Scan and Merge page. Click a branch name to view the details of the latest scan and merge, as well as the history of previous scans and merges.