1. How to check the ComfyUI version
1.1 Method 1: Check the ComfyUI version by selecting
Step 1: In the lower-left corner, click Settings.
Step 2: Click About.
Step 3: View the ComfyUI version.
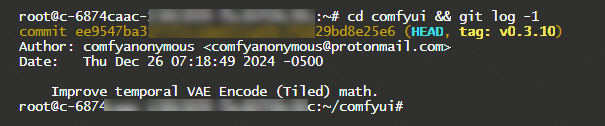
1.2 Method 2: Log on to the instance and run a command
Step 1: Click .
Step 2: Run the cd comfyui && git log -1 command.
2. How to upgrade the ComfyUI version
2.1 Method 1: Upgrade using ComfyUI Manager
Click ComfyUI Manager:
Click Update ComfyUI to upgrade to the latest version.
Click Switch ComfyUI to upgrade to a specific version.
After the upgrade is complete, click Restart to restart ComfyUI.
2.2 Method 2: Upgrade using Git commands after logging on to the instance
cd comfyui

git fetch --tags

# Check out the version you want to upgrade to
git checkout v0.3.41

# Install dependencies
pip install -r requirements.txt
After the upgrade is complete, click Restart to restart ComfyUI.
If the upgrade fails, log on to the instance and run the git config --global core.fileMode false command. This command configures Git to ignore file permission changes. This is necessary because in a Linux environment, Windows executable files in ComfyUI automatically lose their executable permissions. This permission change is detected by git diff and can interfere with the upgrade.
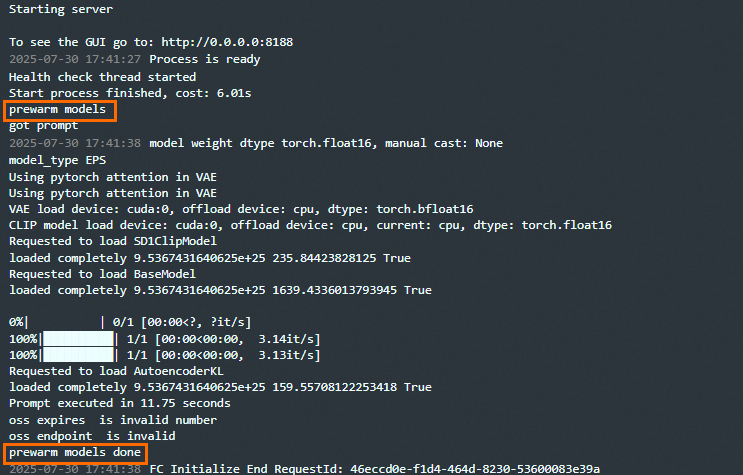
3. How to warm up a model to avoid long processing times for the first image generation request
When a new compute instance starts, it must load large and complex model files from the hard disk into the high-speed GPU memory. This loading process is time-consuming and causes the first image generation request to be slow. After the model files are loaded, they are cached in the GPU memory, which makes subsequent image generation requests faster. However, slow requests can still occur occasionally, which can be caused by configuration updates or underlying resource rotations.
To solve this problem and maintain stable processing times, Function AI provides a model warm-up feature. After ComfyUI starts, this feature automatically submits an image generation task before it handles external requests. This task preloads the model. This process ensures that even new instances can generate images with high performance.
3.1 Prepare the model warm-up script
Use Function AI to deploy a ComfyUI project with a single click. Then, test the workflow in the project's developer mode and export the workflow JSON file to use for the model warm-up.
Modify the content of the exported JSON file to create the model warm-up script.
ImportantThe warm-up workflow must meet the following requirements:
The workflow must run without errors. Ensure that all required models, extensions, and custom nodes are installed in the function instance.
To warm up multiple models, you can add multiple model loaders to the workflow or create sub-workflows.
The core purpose of a model warm-up is to load the model into the GPU memory, not to generate a high-quality image. Therefore, you can shorten the ramp-up period in the following ways:
Set the number of sampler iteration steps to 1.
Set the image dimensions (width and height) to the minimum value of 16 × 16 pixels.
The following provides an example.
{
  "3": {
    "inputs": {
      "seed": 234571336938304,
      "steps": 1,
      "cfg": 8,
      "sampler_name": "euler",
      "scheduler": "normal",
      "denoise": 1,
      "model": [
        "4",
        0
      ],
      "positive": [
        "6",
        0
      ],
      "negative": [
        "7",
        0
      ],
      "latent_image": [
        "5",
        0
      ]
    },
    "class_type": "KSampler",
    "_meta": {
      "title": "K Sampler"
    }
  },
  "4": {
    "inputs": {
      "ckpt_name": "sd-v1-5-inpainting.ckpt"
    },
    "class_type": "CheckpointLoaderSimple",
    "_meta": {
      "title": "Load Checkpoint"
    }
  },
  "5": {
    "inputs": {
      "width": 16,
      "height": 16,
      "batch_size": 1
    },
    "class_type": "EmptyLatentImage",
    "_meta": {
      "title": "Empty Latent Image"
    }
  },
  "6": {
    "inputs": {
      "text": "beautiful scenery nature glass bottle landscape, , purple galaxy bottle,",
      "clip": [
        "4",
        1
      ]
    },
    "class_type": "CLIPTextEncode",
    "_meta": {
      "title": "CLIP Text Encode (Prompt)"
    }
  },
  "7": {
    "inputs": {
      "text": "text, watermark",
      "clip": [
        "4",
        1
      ]
    },
    "class_type": "CLIPTextEncode",
    "_meta": {
      "title": "CLIP Text Encode (Prompt)"
    }
  },
  "8": {
    "inputs": {
      "samples": [
        "3",
        0
      ],
      "vae": [
        "4",
        2
      ]
    },
    "class_type": "VAEDecode",
    "_meta": {
      "title": "VAE Decode"
    }
  },
  "9": {
    "inputs": {
      "filename_prefix": "ComfyUI",
      "images": [
        "8",
        0
      ]
    },
    "class_type": "SaveImage",
    "_meta": {
      "title": "Save Image"
    }
  }
}
3.2 Configure the model warm-up
First, publish the API. Then, in the ComfyUI interface, navigate to . In the Advanced Configuration section, set Workflow Warm-up to Enable and paste the prepared model warm-up script.
On the page, in the Resource Configuration section, select a GPU resource that fits your business needs, configure a fast snapshot, and then click Save.
After you save the configuration, Function AI creates an instance and automatically triggers an image generation request when ComfyUI starts. This process warms up the model. To view the warm-up status, go to the API call mode and navigate to . The following figure shows an example.