Function AI provides built-in project templates, a developer toolchain, and a project management platform. These features allow individual and enterprise developers to focus on business scenarios, quickly build and iterate on Serverless applications, and improve development, deployment, and O&M efficiency. This topic uses the Flow-based retrieval-augmented generation (RAG) Application template as an example to demonstrate how to quickly build an application and create a dedicated online AI assistant by uploading a knowledge base.
Step 1: Choose a template
In the Function AI console, go to the Explore page. You can find application templates by searching or filtering by category.
Step 2: Deploy the project
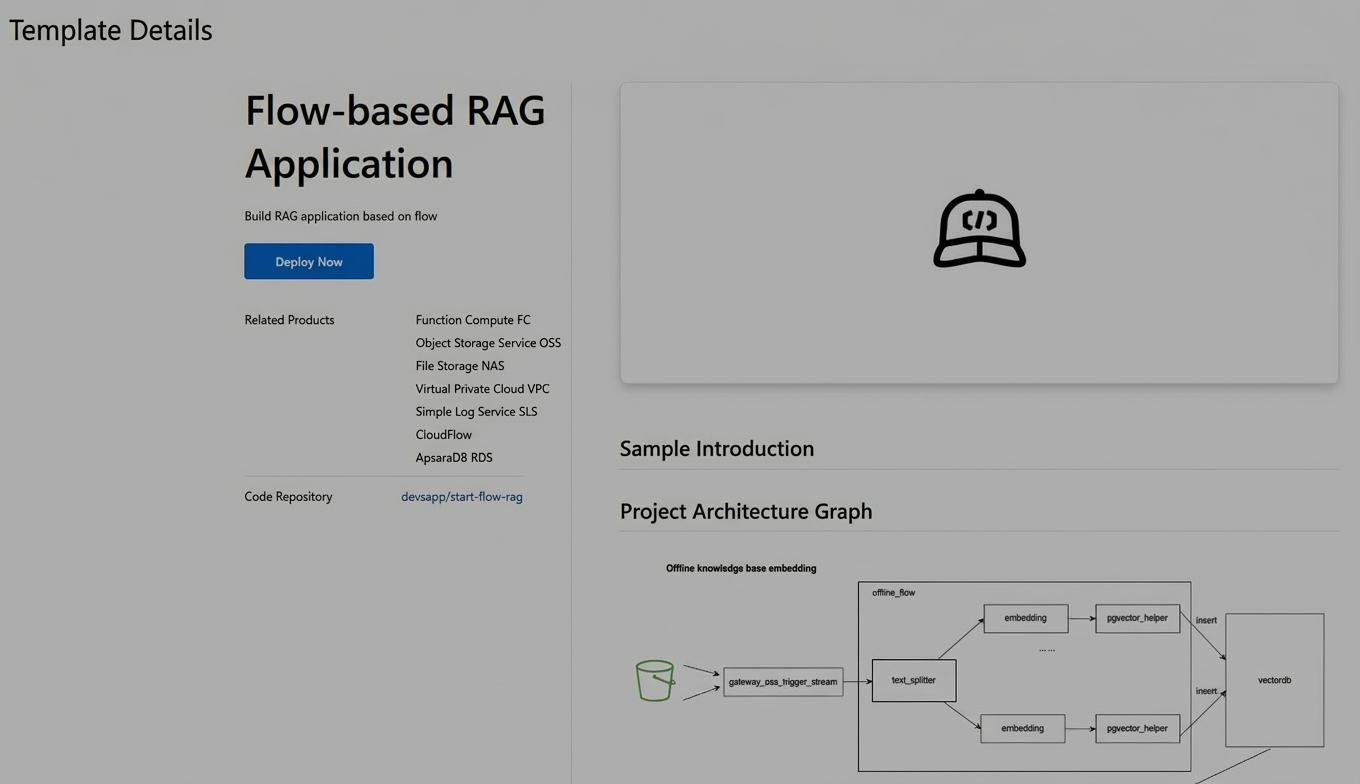
Click a template card. On the Template Details page, you can view the template's architecture, project introduction, usage instructions (project endpoints), and associated cloud products.
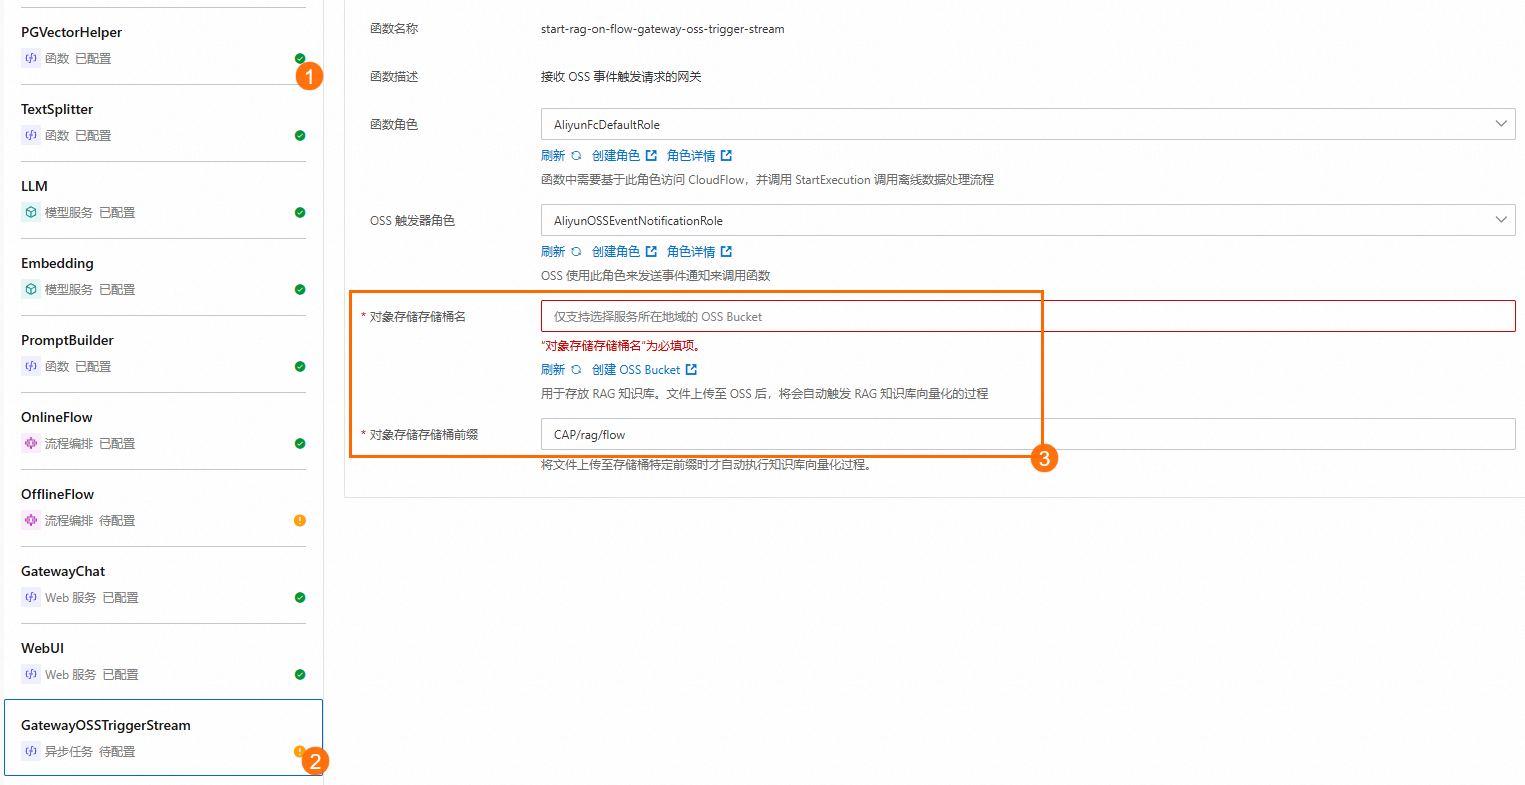
Click Deploy Now. A list of services related to the template is displayed. A green icon (① in the figure) next to a service indicates that default configurations are preset. A yellow icon (② in the figure) indicates that you must manually set some configuration items (③ in the figure). You can also change the default configurations. After you complete the configuration, click Deploy Project.
In this example, for the GatewayOSSTriggerStream function service, you must manually select an existing OSS Bucket. Ensure that the Object Storage Service Bucket Prefix is unique within the same Bucket.
In the Project Resource Preview dialog box, review the billing details for the related products. Then, click Confirm Deployment.
Check the status next to each service to confirm that it has been deployed. For services that have deployed successfully, you can view the deployment details in the Deployment Record.
Step 3: Access the application
After the deployment is complete, go to the project details page. In the upper-right corner, click Usage Instructions and follow the guide to access the project.
The RAG application in this example lets you upload text files in .txt or .pdf format to Object Storage Service. This automatically triggers Function Compute to chunk the files and store them in a vector database. When you chat with the bot, it automatically retrieves related information from the knowledge base and references it in its answers.
1. Upload a knowledge base
On the project details page, find the GatewayOSSTriggerStream service. Click the service name and select the Scheduling Rule tab. Click the Bucket name to navigate to the corresponding Bucket in the Object Storage Service console. Upload the text file to the folder with the same File Prefix. If the folder does not exist in the target Bucket, you must create it manually.
2. Start the online Q&A
On the project details page, find the WebUI service. Click the service name, select the Endpoint tab, and click the custom domain name to open the online Q&A interface in your browser.
The ****.devsapp.net domain name is provided by the Serverless Devs community for learning and testing only. The community performs irregular network probes on this domain and revokes the domain name one day after it is issued. For a better experience, attach a custom domain name. For more information, see Configure a custom domain name.
Step 4: Change code and configurations for custom development
You can perform custom development to better suit your business needs. The development methods vary by service type.
Function services
On the project details page, find a function service, such as TextSpliter. You can change the function code in the WebIDE to implement your data processing logic.
Model services
You can change the resource specifications or switch to your own trained model to meet your business needs.
Flow orchestration services
Select the Flow Definition tab to customize the orchestration logic.

Database services
On the project details page, find the VectorDB database service. You can change the database password to secure access to your knowledge base.
After you modify the project or service configuration, you must deploy the project. Two deployment types are supported:
Full deployment: Deploys the entire project. The Function AI platform automatically determines which service configurations have changed and deploys only the services with changes.
Service deployment: Deploys a single service. You can deploy a service regardless of whether its configuration has changed.
Full deployment
On the Project Details page, you can view the project's configuration status. If a service deployment has failed or if modified configurations are not yet online, Changes to Deploy is displayed in the upper-right corner. Click Full Deployment.
The Deployment Preview dialog box shows the differences between the
Target Configurationfor this deployment and theBaseline Configurationfrom the last successful deployment. Compare the version differences and click Confirm Deployment or Discard Changes.
A full deployment only deploys services with configuration changes.
During a full deployment, services with no dependencies are deployed in parallel. Services with dependencies are deployed in order of their dependency relationships.
Service deployment
If you have multiple services and need to deploy only a single service during development, use Service Deployment.
On the Project Details page, click the target service, and then click Deploy in the upper-right corner.
The Deployment Preview dialog box shows the differences between the
Target Configurationfor this deployment and theBaseline Configurationfrom the last successful deployment. Compare the version differences and click Confirm Deployment or Discard Changes.
Step 5: View deployment logs
After the application is online, you can view the service monitoring data and logs to check the application's health.
(Optional) Step 6: Delete the project
If you no longer need the project, delete it promptly to avoid unexpected charges. Deleting a project also deletes all its service resources.
In the project list, find the project that you want to delete. In the Actions column, click Delete. In the dialog box that appears, confirm the service resources to be deleted, enter the project name, select the check box, and then click Confirm Deletion.
References
To manage configurations and sensitive information, such as account passwords, across services, you can use shared variables, service variables, or service result variables. For more information, see Use variables to manage configurations across services.
For more information about the service types that Function AI supports, see Introduction to more service types.