You can use Cloud Backup to back up files from Elastic Compute Service (ECS) instances and restore them if they are lost or damaged. This topic describes how to back up files from an ECS instance.
This feature has been upgraded to ECS File Backup (New). We recommend that you use the new version of ECS File Backup. For more information, see Comparison between the new and legacy versions of ECS File Backup.
Prerequisites
You have completed the Preparations.
Back up files from a single ECS instance
Follow these steps to back up files from a single ECS instance using Cloud Backup:
Log on to the Cloud Backup console.
In the navigation pane on the left, choose .
On the ECS File Backup page, click the ECS Instance List tab.
Find the target ECS instance and click Back Up in the Actions column.
On the Create Backup Plan page, configure the parameters as described in the following table and then click Create.
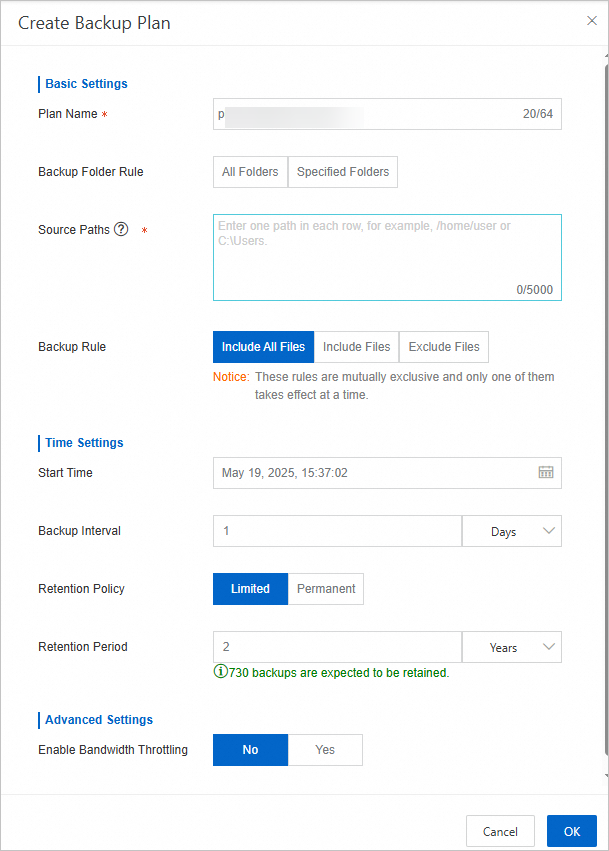
Parameter
Description
Backup Plan Name
Enter a name for the backup plan. If you leave this empty, a random name is assigned.
Backup file path
The rules for source paths are as follows:
If you do not use a wildcard character (*), you can enter up to eight paths.
If you use a wildcard character (*), you can enter only one path. Paths such as /*/* are supported.
Each line must be an absolute path, such as one starting with /, \\, C:\, or D:\.
NoteYou cannot back up multiple root paths at the same time. For example, you cannot back up C:\ and D:\ simultaneously.
When you use Volume Shadow Copy Service (VSS), multiple paths, Uniform Naming Convention (UNC) paths, wildcards, and file exclusions are not supported.
When you use UNC paths, VSS, wildcards, and file exclusions are not supported. If the backup source contains a UNC path, the Windows Access Control List (ACL) is not backed up.
Backup Rule
Select Include All Files or Exclude the following files.
If you select Exclude the following files, you must enter a list of files.
NoteThe rules for exclusion paths are as follows:
You can enter a maximum of eight paths, including paths that contain wildcard characters (*).
If a path does not contain a forward slash (/), a wildcard character (*) matches multiple levels of path names or filenames. For example, *abc* matches /abc/, /d/eabcd/, and /a/abc. *.txt matches all files with the .txt extension.
If a path contains a forward slash (/), each wildcard character (*) matches only a single level of a path or a filename. For example, /a/*/*/share matches /a/b/c/share but does not match /a/d/share.
If a path ends with a forward slash (/), it indicates a folder match. For example, *tmp/ matches /a/b/aaatmp/ and /tmp/.
The path separator is the forward slash (/) for Linux. For Windows, use a backslash (\).
Start Time
Select the time to start the backup. The time is accurate to the second.
Backup Interval
Select the frequency for incremental backups. The unit can be hours, days, or weeks.
NoteThe maximum backup interval is 52 weeks (one year).
Retention Period
Select how long to keep the backups. The unit can be days, weeks, months, or years.
Use VSS
This feature is supported only for Windows instances.
If data in the backup source changes and you need to ensure data consistency between the source and the backup, select Use.
If you select to use VSS, you cannot back up multiple file folders at the same time.
NoteThis feature is not supported if the backup source is on a volume in the exFAT format.
Use Throttling
Throttling can help you control the traffic for backing up file folders during peak business hours to avoid affecting normal business.
If you select Use, specify the Throttling Period and the Maximum Traffic that can be used for backup within that period based on your business needs. Then, click Add.
Batch back up files from multiple ECS instances
You can create multiple backup jobs in a batch to back up files from multiple ECS instances. To do this, follow these steps:
Log on to the Cloud Backup console.
In the navigation pane on the left, choose .
In the top navigation bar, select the region where the ECS instances that you want to back up are located.
In the upper-right corner of the page, choose .
On the Create Backup Plans in Batches page, click Download Template.
Open the downloaded template file, configure the template as described in the following table, and then save the file.
NoteIf you do not need to back up an instance, delete the row for that instance.
Parameter
Description
Client Id
Displays the clients that are available for backup. Do not modify this setting.
Instance Id
The ID of the ECS instance that corresponds to the client. Do not modify this value.
Instance Name
The name of the ECS instance that corresponds to the client. Do not modify this value.
Source
Enter the file folder to back up. The path must be an absolute path.
Plan Name
Enter a name for the backup plan. If you leave this empty, a random name is assigned.
Retention (Day)
Enter the retention period for the backup. The value must be an integer.
The default unit is days.
If you leave this empty, backups are retained for 730 days.
Effective Time
Enter the start time for the backup. Use the
YYYY-MM-DD/HH:MM:SSformat. For example, 2018-12-03/12:00:00.Backup Interval
Enter the interval for incremental backups. The value must be an integer.
The default unit is hours.
If you leave this empty, the default interval is 24 hours.
Use VSS for backup
This feature is supported only for Windows instances.
If data in the backup source changes and you need to ensure data consistency, use this feature.
Enter Y to use this feature or N to not use it. If you leave this empty, this feature is not used by default.
If you use VSS, you cannot back up multiple file folders at the same time.
Bandwidth Throttling
Controls the traffic used for backing up file folders to avoid affecting normal business.
If you use this feature, enter the maximum traffic that can be used for backup throughout the day.
The value must be an integer. The default unit is MB.
If you leave this empty, traffic is not throttled by default.
Click Upload File to upload the completed template.
Click Create.
Browse backup files online
You can use the online browsing feature of Cloud Backup to browse all files in each backup plan.
On the Backup Plans and Jobs tab, click View in the Actions column for the desired backup job.
Click Browse.
On the Browse tab, you can view all files in the source folder.
ImportantThis page is for browsing only. To restore ECS files, see Restore ECS files.
Related operations
On the ECS File Backup page, click the Backup Plans and Jobs tab. You can perform the following operations.
Operation |
Procedure |
View error report |
Find the backup job and check the backup progress. If some files fail to be backed up, click View. In the Number of Errors column, click the download icon to download the Error Report. |
Start backup |
In the Actions column of the backup job, choose . |
Cancel a running backup job |
In the Actions column of the backup job, choose . |
Pause a running backup job |
In the Actions column of the backup job, choose . |
Resume a paused backup job |
In the Actions column of the backup job, choose . |
Modify a backup plan |
In the Actions column of the backup job, choose . |
Delete a backup plan |
In the Actions column of the backup job, choose . After the backup plan is deleted, it will no longer run, but the backed-up data is retained. |
FAQ
If a file backup fails due to factors such as an unstable network, you can configure the following parameters to enable retries.
Log on to the server where the files need to be backed up.
Find and open the installation path of the Cloud Backup client.
In a subdirectory of the
clientfolder, create a file namedhbr.config.NoteThe
hbr.configfile must be in the same directory as thehybridebackupandidsexecutable programs.Add the following parameters to the
hbr.configfile.Parameter
Description
retry_times
The number of retries for a data backup. Default value: 3.
retry_interval
The interval between data backup retries. Default value: 100 ms.
skip_error_files
Specifies whether to skip files that fail to be backed up.
false (default): Does not skip files that fail to be backed up.
true: Skips files that fail to be backed up.
The following code provides an example configuration for the hbr.config file:
retry_times=3
retry_interval=100
skip_error_files=false