Perform batch administration for DataWorks using this tool
This topic describes how to perform batch administration for DataWorks scheduling workflows using the LHM scheduling migration tool.
The LHM scheduling migration tool lets you perform batch modifications on workflows and node properties in DataWorks.
This feature leverages the tool's DataWorks migration capability. The process involves exporting nodes from DataWorks, modifying their properties, and then importing them into a unified workspace. You can modify properties by editing an Excel spreadsheet without the need to write code or understand the standard data structure of LHM scheduling workflows. This method is flexible and user-friendly.
This solution complements the batch operations feature of DataWorks. We recommend that you first use the batch operations feature of DataWorks. If this feature does not meet your needs, you can use this solution.
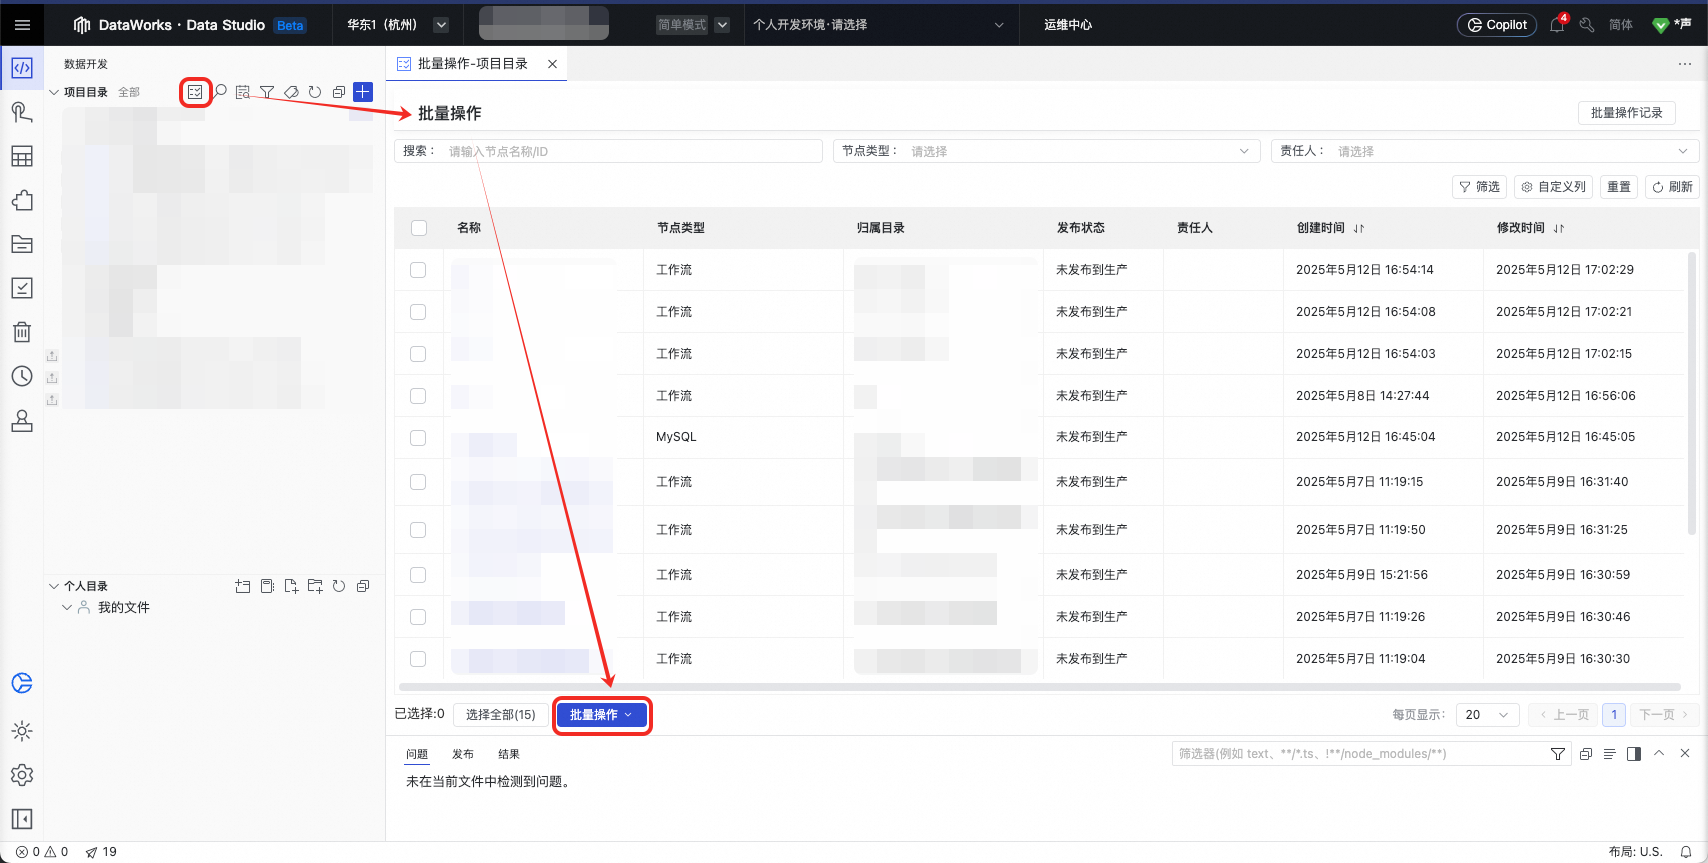
1. Export DataWorks scheduling workflows
Follow the instructions in the DataWorks cross-workspace migration guide to export workflows and generate the ReaderOutput.zip export package.
DataWorks cross-workspace migration
2. Perform batch administration for DataWorks
The statistical report in the LHM scheduling data packet displays a flat list of items and their main properties for workflows, workflow nodes, workflow resources, functions, and DataSources. The tool lets you modify scheduling properties by editing the table. Fields that you can modify are marked in blue font.
Decompress the ReaderOutput.zip export package and open the statistical report.

After you complete the batch modifications, delete the original compressed package, save the report, and then compress the report to create a new package.
2.1. Batch modify workflow properties
The Workflow child table lists the workflows in the workspace and their main properties.
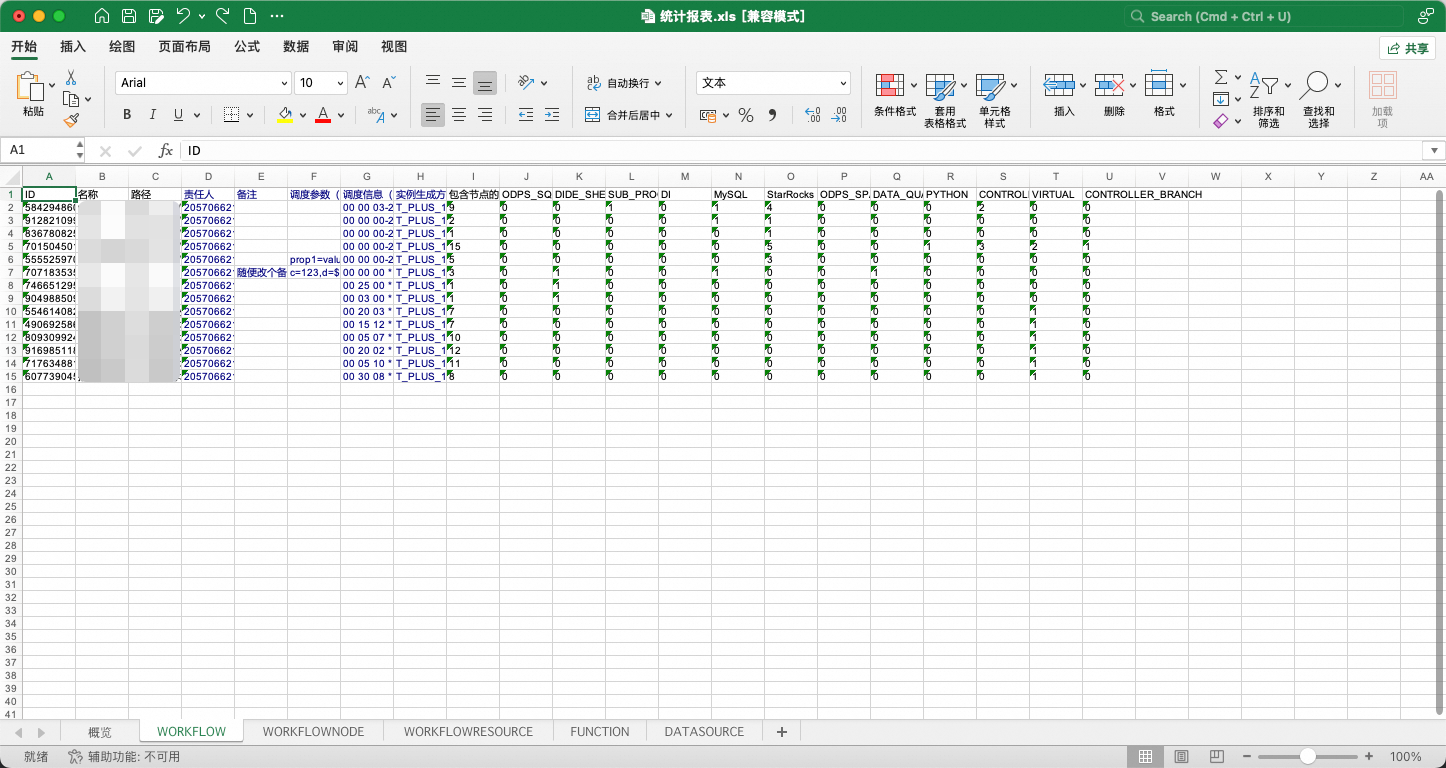
You can modify the following properties:
2.1.1. Owner
2.1.1.a. Definition
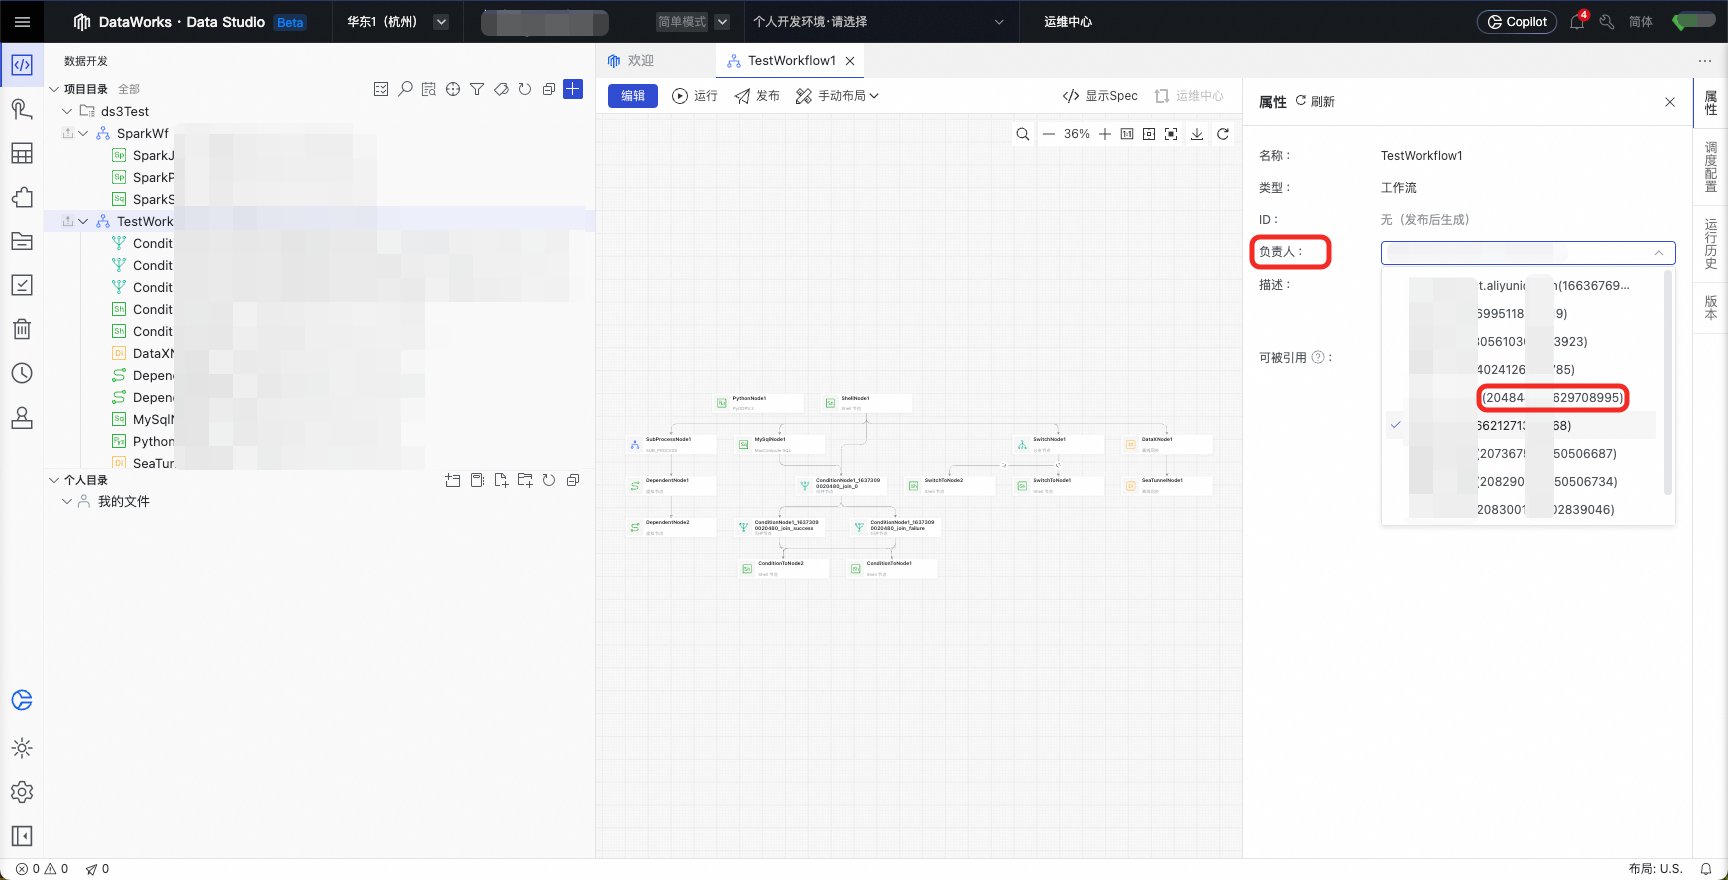
You can modify the "Owner" field in the table. This field corresponds to the following setting on the DataWorks Data Development page:
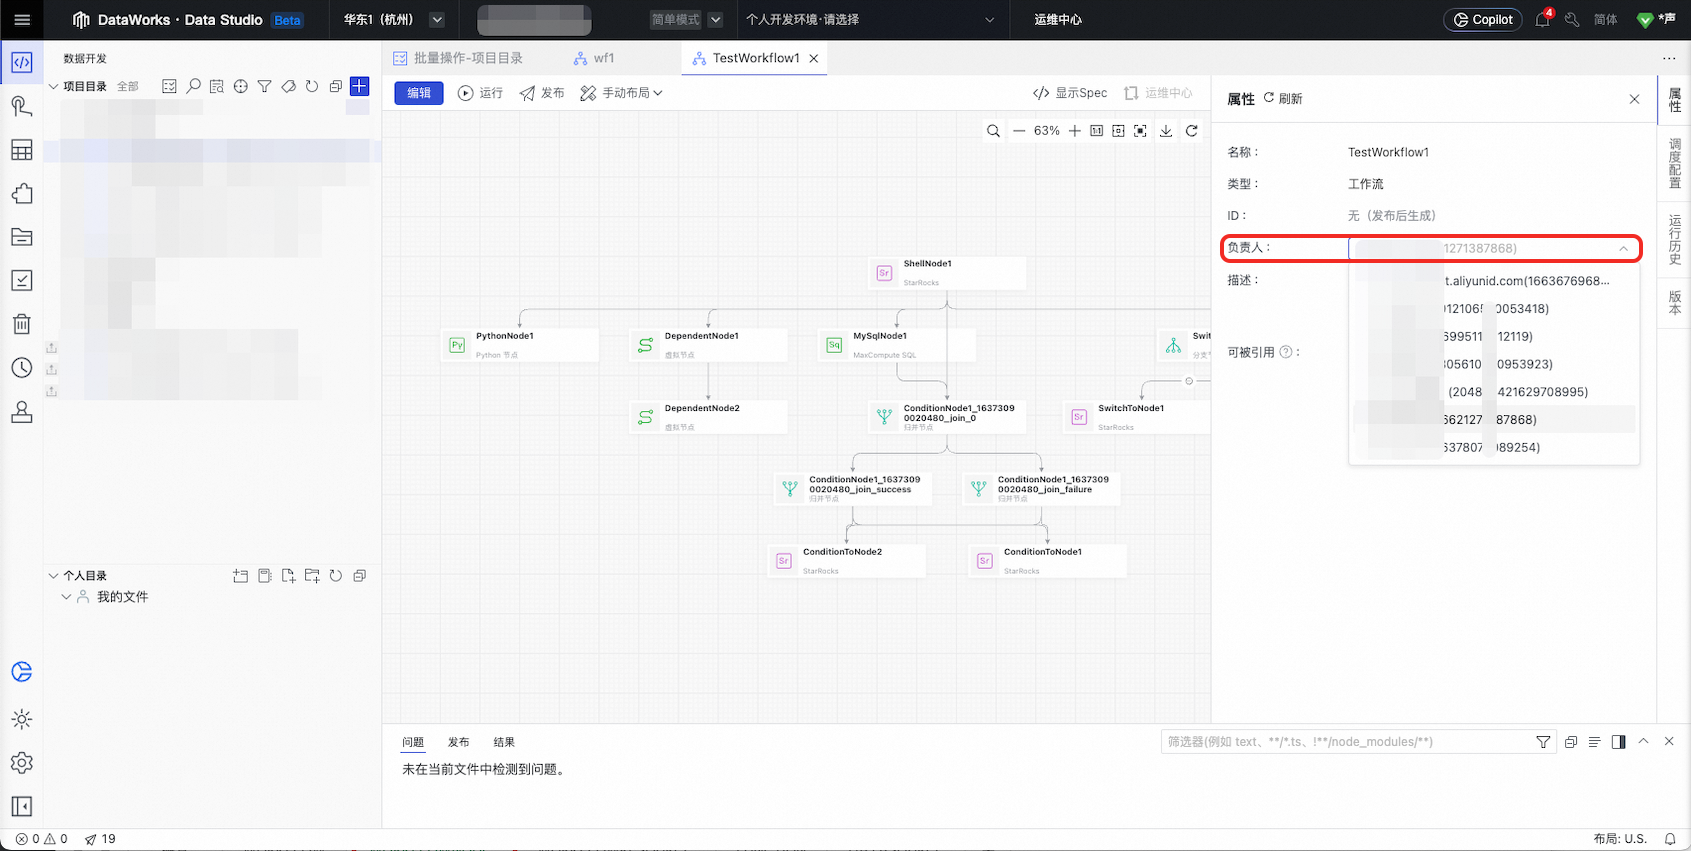
2.1.1.b. Allowed values
Enter the user's account ID in the "Owner" field. You can obtain the ID from the upper-right corner of the page or from the Owner drop-down list for the Data Development node. If you leave this field empty, the value is automatically set to the ID of the account that owns the AccessKey pair (AK and SK) used for the import.
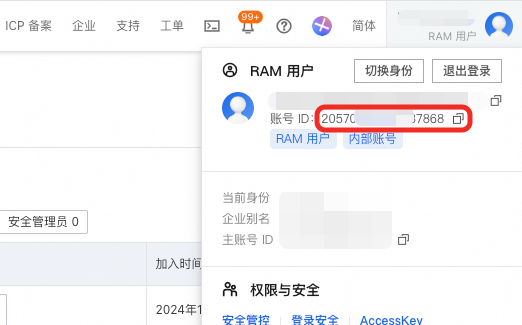
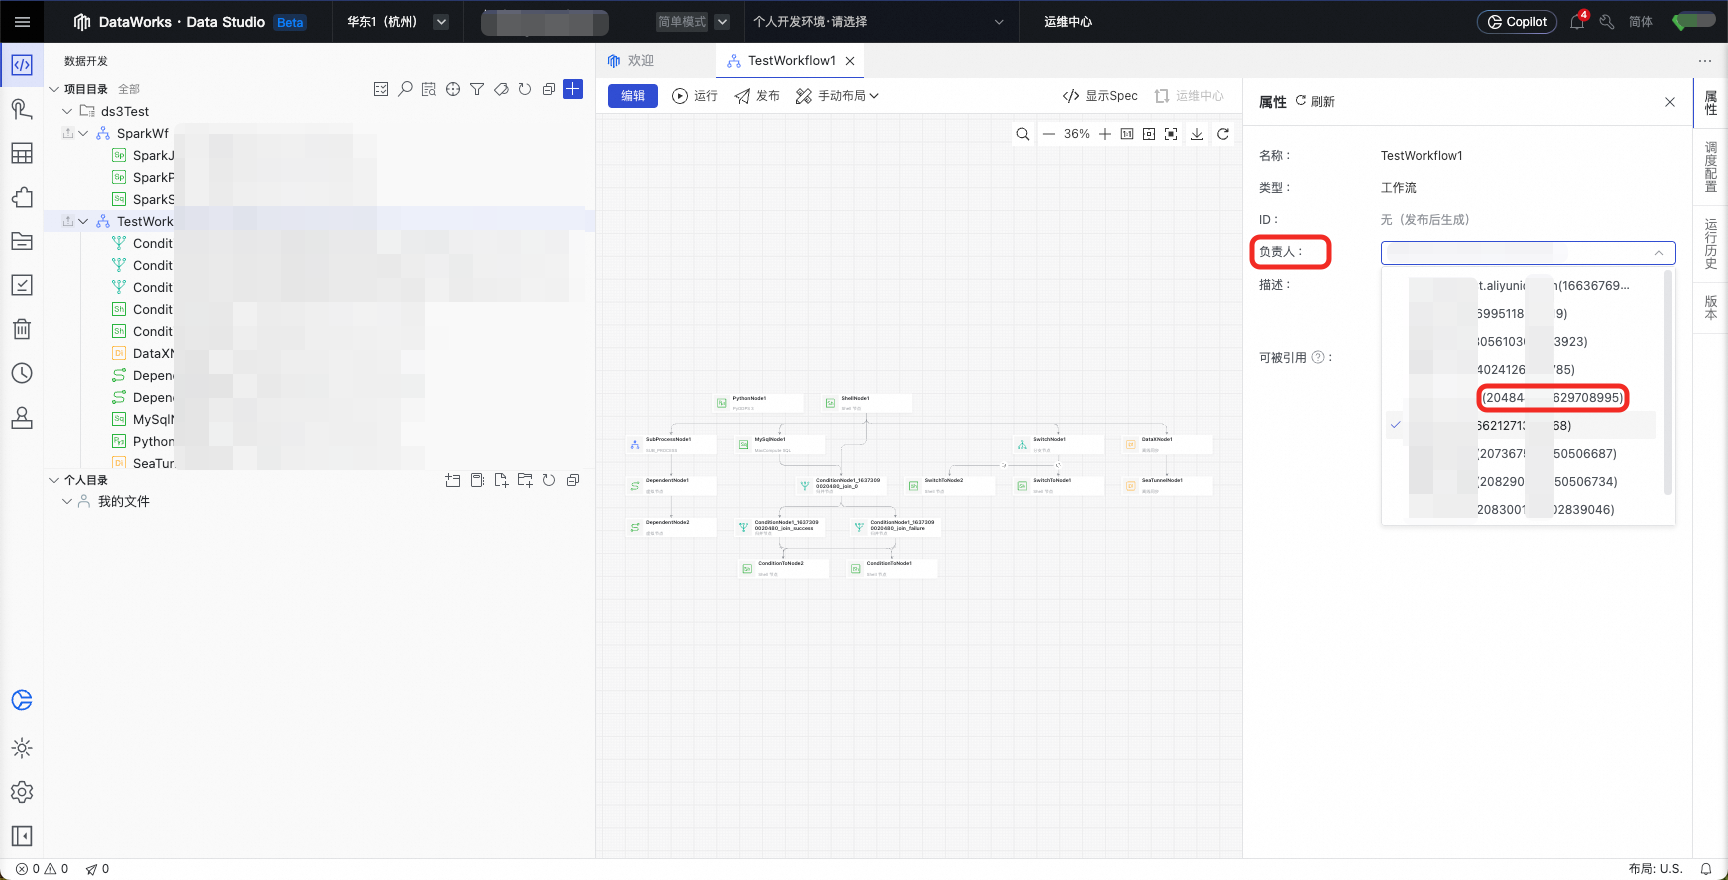
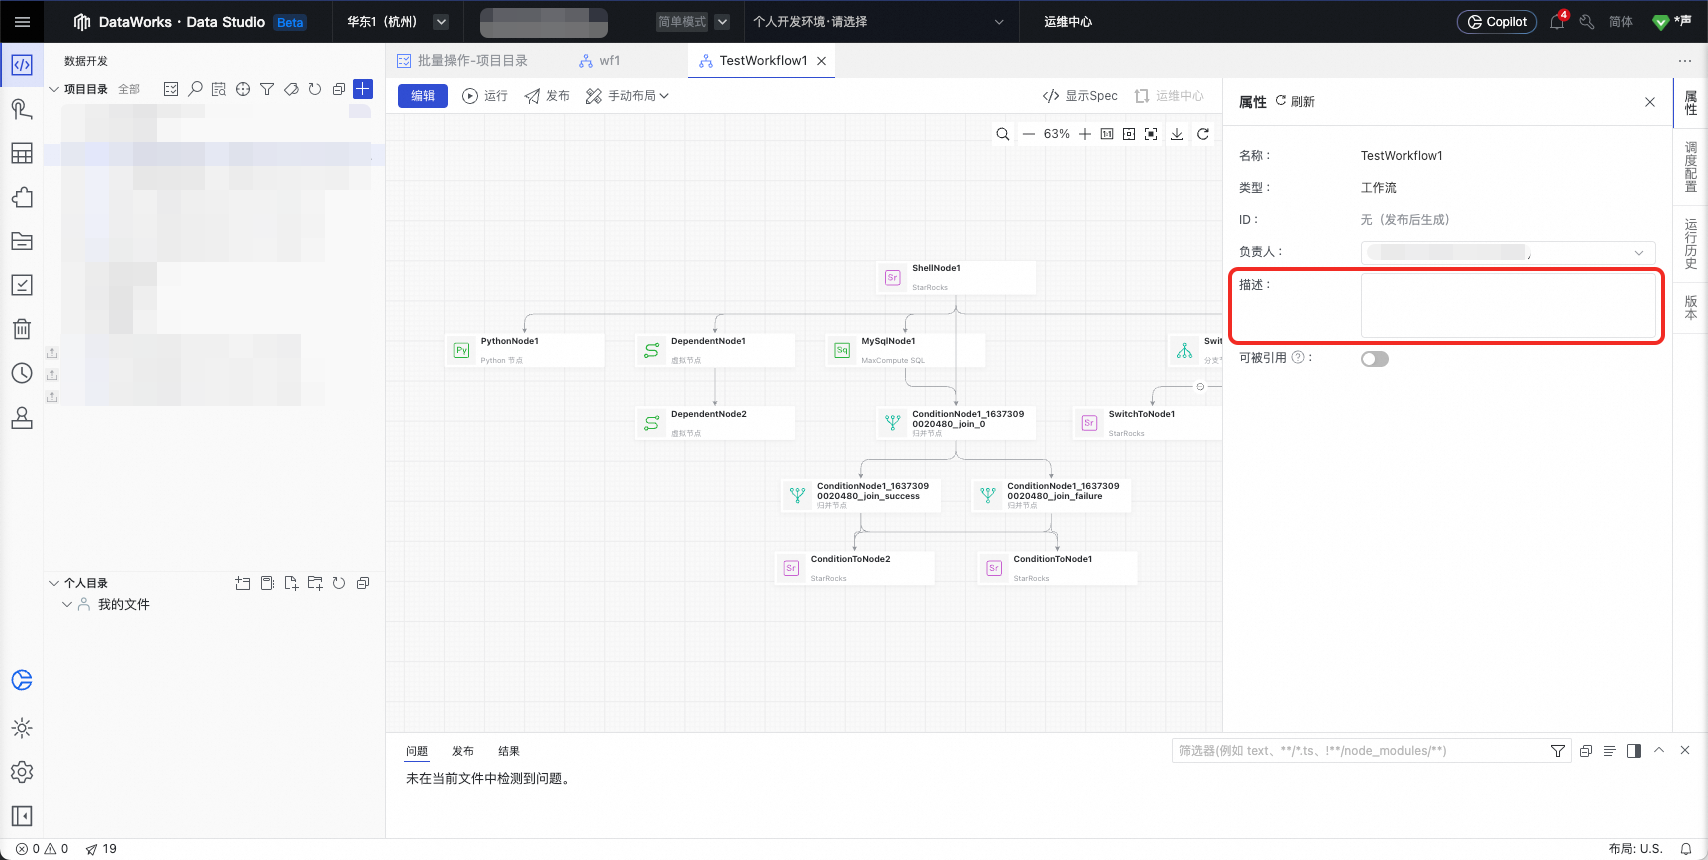
2.1.2. Description
You can modify the "Description" field in the table. This field corresponds to the following setting on the DataWorks Data Development page:
2.1.3. Scheduling parameters
You can modify the "Scheduling parameters" field in the table. This field corresponds to the following setting on the DataWorks Data Development page:
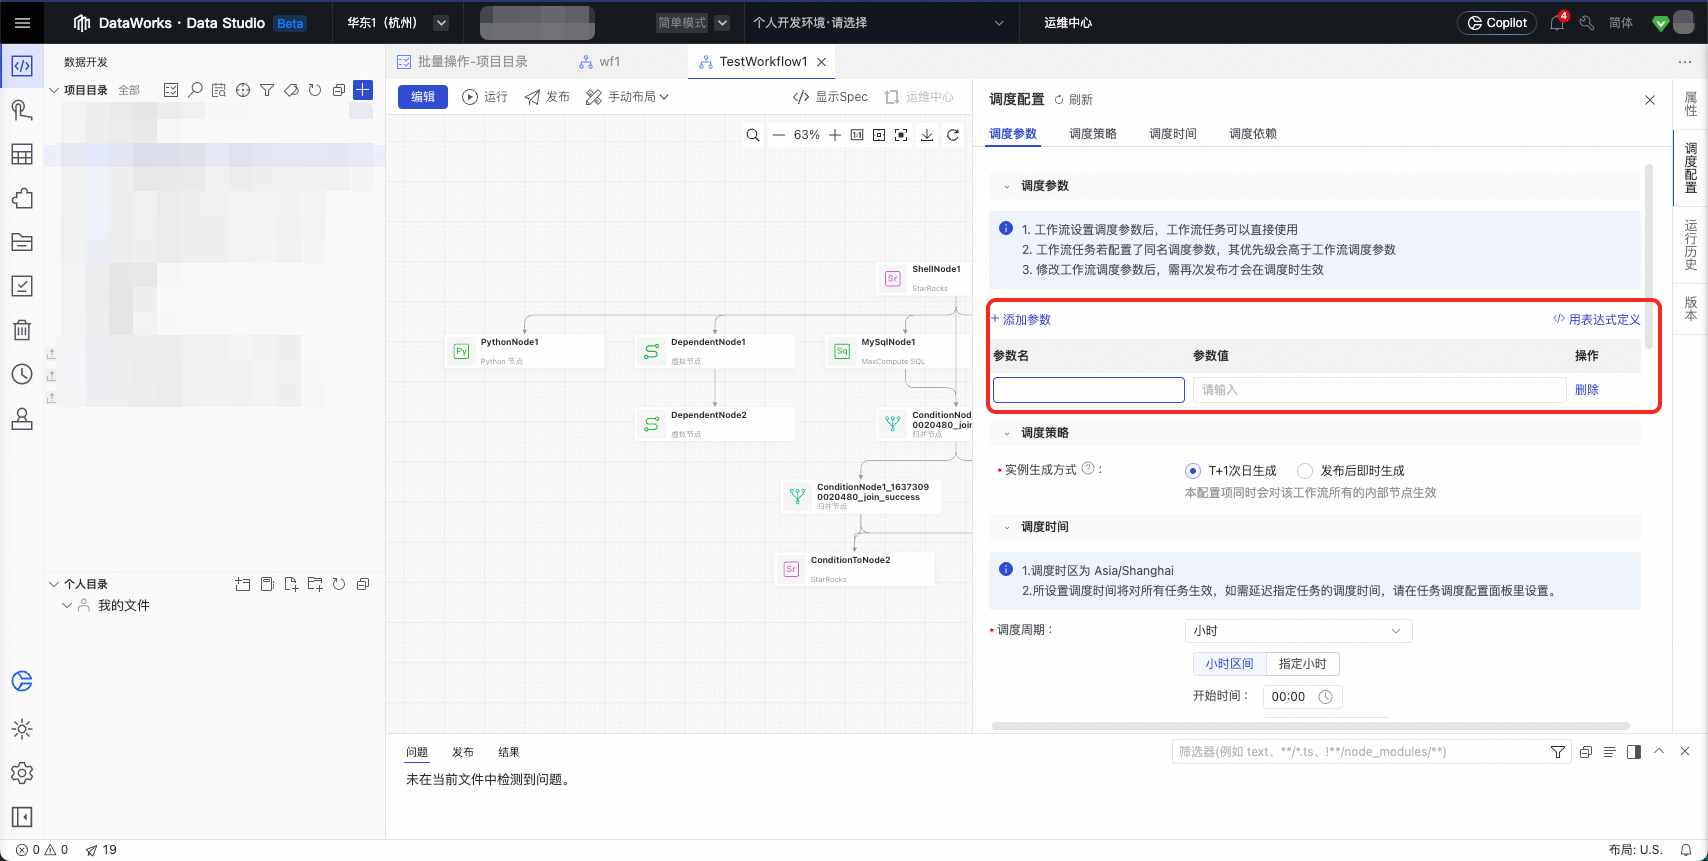
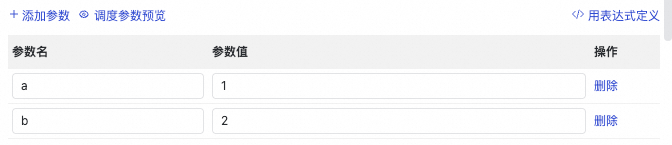
Enter the parameters as expressions that use equal signs. If you specify multiple parameters, separate them with commas. For example: a=1,b=2
2.1.4. Scheduling information (cron expression)
You can modify the "Scheduling information (cron expression)" field in the table. This field corresponds to the following setting on the DataWorks Data Development page:
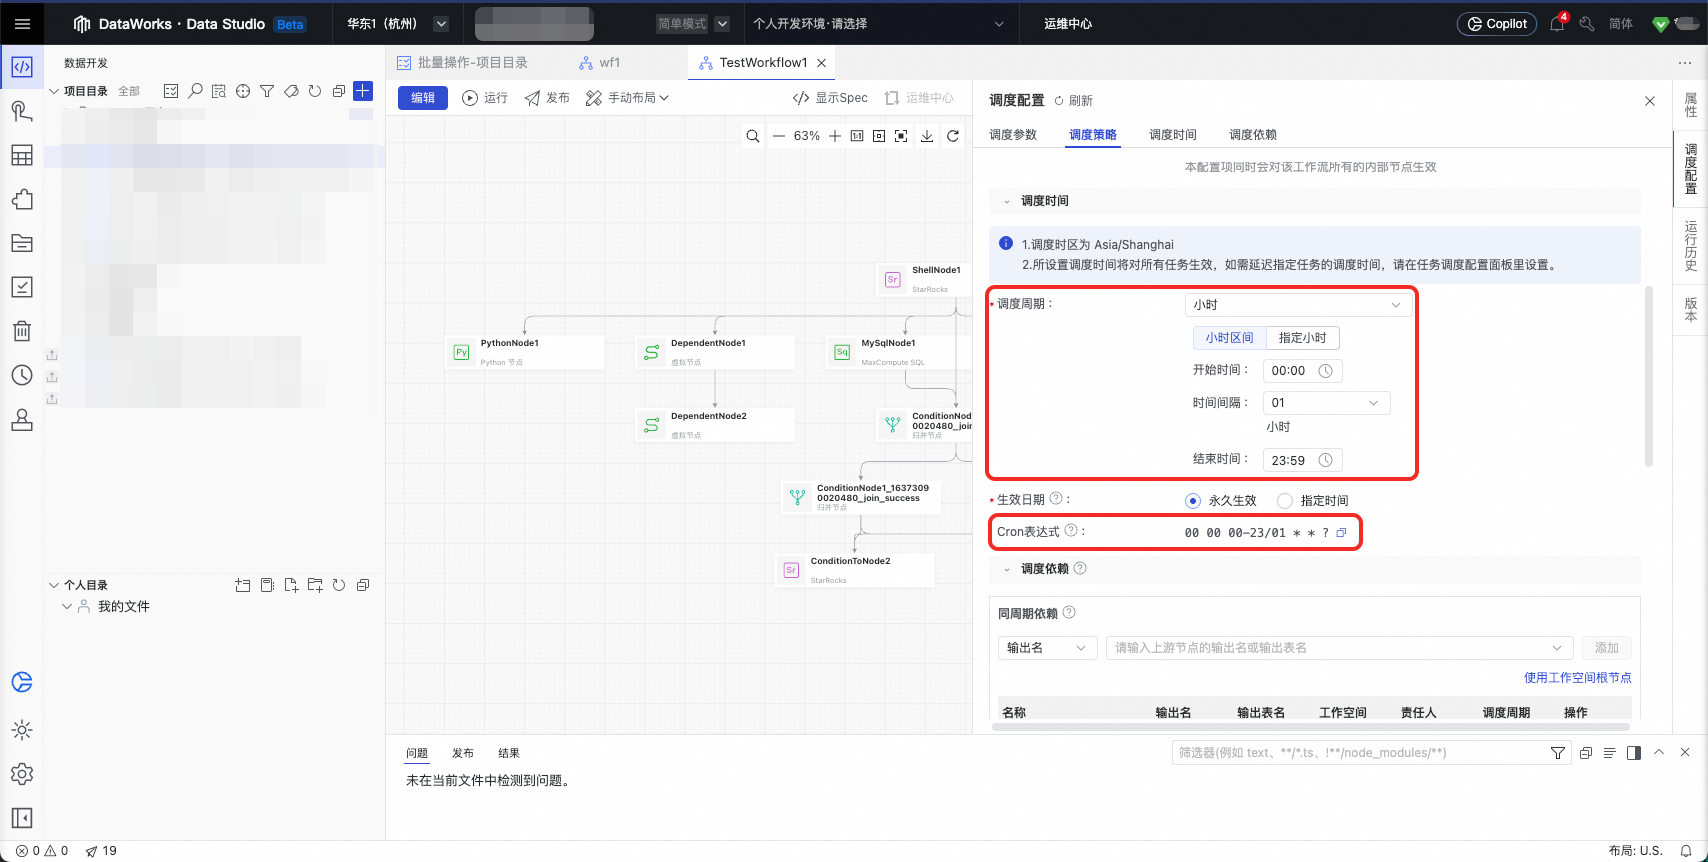
Enter a cron expression in the field. The format is "Second Minute Hour Day Month DayOfWeek". Note that all numbers must be two digits. For example, you must specify 0 as 00 and 1 as 01. DataWorks does not support setting the "Year" field.
The tool automatically populates the "Scheduling Cycle" parameters on the Data Development node based on the cron expression.
2.1.5. Instance generation mode
You can modify the "Instance generation mode" field in the table. This field corresponds to the following setting on the DataWorks Data Development page:
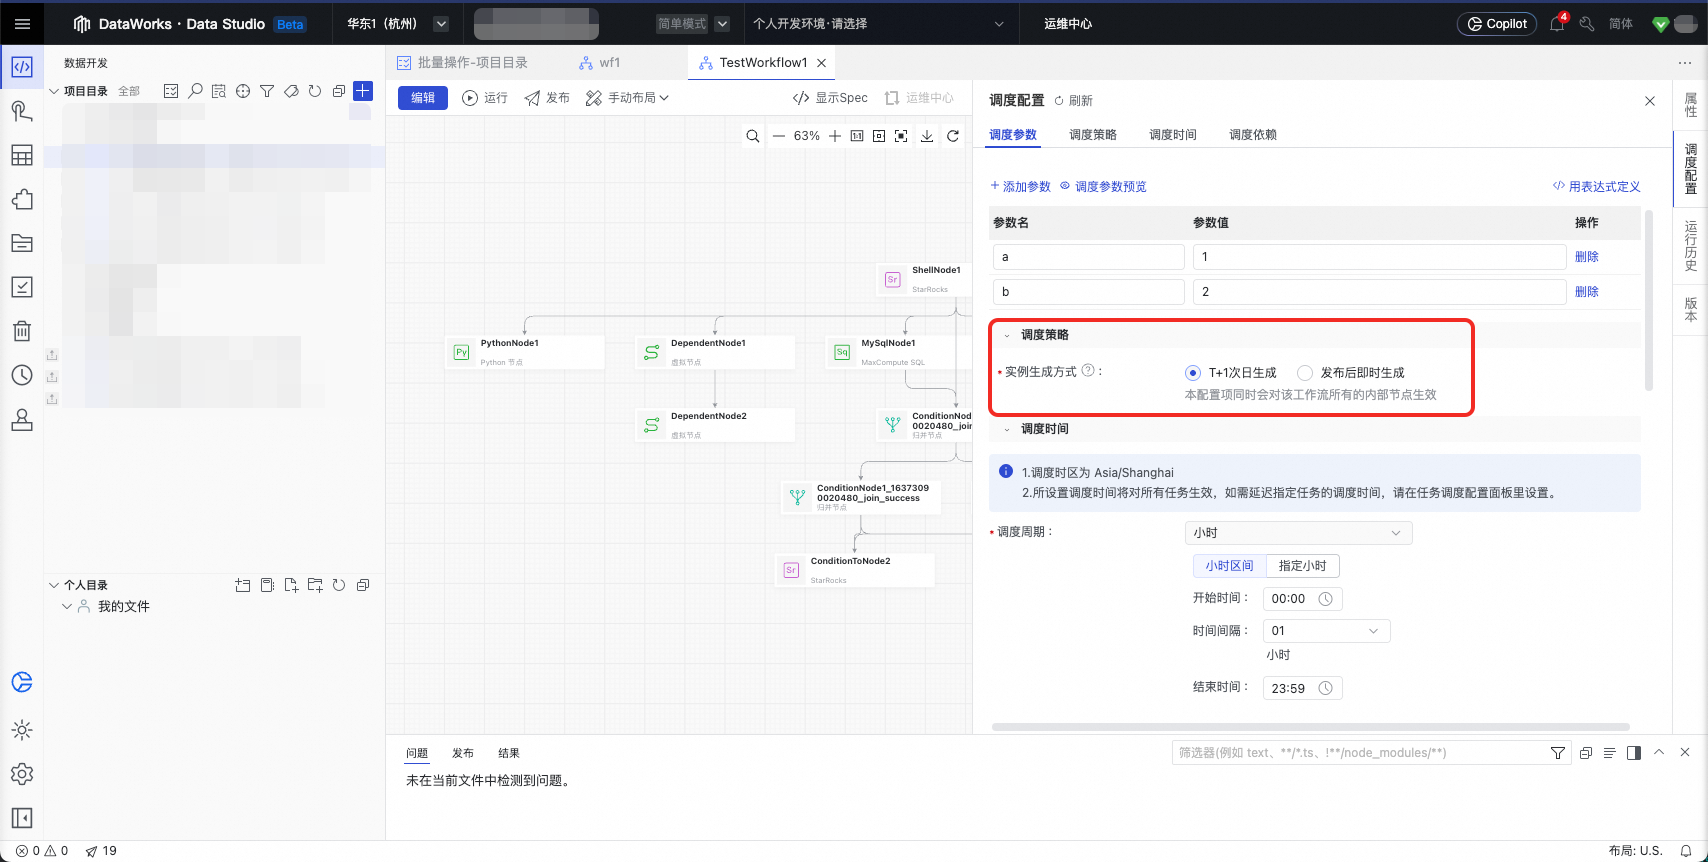
Allowed values:
· T_PLUS_1: Generated on T+1 (the next day)
· IMMEDIATELY: Generated immediately after the node is published.
2.2. Batch modify node properties
2.2.1. Owner
2.2.1.a. Definition
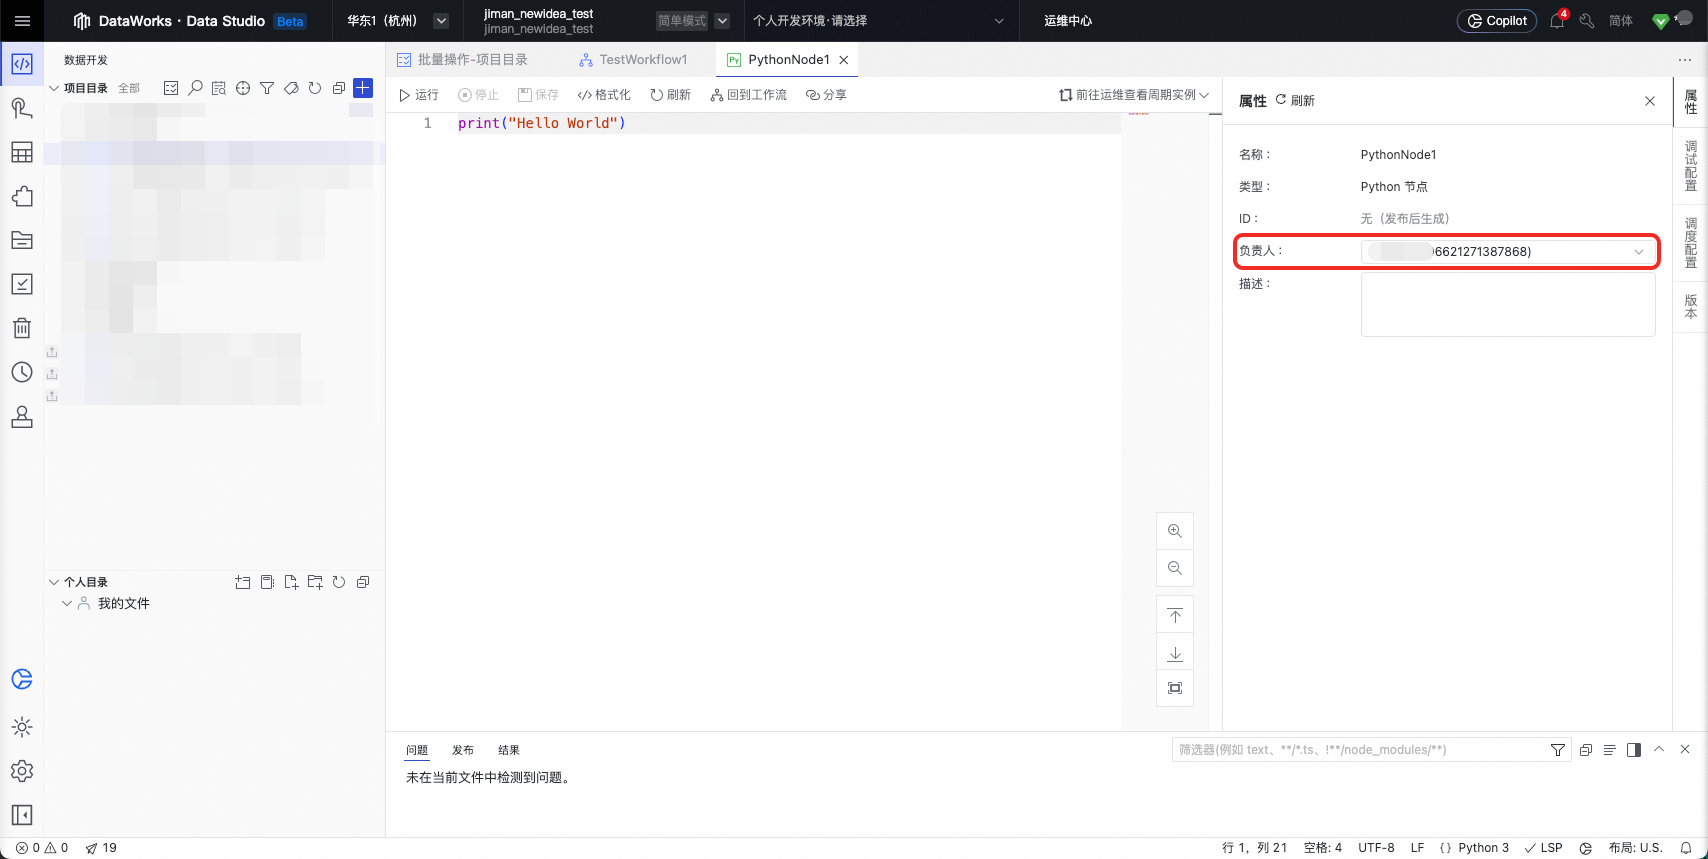
You can modify the "Owner" field in the table. This field corresponds to the following setting on the DataWorks Data Development page:
2.2.1.b. Allowed values
Enter the user's account ID in the "Owner" field. You can obtain the ID from the upper-right corner of the page or from the Owner drop-down list for the Data Development node. If you leave this field empty, the value is automatically set to the ID of the account that owns the AccessKey pair used for the import.

2.2.2 Notes
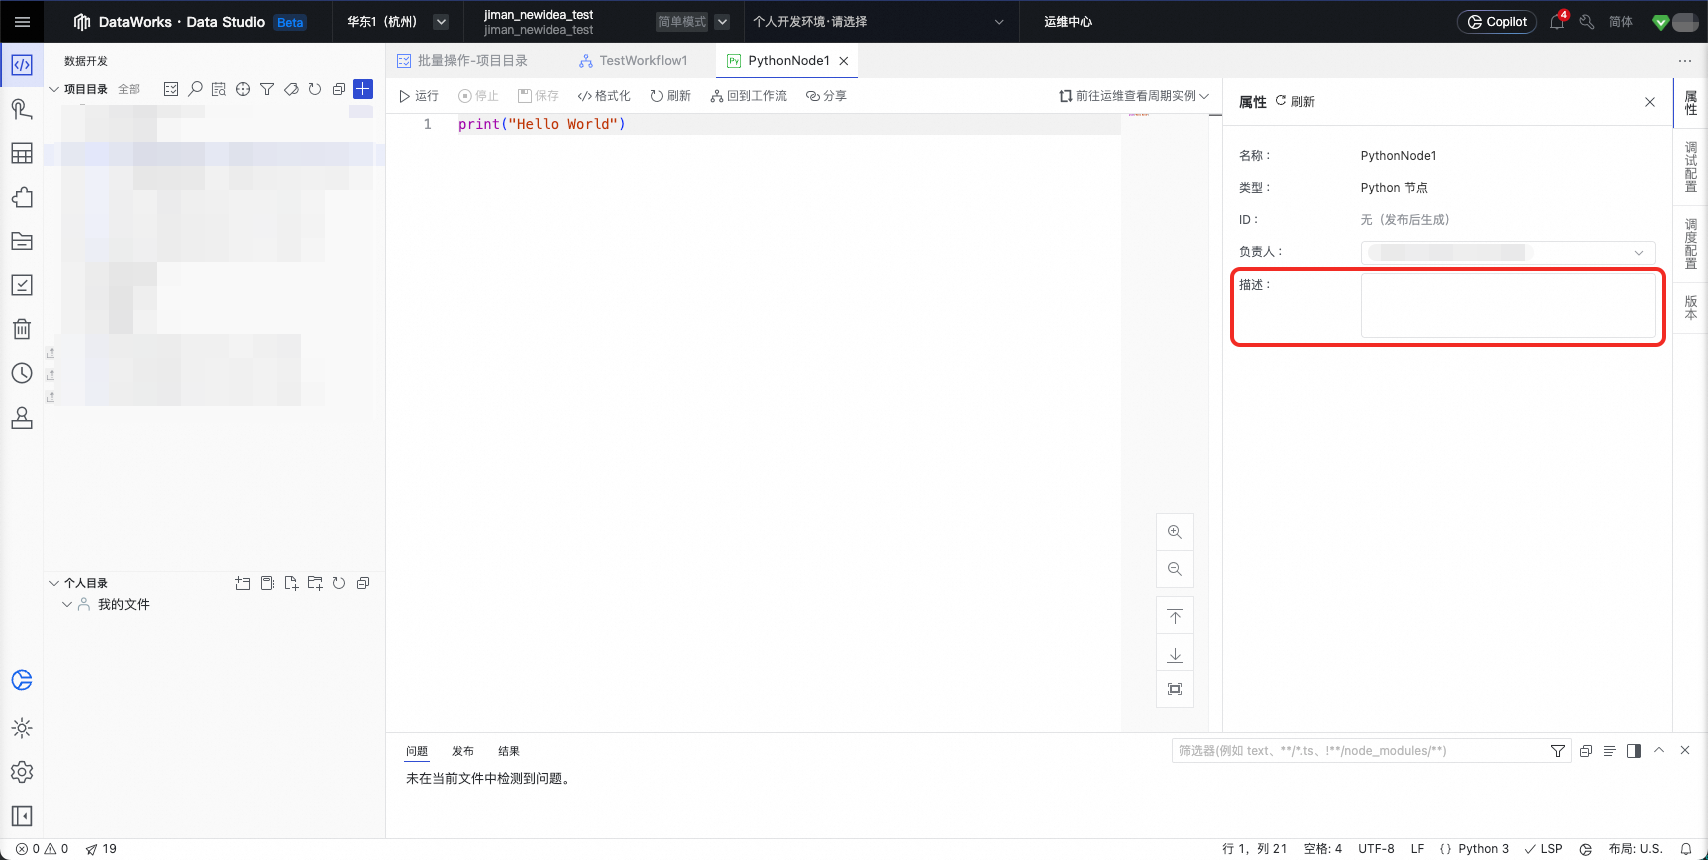
You can modify the "Description" field in the table. This field corresponds to the following setting on the DataWorks Data Development page:
2.2.3. Related data sources
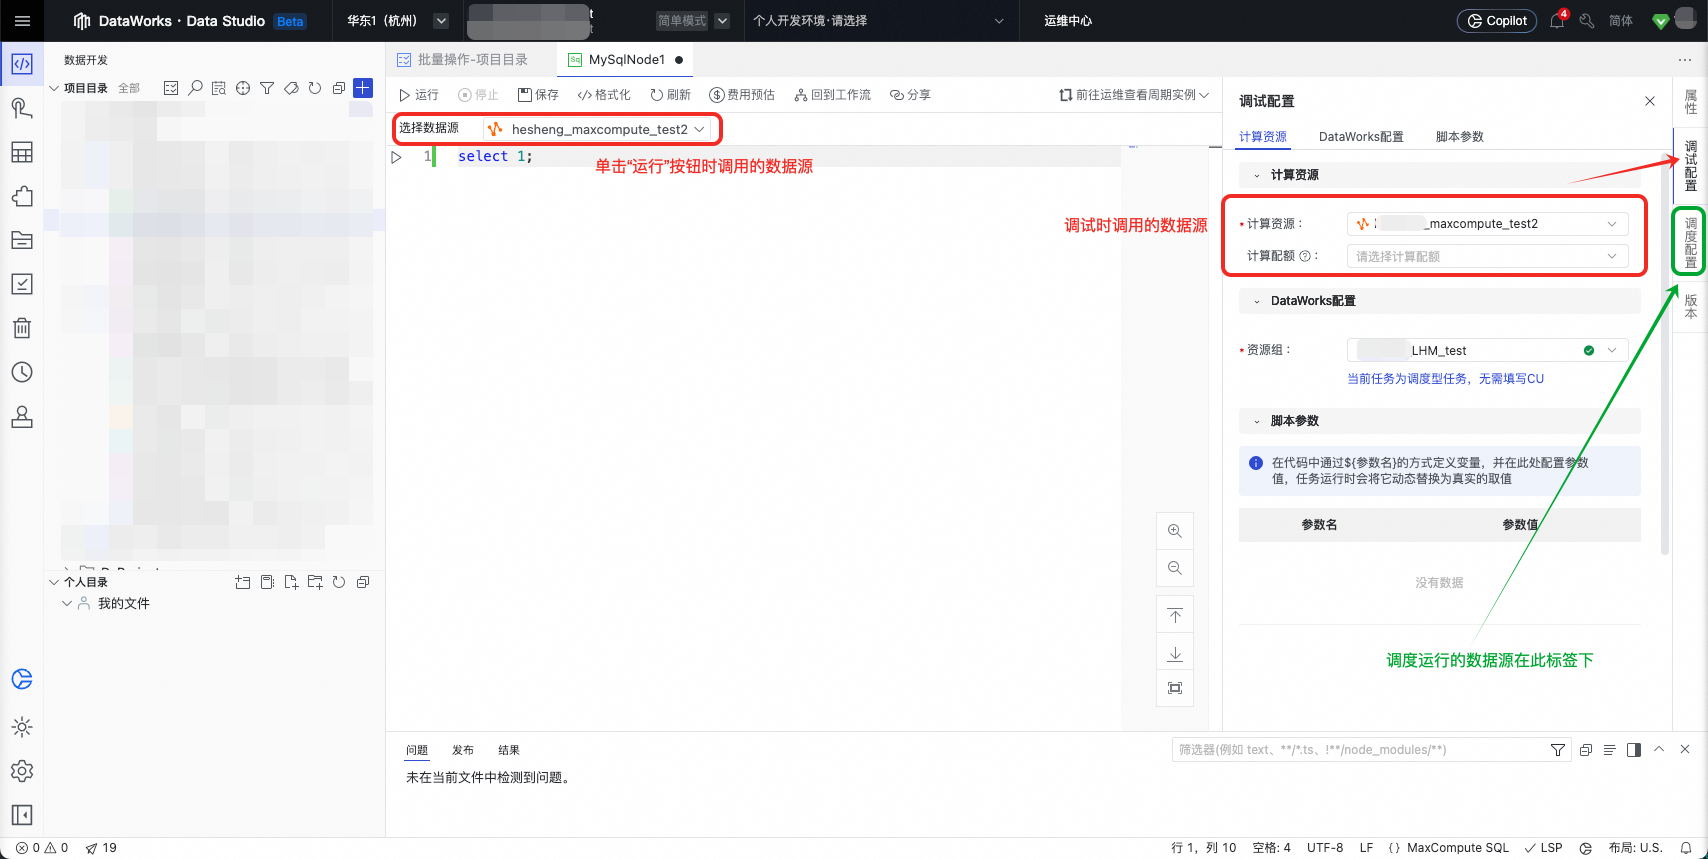
If you want to change the data source that is attached to a node during migration, you can modify the "Related data sources" field in the table.
A data integration node can be associated with multiple data sources. For a data integration task, separate the source and destination data sources with a comma (,). For example, "odps1,odps2" indicates that the data integration task reads data from odps1 and writes data to odps2. If sharding is used, separate the source data sources with spaces. For example, "mysql1 mysql2 mysql3,odps1" indicates that the task reads data from the mysql1, mysql2, and mysql3 data sources and writes data to odps1.
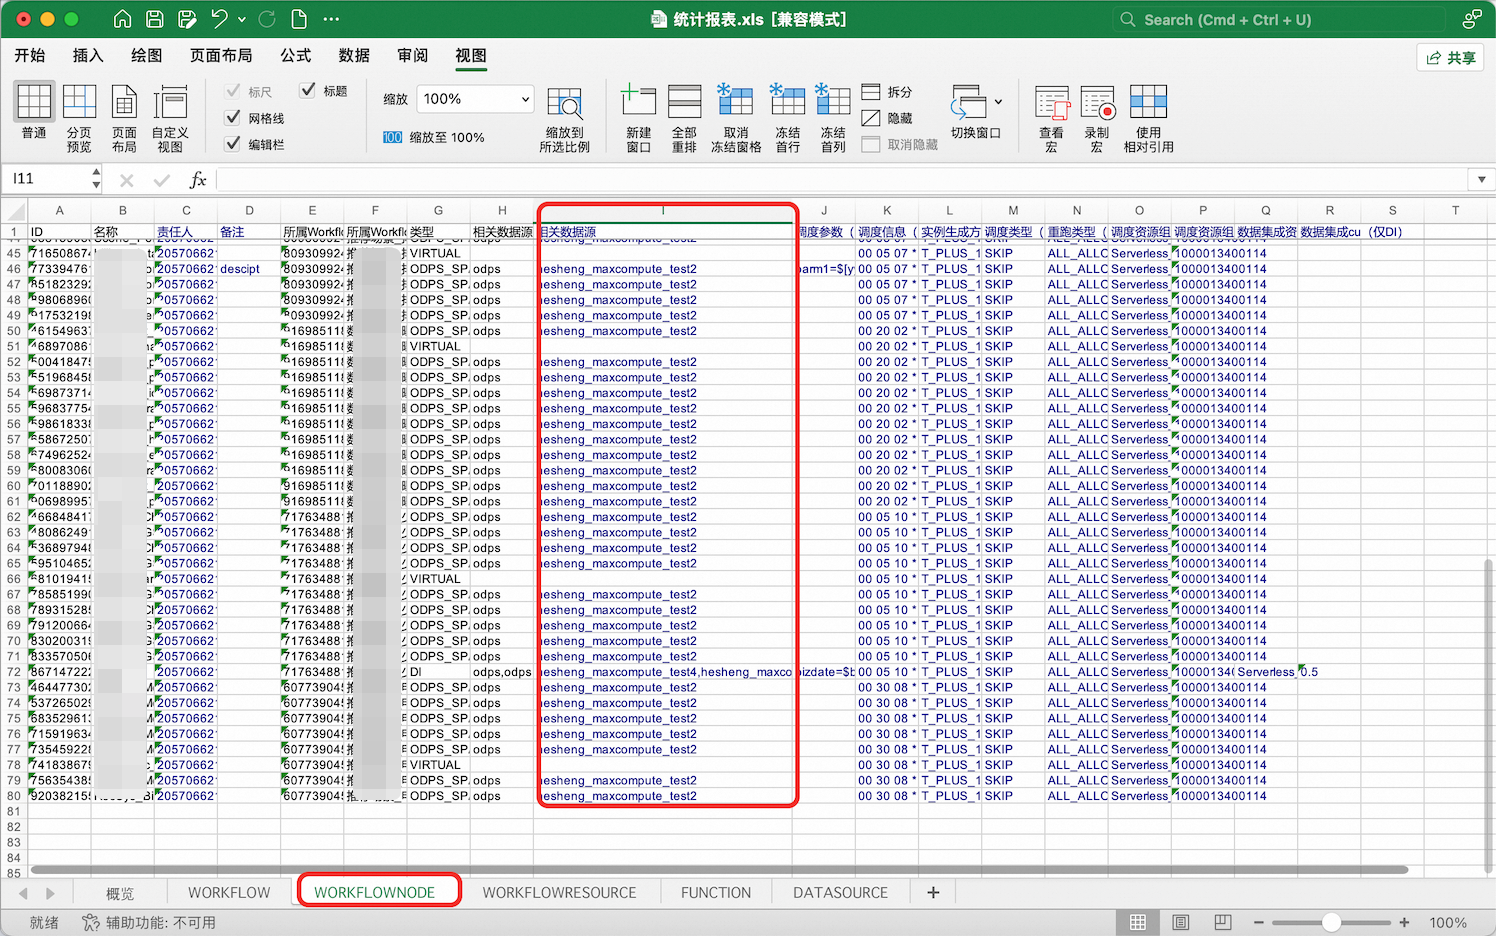
Ensure that the data sources specified in the table exist in the destination DataWorks workspace. We recommend that you fill in this field. If the data source is left empty, nodes that are related to MaxCompute (ODPS), EMR, or HOLOGRES are automatically attached to the default engine in the workspace. Other nodes may fail to run.
This field corresponds to the following settings on the Data Development page in DataWorks:
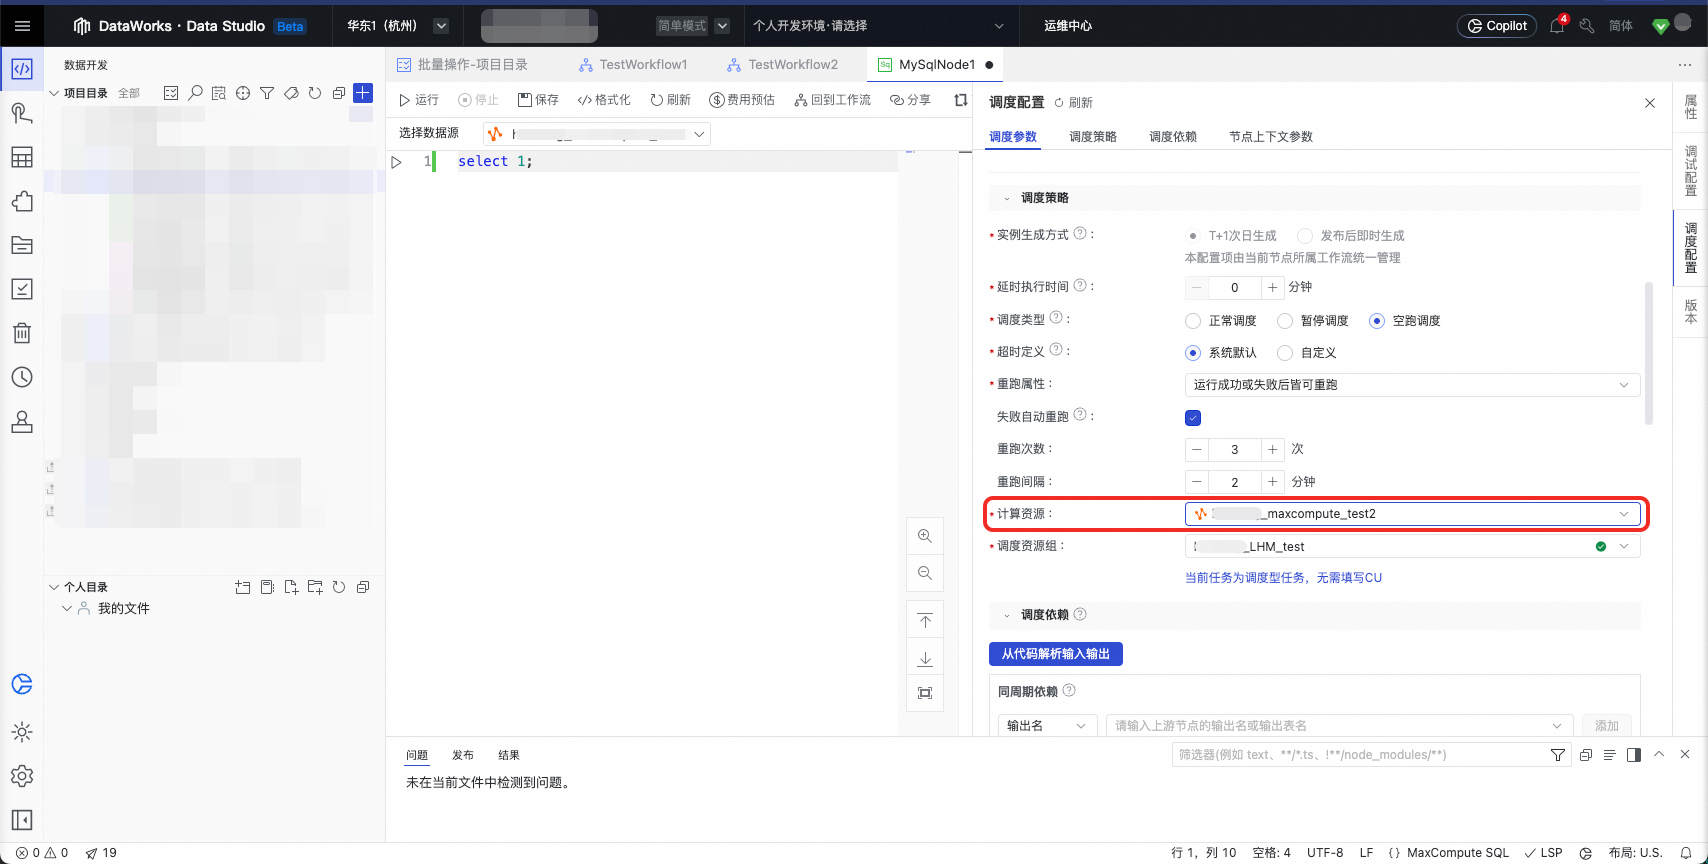
The setting for attaching a data source to a node on the Data Development page in DataWorks is located here:
The setting for attaching a data source to a data integration node (single non-partitioned table, offline) in DataWorks is located here:
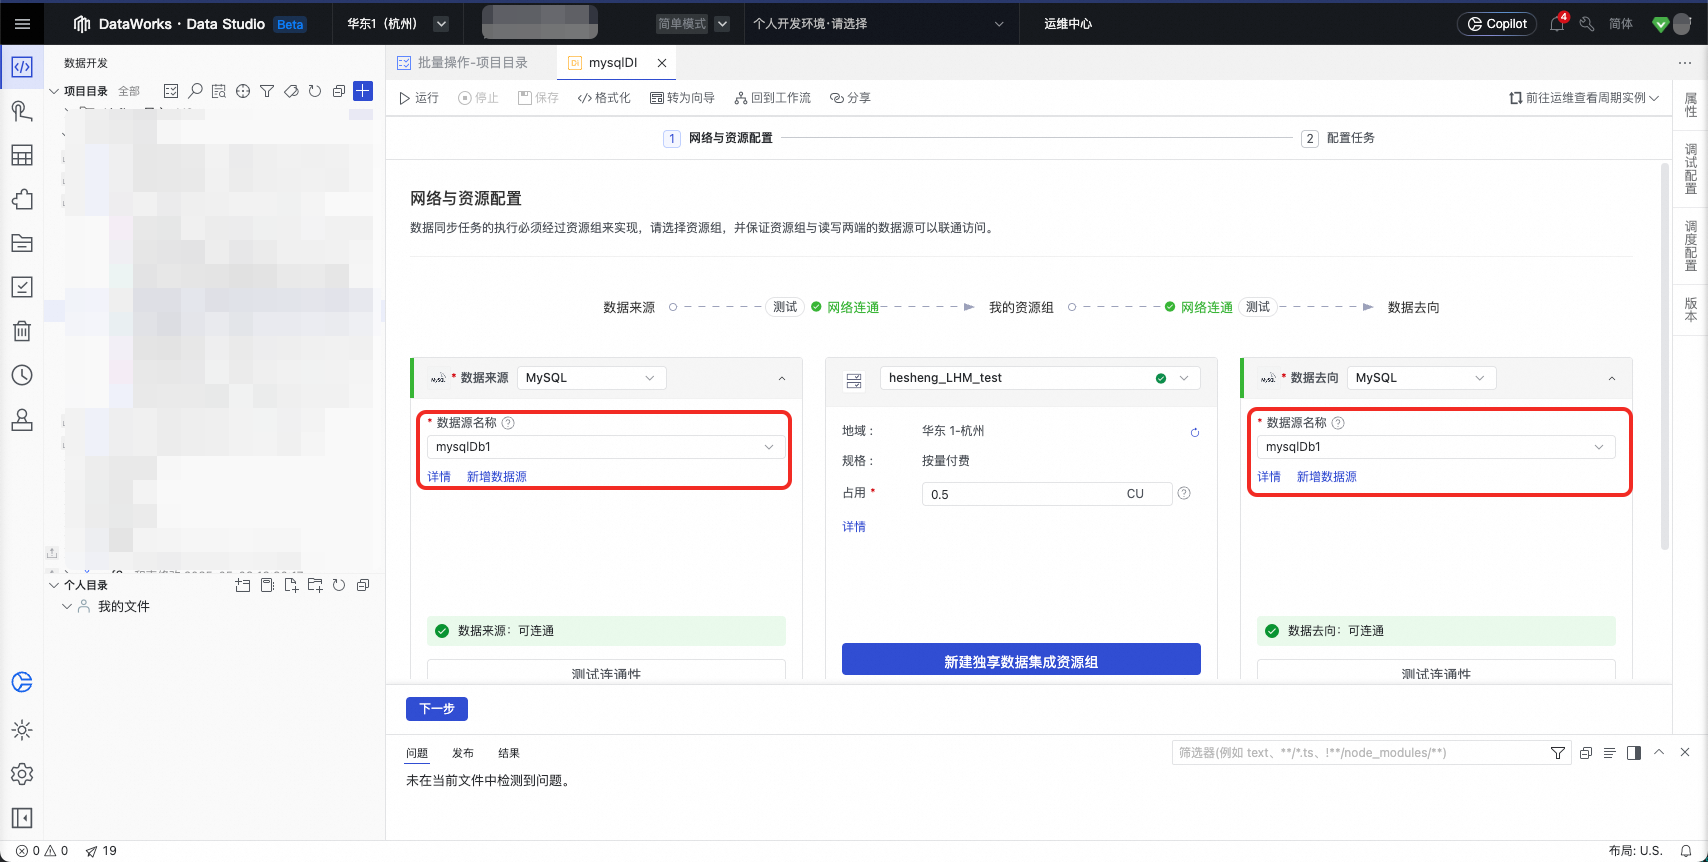
Note: In DataWorks, you can attach different data sources for node testing and scheduled runs. The tool lets you batch-set the data source for scheduled runs. The setting for the test data source is in a different location. Do not confuse the two.
2.2.4. Scheduling parameters
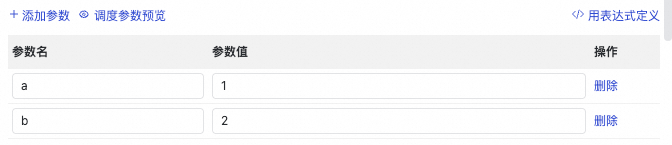
You can modify the "Scheduling parameters" field in the table. This field corresponds to the following setting on the DataWorks Data Development page:
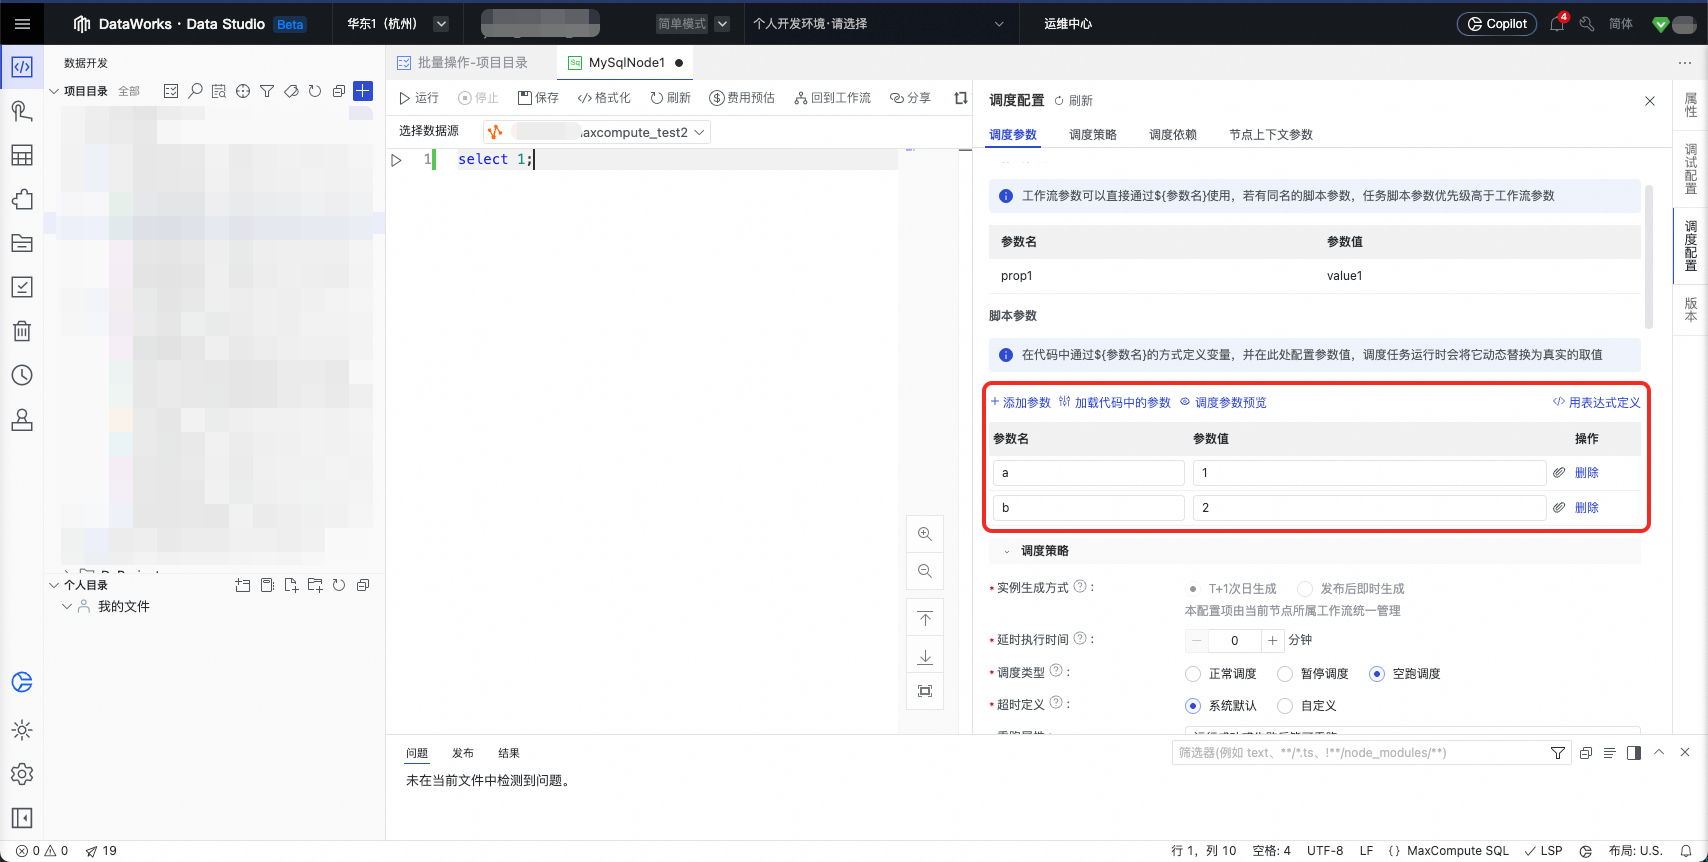
Enter the parameters as expressions that use equal signs. If you specify multiple parameters, separate them with commas. For example: a=1,b=2
2.2.5. Scheduling information (cron expression)
In DataWorks, this configuration item is managed by the workflow that contains the current node.
2.2.6. Instance generation mode
In DataWorks, this configuration item is managed by the workflow that contains the current node.
2.2.7. Scheduling type
You can modify the "Scheduling type" field in the table. This field corresponds to the following setting on the DataWorks Data Development page:

Allowed values:
· NORMAL: Normal scheduling
· PAUSE: skip execution
· SKIP: dry-run scheduling
2.2.8. Rerun type
You can modify the "Rerun type" field in the table. This field corresponds to the following setting on the DataWorks Data Development page:

Allowed values:
· ALL_ALLOWED: The node can be rerun after a successful or failed run.
· FAILURE_ALLOWED: The node can be rerun only after a failed run. The node cannot be rerun after a successful run.
· ALL_DENIED: The node cannot be rerun regardless of whether the run succeeds or fails.
2.2.9. Scheduling resource group
You can modify the "Scheduling resource group" field in the table. This field corresponds to the following setting on the DataWorks Data Development page:
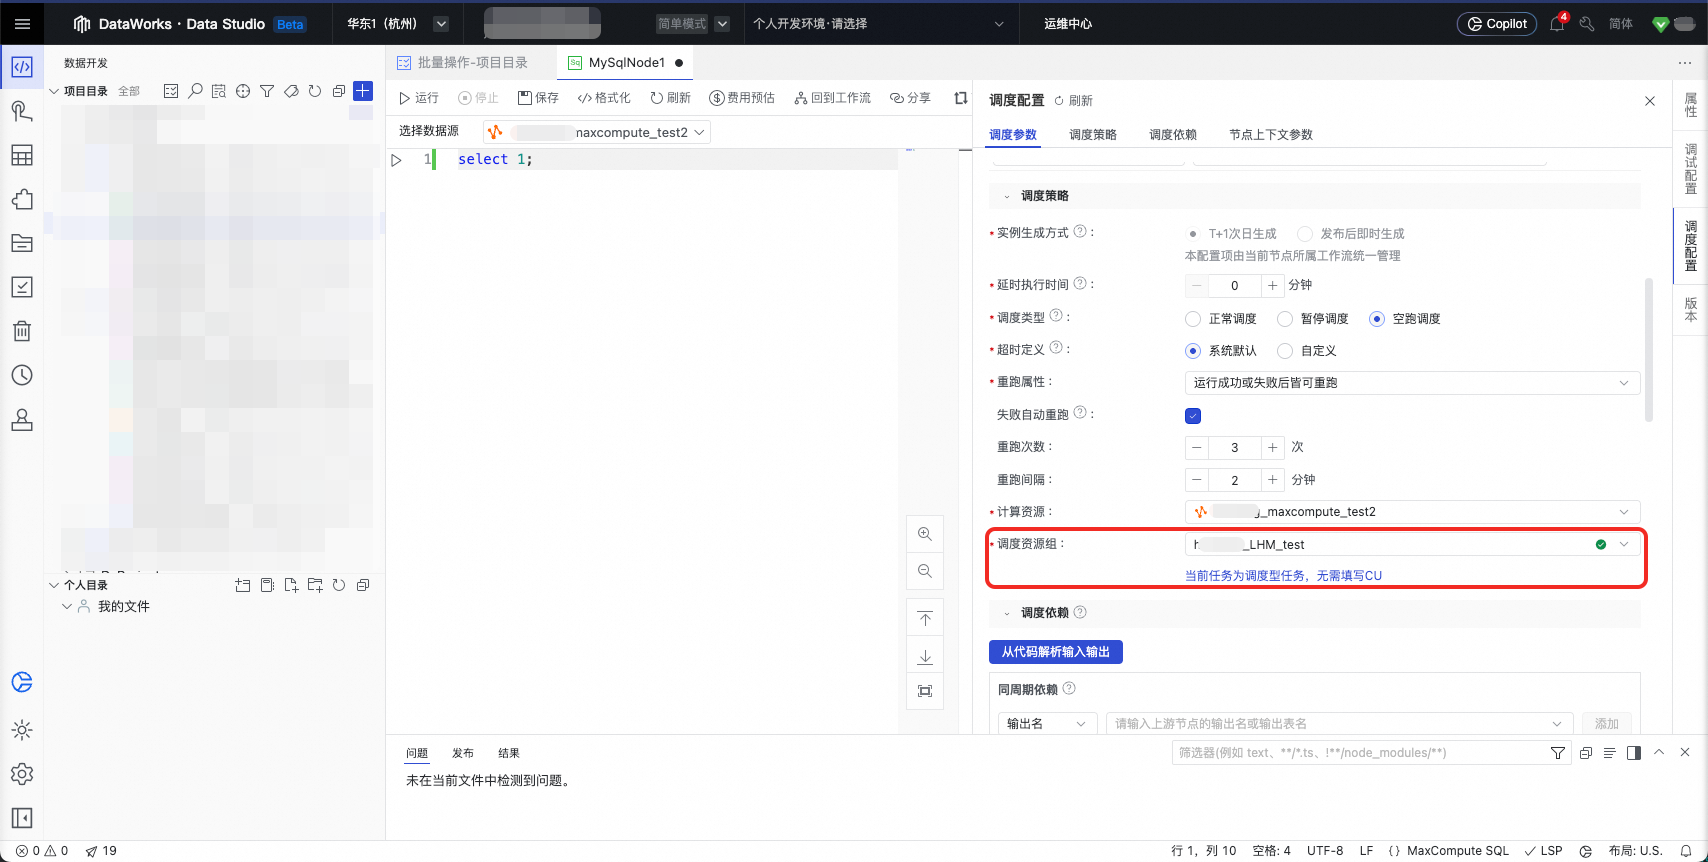
You can find the resource group as follows:
On the details page of the DataWorks workspace, go to the resource group page from the left-side menu bar. Then, attach a resource group and obtain its ID.
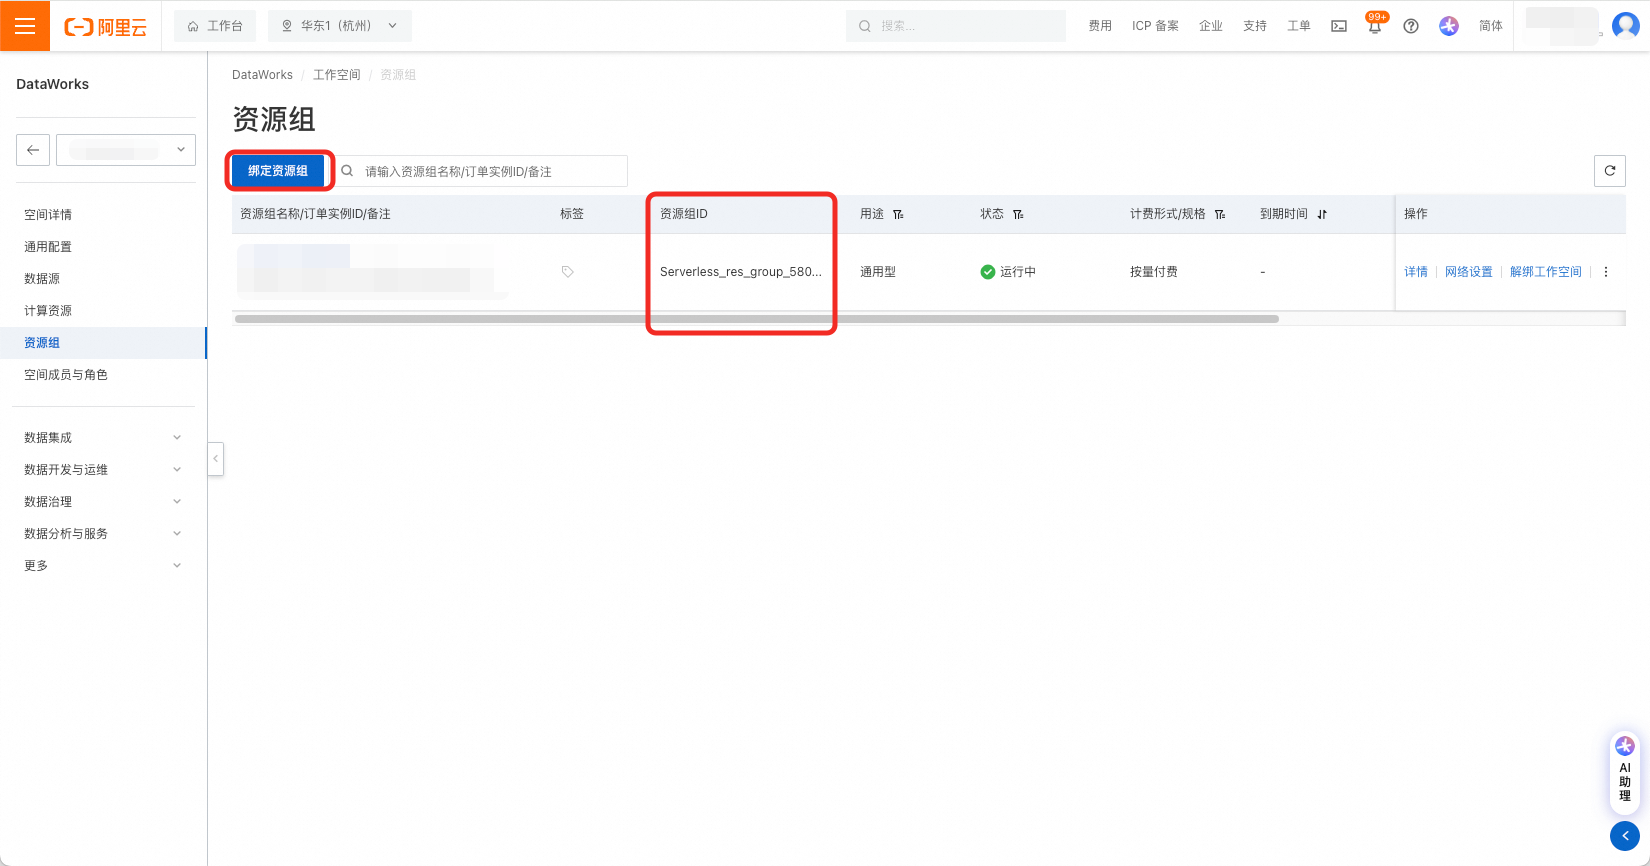
Note that when you use the tool to import scheduling information into the destination DataWorks workspace, the import configuration items also include a resource group setting. If the resource group field in the table has a value, the import tool uses the value from the table. If the resource group field in the table is empty, the import tool uses the setting from the import configuration items. The setting in the table takes precedence over the setting in the import configuration items.
2.2.10. Scheduling resource group (internal ID)
The internal ID of the scheduling resource group, 'resource.group.inner.identifier', is not displayed on the resource group interface. You can follow these steps to obtain the ID from the Data Development page.
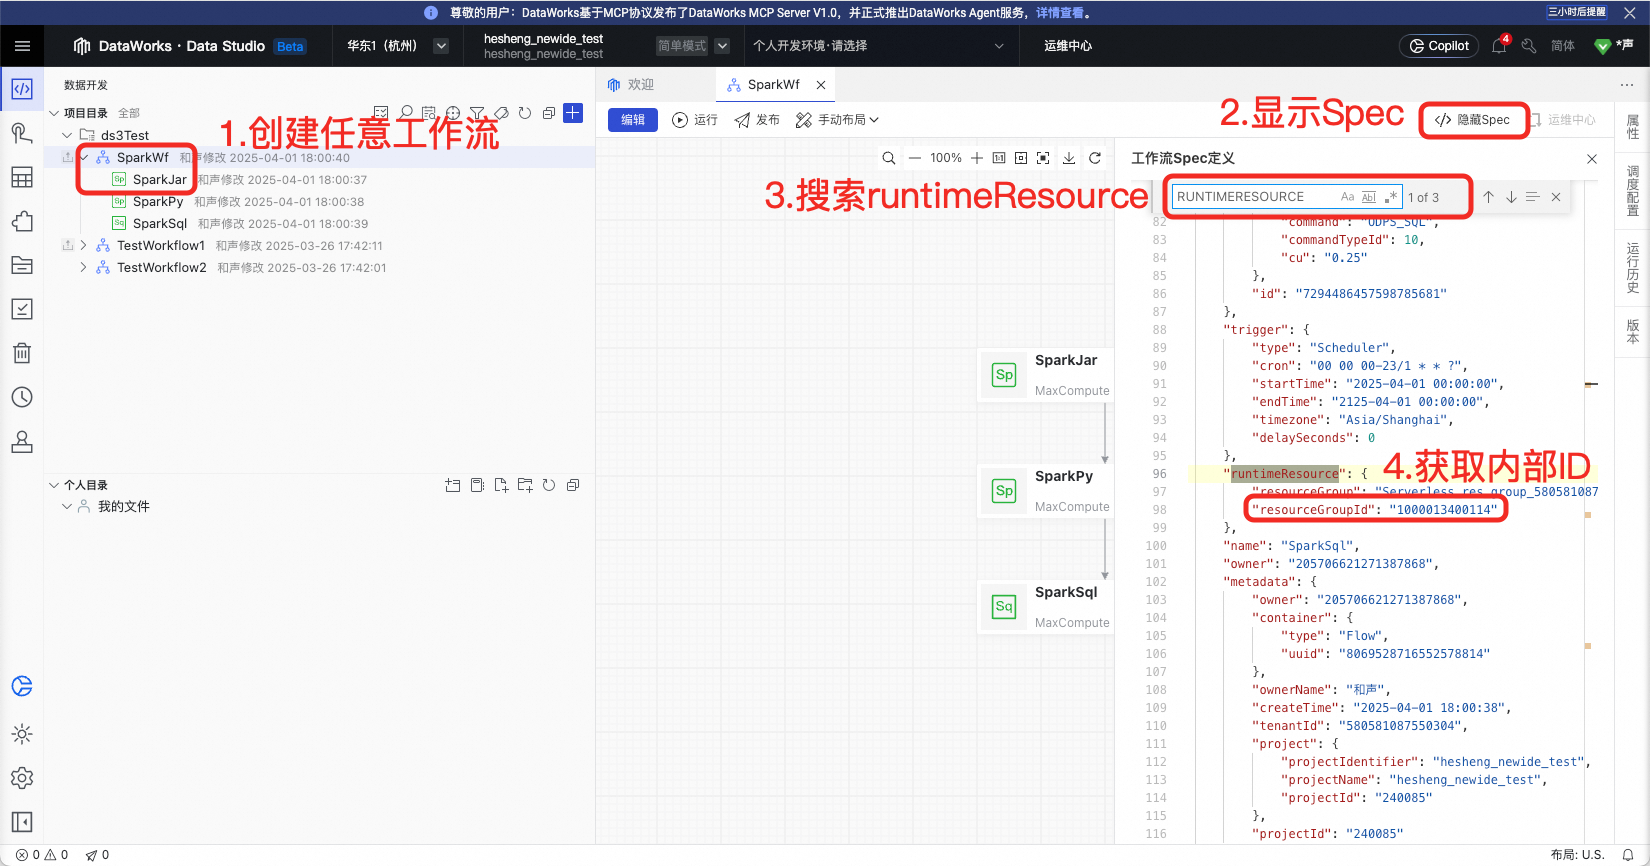
Note that when you use the tool to import scheduling information into the destination DataWorks workspace, the import configuration items also include a resource group setting. If the resource group field in the table has a value, the import tool uses the value from the table. If the resource group field in the table is empty, the import tool uses the setting from the import configuration items. The setting in the table takes precedence over the setting in the import configuration items.
2.2.11. Data integration resource group (DI only)
For DataWorks data integration tasks, you must set a data integration resource group. On the Data Development page, this configuration item is located here:
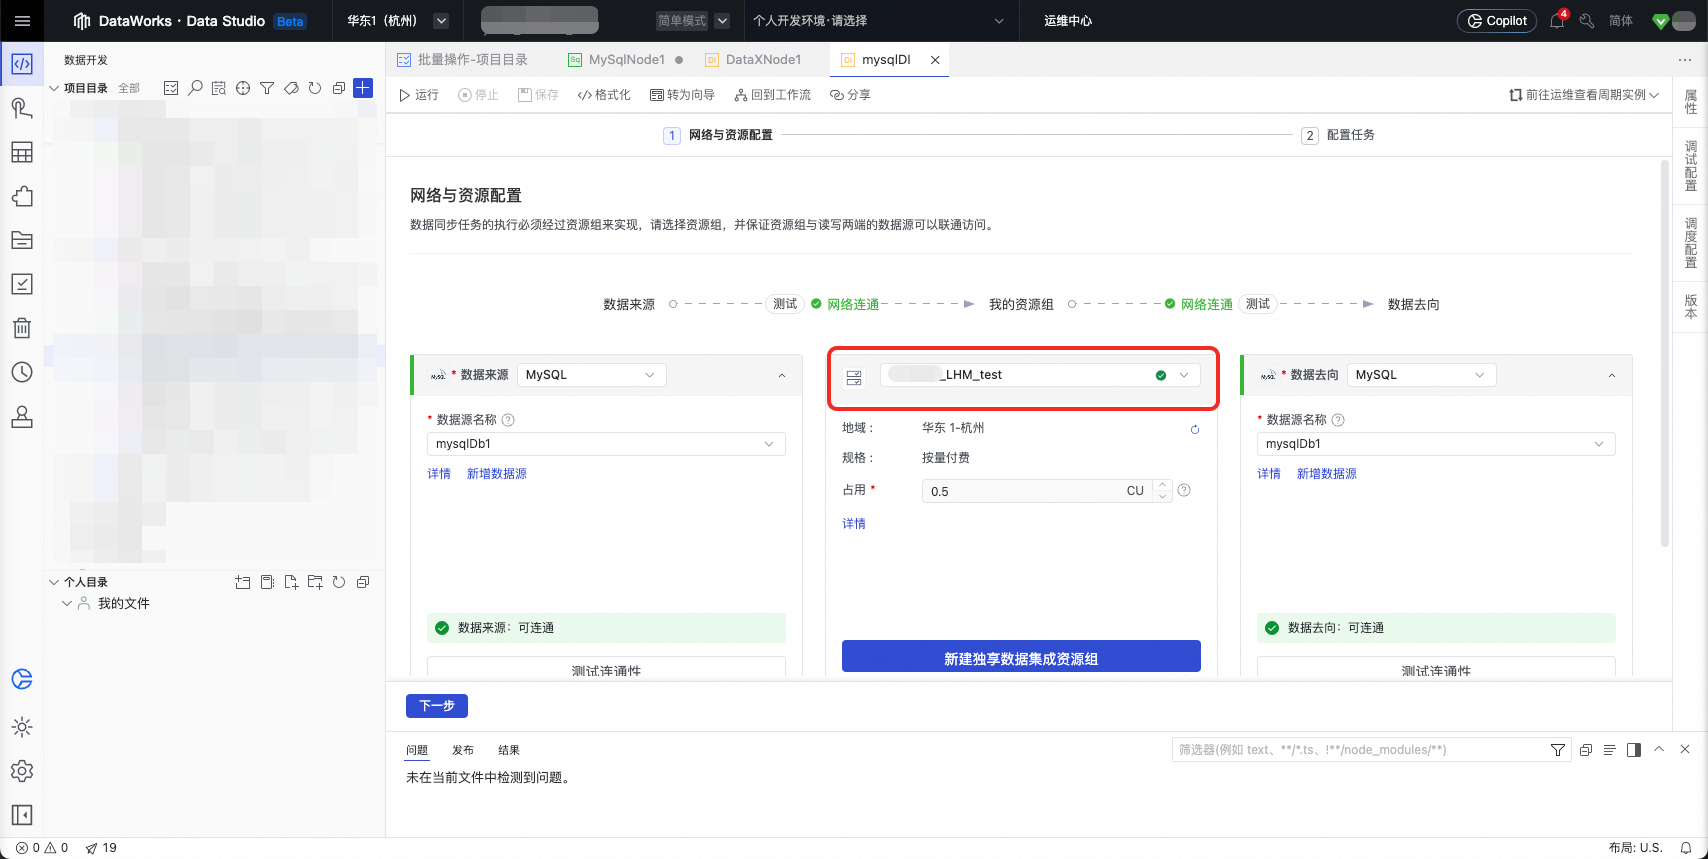
The tool lets you batch-set the data integration resource group for data integration tasks by modifying the "Data integration resource group (DI only)" field in the table. The method for obtaining the resource group ID is the same as for the scheduling resource group. For more information, see section 2.2.9.
Note that when you use the tool to import scheduling information into the destination DataWorks workspace, the import configuration items also include a resource group setting. If the resource group field in the table has a value, the import tool uses the value from the table. If the resource group field in the table is empty, the import tool uses the setting from the import configuration items. The setting in the table takes precedence over the setting in the import configuration items.
2.2.12. Data integration CU (DI only)
You can modify the "Data integration CU (DI only)" field in the table. This field corresponds to the following setting on the DataWorks Data Development page:
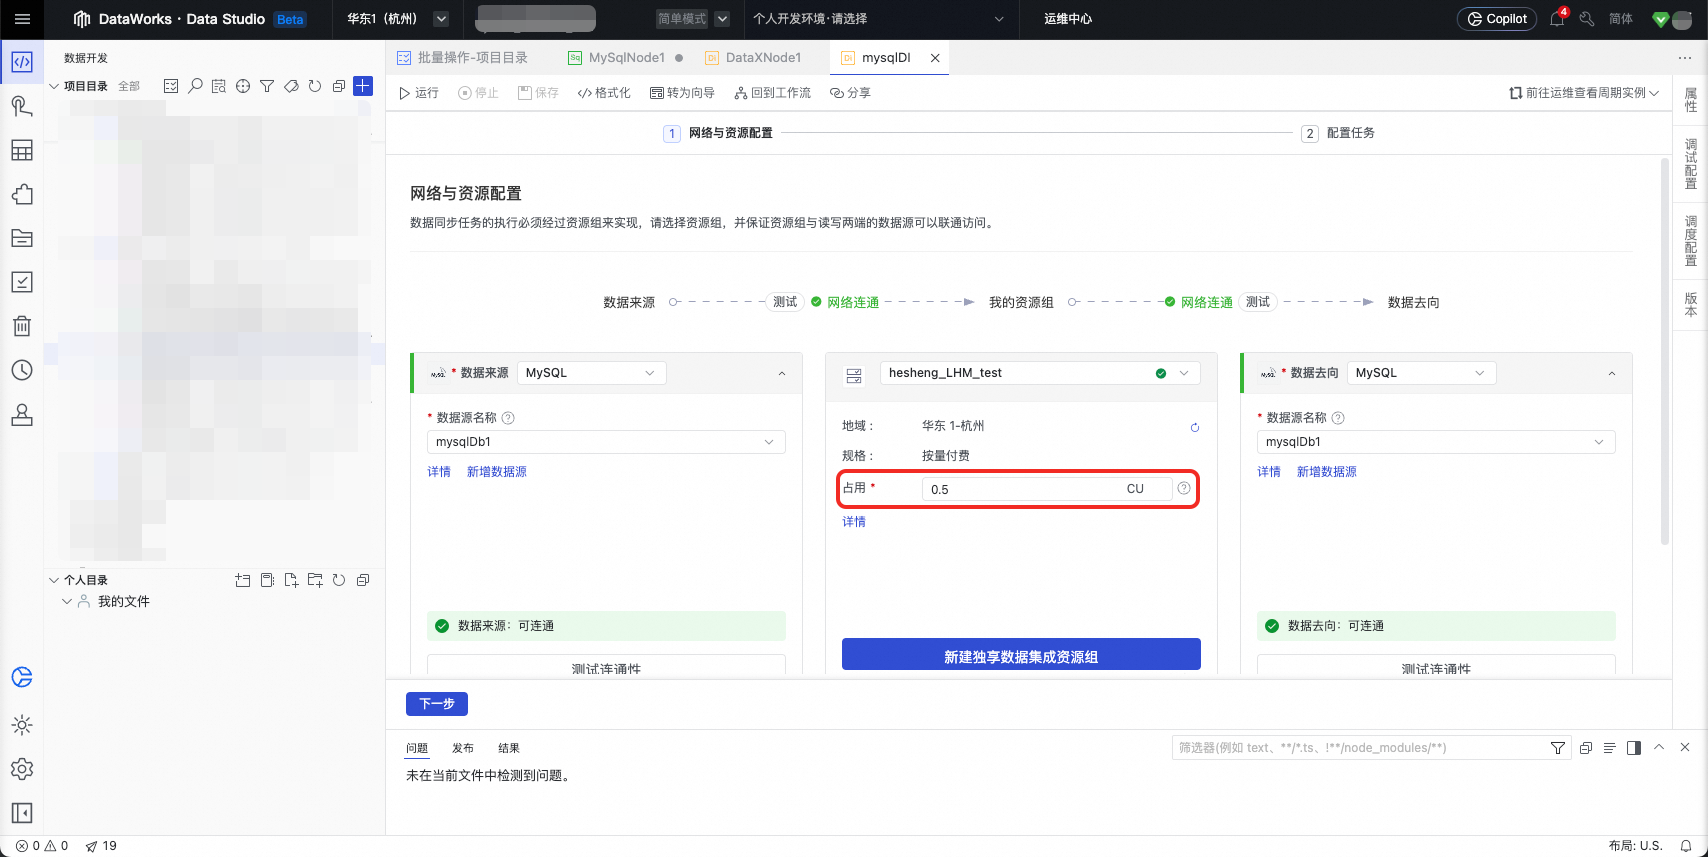
Note that when you use the tool to import scheduling information into the destination DataWorks workspace, the import configuration items also include a resource group setting. If the resource group field in the table has a value, the import tool uses the value from the table. If the resource group field in the table is empty, the import tool uses the setting from the import configuration items. The setting in the table takes precedence over the setting in the import configuration items.
2.3. Batch modify node scripts
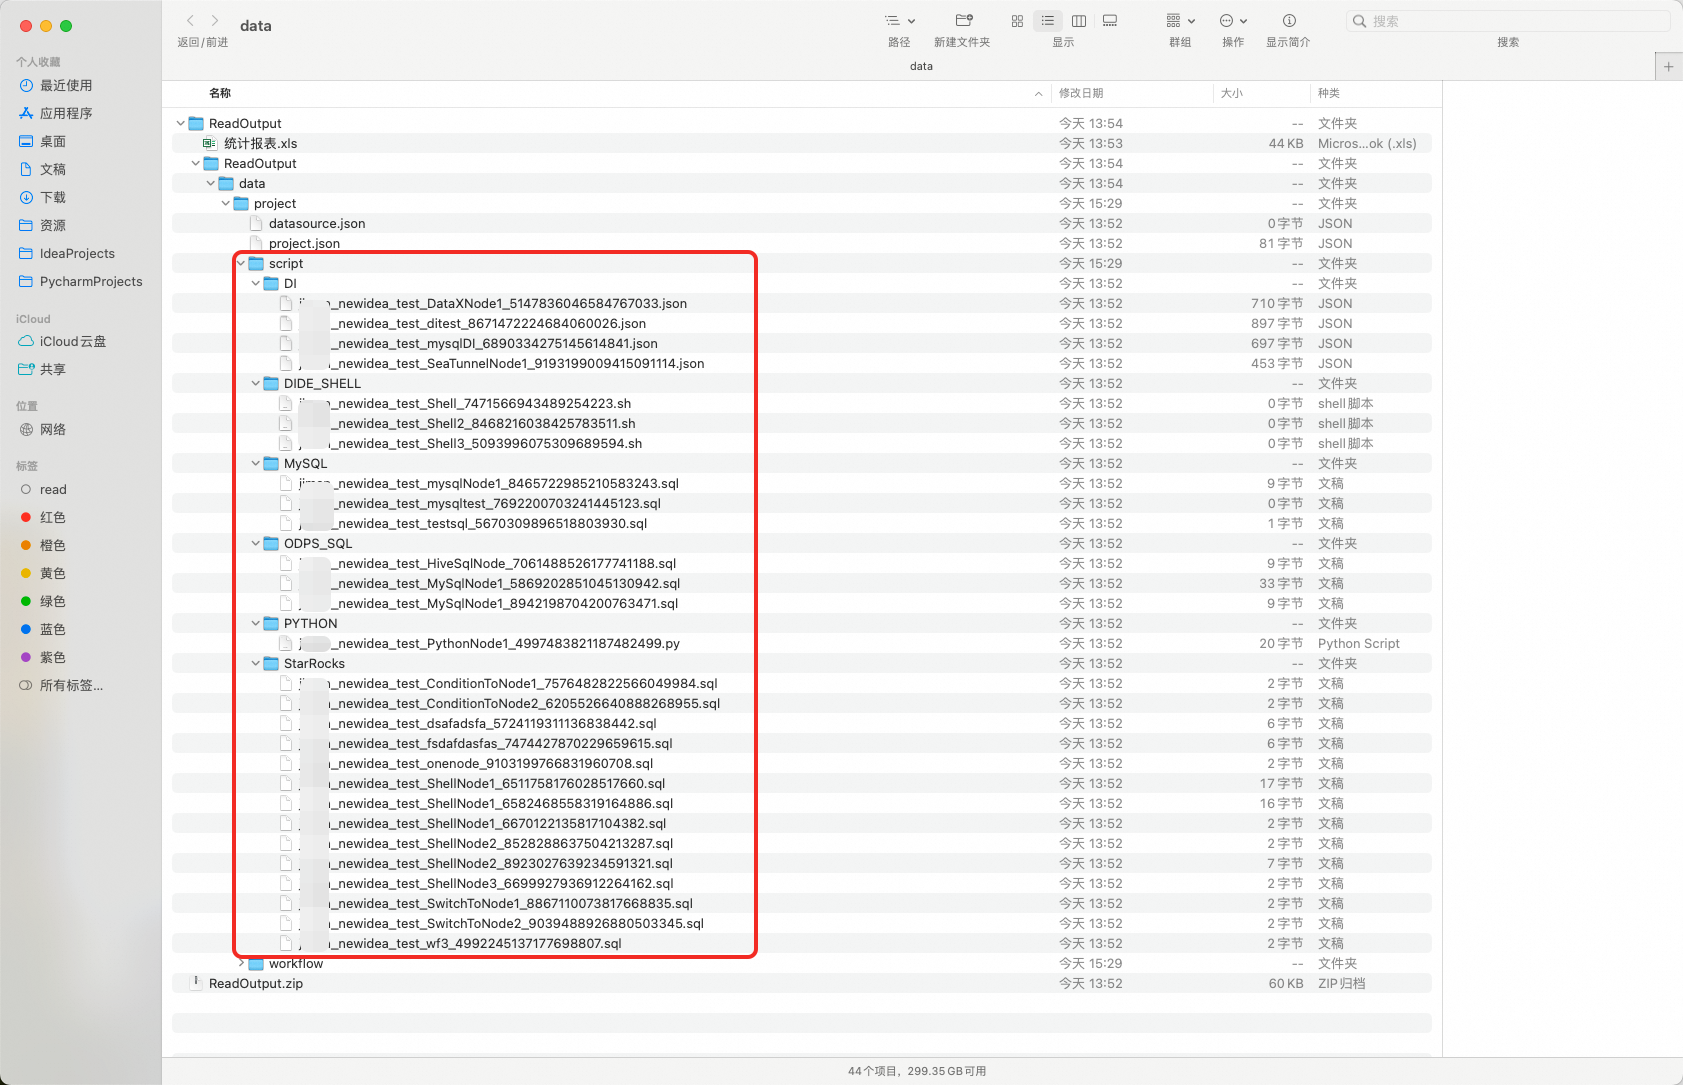
Node scripts are stored in the 'data/project/script' directory. The scripts are saved in subfolders that are classified by node type.
The file name format is "WorkspaceName#NodeName#NodeId". You can use the statistical report to find the node script that you want to modify.
Categorizing storage by node type enables users to modify tasks of the same type in batches.
3. Import to DataWorks
Follow the instructions in the DataWorks cross-workspace migration guide to import and update the workflows. This completes the batch property modifications.