This topic describes how to enrich the DevOps process for microservices. You will build a complete chain of associated entities, from code repositories and container images to Kubernetes resources and application performance management (APM) services. This provides end-to-end observability.
Scope
Cloud service activation requirements
Alibaba Cloud DevOps (Apsara DevOps): You have activated the service and created an organization.
Alibaba Cloud Container Registry (ACR): You have activated the Personal Edition or Enterprise Edition.
Container Service for Kubernetes (ACK): You have created a cluster.
Permission requirements
Create a Resource Access Management (RAM) user or role with the following permissions:
Data preparation
Data type |
Requirements |
DevOps data |
|
Container image data |
|
Kubernetes data |
|
Application observable data |
Ensure the application is connected to the ARMS agent:
|
Deployment steps
The complete code package for these steps is available in umodel_and_codes.zip.
Step 1: Ingest enriched DevOps process data into UModel
Go to the Cloud Monitor 2.0 workspace, click All Features, and then select UModel Explorer to view the currently ingested UModel data.
Replace the parameters and run the following command to upload the DevOps-related UModel definitions and data from the code package.
export ALIBABA_CLOUD_ACCESS_KEY_ID="your-access-key-id"
export ALIBABA_CLOUD_ACCESS_KEY_SECRET="your-access-key-secret"

python umodel_batch_uploader.py ../umodel --endpoint metrics.<REGION>.aliyuncs.com --workspace <YOUR_WORKSPACE>
Go to the Cloud Monitor 2.0 workspace, click All Features, and then select UModel Explorer to view the uploaded UModel data.
You can filter UModel data by node type or domain. The following figure shows how to filter data to view only the
devopsdomain data.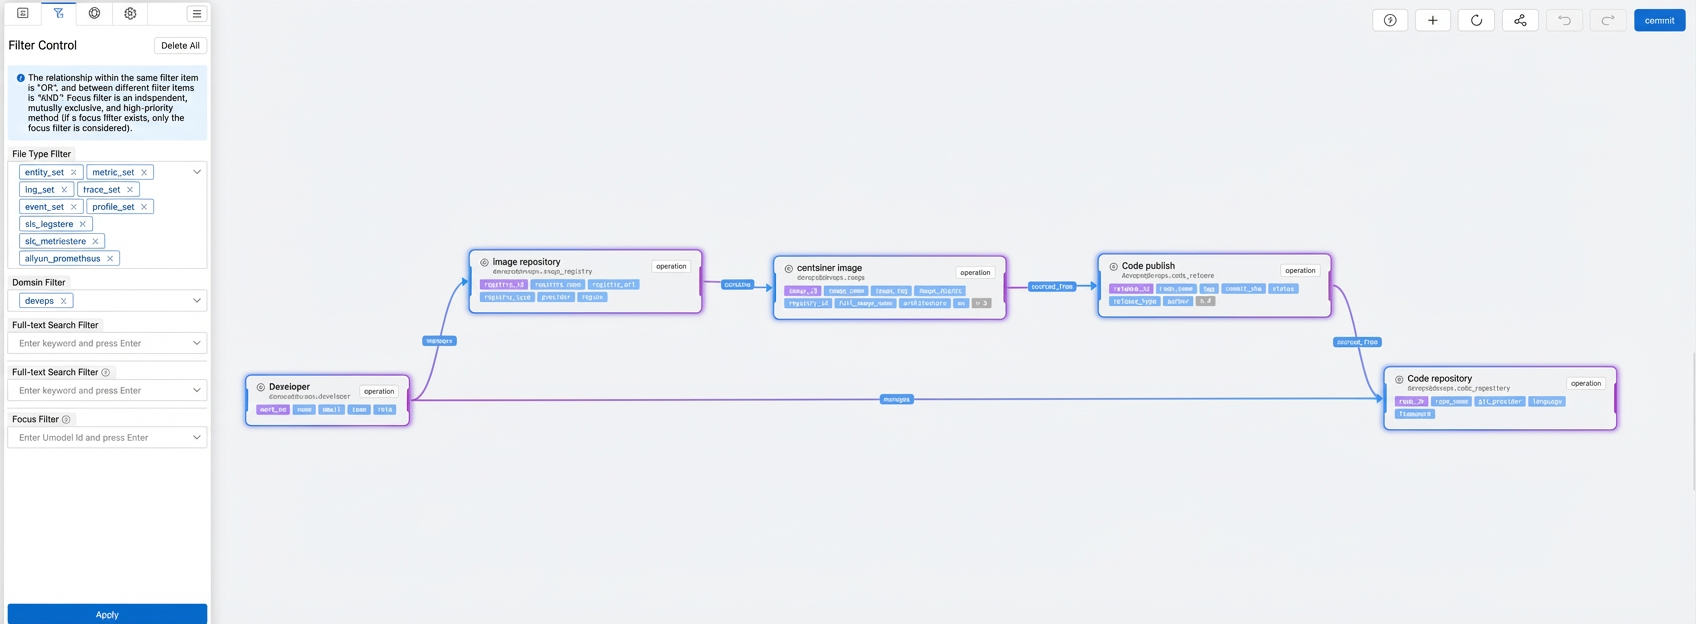
You can also view the connections between the DevOps UModel data domain and other domains. For more information, see the UModel Explorer documentation.
Step 2: Generate DevOps entity and relationship data
Go to the devops_data_generator directory.
Edit the configuration file.
In the root directory of
devops_data_generator, run the following command to generate the entity data.pip install -r requirements.txt # One-time execution python main.py --mode singleDeploy devops_data_generator using one of the three methods described in the following table. Choose the solution that best fits your infrastructure.
Feature
Kubernetes CronJob
Function Compute
Docker Compose
Deployment complexity
Medium
Low
Low
O&M cost
Medium
Low (pay-as-you-go)
Medium
Scenarios
Existing K8s cluster
Serverless scenarios
Standalone server
Deploy using a Kubernetes CronJob (Recommended)
1. Prepare the configuration and image
# Create a namespace and a ConfigMap
kubectl create namespace devops-data-generator
kubectl create configmap devops-generator-config \
  --from-file=config/ \
  -n devops-data-generator

# Build and push the image
docker build -t your-registry.com/devops-data-generator:v1.0 .
docker push your-registry.com/devops-data-generator:v1.0
2. Create the CronJob resource (k8s/cronjob.yaml)
apiVersion: batch/v1
kind: CronJob
metadata:
  name: devops-data-generator
  namespace: devops-data-generator
spec:
  schedule: "*/15 * * * *"  # Runs every 15 minutes. Example frequencies: */5 * * * * (every 5 minutes), 0 * * * * (every hour), 0 2 * * * (at 2:00 AM every day)
  concurrencyPolicy: Forbid
  jobTemplate:
    spec:
      template:
        spec:
          restartPolicy: OnFailure
          containers:
          - name: generator
            image: your-registry.com/devops-data-generator:v1.0
            command: ["python", "main.py", "--mode", "single"]
            volumeMounts:
            - name: config
              mountPath: /app/config
            resources:
              limits:
                memory: "512Mi"
                cpu: "500m"
          volumes:
          - name: config
            configMap:
              name: devops-generator-config
3. Deploy and verify
# Deploy the CronJob
kubectl apply -f k8s/cronjob.yaml
# Manually test the job
kubectl create job --from=cronjob/devops-data-generator test-job -n devops-data-generator
# View the logs
kubectl logs -n devops-data-generator -l app=devops-data-generator --tail=50
Deploy using Alibaba Cloud Function Compute (container image)
You can use the custom container image feature of Function Compute to deploy the application by reusing the Docker image.
1. Build and push the image to ACR
# Log on to ACR
docker login --username=${ACR_USERNAME} registry.cn-hangzhou.aliyuncs.com
# Build the image (add FC adapter)
docker build -t registry.cn-hangzhou.aliyuncs.com/your-namespace/devops-data-generator:v1.0 .
# Push the image
docker push registry.cn-hangzhou.aliyuncs.com/your-namespace/devops-data-generator:v1.0
2. Create the s.yaml configuration file
edition: 1.0.0
name: devops-data-generator-fc

services:
  devops-generator:
    component: fc
    props:
      region: cn-hangzhou
      service:
        name: devops-data-generator-service
        internetAccess: true

      function:
        name: data-generator
        description: DevOps data ingestion generator
        # Use a custom container image
        runtime: custom-container
        customContainerConfig:
          image: registry.cn-hangzhou.aliyuncs.com/your-namespace/devops-data-generator:v1.0
          command: ["python", "main.py", "--mode", "single"]
          accelerationType: Default
        timeout: 600
        memorySize: 512
        instanceConcurrency: 1

      triggers:
        - name: timer-trigger
          type: timer
          config:
            enable: true
            cronExpression: '0 */15 * * * *'  # Runs every 15 minutes
            payload: '{}'
3. Deploy and test
# Install Serverless Devs
npm install -g @serverless-devs/s
s config add  # Configure your Alibaba Cloud account
# Deploy the function
s deploy

# Manually trigger a test
s invoke

# View the logs
s logs -t
4. Deploy
s deploy              # Deploy the function
s invoke --event '{}'  # Test the execution
s logs -t             # View the logs
Deploy using Docker Compose
1. Create docker-compose.yml
version: '3.8'
services:
  devops-data-generator:
    build: .
    container_name: devops-data-generator
    restart: unless-stopped
    command: python app.py --host 0.0.0.0 --port 5000
    ports:
      - "5000:5000"
    volumes:
      - ./config:/app/config:ro
      - ./logs:/app/logs
    healthcheck:
      test: ["CMD", "curl", "-f", "http://localhost:5000/health"]
      interval: 30s
2. Start the service and configure a scheduled trigger
# Start the service
docker-compose up -d

# Configure a scheduled trigger using crontab
crontab -e
# Add: Run every 15 minutes
*/15 * * * * curl -X POST http://localhost:5000/invoke -H "Content-Type: application/json" -d '{"mode":"single"}'
3. Monitor and maintain
curl http://localhost:5000/status   # View the status
docker-compose logs -f              # View the logs
docker-compose restart              # Restart the service
Verify that the data is correctly uploaded to EntityStore.
Demonstration of interconnected DevOps entities
After you complete the preceding steps, the defined DevOps entity data is connected. You can log on to the Cloud Monitor 2.0 console to view the following content:
Panoramic entity data overview: Displays complete DevOps entity data, covering the full chain of entities such as code repositories, developers, code releases, container images, Kubernetes pods, and APM services.
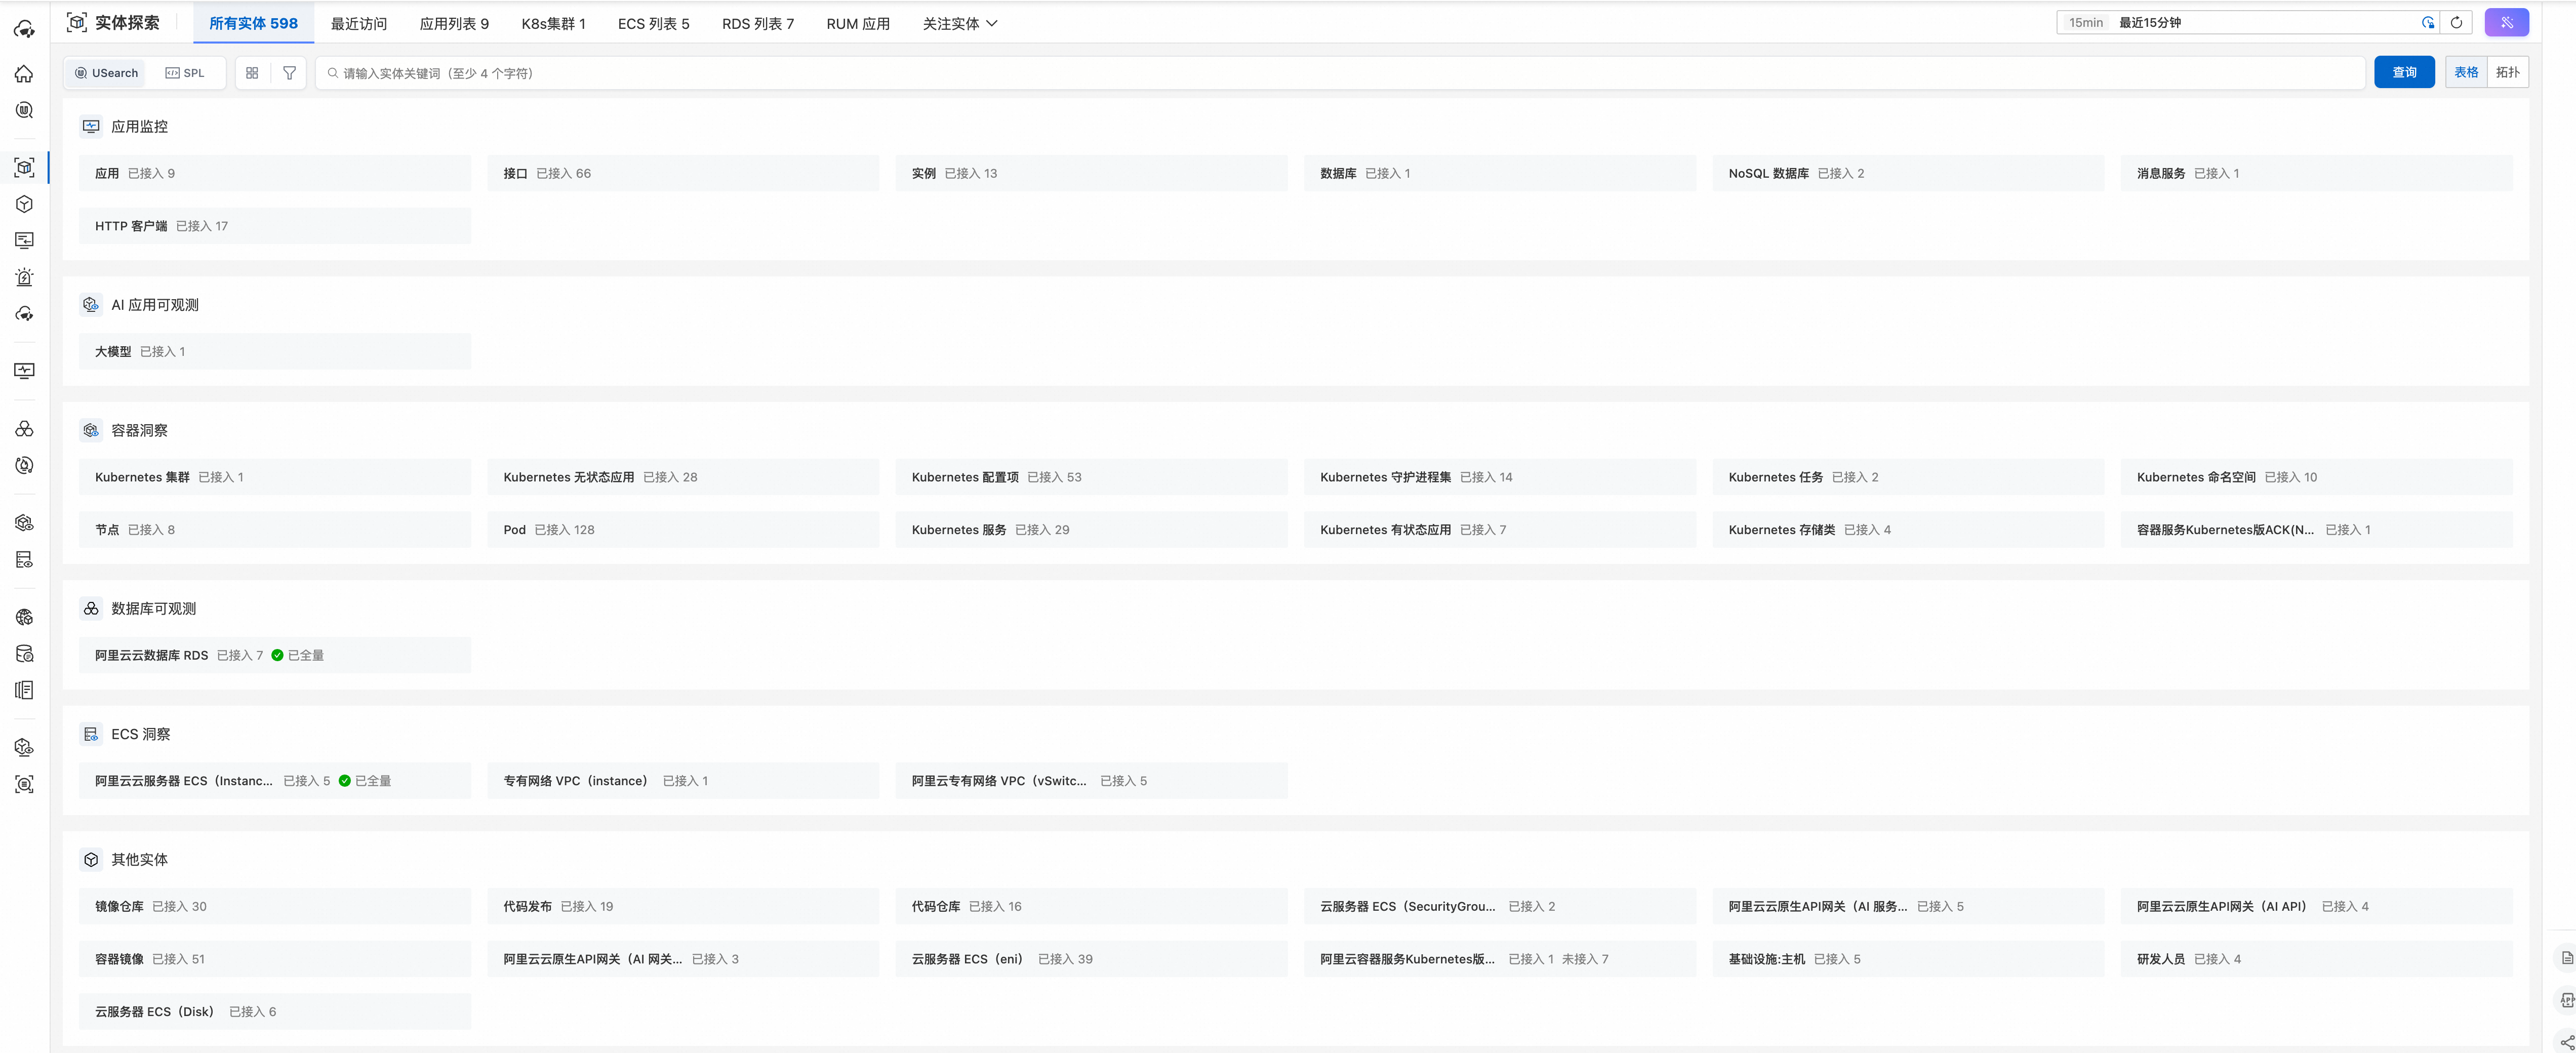
Full-link topology relationship diagram: The entity topology view presents the entities and relationships of the entire DevOps chain as a unified topology graph. It provides a high-level overview and supports layered layouts, relationship flow display, anomaly identification, and interactive exploration.
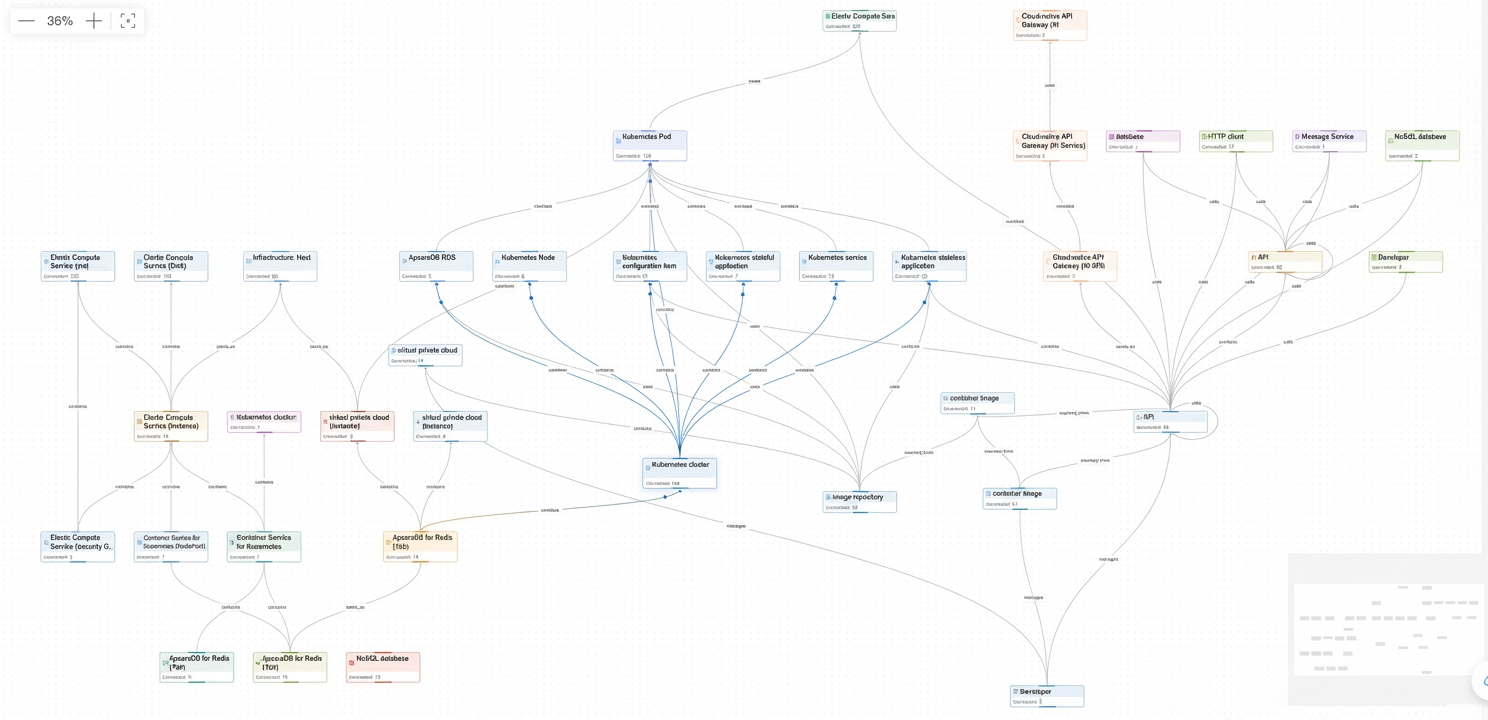
Categorized entity list management: CMS provides a structured entity list view. It supports grouped display by entity type, multi-dimensional filtering and searching, and status monitoring. This view complements the topology graph for a comprehensive visualization experience.

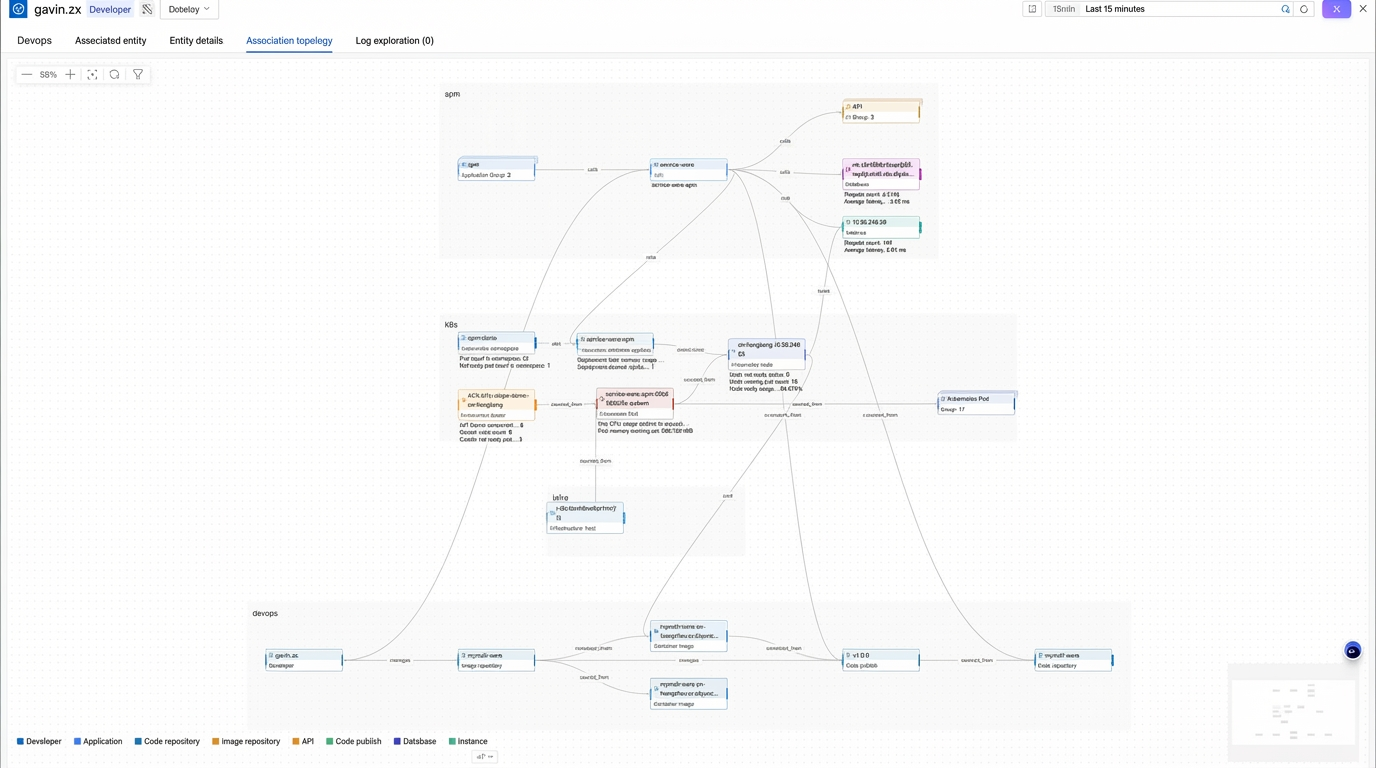
In-depth analysis of a single entity: The single-entity topology view focuses on a specific entity to perform local relationship analysis. It supports upstream and downstream tracing and impact scope analysis. This is useful for scenarios such as fault impact analysis, change risk assessment, and identifying performance bottlenecks.
FAQ
Troubleshooting guide
If data has been uploaded but cannot be found in EntityStore, you can use the following guide to troubleshoot the issue:
Check item |
Using tools |
Confirm that data has been written to the Logstore |
Query the |
Check whether the required fields are complete |
Query for field completeness in the SLS console |
Check whether KeepAlive has expired |
Query the expiration status in the SLS console |
Verify visibility in EntityStore |
Run SQL queries in UModel Explorer |
Check for dangling relationships |
Run JOIN queries in UModel Explorer |
Confirm that data is written to the Logstore
Run the following query statement in the entity data (
**${workspace}__entity**) Logstore.* | select count(*) as total_count where __entity_type__ = 'devops.developer'Run the following query statement in the relationship data (
**${workspace}__topo**) Logstore.* | select count(*) as total_count where __relation_type__ = 'manages'NoteIf the count is 0, the data upload failed. Check the upload code and logs.
Check if required fields are complete
Run the following query statement in the entity data (
**${workspace}__entity**) Logstore to confirm that the uploaded data contains all required fields.* | extend validation_status= case when __domain__ is null or __domain__ = '' then 'domain is missing' when __entity_type__ is null or __entity_type__ = '' then 'entity_type is missing' when __entity_id__ is null or __entity_id__ = '' then 'entity_id is missing' when work_no is null or work_no = '' then 'primary key work_no is missing' when name is null or name = '' then 'name field is missing' else 'Normal' end | where __entity_type__ = 'devops.developer' and validation_status != 'Normal' | project validation_statusRun the following query statement in the relationship data (
**${workspace}__topo**) Logstore to confirm that the uploaded data contains all required fields.* | extend validation_status = case when __src_entity_id__ is null or __src_entity_id__ = '' then 'src_entity_id is missing' when __src_entity_type__ is null or __src_entity_type__ = '' then 'src_entity_type is missing' when __src_domain__ is null or __src_domain__ = '' then 'src_domain is missing' when __dest_entity_id__ is null or __dest_entity_id__ = '' then 'dest_entity_id is missing' when __dest_entity_type__ is null or __dest_entity_type__ = '' then 'dest_entity_type is missing' when __dest_domain__ is null or __dest_domain__ = '' then 'dest_domain is missing' when __relation_type__ is null or __relation_type__ = '' then 'relation_type is missing' else 'Normal' end | where __relation_type__ = 'manages' and validation_status != 'Normal'NoteIf any fields are missing, check the data transformation code to ensure all required fields have values.
All field values must be strings.
Check if KeepAlive has expired
Even if data is written to the Logstore, it cannot be queried in EntityStore if its KeepAlive period has expired.
Run the following query statement in the entity data (
**${workspace}__entity**) Logstore.* | select __entity_id__, from_unixtime(__last_observed_time__) as last_observed, __keep_alive_seconds__ as keep_alive, from_unixtime(__last_observed_time__ + cast(__keep_alive_seconds__ as bigint)) as expire_time, case when to_unixtime(now()) > __last_observed_time__ + cast(__keep_alive_seconds__ as bigint) then 'expired' else 'not expired' end as status where __entity_type__ = 'devops.developer' order by __last_observed_time__ desc limit 20Run the following query statement in the relationship data (
**${workspace}__topo**) Logstore.* | select __src_entity_id__, __dest_entity_id__, __relation_type__, from_unixtime(__last_observed_time__) as last_observed, __keep_alive_seconds__ as keep_alive, case when to_unixtime(now()) > __last_observed_time__ + cast(__keep_alive_seconds__ as bigint) then 'expired' else 'not expired' end as status where __relation_type__ = 'manages' order by __last_observed_time__ desc limit 20Notestatus = 'expired': The entity has expired and cannot be queried in EntityStore.
status = 'not expired': The entity should be queryable. If it cannot be found, check for other issues.
Solutions:
Increase the KeepAlive duration: If entities expire frequently, increase the value of
__keep_alive_seconds__.Increase the upload frequency: Shorten the interval of the scheduled task to ensure
__last_observed_time__is updated promptly.KeepAlive configuration principles:
Scheduled full ingestion: KeepAlive = 2 × full ingestion epoch.
Timed increment: The KeepAlive value is twice the increment period.
Data is not updated promptly
The value of an entity field has changed, but queries still return the old value, or new entities or relationships become visible only after a long delay.
Check the last update time. If
delay_minutesis greater than 60, the data update latency exceeds one hour. You need to optimize the upload policy.* | select __entity_type__, from_unixtime(max(__last_observed_time__)) as last_update, date_diff('minute', from_unixtime(max(__last_observed_time__)), now()) as delay_minutes group by __entity_type__
Optimization strategies:
Current policy |
Data latency |
Optimization solution |
Scheduled full ingestion (24 hours) |
Up to 24 hours |
Change to scheduled full ingestion (6 hours) + scheduled incremental ingestion (30 minutes) |
Scheduled incremental ingestion (1 hour) |
Up to 1 hour |
Add a webhook for event-driven, real-time updates |
Recommended configurations:
Static entities (such as developers): Full ingestion (every 6 hours) + KeepAlive (12 hours)
Semi-static entities (such as code repositories): Full ingestion (every 6 hours) + Incremental ingestion (every 30 minutes) + Events + KeepAlive (12 hours)
Dynamic entities (such as images): Incremental ingestion (every 15 minutes) + Events + KeepAlive (30 minutes)