This topic uses VeOps Configuration Management Database (CMDB) as an example to demonstrate a complete data import solution. This solution uses API calls to synchronize data with Cloud Monitor 2.0.
Example scenario
This example uses a sample set of CMDB data from a typical enterprise to demonstrate the complete import process. The dataset includes the following:
A three-level organizational chart: 3 business units → 8 product lines → 20 applications
Infrastructure resources: 30 physical servers, 50 virtual machines, and 40 Docker containers
Hardware components: 49 network interface cards, 89 hard disks, and 171 memory modules
Relational network: approximately 377 relationships that use two relationship types:
containsanddeploys_on
This creates a complete CMDB asset graph with 9 configuration item types, 460 instances, and 377 relationships.
Local deployment
You can use Docker for a one-click local deployment. For more information about deployment commands, see the deployment document.
# Prerequisites: Install Docker and Docker Compose (v2).
# Clone the project code.
git clone https://github.com/veops/cmdb.git
# Enter the main directory and start the services.
docker compose up -d
Service tree structure
Entity topology relationship
Procedure
Step 1: Map models
Understanding the conceptual mapping between CMDB and UModel provides a foundation for subsequent configuration generation and data synchronization.
Core concept mapping
CMDB Concept | UModel Concept | Description |
Configuration Item | Entity | The basic management unit in a CMDB, such as a server, application, or database. |
Configuration Item Type | EntitySet | The model for a class of entities, including field definitions, primary keys, and lifecycle. |
Configuration Item Type Relationship | EntitySetLink | The relationship types between different entity types, such as contains, deploys, or depends on. |
Configuration Item Instance Relationship | Topo | The association between specific entity instances. |
Property Definition | Field | The property fields of an entity, including type, constraints, and whether it is required. |
Core transformation principles
Model definition layer: Configuration Item Type → EntitySet
Instance data layer: Configuration Item Instance → Entity
Relationship definition layer: Configuration Item Type Relationship → EntitySetLink
Relationship instance layer: Configuration Item Type Relationship → Topo
Entity type mapping table
Based on the example scenario, the nine Configuration Item Types are mapped to UModel as follows:
CMDB Configuration Item Type | UModel EntitySet | Primary key field | Displayed fields | Relationship type |
Business Unit
|
|
|
| contains → Product |
Product Line
|
|
|
| contains → Application |
Application
|
|
|
| deploys_on → Server/VServer/Docker |
Physical Server
|
|
|
| contains → VServer/NIC/HardDisk/RAM |
Virtual Machine
|
|
|
| - |
Docker Container
|
|
|
| - |
Network Interface Card
|
|
|
| - |
Hard Disk
|
|
|
| - |
Memory
|
|
|
| - |
Step 2: Generate UModel configurations
In UModel, you can configure EntitySet and EntitySetLink using static configuration files or by dynamically generating them based on the schema defined in the CMDB. The best practice is to use a hybrid approach where static files take precedence. This approach combines the advantages of both methods.
For example, in VeOps, an entity has a unique identifier and display fields. The unique identifier field can be used as the primary_keys of an EntitySet, and the display fields can be used as the name_fields. Because VeOps does not support the Schema Query API, a static configuration method is used to generate the EntitySet and EntitySetLink configuration files.
2.1 Configure mapping rules
Edit the config.yaml file to configure the mapping from Configuration Item Type to EntitySet:
ci_type_mapping:
  business_unit:
    entity_set: "cmdb.business_unit"
    domain: "cmdb"
    primary_keys: ["bu_name"]
    name_fields: ["bu_name"]
  product:
    entity_set: "cmdb.product"
    domain: "cmdb"
    primary_keys: ["product_name"]
    name_fields: ["product_name"]
  application:
    entity_set: "cmdb.application"
    domain: "cmdb"
    primary_keys: ["project_name"]
    name_fields: ["project_name"]
  server:
    entity_set: "cmdb.server"
    domain: "cmdb"
    primary_keys: ["server_name"]
    name_fields: ["server_name", "private_ip"]
Configuration description:
entity_set: The UModel entity set name.primary_keys: The field that uniquely identifies the entity.name_fields: The fields used for display.
2.2 Run the generation tool
python3 generate_umodel_config.pyStep 3: Apply the UModel configuration
Upload the generated UModel configuration files to the Cloud Monitor 2.0 console to define your entities and relationships.
Log on to the Cloud Monitor 2.0 console.
-
Go to the target workspace. In the navigation pane on the left, select UModel Explorer.
-
On the UModel Explorer page, click the
 icon in the upper-right corner. In the dialog box that opens, click Upload UModel YAML/JSON.
 -
In the Batch Upload UModel dialog box, click the
 icon to select files, or drag the files to the upload box. Upload all YAML files from the
 umodel_config/folder.After the upload completes, verify that the file list shows all 18 files have passed validation (Successful: 18, Warnings: 0, Errors: 0).
-
Click Import Now.
-
After the import is successful, click Submit in the upper-right corner.
-
On the submission preview page, verify the content, then click Confirm that the content meets expectations and proceed with the changes.. In the Changes dialog box, click OK.
-
Verification: In the entity set list, you should see nine new
cmdb.*entity sets.
Step 4: Synchronize entity and relationship data
Entity and relationship data is retrieved from the CMDB API as configuration item instance and relationship data. This data is then transformed into the UModel entity and relationship format and written to Simple Log Service.
Entity data format transformation
The VeOps API uses /api/v0.1/ci to retrieve all entity data in the following format:
GET /api/v0.1/ci?ci_type=server&page=1&count=100Sample response data:
{
    "_id": 1234,
    "ci_id": "272",
    "ci_type_id": "4",
    "bu": "Cloud Computing",
    "buy_date": "2023-01-08",
    "ci_type": "server",
    "ci_type_alias": "Physical Server",
    "cmc_ip": "28.191.122.80",
    "cnc_ip": "224.127.127.194",
    "cpu": "AMD EPYC 7542",
    "cpu_count": "2",
    "ctc_ip": "75.76.9.36",
    "device_spec": "Huawei RH2288H V5",
    "env": "test",
    "idc": "Alibaba Cloud-Heyuan",
    "ilo_ip": "10.161.85.215",
    "ilo_mac": "05:0f:a9:63:91:ad",
    "kernel_version": "3.10.0-1160.el7.x86_64",
    "logic_cpu_count": "40",
    "manufacturer": "Dell",
    "oneagent_id": "XD1VLEEIR15O",
    "op_duty": "[\"Zhang Lihua\"]",
    "os_version": "CentOS 7.9",
    "perm": "{\"execute\": false, \"groups\": [\"viewers\", \"admins\", \"guests\"], \"owner\": \"Zhang Zhiqiang\", \"read\": true, \"write\": true}",
    "private_ip": "10.122.144.73",
    "rack": "59",
    "raid": "RAID 10",
    "ram": "64GB DDR4",
    "ram_size": "64",
    "rd_duty": "[\"Qi Jing\"]",
    "server_name": "phy-server-011",
    "server_room": "Alibaba Cloud-Heyuan Data Center",
    "sn": "C2LVEAZRIVH1",
    "ssh_port": "22",
    "status": "Online",
    "unique": "sn",
    "unique_alias": "Server Serial Number",
    "vnc_port": "5910",
    "__pack_meta__": "0|MTc2MjgzMzA5NTg5OTYzMjg1OQ==|32|3",
    "__topic__": "",
    "__source__": "30.221.145.27",
    "__tag__:__receive_time__": "1763629311",
    "__time__": "1763629311",
    "__time_ns_part__": "127734016"
}
After transformation, the data is written to ${workspace}__entity. The system field mappings are as follows:
UModel Field | Example | Description |
|
| The domain to which the entity belongs. |
|
| The entity set name, which corresponds to the Configuration Item Type. |
|
| Globally unique ID (GUID). |
|
| The time of the first observation, as a UNIX timestamp in seconds. |
|
| The time to live (TTL) in seconds. This is typically set to 2 to 3 times the synchronization epoch. |
|
| The first observation time is a timestamp in seconds. |
Other fields |
| All original fields are retained. |
Complete example:
{
    "__domain__": "cmdb",
    "__entity_type__": "cmdb.server",
    "__entity_id__": "b4da1c11d1a62257087aab071d27c1bc",
    "__method__": "Update",
    "__last_observed_time__": "1763629311",
    "__keep_alive_seconds__": "3600",
    "ci_id": "272",
    "ci_type_id": "4",
    "bu": "Cloud Computing",
    "buy_date": "2023-01-08",
    "ci_type": "server",
    "ci_type_alias": "Physical Server",
    "cmc_ip": "28.191.122.80",
    "cnc_ip": "224.127.127.194",
    "cpu": "AMD EPYC 7542",
    "cpu_count": "2",
    "ctc_ip": "75.76.9.36",
    "device_spec": "Huawei RH2288H V5",
    "env": "test",
    "idc": "Alibaba Cloud-Heyuan",
    "ilo_ip": "10.161.85.215",
    "ilo_mac": "05:0f:a9:63:91:ad",
    "kernel_version": "3.10.0-1160.el7.x86_64",
    "logic_cpu_count": "40",
    "manufacturer": "Dell",
    "oneagent_id": "XD1VLEEIR15O",
    "op_duty": "[\"Zhang Lihua\"]",
    "os_version": "CentOS 7.9",
    "perm": "{\"execute\": false, \"groups\": [\"viewers\", \"admins\", \"guests\"], \"owner\": \"Zhang Zhiqiang\", \"read\": true, \"write\": true}",
    "private_ip": "10.122.144.73",
    "rack": "59",
    "raid": "RAID 10",
    "ram": "64GB DDR4",
    "ram_size": "64",
    "rd_duty": "[\"Qi Jing\"]",
    "server_name": "phy-server-011",
    "server_room": "Alibaba Cloud-Heyuan Data Center",
    "sn": "C2LVEAZRIVH1",
    "ssh_port": "22",
    "status": "Online",
    "unique": "sn",
    "unique_alias": "Server Serial Number",
    "vnc_port": "5910",
    "__pack_meta__": "0|MTc2MjgzMzA5NTg5OTYzMjg1OQ==|32|3",
    "__topic__": "",
    "__source__": "30.221.145.27",
    "__tag__:__receive_time__": "1763629311",
    "__time__": "1763629311",
    "__time_ns_part__": "127734016"
}
Relationship data format transformation
VeOps uses /api/v0.1/relation_ci to retrieve configuration item relationship data. The API call is as follows:
GET /api/v0.1/relation_ci?parent_type=product&child_type=application&level=1Sample response data:
{
  "parent_id": 100,
  "child_id": 200,
  "relation_type": "contains"
}
UModel Topo data format
The transformed data is written to ${workspace}__topo. The data format and system field mappings are as follows:
UModel Field | Example | Description |
|
| |
|
| |
|
| The GUID of the source entity. |
|
| |
|
| |
|
| The GUID of the destination entity. |
|
| Standardized relationship type. |
|
| The time of the first observation, as a UNIX timestamp in seconds. |
|
| The TTL in seconds. This is typically set to 2 to 3 times the synchronization epoch. |
|
| First observed time (UNIX timestamp) |
The following is a complete example:
{
    "__src_domain__": "cmdb",
    "__src_entity_type__": "cmdb.server",
    "__src_entity_id__": "cb18feff0a2faa1b007000773c717942",
    "__dest_domain__": "cmdb",
    "__dest_entity_type__": "cmdb.ram",
    "__dest_entity_id__": "b4da1c11d1a62257087aab071d27c1bc",
    "__relation_type__": "contains",
    "__method__": "Update",
    "__last_observed_time__": "1763703248"
}
2.1 Configure the synchronization connection
Edit the config.yaml file to configure the CMDB and Simple Log Service connection information:
# CMDB configuration
cmdb:
  endpoint: "http://cmdb.example.com"
  api_key: "your-api-key"
  secret: "your-api-secret"
# Simple Log Service configuration
sls:
  endpoint: "cn-hangzhou.log.aliyuncs.com"
  access_key_id: "YOUR_ACCESS_KEY_ID"
  access_key_secret: "YOUR_ACCESS_KEY_SECRET"
  project: "cms-workspace-project"
  entity_logstore: "workspace__entity"
  topo_logstore: "workspace__topo"
2.2 Perform one-click synchronization
Run the full synchronization command to synchronize all entity and relationship data:
python3 main.py --mode full --all2.3 Set up scheduled synchronization
UModel entities require regular updates to the last_observed_time field to maintain their active status (KeepAlive mechanism). For actual deployments, a combination of full and incremental synchronization is recommended:
Full synchronization
Scans all configuration item instances and relationships in the CMDB and rewrites them to the EntityStore.
Ensures data integrity and fixes any data that might have been missed during incremental synchronization.
Use cases: Initial import, data repair, and periodic data validation (such as running daily at midnight).
Incremental synchronization
Synchronizes only the data that has changed since the last synchronization (relies on the
updated_atfield in the CMDB).Fast synchronization with low resource consumption, suitable for frequent execution.
Use cases: Continuous daily synchronization (such as running every 5 to 15 minutes).
This example uses a crontab scheduled task to perform full synchronization:
# Edit the crontab.
crontab -e
# Add a scheduled task to run once per hour.
0 * * * * cd /path/to/cmdb_sync && python3 main.py --mode full --all >> logs/cron.log 2>&1
Results after completion
After the data import is complete, you can view and manage the CMDB data in the Cloud Monitor 2.0 console.
1. Entity list
You can view all entities synchronized from the CMDB.
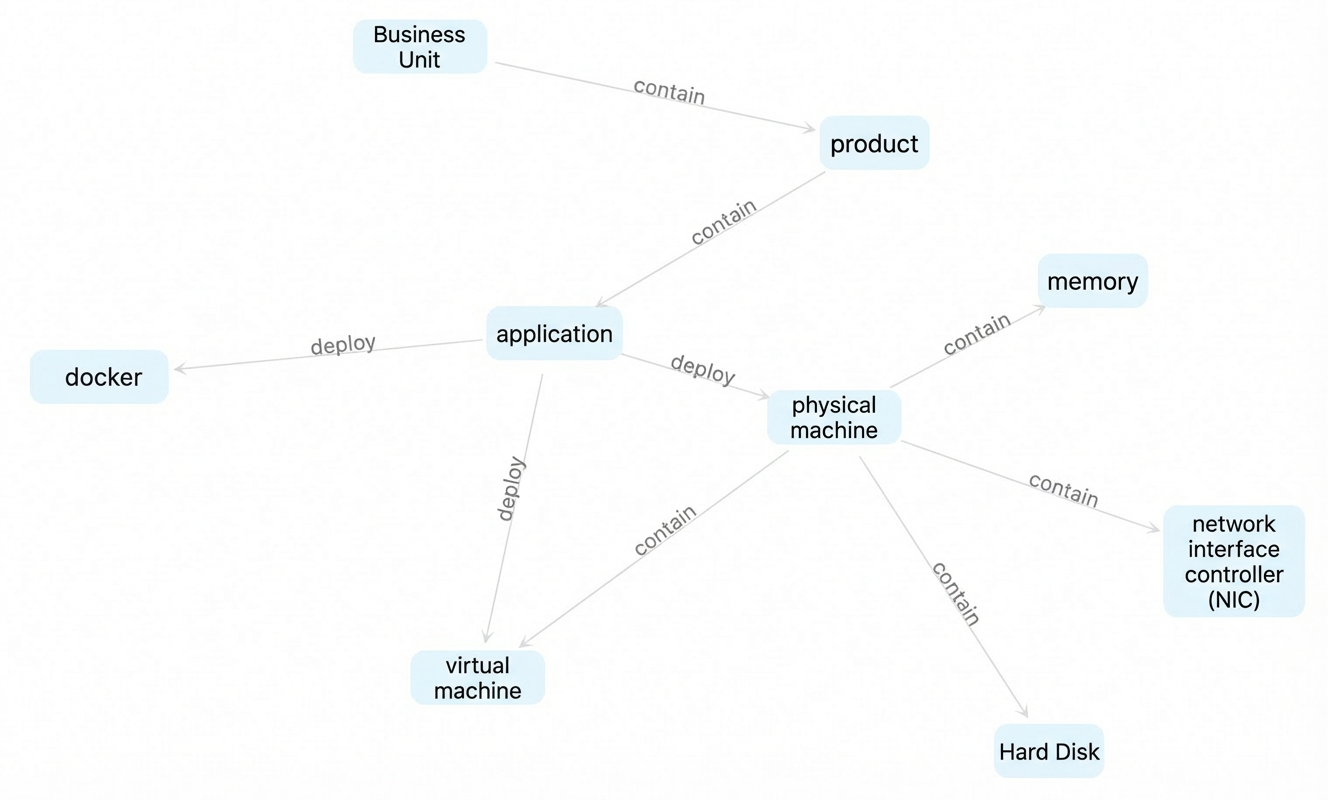
2. Entity relationship topology
This topology visually displays the complete relationship network between entities.
The relationships among these entities are as follows: a contains relationship links a physical machine to a hard disk, network interface, memory, and virtual machine; a deploys_on relationship links a Docker container, virtual machine, and application to a physical machine; and contains relationships link an application to a product and a product to a business unit. The topology includes the following entity models: hard disk (cmdb.harddisk), network interface (cmdb.nic), memory (cmdb.ram), virtual machine (cmdb.vserver), Docker container (cmdb.docker), physical machine (cmdb.server), application (cmdb.application), product (cmdb.product), and business unit (cmdb.business_unit).
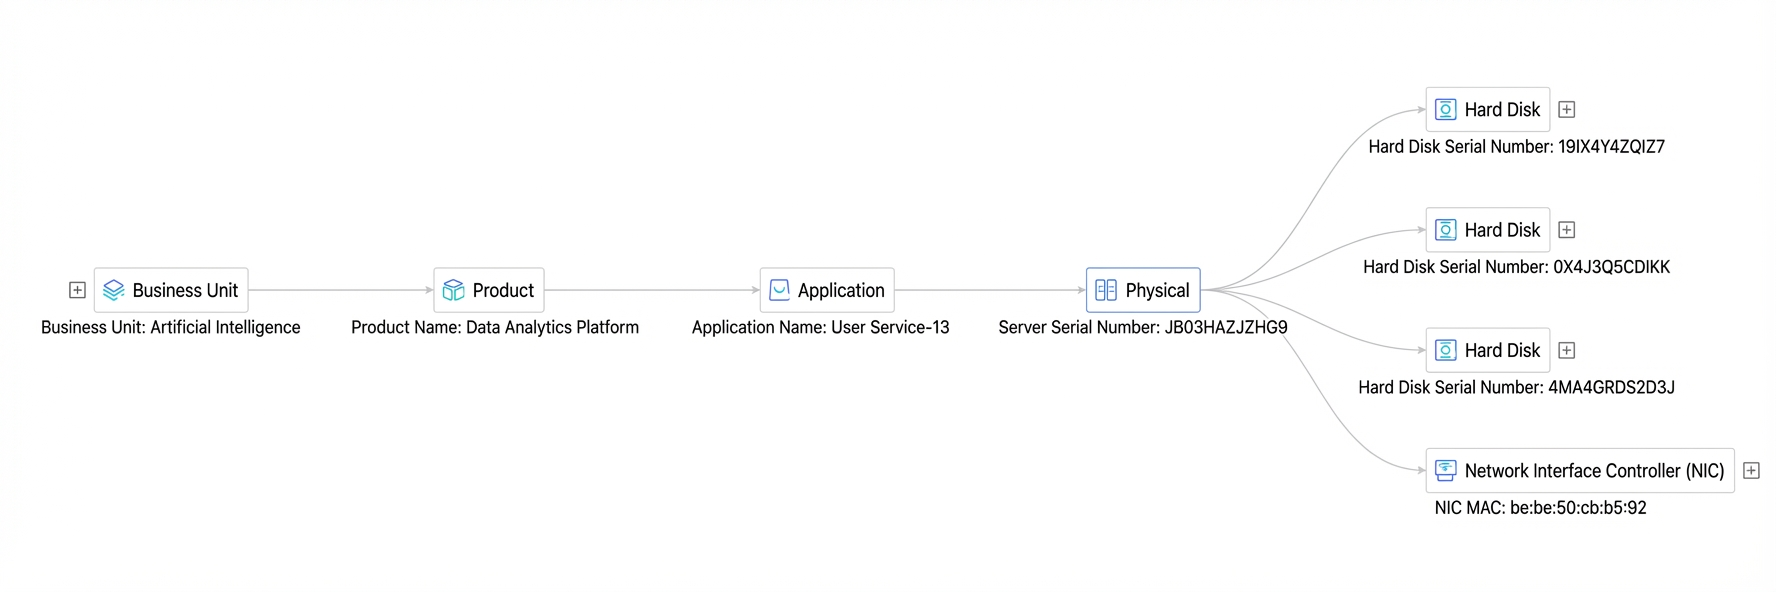
3. Individual entity topology
View the relationships of a specific entity.
The relationship topology tab displays an entity's multi-level relationships as a topology. For example, a business unit is linked to a product by a contains relationship, and the product is linked to an application by another contains relationship. The application is linked to its deployment target, such as a Docker container or a physical machine, with a deploys_on relationship. The physical machine can be further linked to infrastructure components such as hard disks, network interfaces, virtual machines, and memory with a contains relationship. The toolbar allows you to zoom, enter full-screen mode, refresh, and filter the view. You can also set a time range in the upper-right corner.
Queries
Trace data query
.topo | graph-call cypher(`
        MATCH (src {__entity_type__:"cmdb.business_unit"})-[e1]-(n1)-[e2]-(n2)
        RETURN src, e1, n1, e2, n2
      `)
The query returns a table with five columns: src, e1, n1, e2, and n2. The src column contains cmdb.business_unit entities, the n1 column contains cmdb.product entities, and the n2 column contains entities of types such as cmdb.application. The e1 and e2 columns display the corresponding relationships.
Multi-hop query
.topo | graph-call cypher(`
          MATCH (src {__entity_type__:"cmdb.business_unit"})-[e*3..4]->(dest)
          WHERE dest.__domain__ = 'cmdb'
          RETURN src, dest, dest.__entity_type__
      `)
This query returns a three-column table with the columns src, dest, and __entity_type__. The src column displays cmdb.business_unit entities (for example, "AI Business Unit" and "Big Data Business Unit"). The dest column displays cmdb.server or cmdb.vserver entities that are reached after 3 to 4 hops. The __entity_type__ column identifies the entity type of dest.
Get available methods for a single entity
.entity_set with(domain='cmdb', name='cmdb.business_unit', ids=['cc723a11313b5b16a20806a64b89a212']) | entity-call __list_method__()The query returns a table that lists the seven methods supported by the entity set: __inspect__ (Entity Configuration Inspector), __list_method__ (List Available Methods), get_entities (Get Entities), get_entity_set (Get Current EntitySet), get_neighbor_entities (Get Neighbor Entities), list_data_set (List DataSets), and list_related_entity_set (List Related Entities). Each method includes fields such as name, display_name, description, params, and returns.
Get neighbor nodes
.entity_set with(domain='cmdb', name='cmdb.business_unit', ids=['cc723a11313b5b16a20806a64b89a212']) | entity-call get_neighbor_entities()The query returns two rows of data with four columns: src_entity, dest_entity, direction, and __link_type__. The result shows that this cmdb.business_unit entity connects to two cmdb.product entities through the contains relationship with a direction of out.
Use high-order operators for advanced capabilities
When an entity is connected to other observable data, you can use high-order Structured Process Language (SPL) operators for advanced capabilities. The following example shows how to perform anomaly detection on the request latency metric of an application:
.entity_set with(domain='apm', name='apm.service', ids=['e22adf09a11550f4d7eae98d8a11a1e9'])
| entity-call get_metric('apm', 'apm.metric.apm.service', 'avg_request_latency_seconds', aggregate=false)
| extend r = series_decompose_anomalies(__value__)
| extend anomaly_b =r.anomalies_score_series , anomaly_type = r.anomalies_type_series , __anomaly_msg__ = r.error_msg
| extend x = zip(anomaly_b, __ts__, anomaly_type, __value__)
| extend __anomaly_rst__ = filter(x, x-> x.field0 > 0)
| project __entity_id__, __labels__, __anomaly_rst__, __anomaly_msg__
The __anomaly_rst__ field returns the time of the anomaly, the type of anomaly, and the value at that time.
The __anomaly_rst__ column in the result table displays the detected anomaly types, SPIKE_UP (spike up) and SPIKE_DOWN (spike down), along with their corresponding anomaly scores. The __anomaly_msg__ column is null.