Alibaba Cloud Container Compute Service (ACS) is a high-performance service for running Kubernetes containerized applications in the cloud. This topic shows you how to use kubectl to deploy a demo application to an ACS cluster, expose the application, and monitor its status.
Background information
-
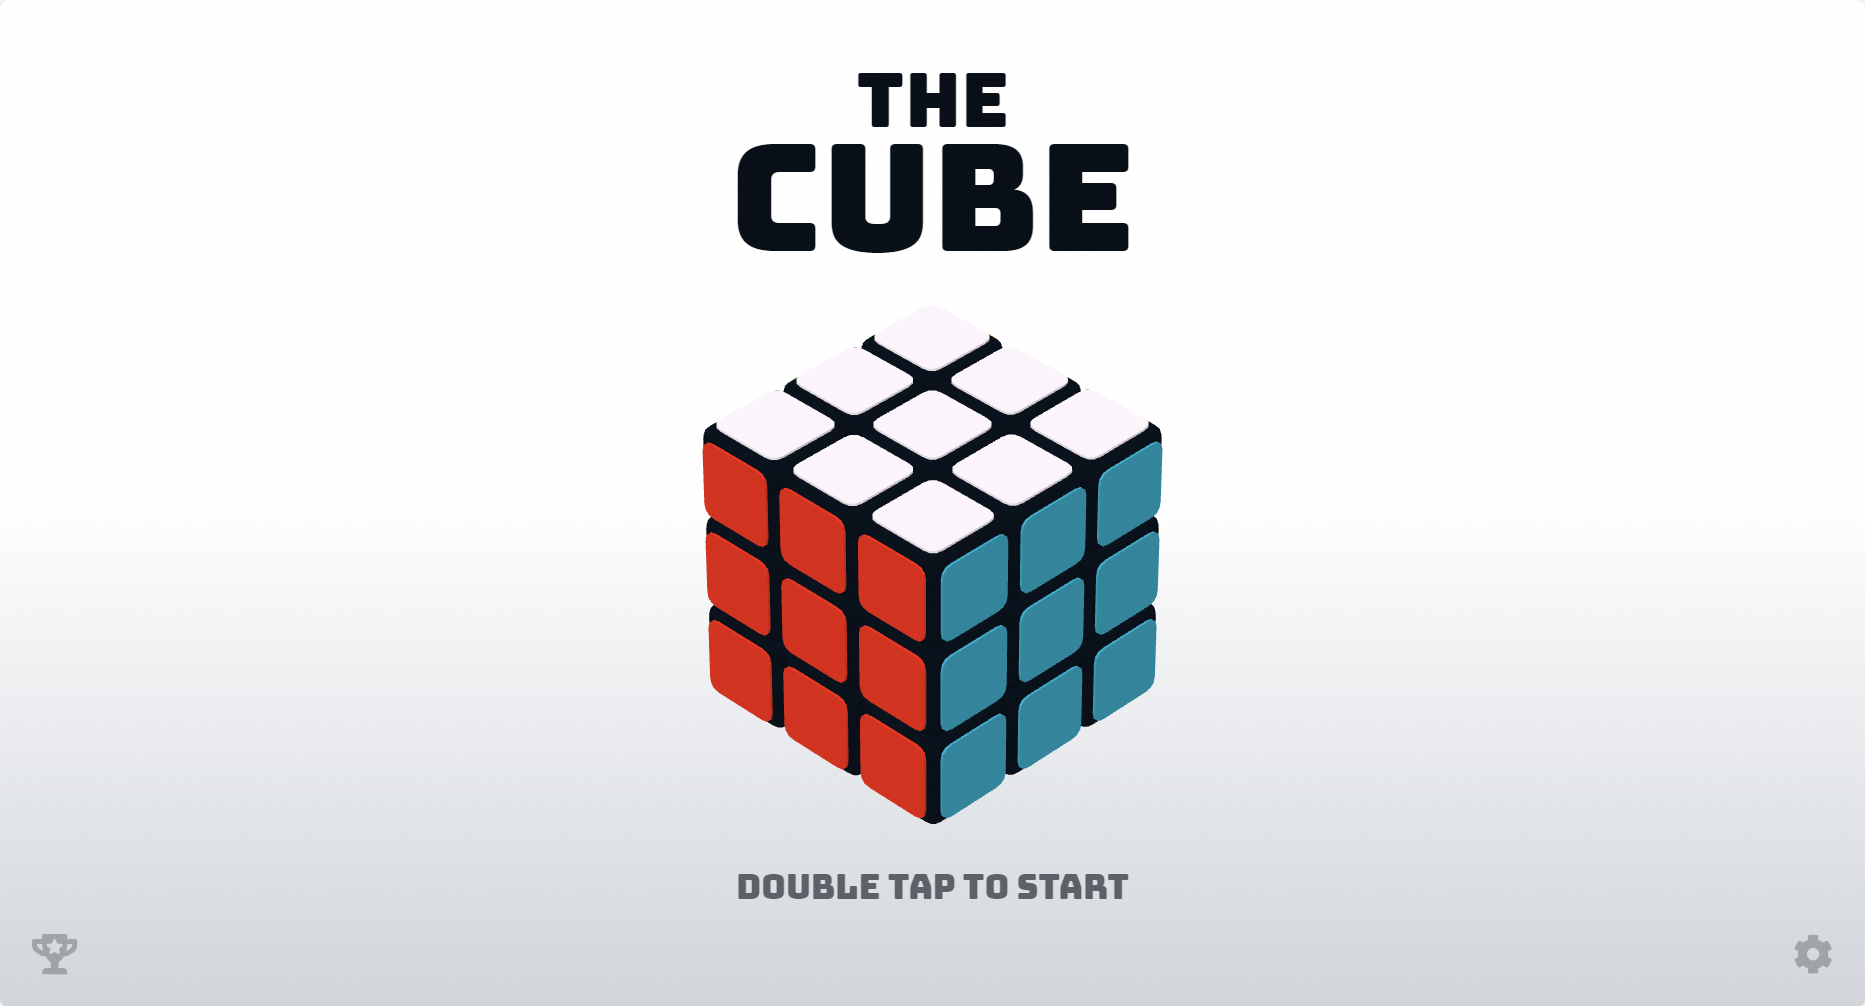
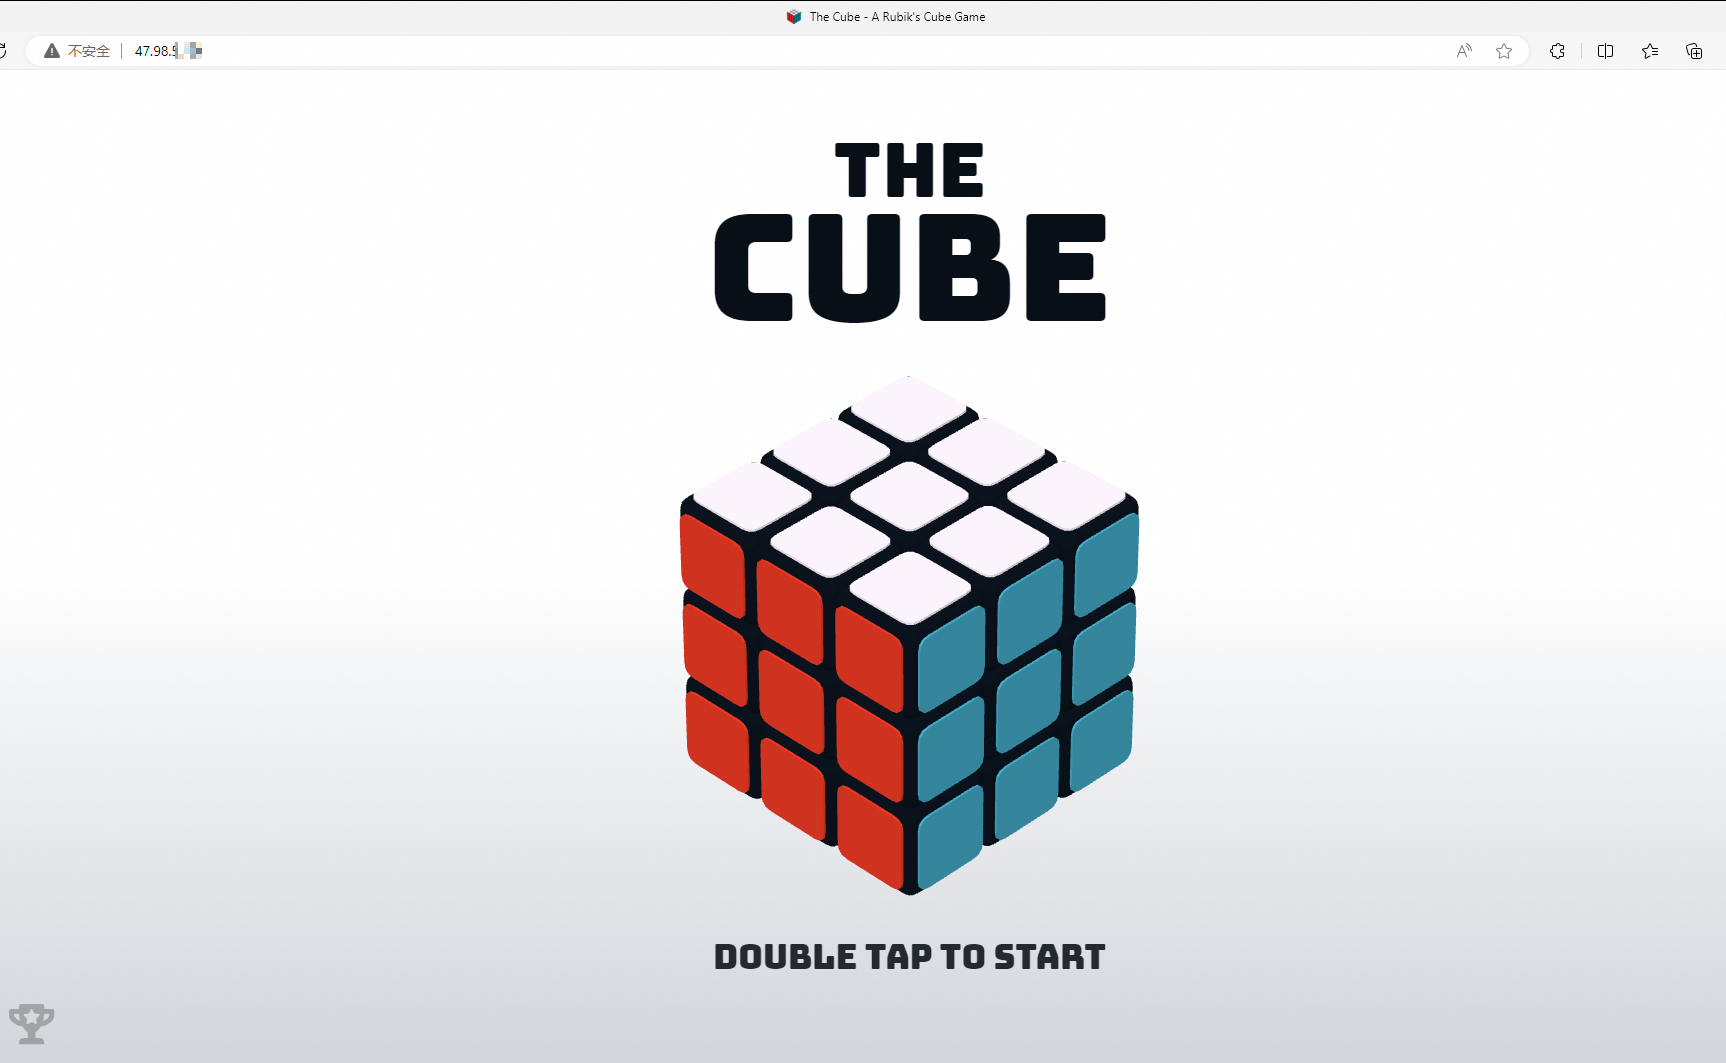
This tutorial uses a demo application named ACK-Cube, an online magic cube game, which you will deploy to an ACS cluster from a container image. After you complete this tutorial, you will have a running ACS cluster with the game application deployed.
-
The container image for the demo application is built from an open source project. The image is hosted at
registry.cn-hangzhou.aliyuncs.com/acr-toolkit/ack-cube. -
kubectl is the standard command-line tool for managing Kubernetes clusters. You can use kubectl to connect to and manage your ACS clusters. For more information, see the official kubectl documentation.
-
Cloud Shell is a web-based command-line tool provided by Alibaba Cloud. You can open Cloud Shell from the ACS console to manage your clusters with kubectl without any local installation or configuration.
Procedure

Step 1: Activate and authorize ACS
Before you use ACS for the first time, you must activate the service and grant it the necessary permissions to access other cloud resources.
-
Log on to the ACS console and click Activate.
-
On the ACS activation page, follow the on-screen instructions to activate the service.
-
Return to the ACS console, refresh the page, and click Go to Authorize.
-
On the ACS authorization page, follow the on-screen instructions to grant the required permissions.
After you grant the permissions, refresh the console to start using ACS.
Step 2: Create an ACS cluster
This section shows how to create an ACS cluster by configuring only its key parameters.
-
Log on to the ACS console. In the left navigation pane, click Clusters.
-
On the Clusters page, click Create Kubernetes Cluster in the upper-left corner.
-
On the Create Kubernetes Cluster page, configure the following parameters. You can use the default values for any parameters not listed here.
Parameter
Description
Example
Cluster Name
Enter a name for the cluster.
ACS-DemoRegion
Select the region where you want to create the cluster.
China (Beijing)
Select VPC
Set the network for the cluster. ACS clusters support only VPCs. You can choose Create VPC or Select Existing VPC .
-
Create VPC: The system automatically creates a VPC, a NAT gateway, and configures SNAT rules.
-
Select Existing VPC : Select an existing VPC and vSwitch. If you need to access the internet, for example to pull container images, you must configure a NAT gateway. We recommend that you upload container images to ACR in the same region as your cluster and pull the images over the internal VPC network.
For more information, see Create and manage a VPC.
Select Create VPC.
API Server Access Settings
Specify whether to expose the cluster's API server to the public internet. If you need to manage the cluster remotely from the internet, you must configure an Elastic IP (EIP).
Select Expose API server with EIP.
Service Discovery
Click Show Advanced Options and specify whether to enable service discovery for the cluster. If you need service discovery, you can select CoreDNS.
Select CoreDNS.
-
-
Click Confirm, review and accept the terms of service, and then click Create Kubernetes Cluster.
NoteCluster creation takes about 10 minutes. After the cluster is created, it appears on the Clusters page.
Step 3: Connect to the cluster
This section describes how to connect to the ACS cluster by using a kubectl client or Cloud Shell. For more information, see Obtain the kubeconfig file of a cluster and use kubectl to connect to the cluster and Use kubectl on Cloud Shell to manage Kubernetes clusters.
kubectl client
-
Log on to the ACS console. In the left navigation pane, click Clusters.
-
On the Clusters page, click the name of your cluster, for example, ACS-Demo.
-
On the Cluster Information page, click the Connection Information tab. Click Obtain Temporary kubeconfig and copy the content from the Public Access tab. This content is the cluster's public access credential.
-
Paste the copied cluster credential into the
configfile in the$HOME/.kubedirectory. Save and close the file.NoteIf the
$HOME/directory does not contain the.kubedirectory and theconfigfile, create them. -
Run the following kubectl command to verify the connection to your cluster.
This example queries the namespaces in the cluster.
kubectl get namespaceExpected output:
NAME              STATUS   AGE
arms-prom         Active   4h39m
default           Active   4h39m
kube-node-lease   Active   4h39m
kube-public       Active   4h39m
kube-system       Active   4h39m
Cloud Shell
Ensure that public access to the API server is enabled for the cluster.
-
Log on to the ACS console. In the left navigation pane, click Clusters.
-
On the Clusters page, find your cluster and choose in the Actions column.
After a few moments, Cloud Shell starts. You can then use kubectl commands in the Cloud Shell interface to manage your cluster and applications.
Step 4: Deploy and expose an application
This step shows how to use kubectl to quickly deploy a stateless application (Deployment) in your new ACK cluster and expose it by using a LoadBalancer service. For more information about exposing services, see Expose an application by using a service that automatically creates a load balancer.
-
Create a file named acs-cube.yaml and add the following YAML content.
-
Run the following command to deploy the acs-cube demo application.
kubectl apply -f acs-cube.yaml -
Run the following command to check the status of the sample application.
kubectl get deployment acs-cubeExpected output:
NAME READY UP-TO-DATE AVAILABLE AGE acs-cube 2/2 2 2 96s -
Create a file named acs-cube-svc.yaml and add the following YAML content for the sample service.
Make sure that the
selectorvalue matches thematchLabelsvalue in acs-cube.yaml. In this example, the value isapp: acs-cube. This links the service to the backend application.apiVersion: v1 kind: Service metadata: labels: app: acs-cube name: acs-cube-svc namespace: default spec: ports: - port: 80 protocol: TCP targetPort: 80 selector: app: acs-cube # This must match the value of matchLabels in the Deployment YAML file. type: LoadBalancer -
Run the following command to create the acs-cube-svc service and expose the application.
ACK automatically creates a public-facing Server Load Balancer (SLB) and binds it to the service.
kubectl apply -f acs-cube-svc.yaml -
Run the following command to check if the LoadBalancer service was created.
The sample application is exposed to the internet through the IP address in the EXTERNAL-IP field.
kubectl get svc acs-cube-svcExpected output:
NAME           TYPE           CLUSTER-IP      EXTERNAL-IP     PORT(S)        AGE
acs-cube-svc   LoadBalancer   172.16.72.161   47.94.xx.xx     80/TCP         32s
Step 5: Test the application
In the browser address bar, enter the IP address for the service's EXTERNAL-IP to start the Rubik's Cube game.
Related documents
-
To dynamically adjust container resources for your application, configure Horizontal Pod Autoscaling (HPA) and CronHPA. For more information, see Elastic scaling overview.
-
In addition to exposing applications using a service, use an ingress to control Layer 7 network routing for your applications. For more information, see ALB Ingress quick start.
-
View application health metrics on the Prometheus monitoring page, such as CPU utilization, memory utilization, and network I/O pressure. For more information, see Monitor the status of an ACS cluster using Alibaba Cloud Prometheus.
Release resources
The fees for using an ACS cluster include the following two parts:
-
ACS charges for the computing power used to create workloads.
-
Each Alibaba Cloud product charges for its resources based on its own billing rules.
After completing the quick start, decide how to proceed with your cluster:
-
If you no longer need the cluster, delete the cluster and its associated resources. For more information, see Delete a cluster.
-
If you want to keep using the cluster, add funds to your Alibaba Cloud account to ensure your balance is at least CNY 100.00. For billing information about other Alibaba Cloud resources, see Cloud product resource billing.