A CronJob creates Jobs on a repeating schedule for recurring tasks, such as performing backups or sending emails. While a Job handles a one-off task, a CronJob adds a time-based schedule to a Job. This topic describes how to create a CronJob.
Console
Step 1: Configure basic information
-
Log on to the ACS console. In the left navigation pane, click Clusters.
-
On the Clusters page, click the name of the target cluster. In the left navigation pane, choose .
-
On the CronJobs page, click Create from Image.
-
In the Basic Information step, configure basic information for the application.
Parameter
Description
Name:
Enter a name for the application.
Type
Select CronJob.
Label
Add a label to identify the application.
Annotations
Add an annotation to the application.
Instance Type
Select a compute type. For more information about compute types, see Overview of ACS pod instances.
QoS Type
Select a Quality of Service (QoS) type.
-
After you configure the basic information, click Next.
Step 2: Configure container settings
In the Container step, configure the container image, resources, ports, environment variables, lifecycle, volumes, and log settings.
To add multiple containers to your application's pod, click Add container on the right side of the Container 1 tab.
-
In the Basic configuration section, configure the container basics.
Configuration item
Description
Image name
-
Select an image.
Click Select image to choose your image.
-
Container Registry Enterprise Edition: Select enterprise edition images hosted in Container Registry (ACR). You must specify the region and ACR instance where the image resides. For more information about ACR, see What Is Container Registry (ACR)?.
-
Container Registry Personal Edition (must be enabled first): Select a personal edition image hosted in Container Registry (ACR). You must specify the region where the image resides and the ACR instance.
-
Artifact Center: Includes base OS images, language runtime images, and AI or big data related images. This example uses an Nginx image from Artifact Center. For more information about Artifact Center, see Artifact Center.
-
-
(Optional) Set the image pull policy.
Select an image pull policy from the Image pull policy drop-down list. By default, no policy is set, and Kubernetes uses IfNotPresent.
-
Use local image if present (IfNotPresent): If the image exists locally (previously pulled to the host), it will not be pulled again. If the image does not exist locally, it will be pulled.
-
Always pull image (Always): Pull the image every time you deploy or scale out. Do not use the local image.
-
Use only local image (Never): Use only the local image.
-
-
(Optional) Set the image secret.
Click Set image secret to secure private images with a secret.
-
For Container Registry Personal Edition instances, you can pull container images by setting an image secret. For more information about setting secrets, see Manage secrets.
-
For Container Registry Enterprise Edition instances, you can pull images using the passwordless component. For instructions, see Pull ACR images without passwords.
-
Required resources
Set resource quotas for the container.
-
CPU: Specify the CPU resource request and limit for the container. By default, the request and limit are equal. The billing method is pay-as-you-go. If you use a YAML template to set a resource limit that differs from the resource request, the resource request is automatically overridden to match the resource limit. For more information, see Resource specifications.
-
Memory: Specify the memory resource request and limit for the container. By default, the request and limit are equal. The billing method is pay-as-you-go. If you use a YAML template to set a resource limit that differs from the resource request, the resource request is automatically overridden to match the resource limit. For more information, see Resource specifications.
Container startup command
(Optional) Set the container startup command.
-
stdin: Send console input to the container.
-
tty: Use standard input console as the container's console input.
NoteYou typically select both stdin and tty. This binds the terminal (tty) to the container's standard input (stdin). For example, an interactive program reads standard input from users and displays output to the terminal.
Init container
(Optional) Select this option to create an init container.
An init container blocks or delays the startup of application containers. After the init container runs successfully, application containers in the pod start in parallel. For example, you can check the availability of dependent services. Init containers can include utilities and installation scripts not present in the application image. These tools initialize the application container's runtime environment, such as setting kernel parameters or generating configuration files. For more information, see Init Container.
-
-
(Optional) In the Port settings section, click Add to configure container ports.
Configuration item
Description
Name
Specify a name for the port.
Container port
Specify the port number to expose. Valid values are from 1 to 65535.
Protocol
Supports TCP and UDP.
-
(Optional) In the Environment variables section, click Add to configure environment variables.
Configure environment variables for the pod using key-value pairs. You can use environment variables to add environment flags or pass configurations. For more information, see Pod Environment Variables.
Configuration item
Description
Type
Specifies the type of the environment variable.
-
Custom
-
Configuration item
-
Secret
-
Variable/variable reference
-
Resource reference
Configuration items and secrets support references to all files.
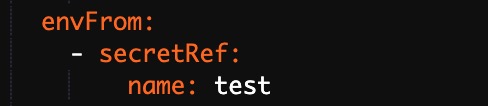
This example uses a secret. Select Secret as the type, and then select the target secret. By default, all files in the secret are referenced.
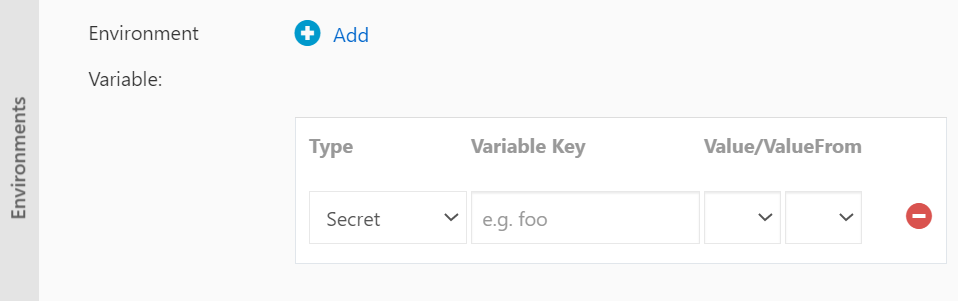
The corresponding YAML file also references the entire secret.
Variable name
The name of the environment variable.
Variable/variable reference
Set the value of the reference variable.
-
-
(Optional) In the Lifecycle section, configure the container lifecycle.
Configure a post-start command, a pre-stop command, and a start command for the container. For more information, see Attach Handlers to Container Lifecycle Events.
Configuration item
Description
Start Execution
Specifies the commands and arguments to run before the container starts.
Post-start command
Specifies the commands to run after the container starts.
Stop Preprocessing
Specifies the commands to run before the container is stopped.
-
(Optional) In the Volumes section, attach volumes to the container.
-
Local storage: Mount ConfigMaps, secrets, and temporary directories to paths in the container. For more information, see Volumes.
-
Cloud storage: Supported volume types include disks and NAS. For more information, see Storage overview.
-
-
(Optional) In the Log configuration section, you can configure Collection configuration and Custom tags.
Configuration item
Description
Collection configuration
-
Logstore: Creates a Logstore in Simple Log Service to store collected logs.
-
Log path in container: Supports stdout and text logs.
-
Stdout: Collects the container’s standard output logs.
-
Text logs: Collects logs from a specified path in the container. In this example, collects all text logs under
/var/log/nginx. Wildcards are supported.
-
Custom tags
Add custom tags. When set, these tags are included with the container’s log output. Custom tags help you tag logs for statistics and filtering.
-
-
You can click Next to go to the Advanced configuration wizard page.
Step 3: Configure advanced settings
-
In the CronJobs section, set the execution schedule.
Parameter
Description
Schedule
Set the schedule by hour, day, week, month, or a custom Cron expression. For more information, see Cron Expressions.
Concurrency Policy
Select one of the following concurrency policies:
-
Allow: Allows Jobs to run concurrently. This may cause Jobs to compete for cluster resources.
-
Forbid: Prevents Jobs from running concurrently. If the previous Job has not finished, the next Job run is skipped.
-
Replace: If a new Job is scheduled to run but the previous Job has not yet finished, the new Job replaces the previous one.
Job History
The number of successful or failed jobs to retain. A value of 0 means no history is retained.
-
-
In the Job Settings section, configure the Job settings.
Parameter
Description
Completions
The number of pods that must terminate with success. Default value: 1.
Parallelism
The number of pods that the Job must run in parallel. Default value: 1.
Timeout
The activeDeadlineSeconds field in the YAML file. This field specifies the duration time limit of the Job. If the Job is not complete within the duration time limit, the system attempts to terminate the Job.
BackoffLimit
The maximum number of attempts to recreate pods after pods fail. Default value: 6. Failed pods are recreated with an exponential back-off delay. The upper limit of the delay is 6 minutes.
Restart
Only Never and On Failure are supported.
-
(Optional) In the Labels,Annotations section, click Add to set labels and annotations for the pod.
-
Click Create.
Step 4: View application information
After the CronJob is created, a completion page appears. Click View Details to view the CronJob details page.
You can also view the CronJob on the Jobs page. Click the name of the target CronJob or click Details in the Actions column to view the application details page.
kubectl
The following table describes the key parameters for creating a CronJob.
|
Parameter |
Description |
|
.spec.schedule |
The schedule for running the Job. The format is the same as a Cron schedule. |
|
.spec.jobTemplate |
The Job template to run. The format is the same as for Job patterns. |
|
.spec.startingDeadlineSeconds |
The deadline in seconds for starting the Job if it misses its scheduled time. |
|
.spec.concurrencyPolicy |
The concurrency policy. The following options are supported: Allow, Forbid, and Replace.
|
This topic uses a CronJob named hello as an example to show how to create a CronJob by using kubectl.
-
Connect to your cluster. For more information, see Obtain the kubeconfig file of a cluster and use kubectl to connect to the cluster or Use kubectl on Cloud Shell to manage Kubernetes clusters.
-
Save the following YAML content as a file named
cronjob.yaml.apiVersion: batch/v1 kind: CronJob metadata: name: hello spec: schedule: "*/1 * * * *" jobTemplate: spec: template: spec: containers: - name: hello image: registry.cn-hangzhou.aliyuncs.com/acs/busybox:v1.29.2 args: - /bin/sh - -c - date; echo Hello from the Kubernetes cluster restartPolicy: OnFailure -
Run the following command to create the CronJob.
kubectl create -f cronjob.yamlThe output
cronjob.batch/hello createdindicates that the CronJob was created.