Knative Eventing provides an event model that simplifies ingesting events from external systems. Events flow through the cluster in the standard CloudEvents format. This tutorial shows how to use EventBridge as an event source and trigger a Knative service to process those events.
Prerequisites
Before you begin, ensure that you have:
ossutil installed and an OSS bucket created. For more information, see Install ossutil and Create a bucket.
EventBridge activated and permissions granted to a Resource Access Management (RAM) user. For more information, see Activate EventBridge and grant permissions to a RAM user.
Knative Serving version 1.12.7 or later deployed in your ACS cluster.
EventBridge is a serverless event bus service that routes events between Alibaba Cloud services, custom applications, and software-as-a-service (SaaS) applications based on the CloudEvents 1.0 specification.
How it works
EventBridge supports a wide range of event sources. Configure an event bus, rules, and targets to filter, transform, and deliver events to a Knative service. The Knative service scales up on demand to process each event and scales back to zero when idle.

You can use OSS as an event source for EventBridge. For details, see OSS events.
Step 1: Deploy the Eventing and EventBridge components
Deploy Eventing first, then deploy EventBridge. Both components are required for Knative to support Alibaba Cloud event sources and event forwarding.
Log on to the ACS console. In the left-side navigation pane, click Clusters.
On the Clusters page, click the ID of the target cluster. In the left-side navigation pane, choose Applications > Knative.
On the Components tab, deploy the two components in order:
Find Eventing and click Deploy in the Actions column.
After Eventing is deployed, find EventBridge and click Deploy in the Actions column. In the dialog box, enter your AccessKey ID and AccessKey secret, then click OK. To get an AccessKey pair, see Create an AccessKey.
Bind a multi-factor authentication (MFA) device to the RAM user to add a second layer of protection for console logon and sensitive operations. For details, see Bind an MFA device to a RAM user.
Result: When Deployed appears in the Status column for both components, the components are ready.
Step 2: Create a Knative service
This step creates an event-display Knative service that automatically logs all received events. Choose either the ACS console or kubectl.
Use the ACS console
Log on to the ACS console. In the left-side navigation pane, click Clusters.
On the Clusters page, click the ID of the target cluster. In the left-side navigation pane, choose Applications > Knative.
Click the Services tab, then click Create from Template.
Paste the following YAML and submit:
apiVersion: serving.knative.dev/v1
kind: Service
metadata:
  name: event-display
  namespace: default
spec:
  template:
    spec:
      containers:
      - image: registry.cn-hangzhou.aliyuncs.com/knative-sample/event-display:20230207194118_3874dbd
Result: When Created appears in the Status column for event-display on the Services tab, the Knative service is ready.
Use kubectl
Create
event-display.yamlwith the following content:apiVersion: serving.knative.dev/v1 kind: Service metadata: name: event-display namespace: default spec: template: spec: containers: - image: registry.cn-hangzhou.aliyuncs.com/knative-sample/event-display:20230207194118_3874dbdApply the manifest:
kubectl apply -f event-display.yamlVerify the Knative service is ready:
kubectl get ksvcExpected output:
NAME            URL                                        LATESTCREATED         LATESTREADY           READY   REASON
event-display   http://event-display.default.example.com   event-display-00001   event-display-00001   True
READY: Trueconfirms the Knative service is running.
Step 3: Create a trigger
A trigger subscribes to events from a broker and forwards matching events to a Knative service. Configure the broker, event source, and event type to control which events reach your service.
Use the ACS console
On the Knative page, click the Services tab, then click the name of the Knative service. On the details page, click the Trigger tab.
Click Create Trigger. On the Configure page, set the following parameters:
Parameter
Description
Example
Name
Name for the trigger
my-service-triggerBroker
Select EventBridge or Other
EventBridgeEvent Source
The source service that emits events
OSSEvent Type
The event type to filter on; separate multiple types with commas
oss:ObjectCreated:PutObject
Result: After the trigger is created, it appears on the Triggers tab.

Use kubectl
Create
my-service-trigger.yamlwith the following content:Field
Description
brokerSet to
eventbridge-default-broker, which maps to the default event bussourceThe event source supported by EventBridge (for example,
acs.oss)typeThe event type from that source; separate multiple types with commas
subscriberThe Knative service that receives matching events
apiVersion: eventing.knative.dev/v1
kind: Trigger
metadata:
  name: my-service-trigger
spec:
  broker: eventbridge-default-broker
  filter:
    attributes:
      source: acs.oss
      type: 'oss:ObjectCreated:PutObject'
  subscriber:
    ref:
      apiVersion: serving.knative.dev/v1
      kind: Service
      name: event-display
      namespace: default
Key fields:
Apply the manifest:
kubectl apply -f my-service-trigger.yamlVerify the trigger is ready:
kubectl get triggersExpected output:
NAME                         BROKER                       SUBSCRIBER_URI                                      AGE   READY   REASON
my-service-trigger           eventbridge-default-broker   http://event-display.default.svc.cluster.local   42h   True
READY: Trueconfirms the trigger is active and listening for events.
Step 4: Verify the event pipeline
Upload an object to OSS to confirm the full pipeline works end to end.
The OSS bucket and EventBridge must be in the same region.
Trigger an event
Upload an object to OSS using ossutil:
ossutil cp <file-name> oss://<bucket-name>Replace <file-name> with the local file path and <bucket-name> with your OSS bucket name. After the upload completes, EventBridge detects the OSS event and delivers it to the Knative service through the trigger.
Check the event trace in EventBridge
Log on to the EventBridge console. In the left-side navigation pane, click Event Buses.
On the Event Buses page, click Event Tracking in the Actions column for the default event bus.
On the Query By Time Range tab, set the Time Range to cover the upload time, then click Query.
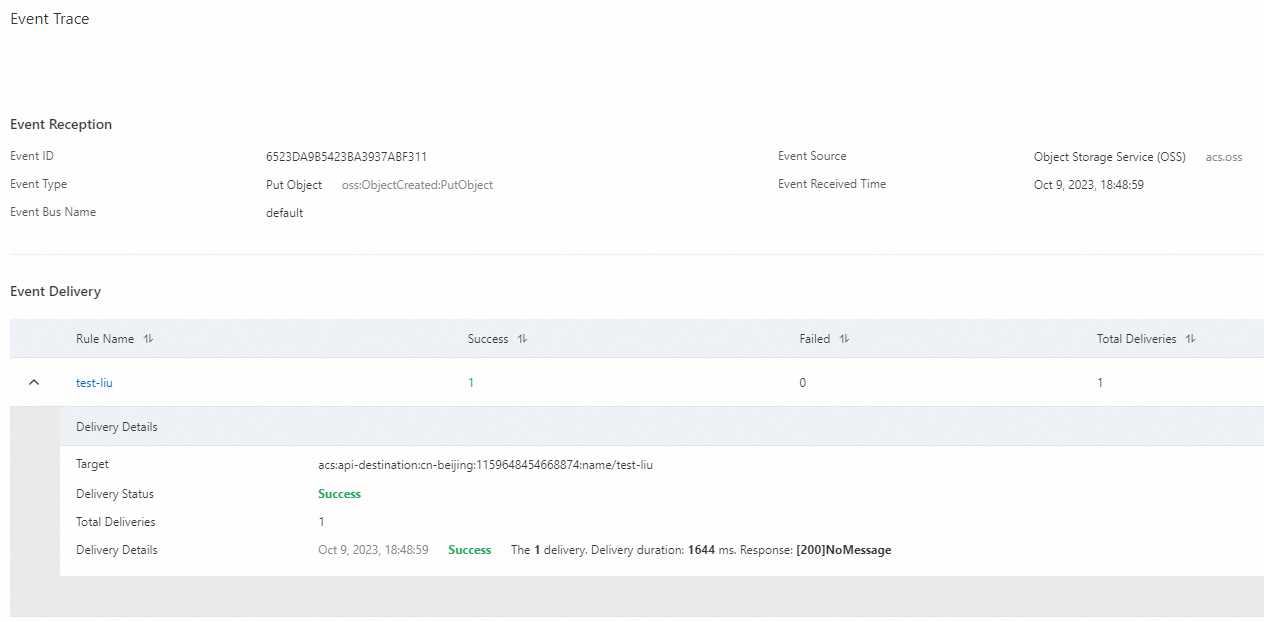
Set Event Source to OSS and Event Type to Put Object. In the Operations column for the matching event, click Event Trace. The Event Trace page shows whether the event was delivered successfully through the pipeline.
Confirm the Knative service processed the event
Check that the
event-displaypod is running:kubectl get podExpected output:
NAME                                              READY   STATUS    RESTARTS   AGE
event-display-00001-deployment-56cc79****-z2vhv   2/2     Running   0          7s
The pod started in response to the incoming event, which confirms the trigger fired correctly.
View the event payload logged by the service:
kubectl logs event-display-00001-deployment-56cc79****-z2vhv user-containerExpected output:
{"data":{"eventVersion":"1.0","responseElements":{"requestId":"63E21F5FEE852133319101AD"},"eventSource":"acs:oss","eventTime":"2023-02-07T09:52:31.000Z","requestParameters":{"sourceIPAddress":"XX.XXX.XX.XXX"},"eventName":"ObjectCreated:PutObject","userIdentity":{"principalId":"1118324452360952"},"region":"cn-hangzhou","oss":{"bucket":{"name":"knative","arn":"acs:oss:cn-hangzhou:1581204543170042:knative","virtualBucket":"","ownerIdentity":"1581204543170042"},"ossSchemaVersion":"1.0","object":{"size":225496,"objectMeta":{"mimeType":"application/octet-stream"},"deltaSize":0,"eTag":"B350C082843DAC7E9E634193437EBA30","key":"demo.data"}}}}The
eventName: ObjectCreated:PutObjectfield confirms that the Knative service received and logged the OSS upload event. EventBridge successfully delivered the event through the trigger pipeline.
What's next
To set up event-driven workflows with other event sources, see Use GitHub events in Knative.