Install hardware
After you receive the Data Transport Mini device, follow these steps to install and configure its hardware.
Device introduction
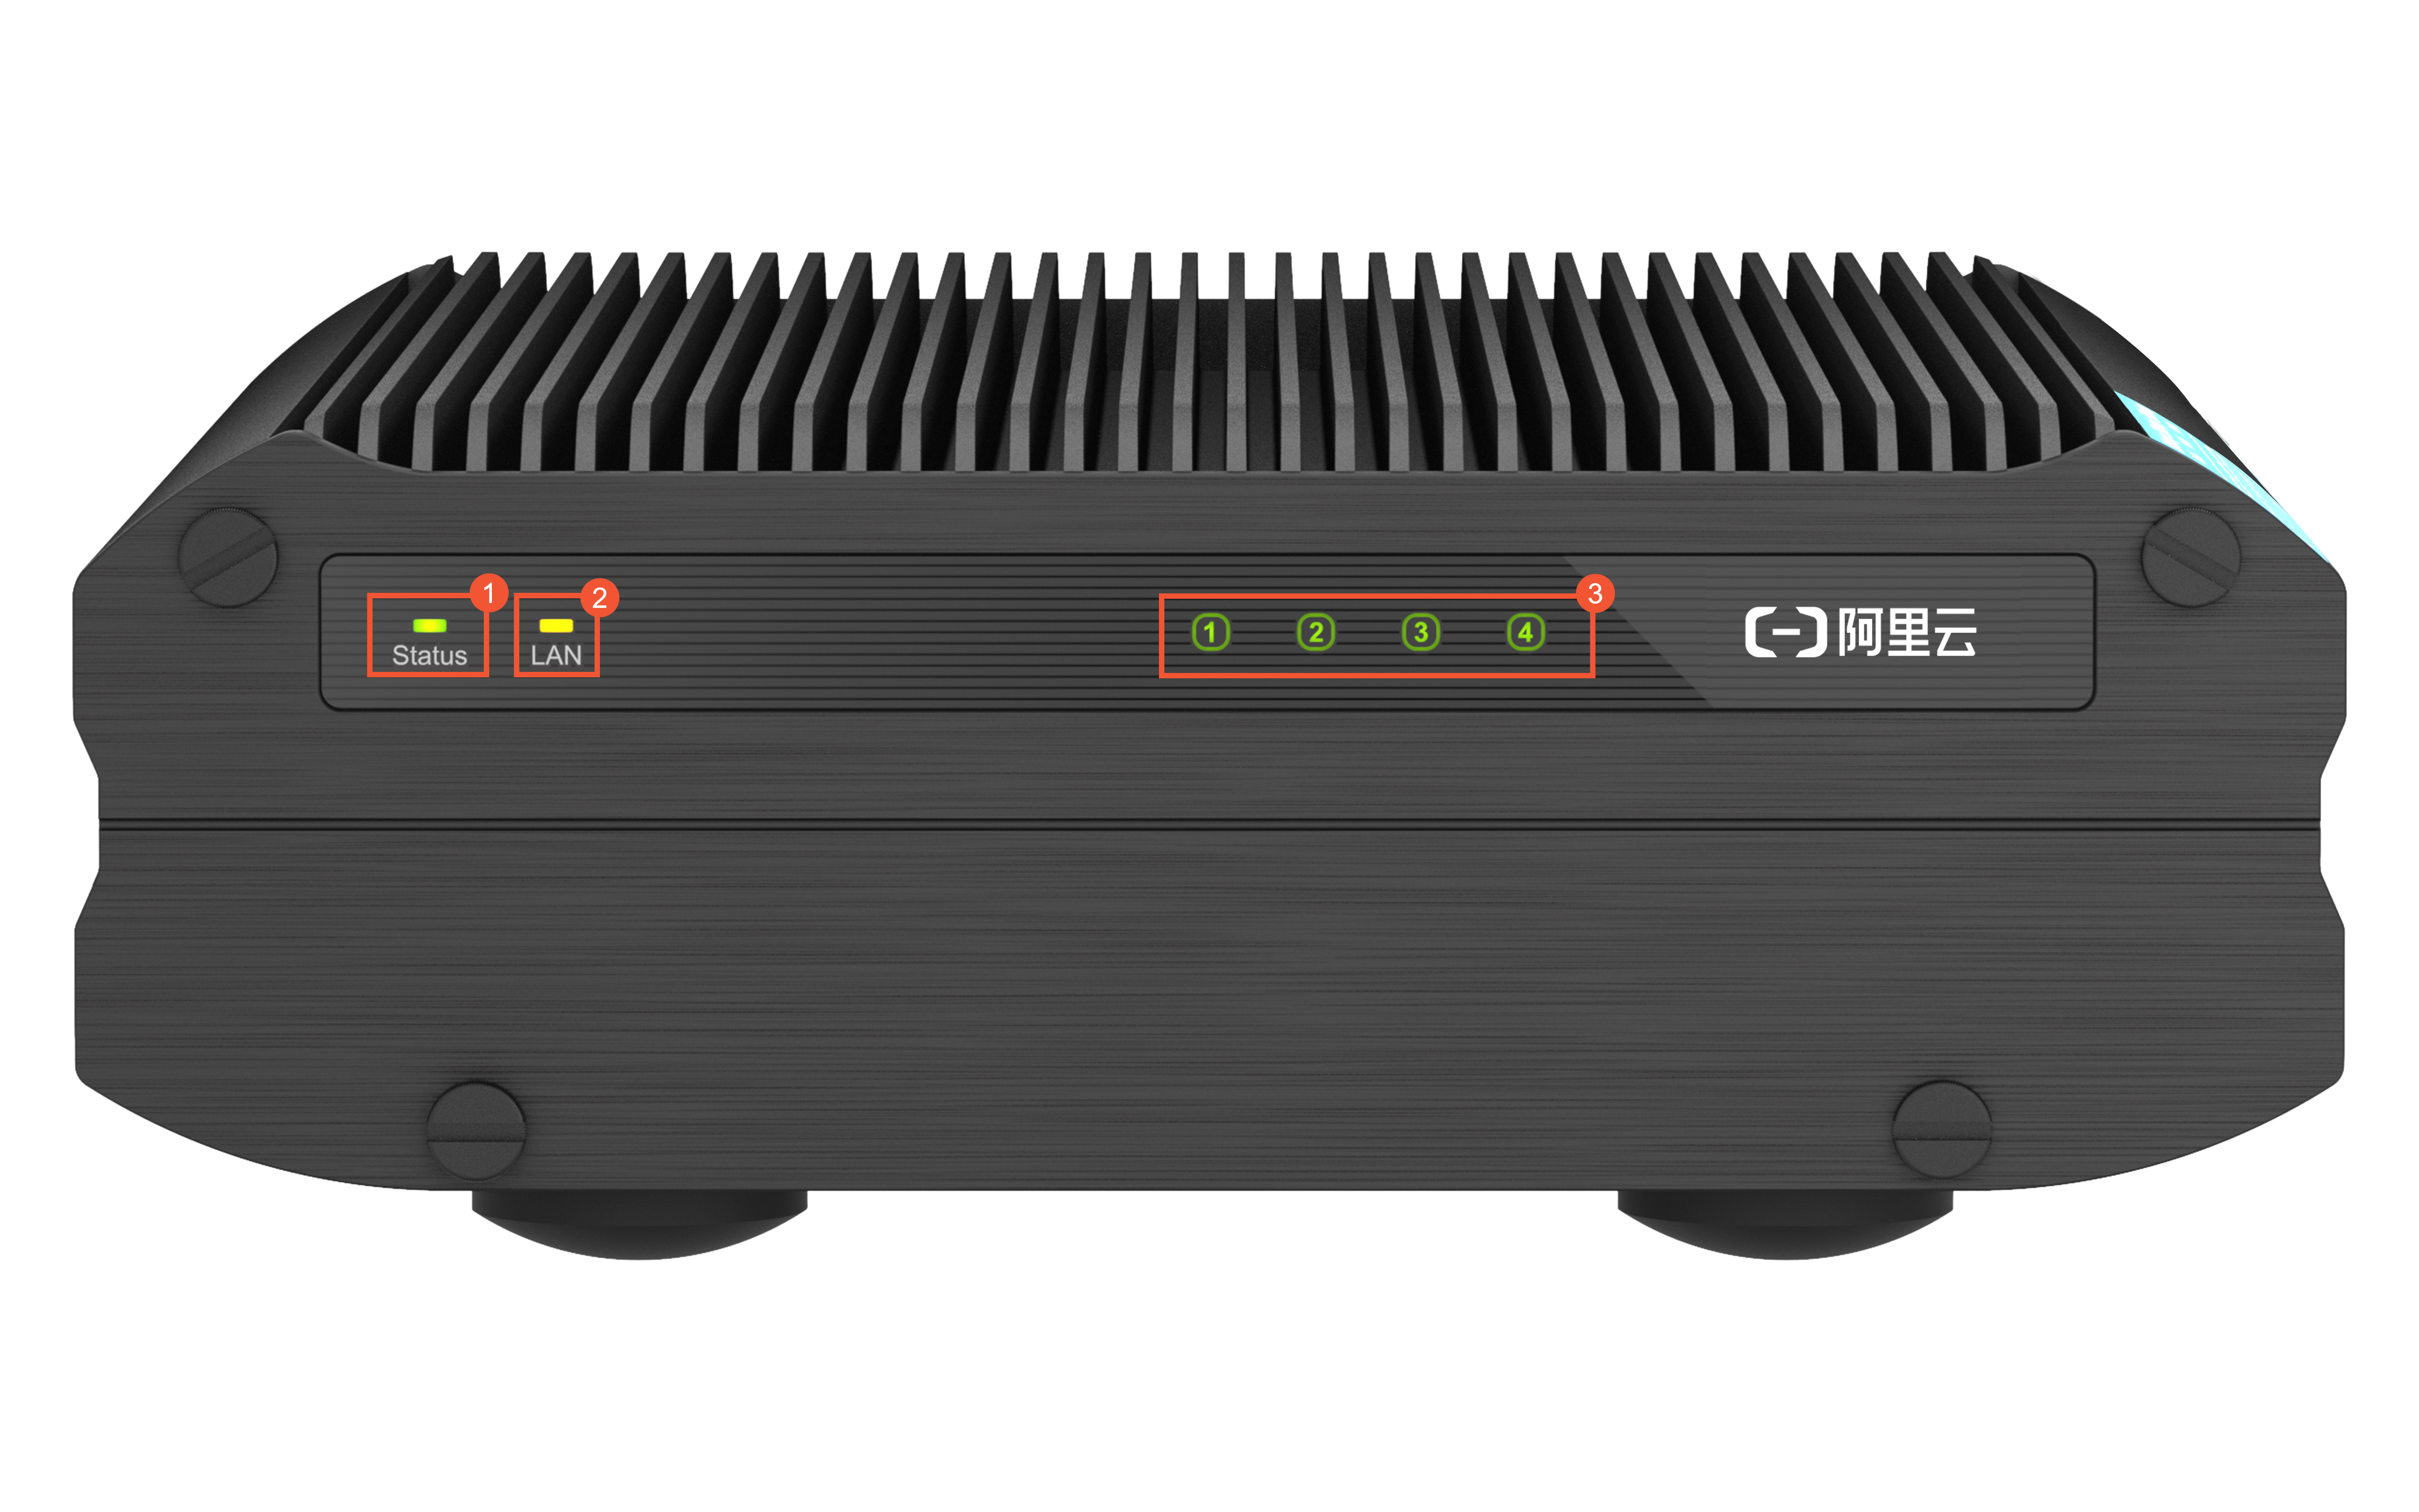
Device LED indicators
No.
Description
①
Device status LED indicator.
Green: The device is normal.
Yellow or red: The device is abnormal. Contact Alibaba Cloud support.
②
Network status LED indicator.
Green: The network connection is normal.
Red: The network is abnormal. Check if the network cable is connected correctly.
③
Hard disk status LED indicator.
Green: The hard disk is normal.
Yellow or red: The hard disk is abnormal. Contact Alibaba Cloud support.
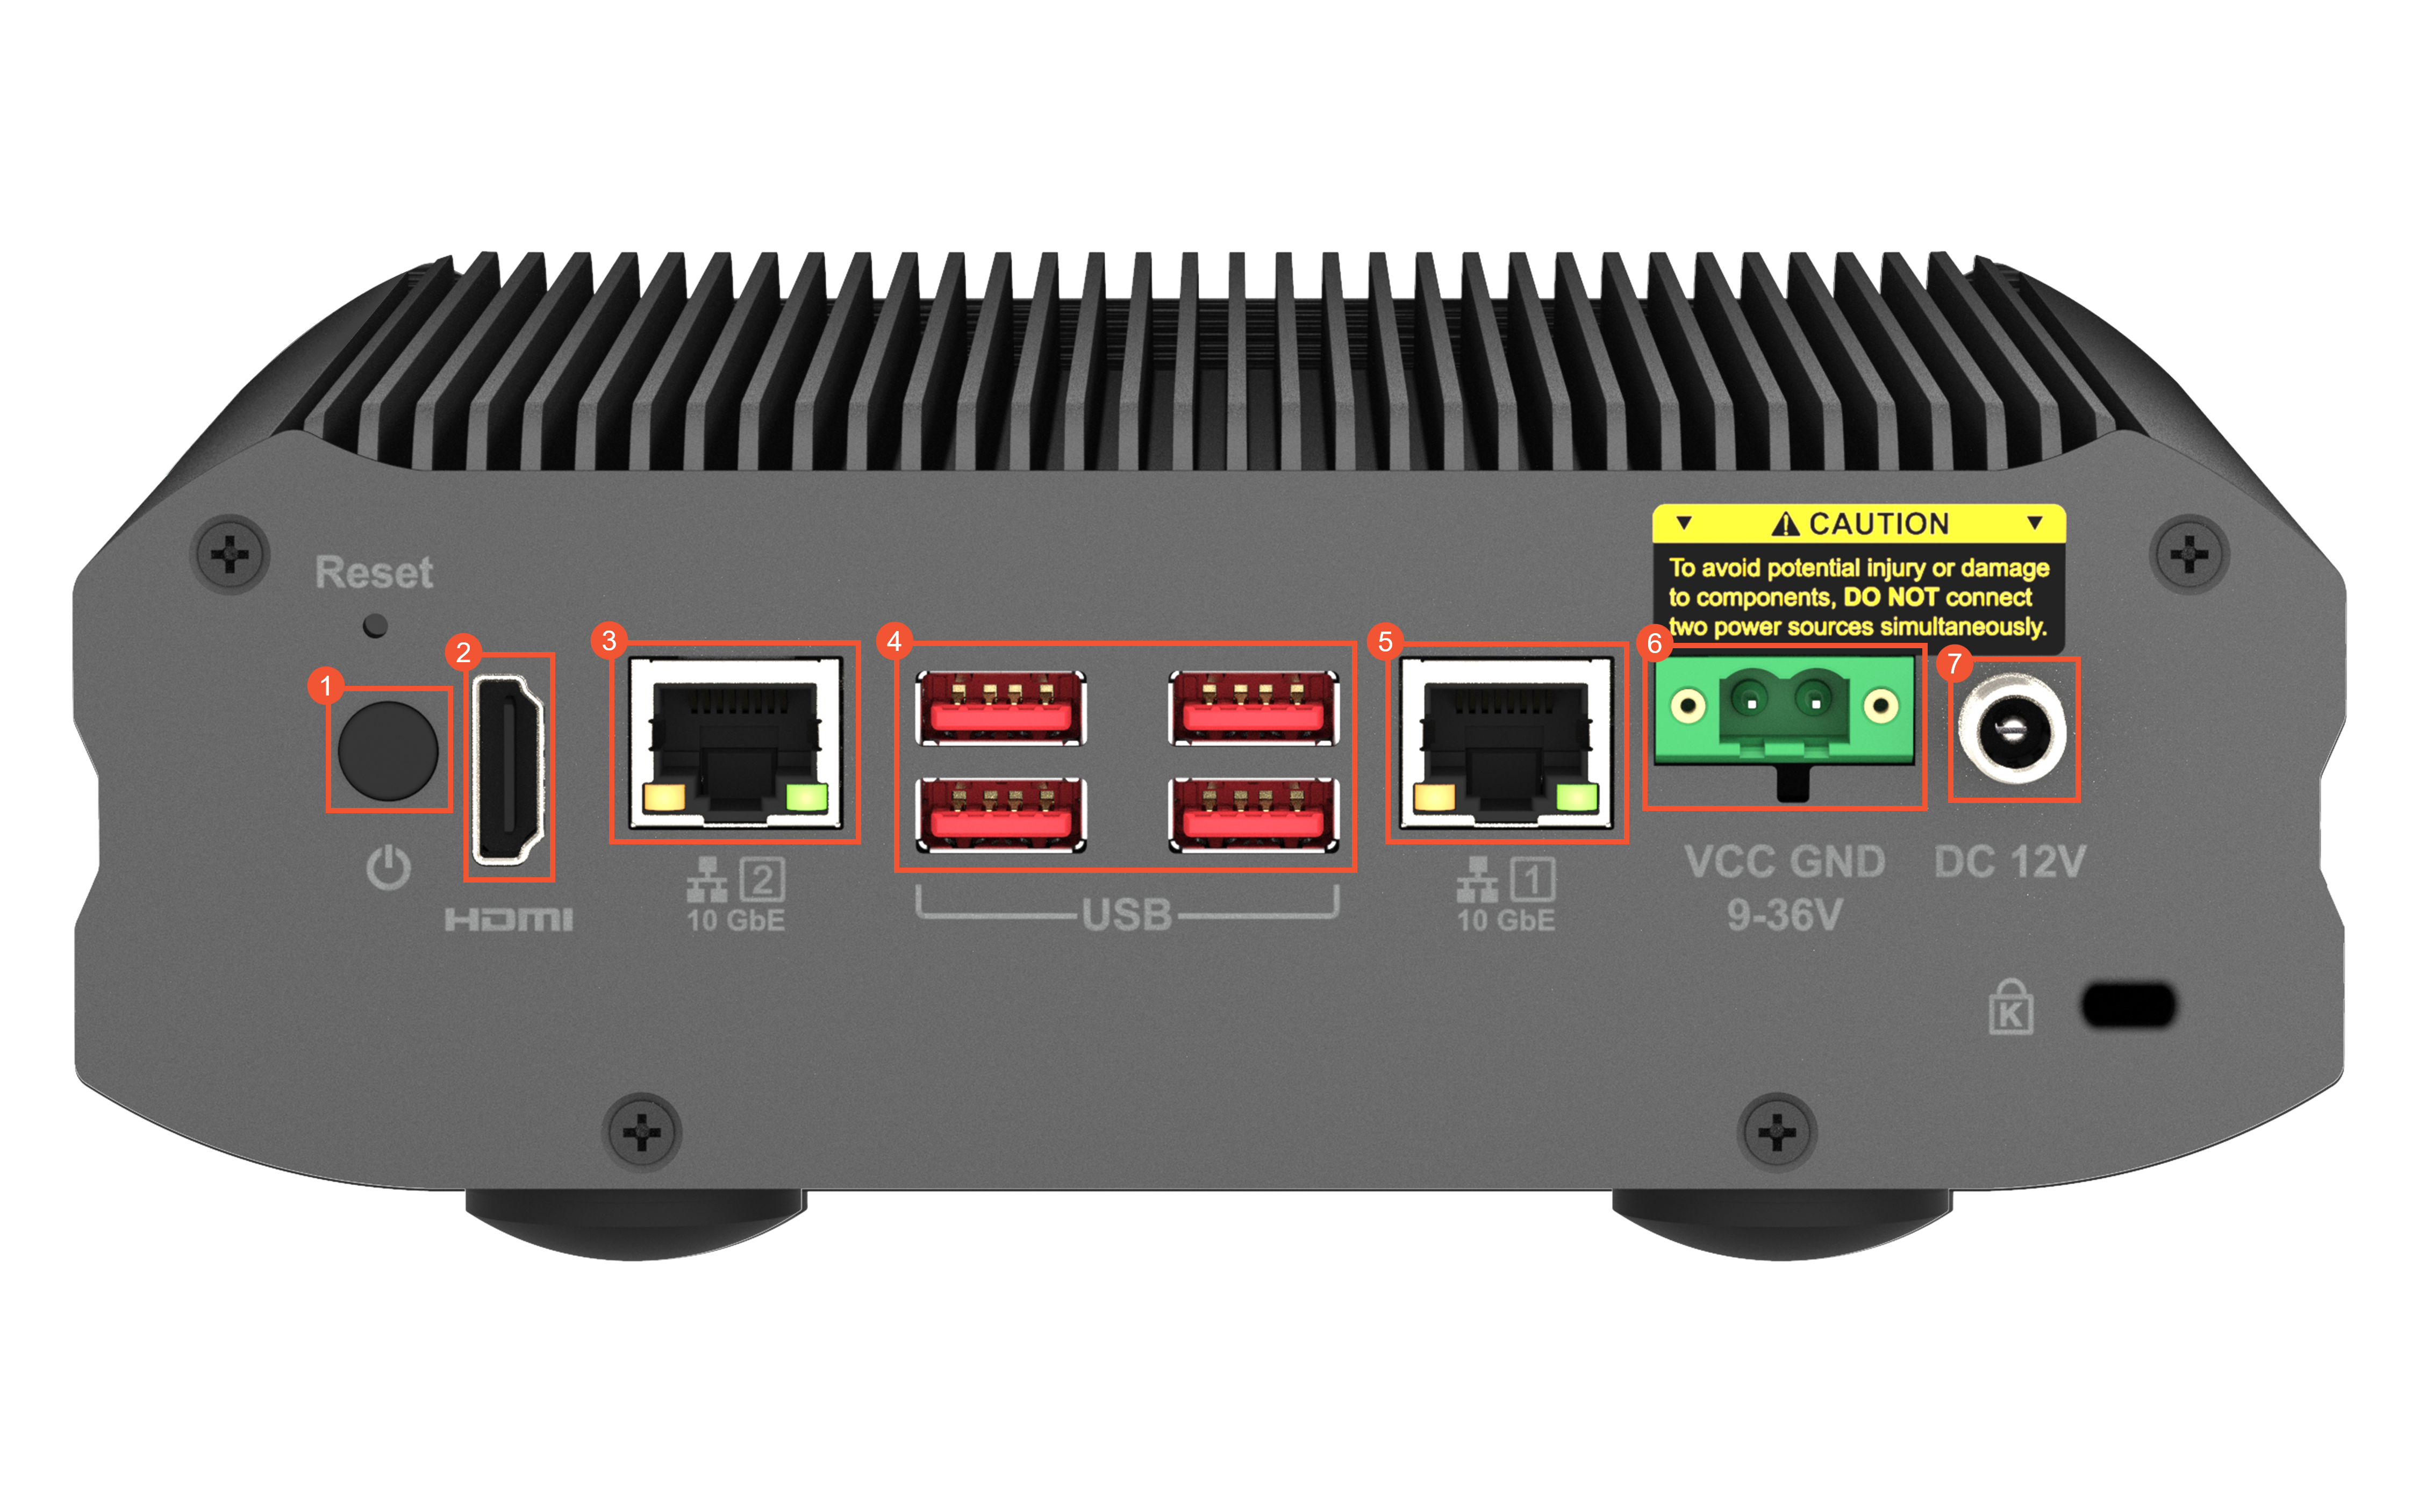
Device ports
No.
Description
①
Power button.
②
HDMI port.
③
Service port 2, a 10 GbE copper Ethernet port.
④
Four USB-A 3.2 ports.
⑤
Management port 1, a 10 GbE copper Ethernet port.
ImportantAvoid using the management port as a service port.
⑥
4-pin terminal block connector (9-36 V DC).
⑦
DC power jack. External power adapter, 12 V, 120 W, input voltage 100-240 V.
Power cable (shipped with the device)
Network cable (shipped with the device)
Step 1: Set up the hardware
Unpack and inspect the device.
When you receive the Data Transport Mini device, check that it is complete and not damaged. If the device is damaged, contact Alibaba Cloud support immediately.
Select the appropriate power cable (US standard or Chinese standard) based on the rack's power outlet and connect it.
Check the data ports.
The device has two onboard 10 Gb network ports, one HDMI port, four USB-A 3.2 ports, one 4-pin terminal block connector, and one DC power jack.
After connecting the cables, power on the device and check its status.
Press the power button. The six LED indicators on the front panel (one for device status, one for network status, and four for hard disk status) blink green to indicate that the device is starting up. After the system starts, the LED indicators turn solid green.
Step 2: Log on to the hardware management console
The default management IP address for the Data Transport Mini device is 192.168.1.1, and the subnet mask is 255.255.255.0. The following steps use management port 1 as an example.
Use a network cable to connect your laptop to the management port of the Data Transport Mini device.
Change the local IP address of your laptop so that it is in the same network segment as the management IP address. For example, you can change the local IP address to
192.168.1.2and the subnet mask to255.255.255.0.Open a browser and enter
http://192.168.1.1:5000to access the hardware management console.Enter the username and password to log on to the hardware management console.
NoteTo obtain the username and password, contact Alibaba Cloud support.
Step 3: Configure the service IP address
Log on to the hardware console.
Choose Console > Network & Virtual Switch > Network Adapter.
For the adapter with a Connected status, click the
 Icon > Settings.
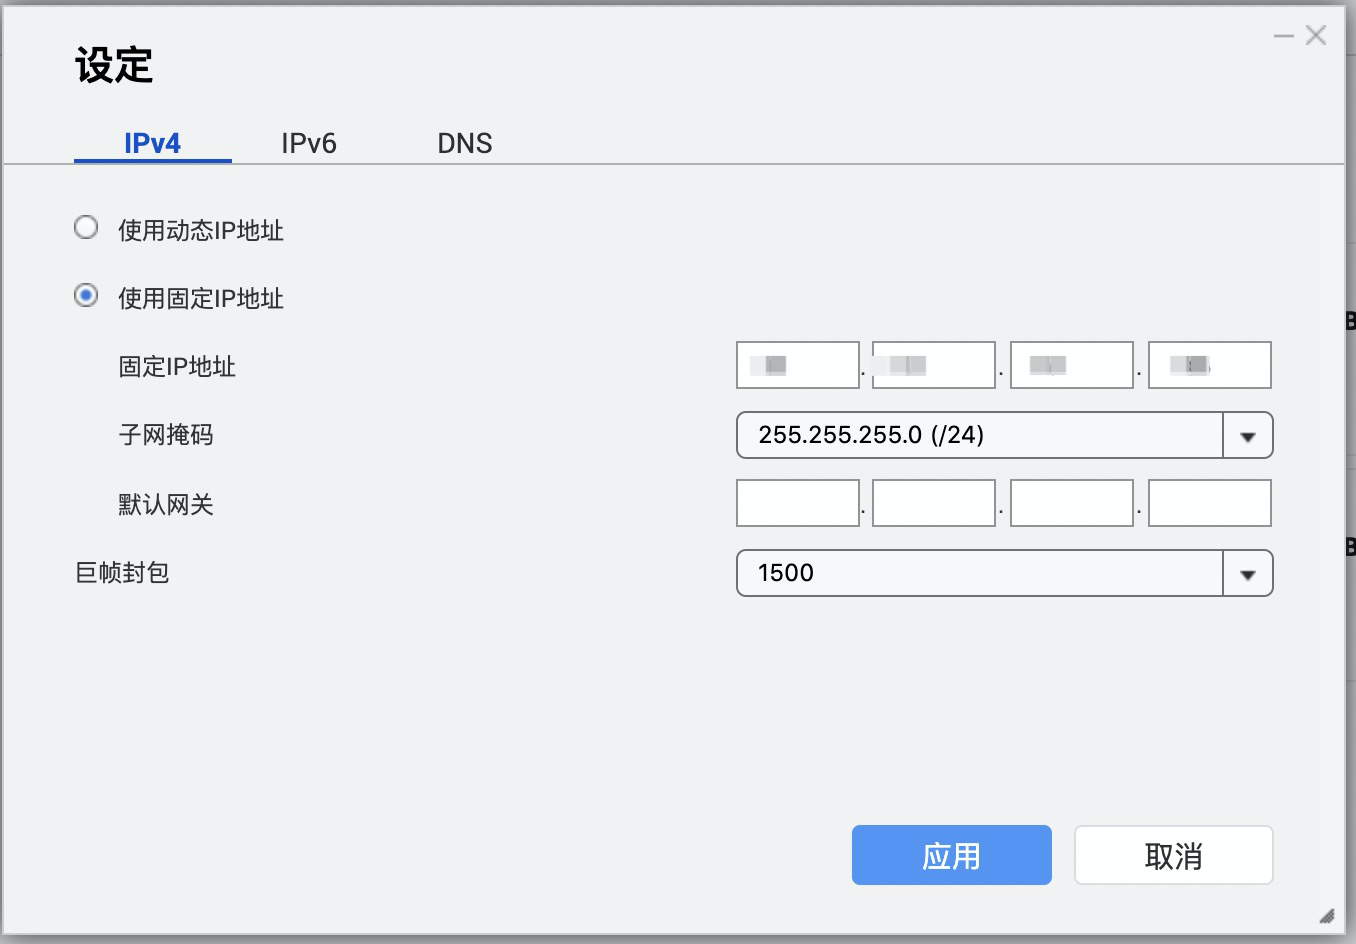
In the IPv4 section, select Use static IP address. Configure the Static IP Address, Subnet Mask, and Default Gateway based on your network environment, and then click Apply.
NoteThe configured static IP address must be in the same network segment as your source device's IP address. Use the ping command to test the connectivity between them.
Step 4: Check the hard disk status
Before you use the Data Transport Mini device, check the hard disk status. If a hard disk or storage pool is abnormal, contact Alibaba Cloud support immediately.
In the Hardware Management Console, go to Console > System > Storage & Snapshot Manager.
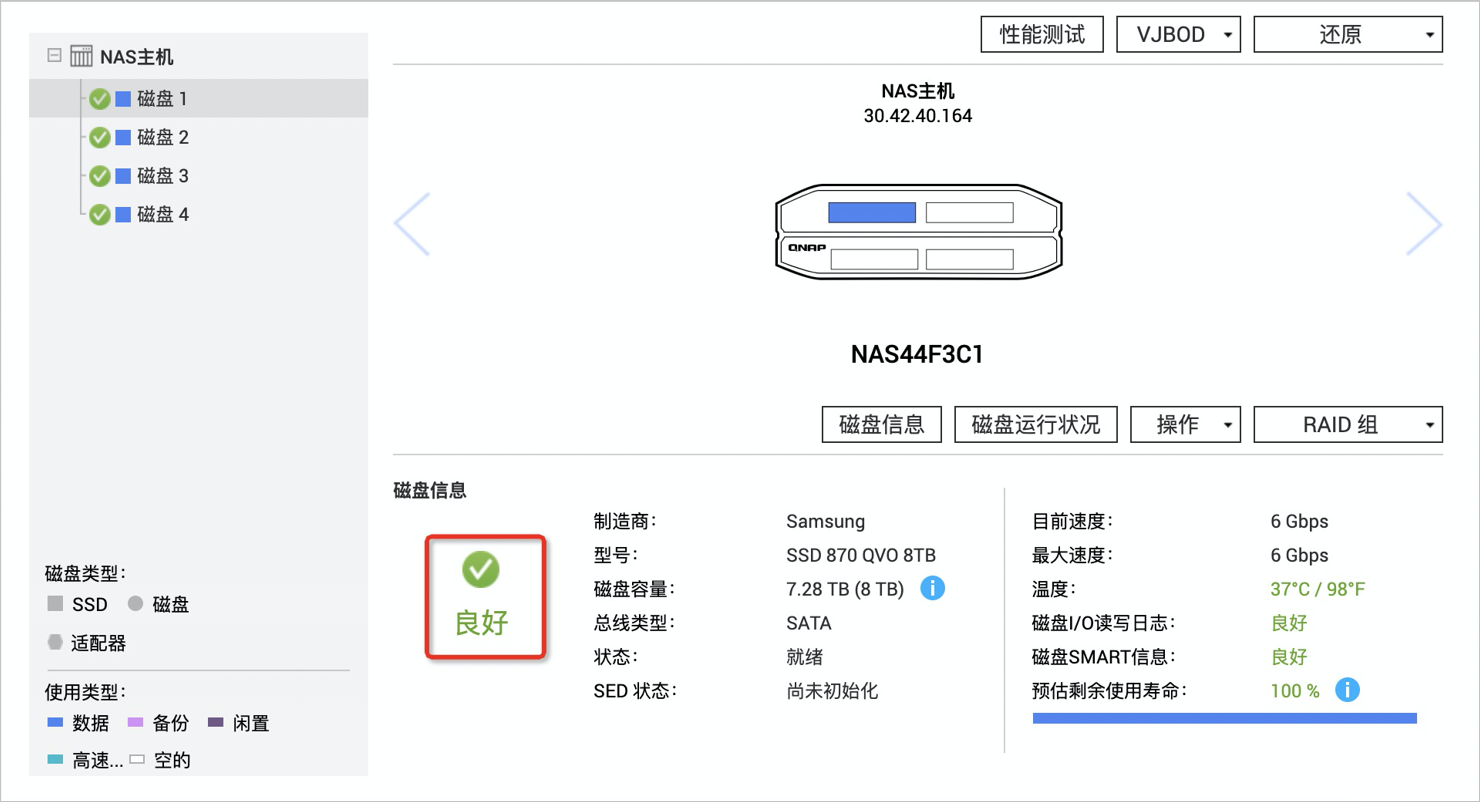
Go to Storage > Disk/VJBOD and check the status of each disk.
As shown in the following figure, a status of Good indicates that the hard disk is working normally.
Go to Bucket>Storage/Snapshot to view the status of storage pools and volumes.
By default, the storage pool status is Not Unlocked and the volume is locked. To unlock the storage pool, select Unlock SED Storage Pool under Manage and enter the password. Contact Alibaba Cloud support to obtain the storage pool password.
 After the storage pool is unlocked, the status changes to Ready and the Syncing prompt is no longer displayed, as shown in the following figure. This indicates that the storage pool and the volume are ready.
 After the storage pool is unlocked, the status changes to Ready and the Syncing prompt is no longer displayed, as shown in the following figure. This indicates that the storage pool and the volume are ready.
Step 5: Check the shared folder
Before you use the Data Transport Mini device, check the shared folder.
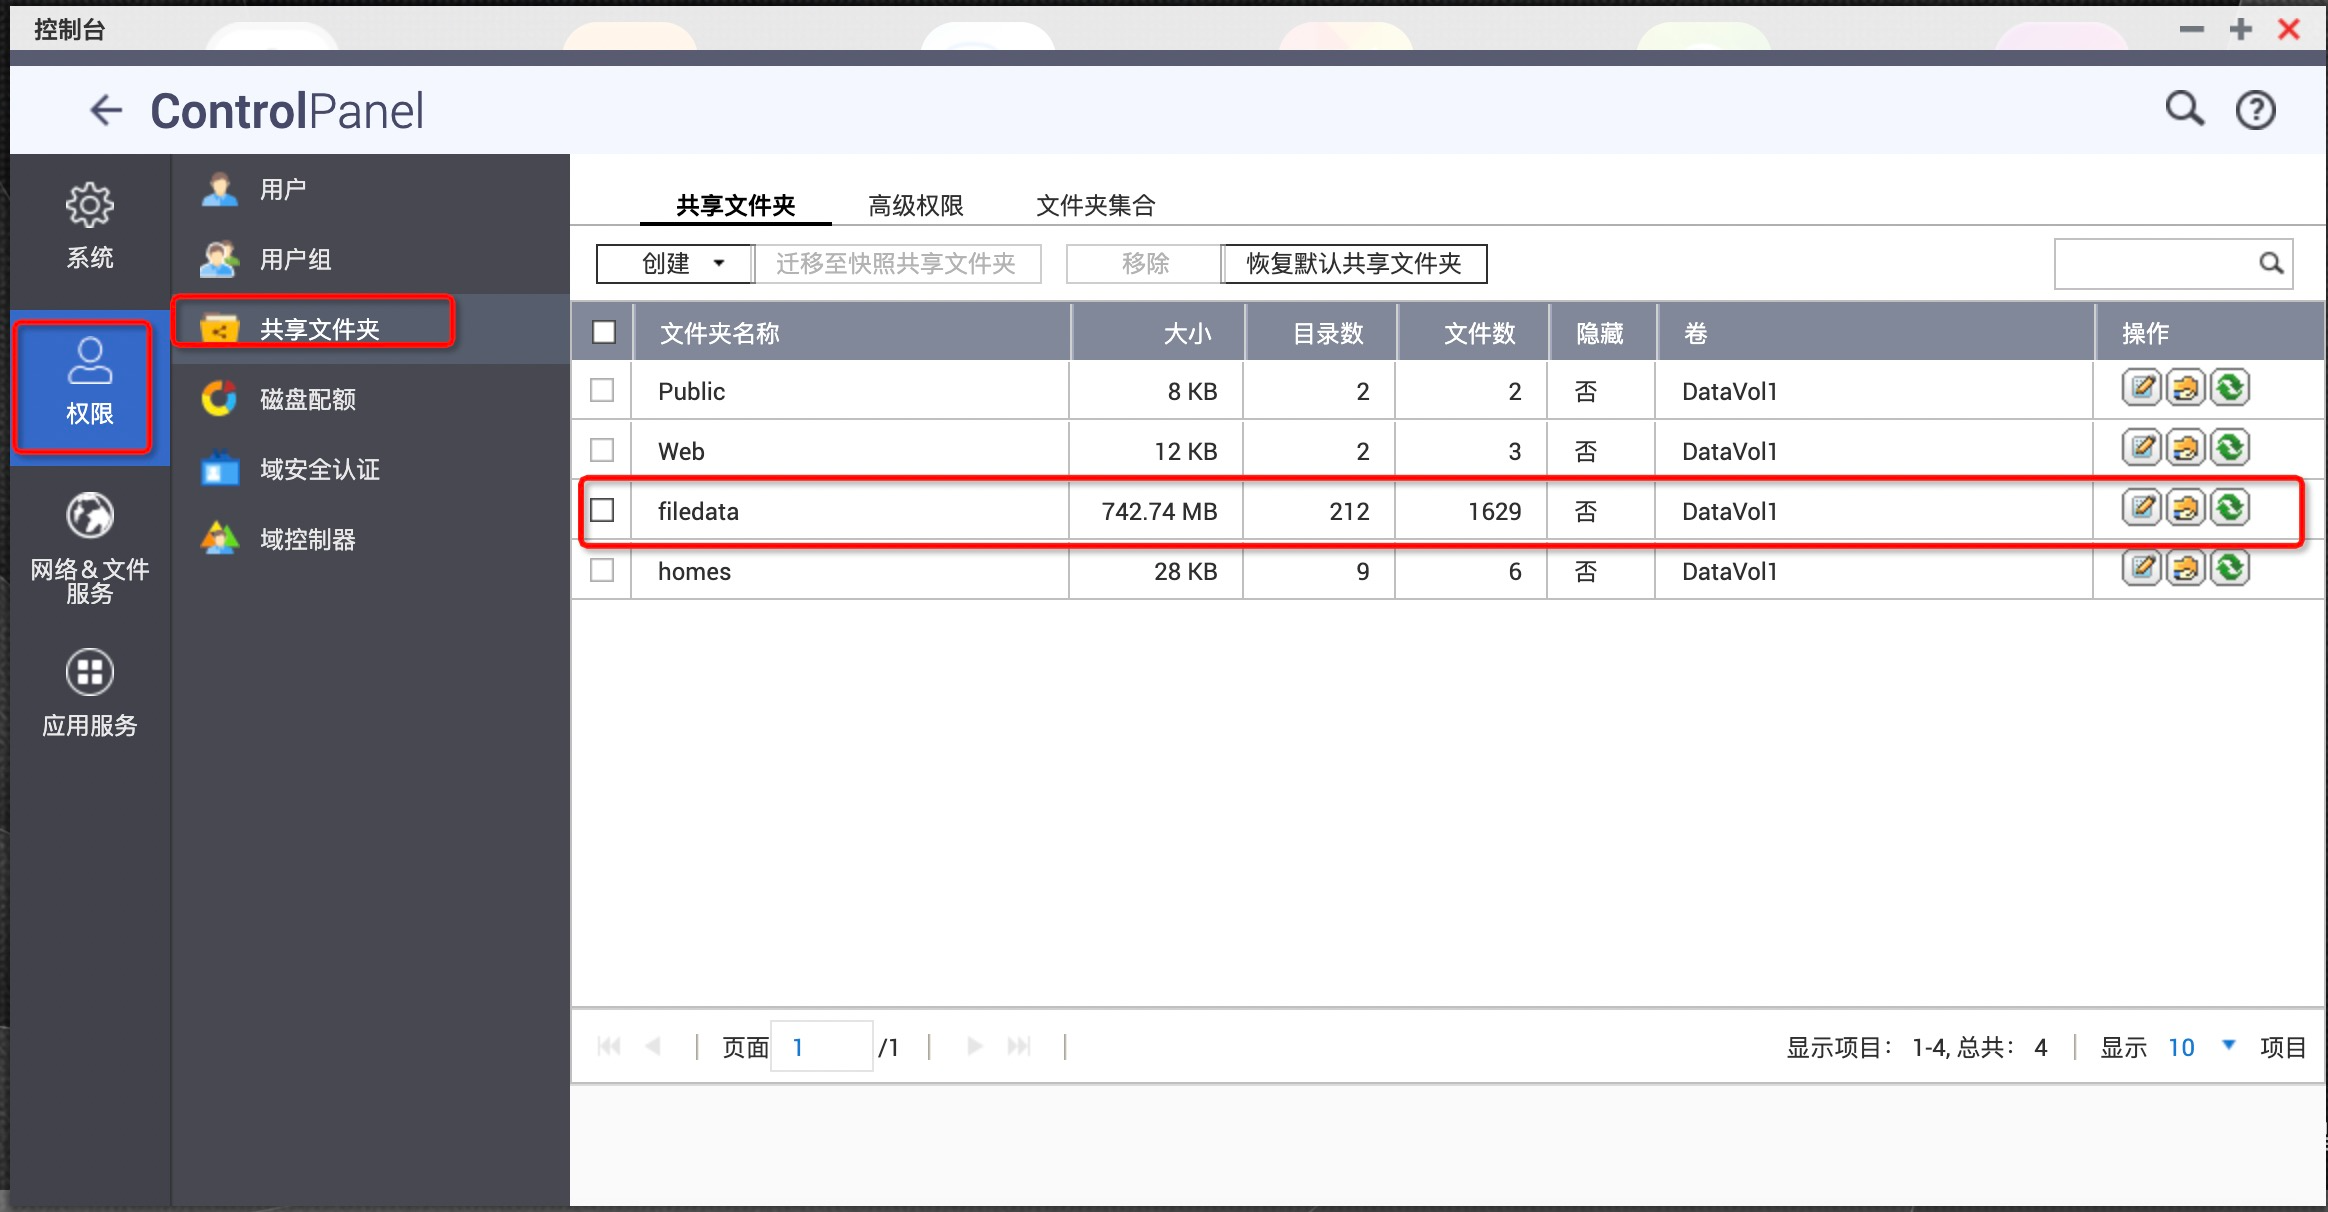
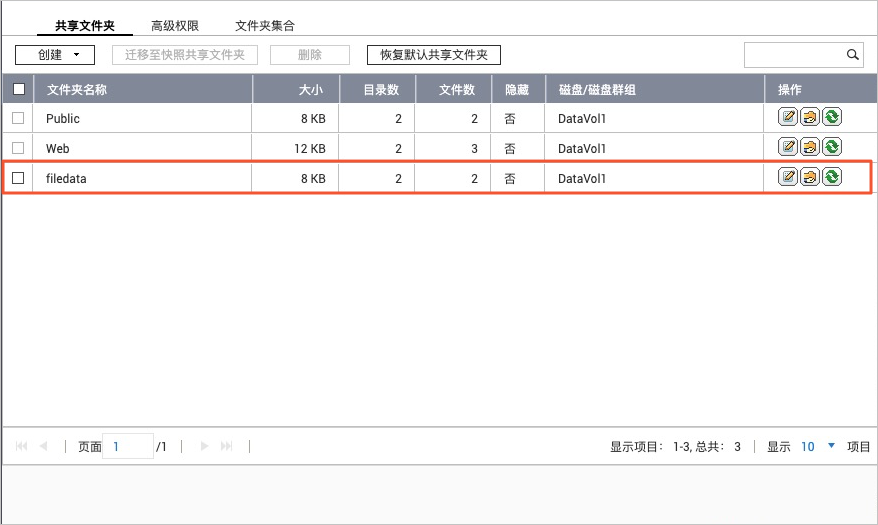
In the Hardware Management Console, select Permissions > Shared Folder to check whether the filedata folder exists. This folder typically exists by default. If it does not exist, you need to create a shared folder. For more information, see (Optional) Create a shared folder.
Click the edit icon to the right of the filedata folder.
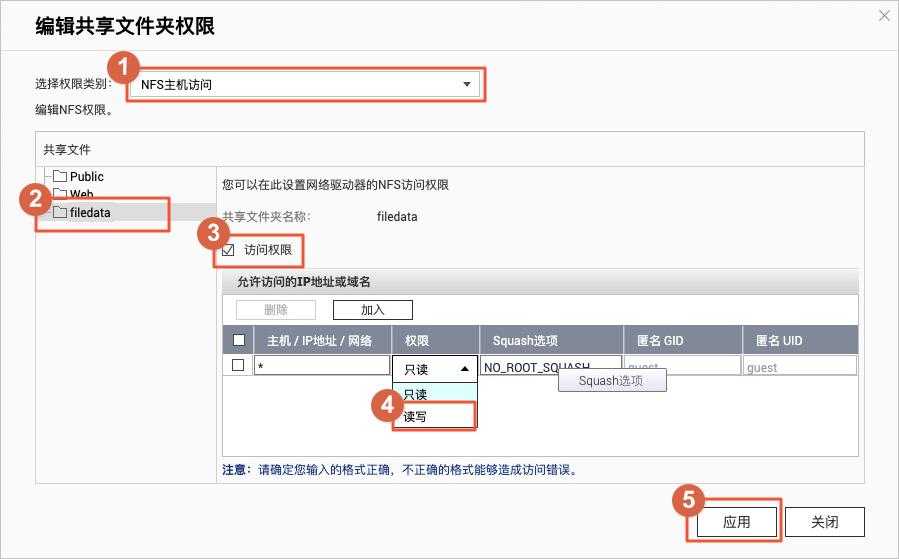
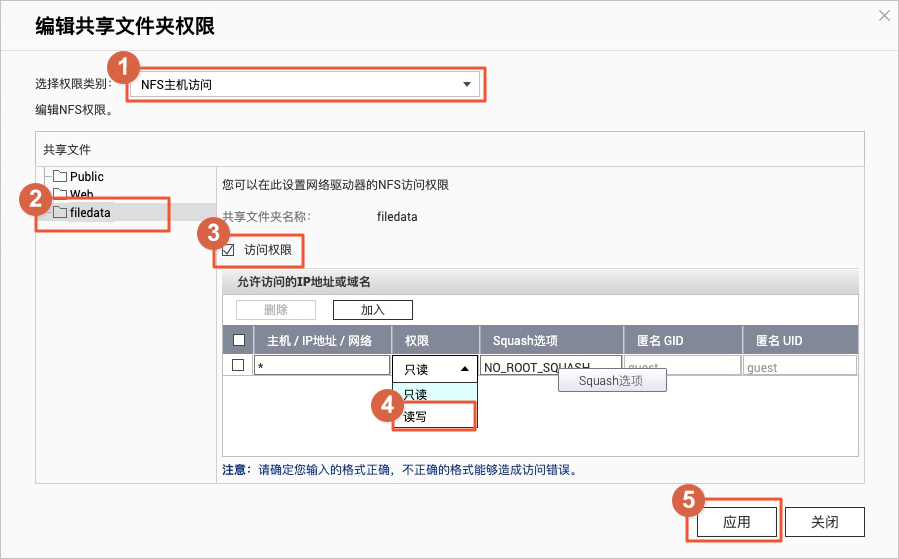
As shown in the figure below, check the shared folder permissions. Confirm that the access permission for the filedata folder is set to read/write. If the permission is set to read/write, the shared folder is configured correctly.
(Optional) Create a shared folder
Before you create a shared folder, log on to the Data Transport server to confirm that the shared folder exists. Then, use a browser to log on to the hardware console and add the shared folder.
Log on to the Data Transport server to check for the shared folder
Log on to the Data Transport server from Linux or macOS
On your laptop, open a command-line window.
Execute the
ssh username@management_ip_addresscommand.The default management IP address is
192.168.1.1. For more information, see Step 2: Log on to the hardware management console.Enter the password to log on to the Data Transport server.
Execute the
cd /share/CACHEDEV1_DATAcommand. Then, execute thelscommand to check if thefiledatadirectory exists.If it exists, the task is complete, and you can then directly access the Hardware Management Console from a browser. For more information, see Related operations.
If the shared folder does not exist, execute
mkdir filedatato create it.
After you complete the preceding steps, log on to the Data Transport hardware console using a browser and create the shared folder. For more information, see Create a shared folder in the hardware management console.
Log on to the Data Transport server from Windows
On your laptop, download a remote connection tool.
This topic uses PuTTY as an example. You can download it from Download PuTTY. Select and install the version that is compatible with your operating system.
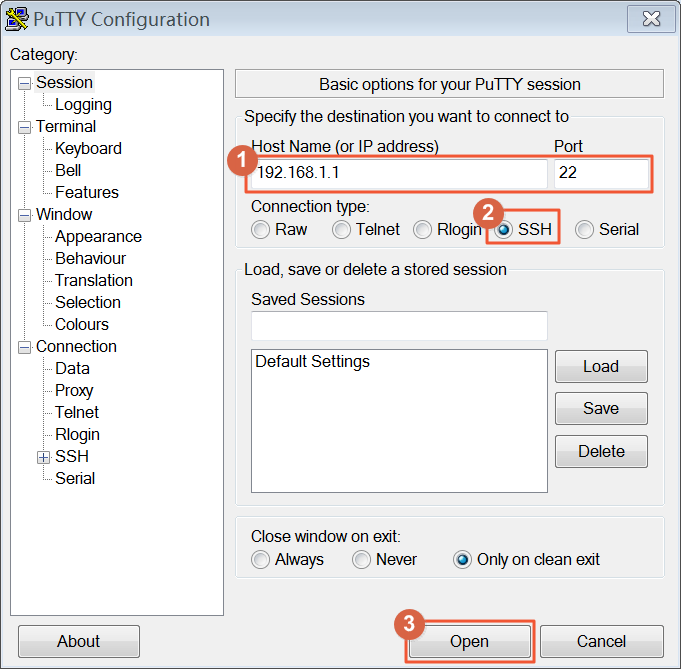
Open PuTTY. As shown in the figure below, configure the settings and log on to the Data Transport server.
Set Host Name (or IP address) to the management IP address, which is
192.168.1.1by default. For more information, see Step 2: Log on to the hardware management console.Execute the
cd /share/CACHEDEV1_DATAcommand. Then, execute thelscommand to check if thefiledatadirectory exists.If it exists, you can use a browser to access the Hardware Management Console. For more information, see Related operations.
If the shared folder does not exist, execute
mkdir filedatato create it.
After you complete the preceding steps, log on to the Data Transport hardware console using a browser and create the shared folder. For more information, see Create a shared folder in the hardware management console.
Create a shared folder in the hardware management console
Log on to the hardware console. For more information, see Step 2: Log on to the hardware management console.
Go to Console > Permission > Shared Folder.
To create a shared folder, select Create > Shared Folder and configure the following parameters:
Shared Folder Name: Enter filedata.
Path: Select Manually enter path and then select filedata.
Click the edit icon to the right of the filedata folder.
As shown in the figure below, check the shared folder permissions and confirm that the access permission for the filedata folder is set to read/write.
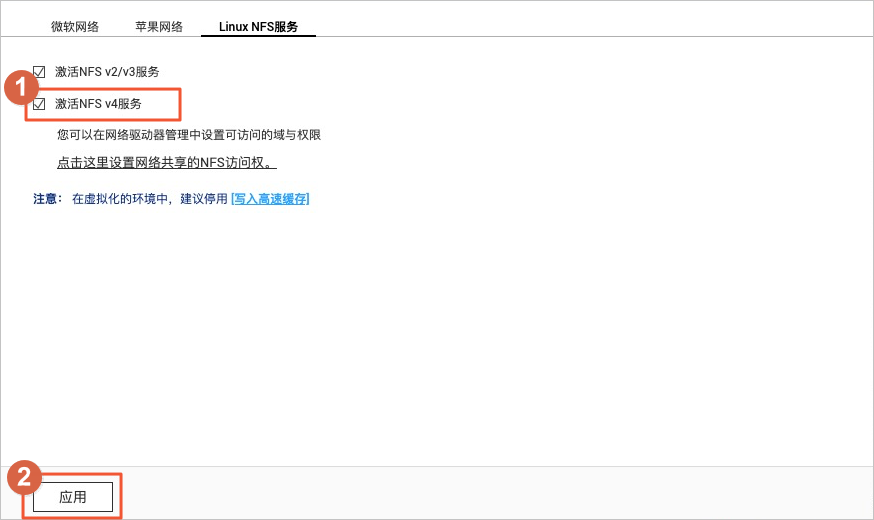
Select Console > Network & File Services > Win/Mac/NFS, and click the Linux tab.
As shown in the following figure, select Activate NFS V4 Service and click Apply.
Related operations
In the hardware management console, you can also perform the following operations.
View log information
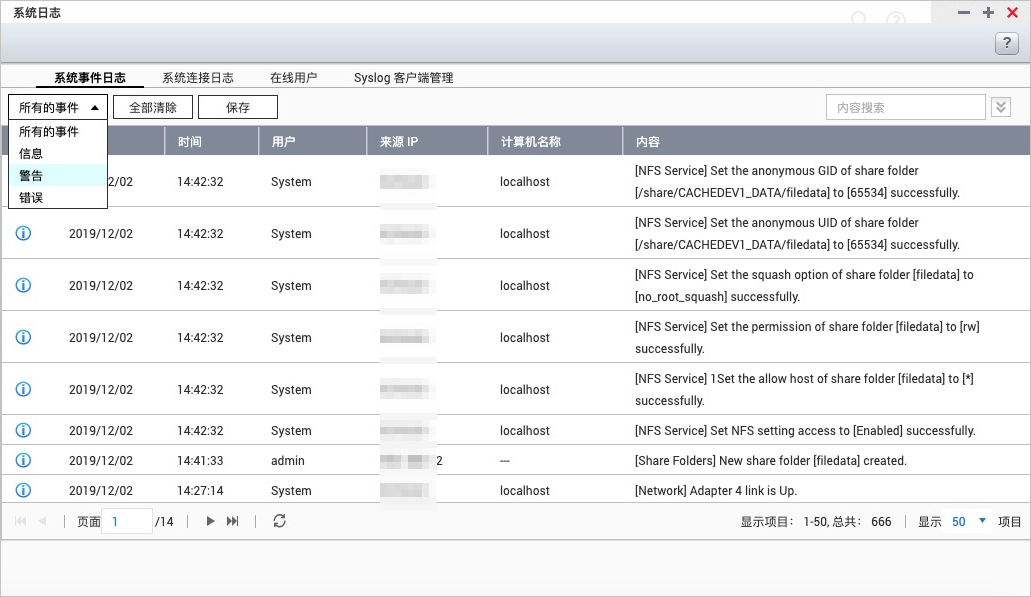
Go to Console > System > System Log to view device logs.
Configure the time
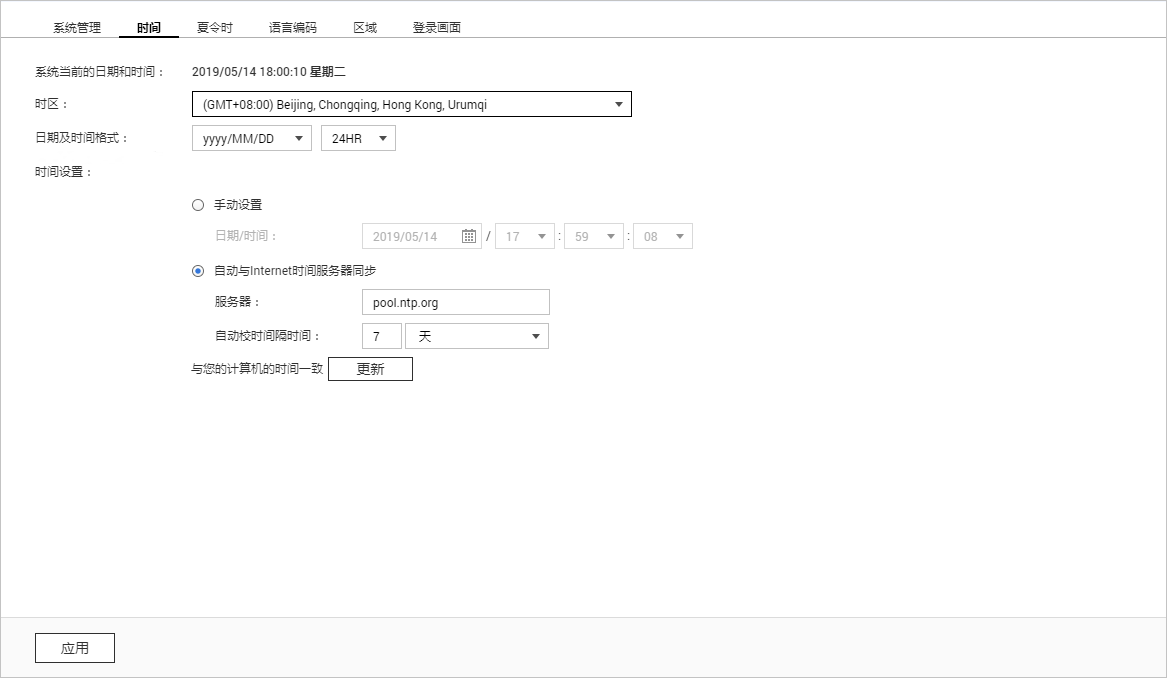
Go to Console > System > General Settings > Time and click Edit to configure the time.
Set the time zone to (GMT+08:00) Beijing, Chongqing, Hong Kong, Urumqi, adjust the time settings, and click Apply.