This document describes how to correctly install and configure a Data Transport device. It covers device specifications, interface layout, physical installation, hardware connections, IP address setup, and how to confirm network connectivity.
Device overview
Data Transport II device
-
Device diagram

The front, rear, and top panels can all be opened. The front and rear panels fold out flat at 90 degrees and can be stowed under the device. The device includes four optical transceiver modules (two 10 Gb and two 25 Gb) and one Chinese-standard power cable (visible when the top cover is opened). Depending on rack space, you can place the device upright or lay it horizontally.
-
Device details
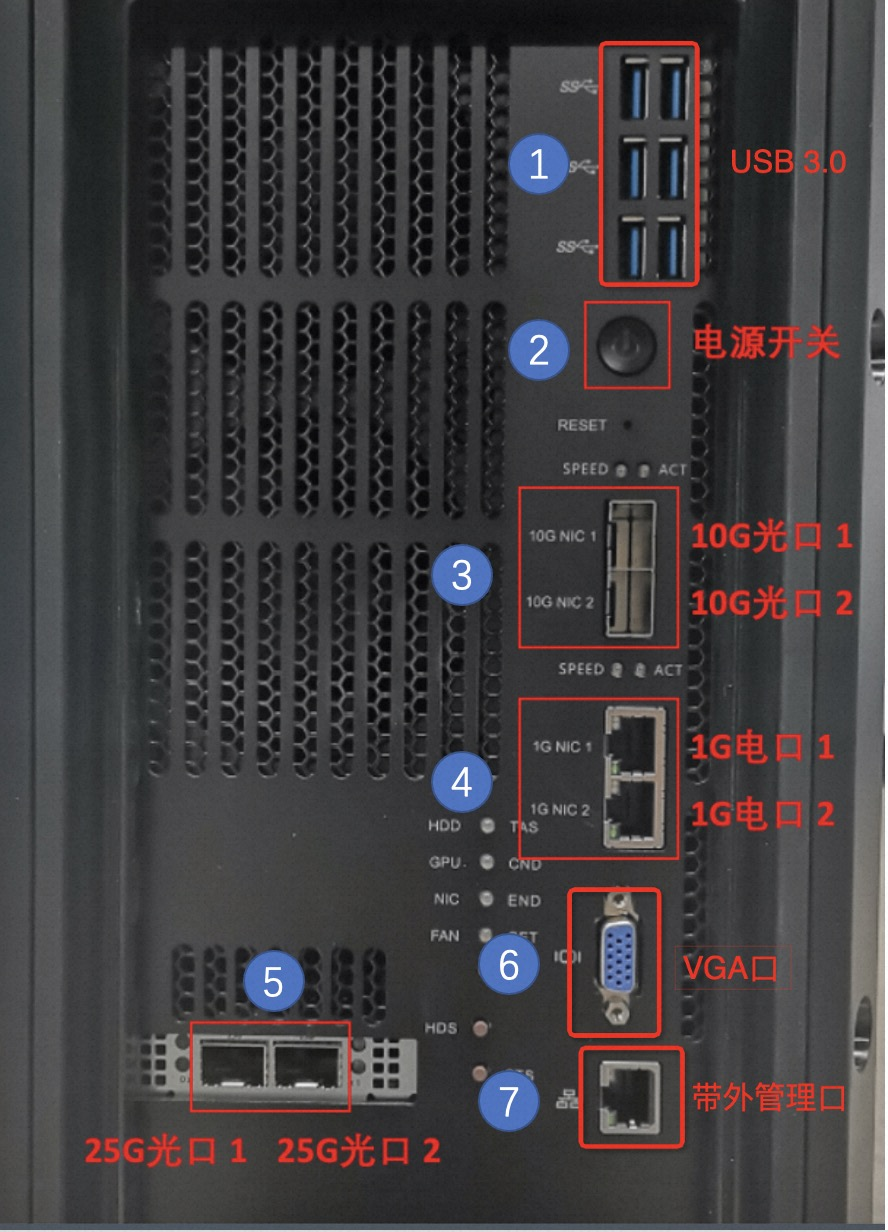
Ordinal number
Description
①
Six USB 3.0 ports for connecting devices such as a mouse, keyboard, or hard drive.
②
Power switch.
③
Two 10 GB optical ports. Port 1 is the management port with IP address
10.10.1.1.④
Two 1 Gb copper Ethernet ports.
⑤
Two 25 Gb optical ports.
⑥
VGA port for connecting a display.
⑦
Out-of-band management port.
NoteDo not use the management port for business traffic.
Step 1: Rack the hardware
-
Unpack and inspect the shipment.
When you receive the Data Transport device, verify that the device and accessories are complete. Accessories include four optical transceiver modules (two 10 Gb and two 25 Gb) and one Chinese-standard power cable (visible when the top panel is opened). Check for any critical damage. If the device is damaged, contact Alibaba Cloud support immediately.
-
Rack the Data Transport device.
The Data Transport II is a non-standard rack-mounted device. Prepare rails and a tray in advance, or place it on the bottom of the rack.
-
Connect the appropriate power cable (US or Chinese standard) based on your rack’s power outlet.
-
Inspect the data tunnel ports.
The device has built-in 1 Gb network ports. If you plan to use 10 Gb or 25 Gb networking, confirm that SFP optical transceiver modules are installed.
-
After completing all connections, press the power button to turn on the device and check its operational status.
Connection methods
The Data Transport device supports the following two connection methods:
-
Connection through a vSwitch

-
Direct connection using an Ethernet cable

Step 2: Configure the service IP address
Method 1
The default management port IP address for the Data Transport II device is 10.10.1.1, with a subnet mask of 255.255.255.0.
-
Connect your laptop to the Data Transport II management port (one of the two 1 Gb copper Ethernet ports; port 1 is the management port with IP
10.10.1.1) using an Ethernet cable. -
Change your laptop’s local IP address to be in the same CIDR block as the management port. For example, set the local IP address to
10.10.1.2with a subnet mask of255.255.255.0.NoteIf the device’s management port IP address is not
10.10.1.1, use Method 2. -
Open the command line and enter
ssh root@10.10.1.1, then press Enter. -
Enter the username and password to log on to the Data Transport device.
Contact Alibaba Cloud support to obtain the username and password.
-
Run the command
cd /etc/sysconfig/network-scripts/to go to the target directory. You will see the following network interface configuration files.ImportantIf you cannot find the corresponding network interface configuration file, use the graphical interface by choosing Applications --> System Tools --> Settings --> Network. Select Manual mode and configure the service IP address, subnet mask, and gateway. After applying the settings, the system generates the corresponding configuration file.
Name
Description
eno1
Configuration file for 1 Gb copper Ethernet port 1 (do not modify the management port)
eno2
Configuration file for 1 Gb copper Ethernet port 2
eno3
Configuration file for 10 Gb optical port 1
eno4
Configuration file for 10 Gb optical port 2
eth4
Configuration file for 25 Gb optical port 1
eth5
Configuration file for 25 Gb optical port 2
-
Open the configuration file that corresponds to the connected network port and confirm or update the following settings.
Parameter Name
Description
BOOTPROTO
Set to static
ONBOOT
Set to yes
IPADDR
Configure the service IP address, for example: 10.10.1.2
NETMASK
Configure the subnet mask, for example: 255.255.255.0
GATEWAY
Configure the gateway, for example: 10.10.1.1
-
Run the command
service network restartto restart the network service. A return of 【OK】 indicates success.
Method 2
Connect a display, keyboard, and mouse to the Data Transport II device.
-
Enter the username and password to log on to the Data Transport device.
Contact Alibaba Cloud support to obtain the username and password.
-
Run the command
cd /etc/sysconfig/network-scripts/to go to the target directory. You will see the following network interface configuration files.Name
Description
eno1
Configuration file for 1 Gb copper Ethernet port 1 (do not modify the management port)
eno2
Configuration file for 1 Gb copper Ethernet port 2
eno3
Configuration file for 10 Gb optical port 1
eno4
Configuration file for 10 Gb optical port 2
eth4
Configuration file for 25 Gb optical port 1
eth5
Configuration file for 25 Gb optical port 2
-
Open the configuration file that corresponds to the connected network port and confirm or update the following settings.
Parameter Name
Description
BOOTPROTO
Set to static
ONBOOT
Set to yes
IPADDR
Configure the service IP address, for example: 10.10.1.2
NETMASK
Configure the subnet mask, for example: 255.255.255.0
GATEWAY
Configure the gateway, for example: 10.10.1.1
-
Run the command
service network restartto restart the network service. A return of 【OK】 indicates success.
Step 3: Check disk status
Before using the Data Transport II device, check the disk status. If you detect any abnormal disks or storage pools, contact Alibaba Cloud support right away.
-
Run
df -hin the command line to view the storage pool. -
The
/mnt/cubefolder is the Data Transport storage directory. Save your data here.
Step 4: Check shared folders
Before using the Data Transport II device, verify the shared folders.
-
Run
showmount -e 127.1.1.1in the command line. -
Confirm the command returns the following output.
[root@Cube-II-21A834217 network-scripts]# showmount -e 127.1.1.1
Export list for 127.1.1.1:
/mnt/cube *