Configure the Easysearch output component
The Easysearch output component writes data to an Easysearch data source. To synchronize data from other data sources to Easysearch, you must configure the Easysearch output component as the target. This topic describes how to configure the Easysearch output component.
Prerequisites
An Easysearch data source has been created. For more information, see Create an Easysearch data source.
The account that you use to configure the Easysearch output component has sync write permissions for the data source. If the account does not have the required permissions, request them. For more information, see Request data source permissions.
Procedure
In the top menu bar on the Dataphin home page, choose Develop > Data Integration.
In the top menu bar of the Data Integration page, select a Project. If you use the Dev-Prod mode, also select an Environment.
In the navigation pane on the left, click Batch Pipeline. In the Batch Pipeline list that appears, click the offline pipeline that you want to develop to open its configuration page.
In the upper-right corner of the page, click Component Library. The Component Library panel opens.
In the left navigation pane of the Component Library panel, select Outputs. Find the Easysearch component in the list on the right and drag it to the canvas.
Click and drag the
 icon of the source component to connect it to the Easysearch output component.
Click the
 icon on the Easysearch output component card to open the Easysearch Output Configuration dialog box.
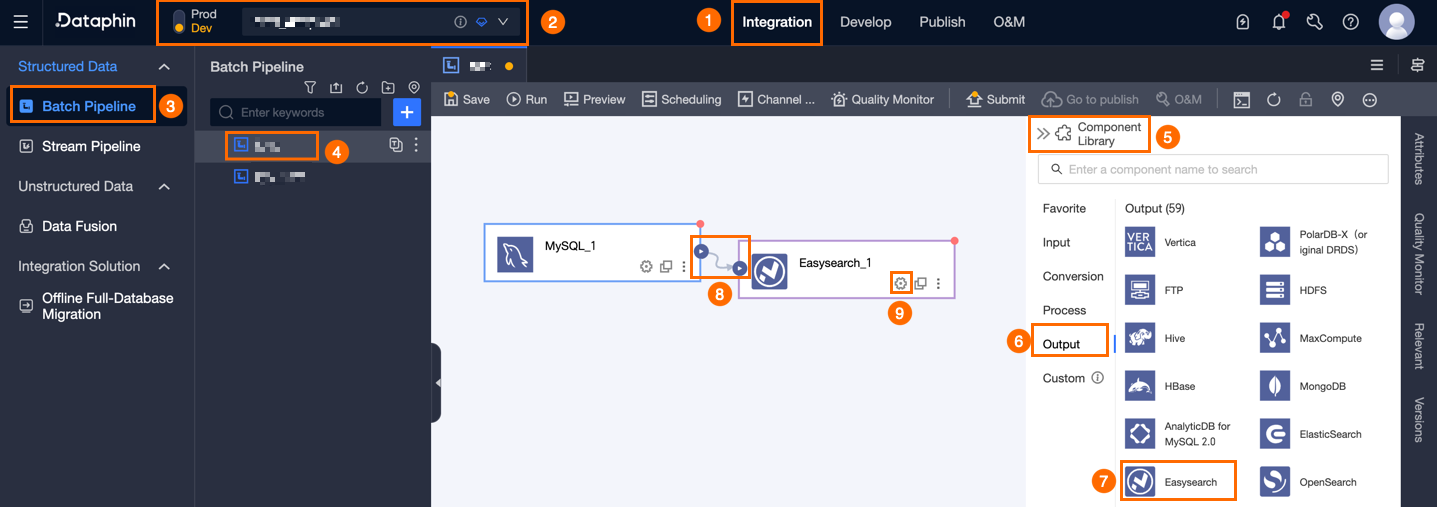
In the Easysearch Output Configuration dialog box, you can configure the parameters.
Parameter
Description
Step Name
The name of the Easysearch output component. Dataphin automatically generates a step name. You can also change the name as needed. The naming convention is as follows:
Contains only Chinese characters, uppercase and lowercase letters, underscores (_), and digits.
Cannot exceed 64 characters in length.
Datasource
The data source drop-down list displays all Easysearch data sources. This includes data sources for which you have sync write permissions and those for which you do not.
For a data source where you lack sync write permissions, click Request next to the data source to request the permissions. For more information, see Request, renew, and return data source permissions.
If you do not have an Easysearch-type data source, click Create to create one. For more information, see Create an Easysearch data source.
Loading Policy
The policy for writing data to the target table. Loading Policy includes:
Overwrite Data: Overwrites the historical data in the target table with data from the source table.
Append Data: Appends new data to the target table without changing the existing data.
Index Document
The name of the index in Easysearch. Click the
 icon to copy the name of the selected index document.
Field Separator
This parameter is optional. The separator between fields. If you leave this blank, the system uses a comma (,) as the separator.
Input Fields
Displays the input fields based on the output from the upstream component.
Output Fields
Displays the output fields.
Batch Add fields.
Click Batch Add.
Configure fields in a batch using the JSON format. The following is an example:
[{"name":"col_integer","type":"integer"}, {"name":"col_long","type":"long"}, {"name":"col_double","type":"double"}]Notename specifies the name of the field to import, and type specifies the data type of the field after it is imported. For example,
"name":"user_id","type":"String"specifies that the field named user_id is imported and its data type is set to String.Configure fields in a batch using the TEXT format. The following is an example:
col_long,long
col_double,double
The row delimiter separates the information for each field. The default is a line feed (\n). Semicolons (;) and periods (.) are also supported.
The column delimiter separates the field name from the field type. The default is a comma (,).
Click Confirm.
Add Output Field.
Click Create Output Field. Then, enter a Column name and select a Type as prompted.
Copy Ancestor Table Field.
Use the input fields from the upstream component as the output fields.
Manage output fields
Manage the added fields as follows:
Click and drag the
 move icon next to Column to change the position of the field.
Click the
 Edit icon in the Actions column to edit an existing field.
Click the
 delete icon in the Actions column to delete an existing field.
Mapping
The mapping relationship connects the input fields of the source table to the output fields of the target table for data synchronization. Mapping relationships include mapping by name and mapping by row. The scenarios are described as follows:
Map By Name: Maps fields that have the same name.
Map By Row: Maps fields that are in the same row. Use this when the field names in the source and target tables do not match, but the data in the corresponding rows needs to be mapped.
Click Confirm to configure the properties of the Easysearch output component.