The OSS output component writes data from an external database to OSS, or replicates data from a connected big data storage system to OSS for integration and reprocessing.
Prerequisites
-
An OSS data source must be created. For more information, see Create OSS Data Source.
-
The account that configures the OSS output component must have read-through permissions for the data source. If you do not have the required permissions, request them. For more information, see Request Data Source Permission.
Procedure
-
On the Dataphin home page, navigate to the top menu bar and select Development > Data Integration.
-
At the top menu bar on the integration page, select Project (Dev-Prod mode requires selecting the environment).
-
In the navigation pane on the left, click Batch Pipeline. In the Batch Pipeline list, select the offline pipeline to be developed to access its configuration page.
-
Click the Component Library in the upper right corner to open the Component Library panel.
-
In the Component Library panel's left-side navigation pane, select Output, locate the OSS component in the list on the right, and drag it onto the canvas.
-
Connect the target component to the current OSS output component by clicking and dragging the
 icon.
icon. -
Click the
 icon on the OSS output component card to open the OSS Output Configuration dialog box.
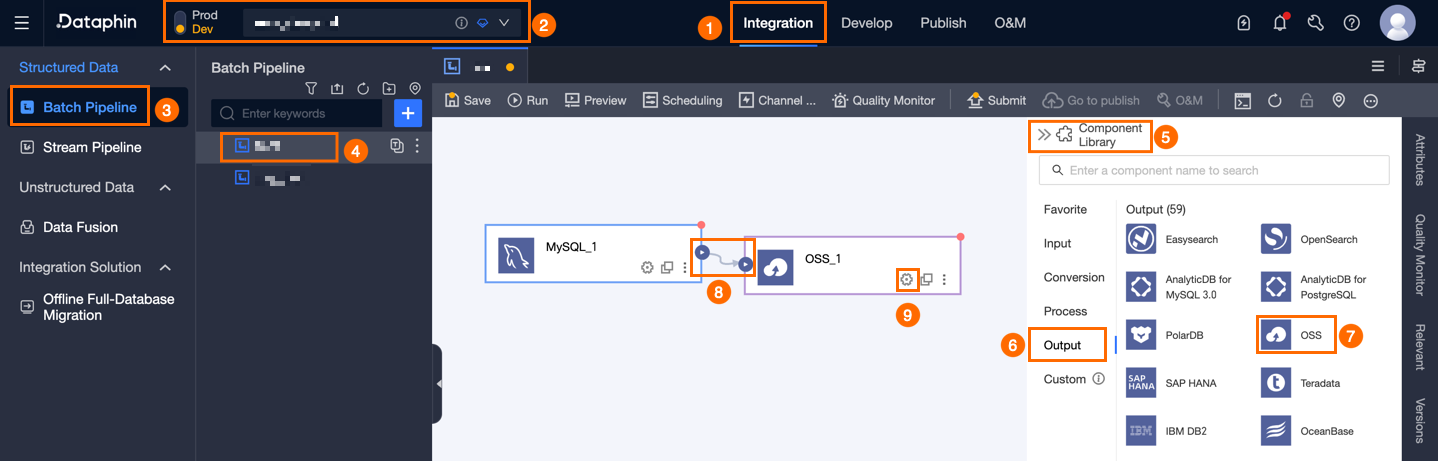
-
Configure the following parameters in the OSS Output Configuration dialog box.
Parameter
Description
Basic Settings
Step Name
Enter a name for the OSS output component. The name must meet the following conventions:
-
Supports Chinese characters, letters, numbers, and underscores (_).
-
Allows up to 64 characters.
Datasource
Select a pre-configured data source in Dataphin, or click Create to go to the Management Center and create a new data source. For more information, see Create OSS Data Source.
Ensure the account used for configuration has write-through permissions for the data source. If you do not have the required permissions, request them. For more information, see Request Data Source Permission.
File Type
Choose between Text and CSV file types.
File Encoding
Supports UTF-8 and GBK encodings.
Object Prefix
The prefix of the OSS object. You can specify multiple prefixes. For example, if an OSS bucket contains a `data` folder with a `phin.txt` file, set the object prefix to
data/phin.txtto sync a specific file. To sync all files in a folder, use a wildcard character, such asdata/*.Prefix Conflict
Specify how to handle prefix conflicts:
-
Replace existing file: Before writing, deletes all objects that match the specified object prefix. For example, if the object prefix is
Dataphin, all objects whose names start withDataphinare deleted. -
Append to Existing Files: Writes directly using the configured prefix, adding a random UUID suffix to avoid filename conflicts.
-
Report error on conflict: If an object that matches the prefix exists in the specified path, an error is reported. For example, if the object prefix is
Dataphinand an object namedDataphinexists, an error is reported.
Number Of Files To Write
Specify whether to write to a single file or multiple files in the destination OSS.
-
Single File: Writes to a single file in the destination OSS.
-
Multiple files: Writes data to multiple files in the destination OSS. You must also configure the suffix format. You can choose to generate a sequential suffix, such as
_0,_1, or_2, or generate a random UUID suffix. The number of files is determined by the task concurrency.Note-
If you choose to write to multiple files, a suffix is generated even if the task concurrency is set to 1. The suffix can be
_1or a randomuuid. -
When appending to existing files, only a UUID random number suffix is possible.
-
Advanced Configuration
Column Delimiter
The column delimiter used when writing data. Default: comma (,).
Row Delimiter
The row delimiter used when writing data. Default: line feed (\n).
Null Value
Optional. The string used to represent null values.
File Name Extension
An optional extension, such as
.csvor.text, appended as the final suffix of the object name.Output Field Names
Select Yes to include the field names from the upstream component as the first line in the output file, or No to exclude them.
Field Mapping
Input Fields
Displays the output fields from the upstream component.
Output Fields
The output fields. You can configure output fields by using Batch Add and Create Output Field:
-
Batch Add: Click Batch Add to support batch configuration in JSON or TEXT format.
-
For JSON format, an example is:
// Example: [{"name": "user_id","type": "String"}, {"name": "user_name","type": "String"}]Note`name` specifies the name of the imported field, and `type` specifies the data type of the field after it is imported. For example,
"name":"user_id","type":"String"specifies that the `user_id` field is imported and its data type is set to String. -
For TEXT format, an example is:
// Example: user_id,String user_name,String-
Each field's information is separated by a row delimiter, defaulting to a line feed (\n). It supports line feed (\n), semicolon (;), and period (.).
-
The column delimiter, defaulting to a comma (,), separates the field name from the field type.
-
-
-
Creating an Output Field.
Click + Create Output Field, enter a value for Column, and select the appropriate Type.
-
Copy Fields from Upstream.
Click Copy Upstream Fields to automatically generate output fields matching the upstream field names.
-
Manage Output Fields:
You can perform the following operations on added fields:
-
Click the Actions column's
 icon to edit the existing fields.
 -
To delete an existing field, click the Actions column
 icon.
icon.
-
Mapping
Maps input fields from the source table to output fields of the target table. Mapping options:
-
Same-name Mapping: Maps fields with identical names.
-
Same-row Mapping: Maps fields by their row position when source and target field names differ.
-
-
Click Confirm to complete the OSS output component configuration.