Before you use a PolarDB-X data source in DataV-Board, add the PolarDB-X instance as a data source.
Prerequisites
Activate the database service. Create a PolarDB-X instance.
DataV-Board supports PolarDB-X 1.0 and PolarDB-X 2.0 data sources. The following example uses PolarDB-X 2.0.
Limits
This feature is available only in DataV Enterprise Edition and later versions.
Add a data source over an internal network
Access the DataV console.
-
On the Workbench page, choose .
-
In the Type list, select PolarDB-X.
-
From the list, select Internal Network and the region that contains the PolarDB-X instance.
-
Enter the database information and select the network type: VPC or classic network.
Virtual private cloud
-
Turn on the VPC switch.
-
Enter the database configuration information.
Parameter
Description
Name
A custom name for the data source.
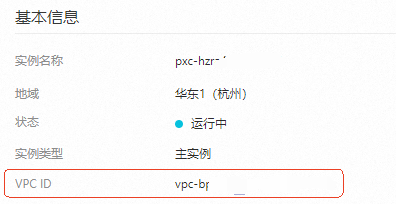
VPC ID
The VPC ID of the PolarDB-X instance. In the PolarDB-X console, select the PolarDB-X 2.0 tab, click the instance name, and find the VPC ID on the Basic Information page.
VPC-connected instance ID
The VPC-connected database instance ID, VPC network connection address, or VPC network IP address. Call the DescribeDBInstanceAttribute operation to obtain the VPCInstanceId.
Domain Name
The VPC address of the PolarDB-X instance. In the PolarDB-X console, select the PolarDB-X 2.0 tab, click the instance name, and find the address in .
Port
The database port number.
Database logon information
Enter the username and password of the PolarDB-X instance. The system auto-discovers databases, or you can enter a database name manually.
In the PolarDB-X console, select the PolarDB-X 2.0 tab, click the instance name, and go to Configuration and Management > Database Management and Account Management.
Classic network
-
Turn off the VPC switch.
-
Enter the database configuration information.
Parameter
Description
Name
A custom name for the data source.
Domain Name
The classic network address of the PolarDB-X instance.
Port
The database port number.
Database logon information
Enter the username and password of the PolarDB-X instance. The system auto-discovers databases, or you can enter a database name manually.
In the PolarDB-X console, select the PolarDB-X 2.0 tab, click the instance name, and go to Configuration and Management > Database Management and Account Management.
-
-
Click OK. The system tests the connection. If successful, the data source appears in the data source list.
Add a data source over the public network
Access the DataV console.
-
On the Workbench page, choose .
-
From the Type list, select PolarDB-X.
-
Select Public Network from the list.
-
Enter the database configuration information.
Parameter
Description
Name
A custom name for the data source.
Domain Name
The public endpoint of the PolarDB-X instance. In the PolarDB-X console, select the PolarDB-X 2.0 tab, click the instance name, and find the endpoint in .
Port
The database port number.
Database logon information
Enter the username and password of the PolarDB-X instance. The system auto-discovers databases, or you can enter a database name manually.
In the PolarDB-X console, select the PolarDB-X 2.0 tab, click the instance name, and go to Configuration and Management > Database Management and Account Management.
-
Click OK. The system tests the connection. If successful, the data source appears in the data source list.
What to do next
After you add the data source:
-
Use the data source: Open a project in the editor, add a widget, and configure it to use the data source.
-
Manage the data source: Edit or delete the data source in Data Source Management.
References
-
For questions or feedback about DataV-Board, contact us.
-
Supported data source types: Data source overview.