Add a Hologres data source
To create reports in DataV-Note (Analysis Intelligence) with data from Hologres, you must first add your Hologres instance as a data source. Once added, you can use it in DataV-Note projects to query, analyze, and visualize data from the instance. This topic describes how to add a Hologres data source.
Prerequisites
You have purchased a Hologres instance and created a database. For more information, see Purchase a Hologres instance and Create a database.
You have a workspace. For more information, see Create a workspace.
NoteDataV-Note includes a default workspace that you can use.
Limitations
DataV-Note supports three connection methods: public network, internal network, or VPC.
Public network connection: Supports instances in all regions.
Internal network or VPC connection: Supports only instances in the China (Shanghai) region.
Procedure
Go to the data source page.
Log on to the DataV-Note console.
In the navigation pane on the left, select the target workspace and click .
Click New Data Connection.
Configure the data source information.
Configure basic information.
Configure the name and type for the data source. The following table describes the parameters.
Parameter
Description
Data source identifier
A custom name for the data source. The name must be unique within the workspace.
Data source description
A brief description of the data source, such as its purpose.
Data source type
Select Hologres.
IP whitelist
Add an IP whitelist. To avoid access restrictions when DataV-Note accesses the Hologres database, go to the Hologres console and add the obtained IP address to the Hologres IP whitelist. For more information, see Set an IP Whitelist.
Public network IP whitelist: On the data source configuration page, find the system IP address in the prompt box below the Data Source Type parameter.
Internal network/VPC IP whitelist: Log on to the Hologres console, click the instance ID, and find the vSwitch ID in the section. Then, on the vSwitch console, use this ID to find the corresponding IP address range.
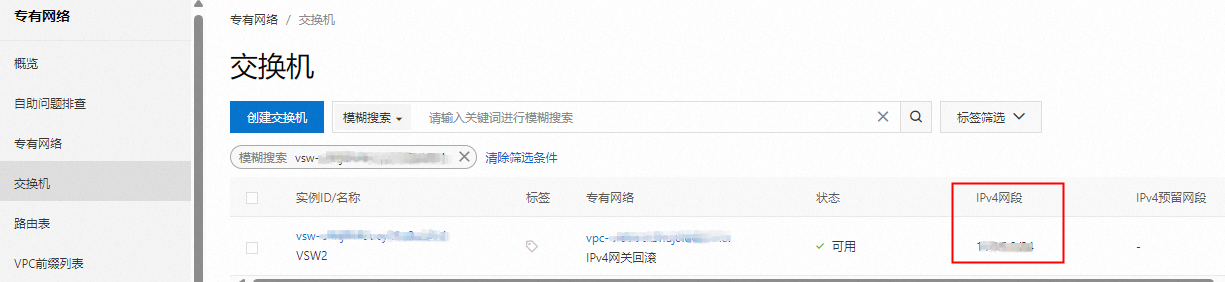 Note
NoteIf the default IP whitelist group of the instance, named
default, contains 0.0.0.0/0, the instance accepts connections from any IP address, so no IP whitelist configuration is required.
Configure connection information.
Connection address and port
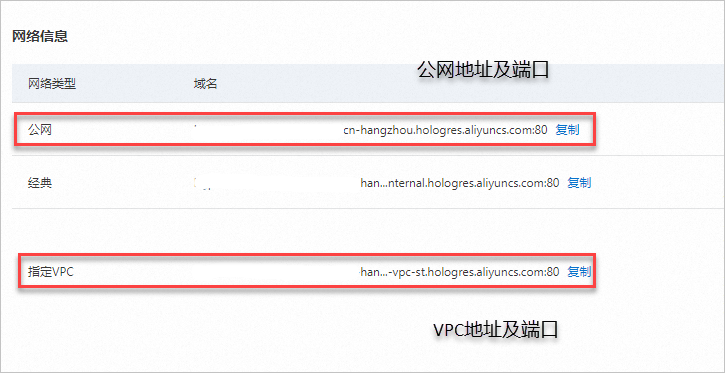
The public, internal network, or VPC connection address of the database.
Public connection address: The address used to access the Hologres instance from the public network. Log on to the Hologres console, click the instance name, and view the public network information in the section.
Internal/VPC connection address: The address for accessing the Hologres instance from the internal network or a VPC. Log on to the Hologres console, click the instance name, and view the VPC information in the section.
Database logon information
Enter the name of the Hologres database to access, along with the username and password.
Log on to the Hologres console and click the instance name. In the navigation pane on the left, you can view the database name and user information under Database Management and Account Management.
Test connection
See the connectivity test instructions below.
Test the connectivity.
The Test Connection toggle determines whether to test the connection to the Hologres data source:
On: The connection is automatically tested with the provided configuration.
Off: The connection is not tested. You must test it manually after creating the data source to ensure it is available.
NoteAfter the data source is created, its connection status appears in the data source list. The possible statuses are as follows:
Connection normal: Indicates that the data source is available. You can use the data source for subsequent query and analysis operations.
Connection failed: DataV-Note cannot access the data source. Click the
 icon below the data source to run a test. Fix any reported errors.
Untested: Click the
icon below the data source to test the connectivity. You can use the data source for queries and analysis only after the connection is normal.
Click OK to create the data source.
Next steps
After you create the data source, you can perform the following operations:
Use the data source: Go to the edit page of your target project and perform queries and analysis based on this data source. For more information, see Data analysis.
NoteIn a project, you can use only data sources with a Connection successful status.
Manage the data source: Perform operations, such as refreshing cached tables or deleting the data source. For more information, see Manage data sources.
Related topics
If you have any questions or suggestions while using DataV-Note, feel free to contact us.
For more information about data sources, see Data source management.