Automated governance of materialized views
If you frequently run big data computing tasks with many similar subqueries, DataWorks offers an intelligent, automated solution. The automated governance feature recommends materialized views by automatically identifying and classifying similar subqueries in MaxCompute. You can then create a materialized view with a single click to significantly improve query performance and reduce resource consumption.
Features
The feature of automated governance of materialized views in DataWorks relies on the materialized view feature of MaxCompute. You can use the feature of automated governance of materialized views to quickly scan and identify a large number of similar subqueries that exist in MaxCompute SQL statements in DataWorks scheduling scenarios. DataWorks then uses similar subqueries to recommend the view generation SQL statements that can be used to efficiently create materialized views.
After a view is created, DataWorks synchronously creates a node that generates the view data and deploys the node to the production environment for scheduling. Nodes that originally have similar subqueries in DataWorks are uniformly specified as the descendant nodes of the node that generates the view data. DataWorks preferentially schedules the node that generates the view data based on the scheduling dependencies. When the descendant nodes use the public subquery, the nodes query data from the materialized view that has generated data. This reduces the repetitive calculation of data for governance purposes.
The feature of automated governance of materialized views in DataWorks is available in the following regions: China (Hangzhou), China (Shanghai), China (Shenzhen), China (Beijing), and China (Chengdu).

Prerequisites
A MaxCompute data source is added. For more information, see Associate a MaxCompute compute resource.
The intelligent analysis feature on materialized views is enabled in MaxCompute. For more information, see Materialized view recommendations and management.
Use process
Enable the intelligent recommendation feature on materialized views.
After you enable the intelligent recommendation feature on materialized views for a MaxCompute project that is associated with DataWorks Data Studio, the recommendations for creating materialized views are generated and displayed on the Materialized View Recommendation tab if the following conditions are met:
An auto triggered task is run for at least three consecutive days.
The number of rows of input data in a public subquery is greater than 1,000,000.
The public subquery contains operators that are related to data reorganization, such as join or aggregation operators.
-
View the recommendations and create a materialized view.
You can check whether the recommendations are valid and create and manage a materialized view.
When you create a materialized view, if you select Create Materialized View Refresh Node and Add Materialized View Refresh Node as Ancestor Node, the created materialized view becomes active in DataWorks scheduling scenarios.
A materialized view refresh node is automatically added as an ancestor node of nodes that have similar computing logic. When an ancestor node or the node that generates the source table generates new output, the materialized view is refreshed to produce the latest data for descendant nodes to query.
Manage materialized views.
You can view the usage of the materialized views in the current workspace and analyze or delete the materialized views whose output data does not meet expectations.
Procedure
Step 1: Enable or disable the intelligent recommendation feature on materialized views
Only users that are assigned the Workspace Administrator role can enable or disable the intelligent recommendation feature on materialized views.
-
Go to the Data Governance Center page.
-
In the top navigation bar, click Workbench. In the left-side navigation pane, click Materialized View.
-
Select a Workspace and click Settings for Materialized View Recommendation. Find the project for which you want to enable smart recommendations and turn on the smart recommendation switch.
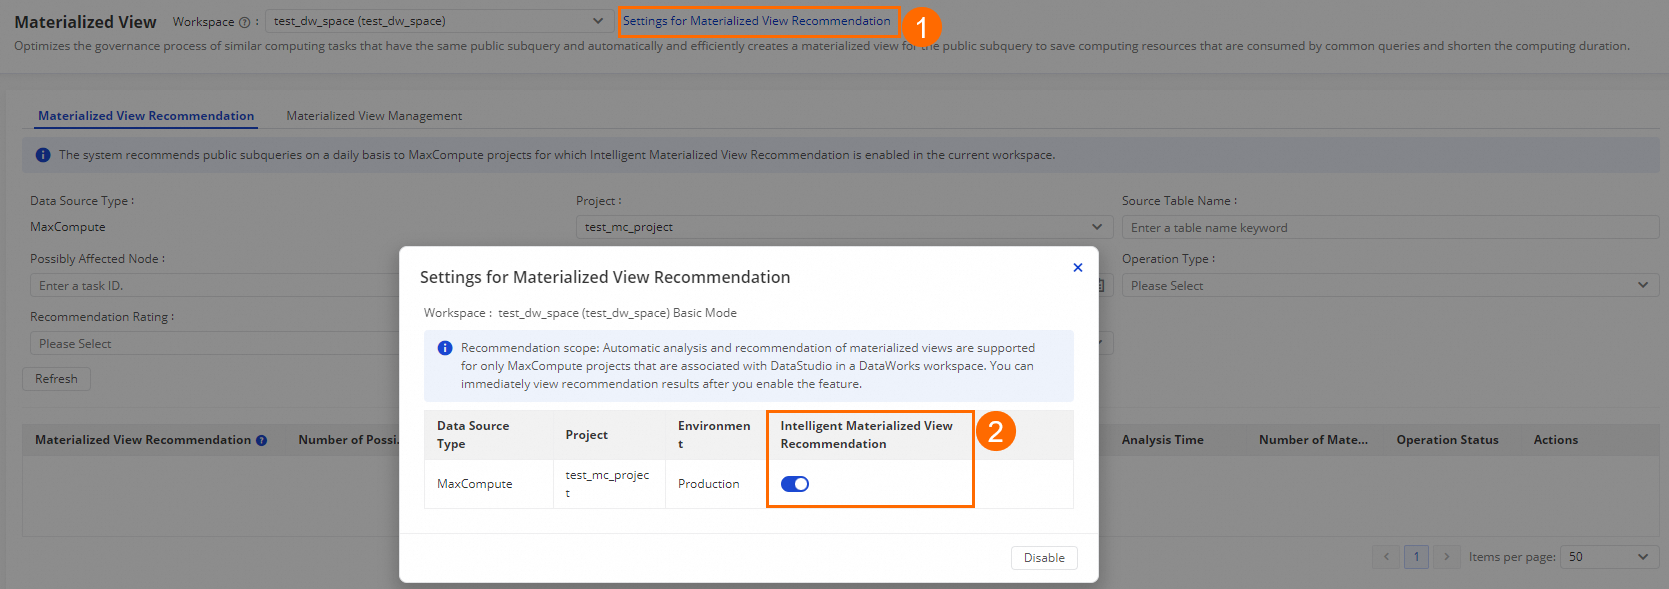
Log on to the DataWorks console. After you switch to the target region, in the left-side navigation pane, choose . On the page that appears, click Go to Data Governance Center.
Step 2: View the recommended materialized views
The materialized view recommendation module can automatically identify materialized views that can be created and the associated computing tasks. The related owners can determine whether the materialized views are valid and manage their creation process.
To ensure accurate recommendations, the system generates and displays relevant recommendations on the Materialized View Recommendation tab only when the following conditions are met after you enable the intelligent recommendation feature on materialized views:
An auto triggered task is run for at least three consecutive days.
The number of rows of input data in a public subquery is greater than 1,000,000.
The public subquery contains operators that are related to data reorganization, such as join or aggregation operators.
-
In the top navigation bar, select a Workspace, and then click the Materialized View Recommendation tab.
-
Adjust the filter conditions, such as Project and Analysis Time Interval, to check for any generated recommendations.
If recommendations are available for the specified Analysis Time Interval, you can view the following information.

Parameters:
-
The Materialized View Recommendation column displays the identifier for each materialized view recommendation task. The identifier contains summary information about the public subquery in the format
Aggregate: xx; Inputs: xx, xx;, where:Aggregate: indicates whether the recommended public subquery contains the aggregate operation.
Inputs: lists the names of all source tables used by the public subquery.
-
Number of Possibly Affected SQL Statements: The number of SQL statements that use the current public subquery.
Possibly Affected Node: the number of scheduling nodes that use the public subquery.
-
Recommendation Rating: A score calculated based on the frequency, complexity, and input record count of the subquery.
-
-
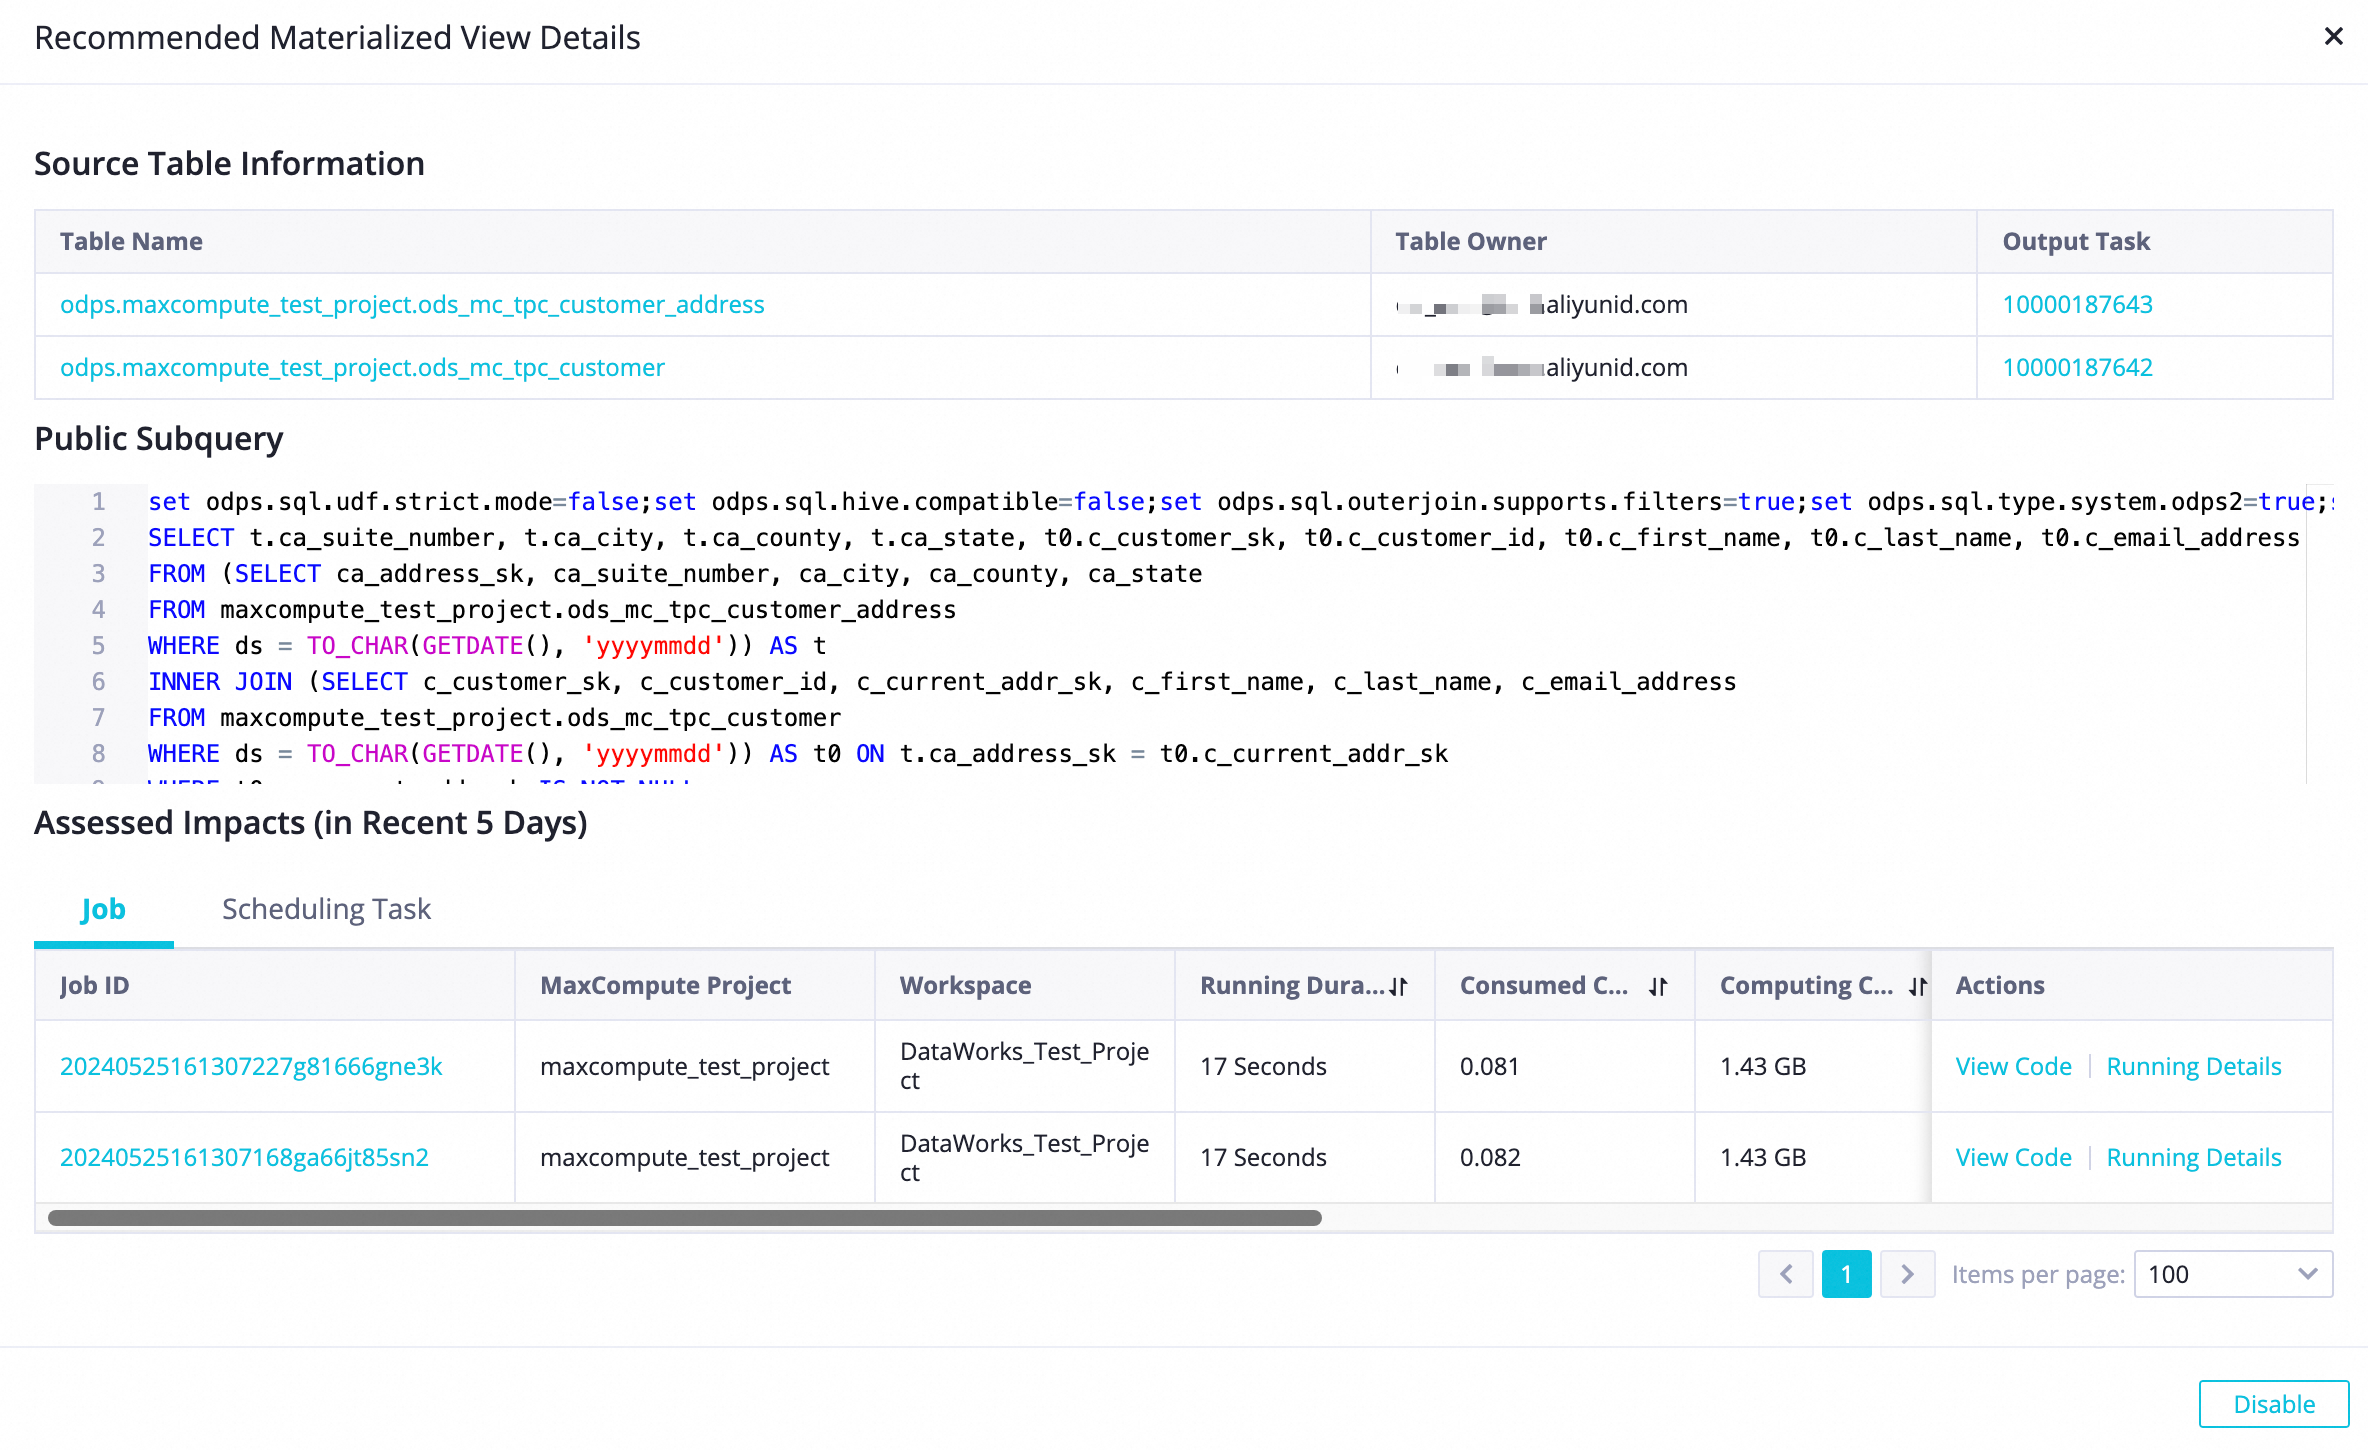
Click a task identifier in the Materialized View Recommendation column to view detailed information about the subquery, including Source Table Information, the associated Public Subquery, and related Job and Scheduling Tasks.
Step 3: Create a materialized view
-
Based on your business needs and the recommendation details, decide whether to create a materialized view on the Materialized View Recommendation page. If you decide to proceed, click Create Materialized View in the Actions column.
-
On the Create Materialized View page, configure the parameters for the materialized view.

-
(Required) Create Materialized View section: Create a materialized view and a corresponding node based on the common subquery from the input tasks.
Parameter
Description
Input Table
The input tables, which are automatically obtained and do not need to be modified.
Create Materialized View or Not
When you create a view for the first time, this defaults to Create Materialized View and does not require changes.
NoteIf a materialized view with the same input tables already exists, you can select Select Existing Materialized View as needed.
Materialized View Name
The name of the materialized view. You can specify a name based on your business requirements.
Lifecycle
Supported options are 1 Day, 7 Days, and Custom Days.
Refresh Type
The refresh mode of the materialized view.
-
Refresh at Fixed Interval
If the table from which you want to read data is the output of a task in DataWorks, Time Management Cron Mode is selected by default. Otherwise, Refresh at Fixed Interval is selected.
-
Time Management Cron Mode
The materialized view is refreshed at the most recent output time of the node that generates the table from which you want to read data.
-
Do Not Refresh
Preview Statement
The SQL statements of the materialized view.
-
-
(Optional) Create Materialized View Refresh Node section: Create a node that can dynamically refresh the materialized view. After the source table task generates output, the materialized view is dynamically refreshed with the latest data.
Configure the Materialized View Refresh Node Name and Node Running Timeout Period.

-
(Optional) Add Materialized View Refresh Node as Ancestor Node section: Add the materialized view refresh node as an ancestor node for tasks with similar computations to improve the query hit rate for incremental data.
This area shows the affected computing tasks, including the number of task nodes in the current and other workspaces. You can click View Details to see the specific task node details.
-
-
Click Create and Execute. DataWorks then automatically creates the materialized view. You can monitor the creation status in the Status column on the Materialized View Recommendation page, or click View Details in the Actions column to see the progress.
-
The Status can be:
To Be Created: The materialized view is not created by using DataWorks.
Created: The materialized view is created.
Creating: The process of creating the materialized view by using DataWorks is initiated but the creation is not finished.
Create Failed: The process of creating the materialized view by using DataWorks is initiated but the creation failed.
-
Click View Details to display the creation details of the materialized view.
-


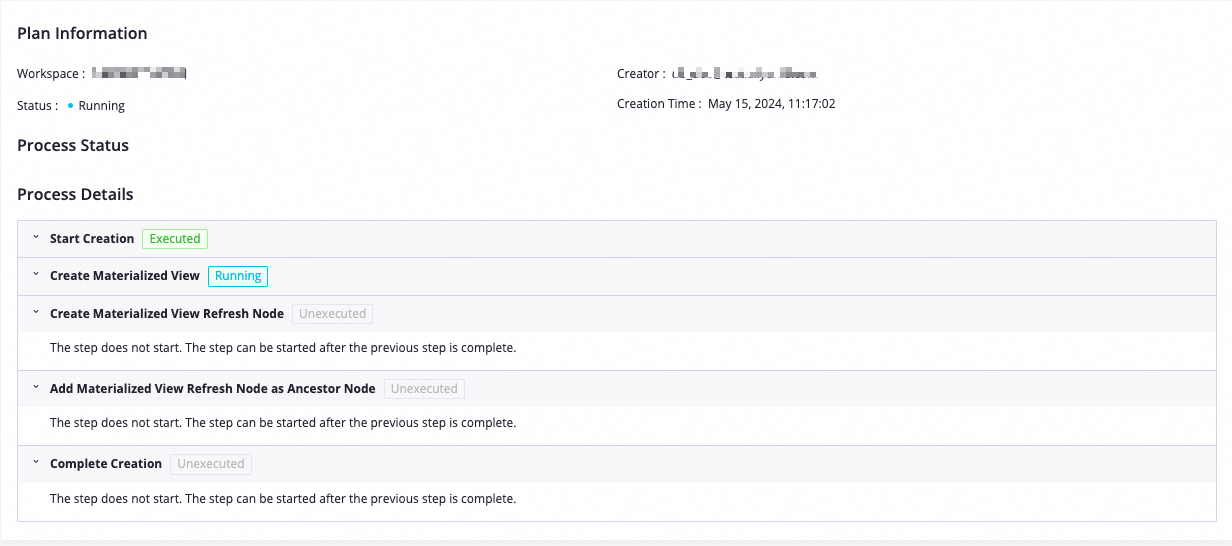
If you configured Create Materialized View Refresh Node and Add Materialized View Refresh Node as Ancestor Node during creation, a new materialized view refresh node is added to the corresponding task workflow. This node is placed before tasks with similar computations. The owner of the refresh node is the user who created the materialized view.
Step 4: Manage materialized views
You can view the usage of the materialized views in the current workspace and analyze or delete the materialized views whose output data does not meet expectations.
-
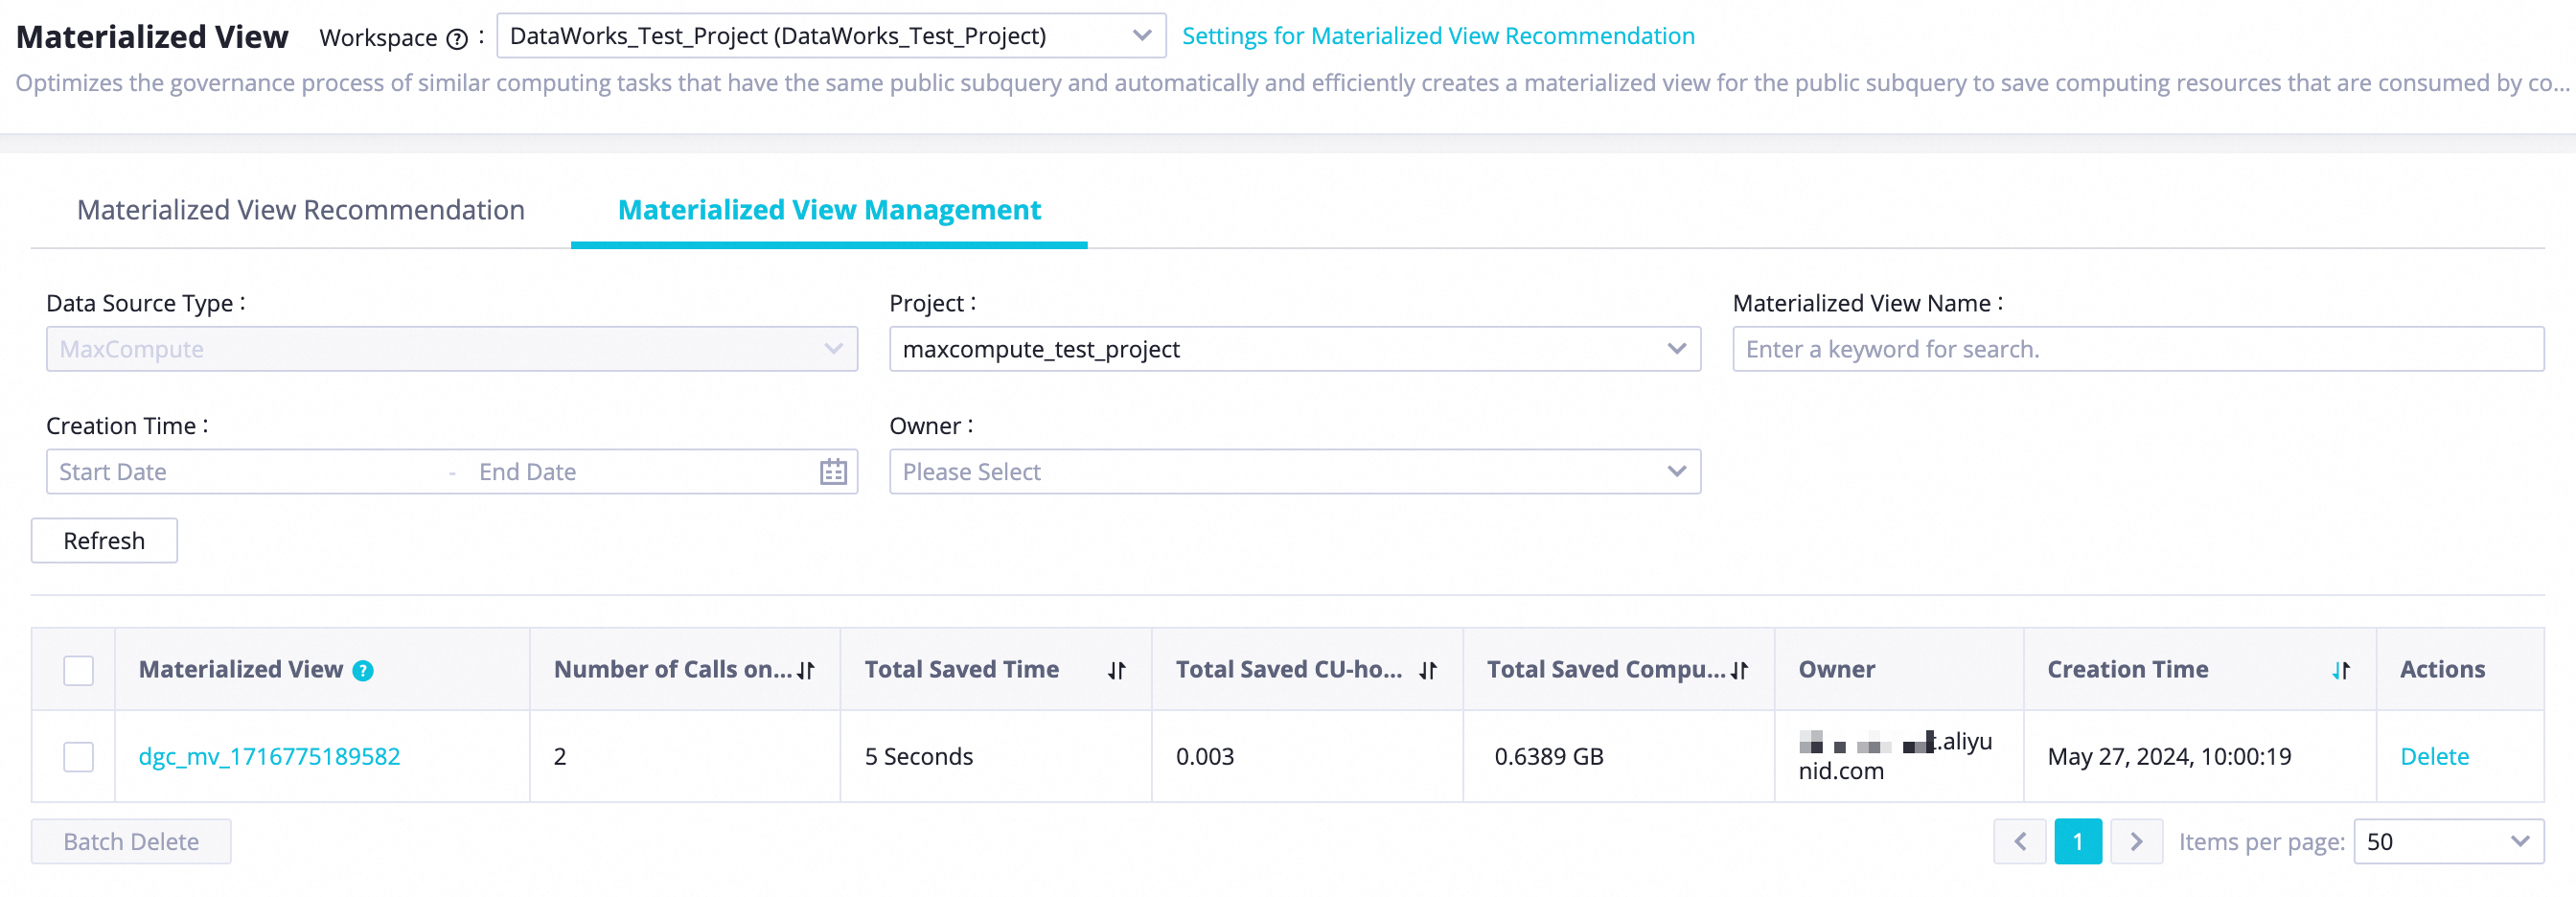
In the top navigation bar, select a Workspace, and then click the Materialized View Management tab.
-
Adjust the filter conditions, such as Project, to view the materialized views that were created from recommendations.
ImportantIf the quota for your MaxCompute project is pay-as-you-go:
Total saved computing resources = Input data size × SQL complexity. MaxCompute SQL jobs are charged based onComputing resources × Unit price. For more information, see MaxCompute computing fees (pay-as-you-go).-
You can click a materialized view identifier in the Materialized View column to see its details.
-
You can click Delete in the Actions column to delete a materialized view.
-

Configuration example
The test data used in this example is from a MaxCompute public dataset. For more information, see TPC-DS data. You can use the tables related to your business data for configuration.
Prepare data
-
Bind a MaxCompute compute engine and bind it in .
-
In Data Development, create a zero load node named
Materialized_View_Testto serve as the root node for downstream tasks. -
In this example, create four ODPS nodes in Data Studio.
dws_customer_info_1anddws_customer_info_2share a public subquery that retrieves data fromods_mc_tpc_customerandods_mc_tpc_customer_address.ods_mc_tpc_customer
The scheduling parameter has a Parameter Name of
bdayand a Parameter Value of$[yyyymmdd].CREATE TABLE IF NOT EXISTS ods_mc_tpc_customer ( c_customer_sk BIGINT NOT NULL ,c_customer_id CHAR(16) NOT NULL ,c_current_cdemo_sk BIGINT ,c_current_hdemo_sk BIGINT ,c_current_addr_sk BIGINT ,c_first_shipto_date_sk BIGINT ,c_first_sales_date_sk BIGINT ,c_salutation CHAR(10) ,c_first_name CHAR(20) ,c_last_name CHAR(30) ,c_preferred_cust_flag CHAR(1) ,c_birth_day BIGINT ,c_birth_month BIGINT ,c_birth_year BIGINT ,c_birth_country VARCHAR(20) ,c_login CHAR(13) ,c_email_address CHAR(50) ,c_last_review_date_sk CHAR(10) ) COMMENT 'TABLE COMMENT' PARTITIONED BY (ds STRING COMMENT 'Partition') LIFECYCLE 90; SET odps.namespace.schema=TRUE; INSERT OVERWRITE TABLE ods_mc_tpc_customer PARTITION(ds='${bday}') select * from BIGDATA_PUBLIC_DATASET.TPCDS_10T.customer;ods_mc_tpc_customer_address
The Parameter Name for the scheduling parameter is
bday, and the Parameter Value is$[yyyymmdd].CREATE TABLE IF NOT EXISTS ods_mc_tpc_customer_address ( ca_address_sk BIGINT NOT NULL ,ca_address_id CHAR(16) NOT NULL ,ca_street_number CHAR(10) ,ca_street_name VARCHAR(60) ,ca_street_type CHAR(15) ,ca_suite_number CHAR(10) ,ca_city VARCHAR(60) ,ca_county VARCHAR(30) ,ca_state CHAR(2) ,ca_zip CHAR(10) ,ca_country VARCHAR(20) ,ca_gmt_offset DECIMAL(5,2) ,ca_location_type CHAR(20) ) COMMENT 'TABLE COMMENT' PARTITIONED BY (ds STRING COMMENT 'Partition') LIFECYCLE 90; SET odps.namespace.schema=TRUE; INSERT OVERWRITE TABLE ods_mc_tpc_customer_address PARTITION(ds='${bday}') select * from BIGDATA_PUBLIC_DATASET.TPCDS_10T.customer_address;dws_customer_info_1
The Parameter Name of the scheduling parameter is
bday, and the Parameter Value is$[yyyymmdd].CREATE TABLE IF NOT EXISTS dws_customer_info_1 ( c_customer_sk BIGINT NOT NULL ,c_customer_id CHAR(16) NOT NULL ,c_first_name CHAR(20) ,c_last_name CHAR(30) ,c_email_address CHAR(50) ,ca_suite_number CHAR(10) ,ca_city VARCHAR(60) ,ca_county VARCHAR(30) ,ca_state CHAR(2) ) COMMENT 'TABLE COMMENT' PARTITIONED BY ( ds STRING COMMENT 'Partition' ) LIFECYCLE 90 ; INSERT OVERWRITE TABLE dws_customer_info_1 PARTITION (ds = '${bday}') SELECT t02.c_customer_sk ,t02.c_customer_id ,t02.c_first_name ,t02.c_last_name ,t02.c_email_address ,t03.ca_suite_number ,t03.ca_city ,t03.ca_county ,t03.ca_state FROM ( SELECT * FROM ods_mc_tpc_customer_address WHERE ds = '${bday}' ) t03 JOIN ( SELECT * FROM ods_mc_tpc_customer WHERE ds = '${bday}' ) t02 ON t03.ca_address_sk = t02.c_current_addr_sk ;dws_customer_info_2
For the scheduling parameter, Parameter Name is
bday, and Parameter Value is$[yyyymmdd].CREATE TABLE IF NOT EXISTS dws_customer_info_2 ( c_customer_sk BIGINT NOT NULL ,c_customer_id CHAR(16) NOT NULL ,c_first_name CHAR(20) ,c_last_name CHAR(30) ,c_email_address CHAR(50) ,ca_suite_number CHAR(10) ,ca_city VARCHAR(60) ,ca_county VARCHAR(30) ,ca_state CHAR(2) ) COMMENT 'TABLE COMMENT' PARTITIONED BY ( ds STRING COMMENT 'Partition' ) LIFECYCLE 90 ; INSERT OVERWRITE TABLE dws_customer_info_2 PARTITION (ds = '${bday}') SELECT t02.c_customer_sk ,t02.c_customer_id ,t02.c_first_name ,t02.c_last_name ,t02.c_email_address ,t03.ca_suite_number ,t03.ca_city ,t03.ca_county ,t03.ca_state FROM ( SELECT * FROM ods_mc_tpc_customer_address WHERE ds = '${bday}' ) t03 JOIN ( SELECT * FROM ods_mc_tpc_customer WHERE ds = '${bday}' ) t02 ON t03.ca_address_sk = t02.c_current_addr_sk ; -
Click Save and Commit. After the task is published to the production environment, you can view the auto-triggered task workflow in the Operation Center as follows:
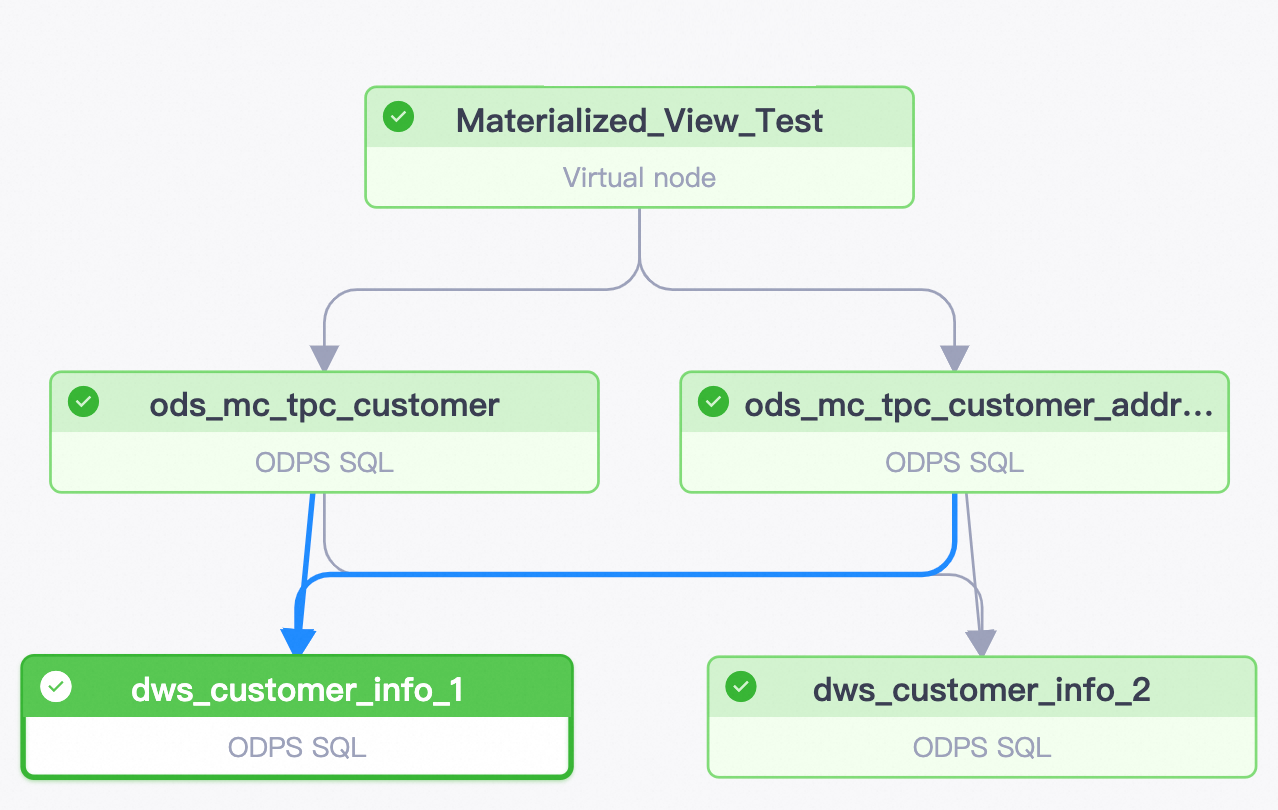
Enable materialized views
Enable the intelligent analysis feature on materialized views in MaxCompute. For more information, see Materialized view recommendations and management.
Enable the intelligent recommendation feature on materialized views in DataWorks Data Governance Center. For more information, see Step 1: Enable or disable the intelligent recommendation feature on materialized views.
-
After the auto triggered tasks are run for more than three days, you can view the recommendations for creating materialized views in DataWorks Data Governance Center.
NoteThe test data used in this example is 10-TB TPC-DS datasets, which meet the requirements for generating materialized view recommendations. If you do not view the generated recommendations on the Materialized View Recommendation tab, check whether your data meets the requirements.
An auto triggered task is run for at least three consecutive days.
The number of rows of input data in a public subquery is greater than 1,000,000.
The public subquery contains operators that are related to data reorganization, such as join or aggregation operators.
Create a materialized view
-
On the Materialized View Recommendation page, click Create Materialized View in the Actions column of a recommendation. For more information, see Step 3: Create a materialized view.
NoteBy default, Create Materialized View Refresh Node and Add Materialized View Refresh Node as Ancestor Node are already selected and do not require changes.
-
Click Create and Execute. You can view the creation details on the Materialized View Recommendation tab.
After the materialized view is created, you can see that the materialized view is used in scheduling nodes when the nodes are run for the second time. For duplicate subqueries, the nodes query data from the related materialized view refresh node.

References
For information about how to create a materialized view in MaxCompute, see Materialized view operations.
For information about how to enable the intelligent analysis feature on materialized views in MaxCompute, see Materialized view recommendations and management.