DataWorks provides the for-each node to iterate over a result set from an assignment node. You can also customize the workflow inside the for-each node. This topic uses an example where a for-each node iterates twice over the output of an assignment node and prints the current loop count in each iteration. This demonstrates its logic and configuration.
Prerequisites
Before you configure the node, ensure you understand its logic to prevent errors. For more information, see How for-each nodes work.
Procedure
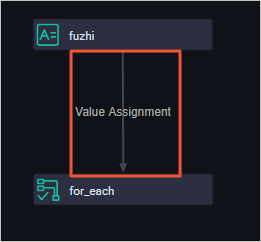
The for-each node is typically used with an assignment node. The general procedure is as follows.
-
Set node dependencies
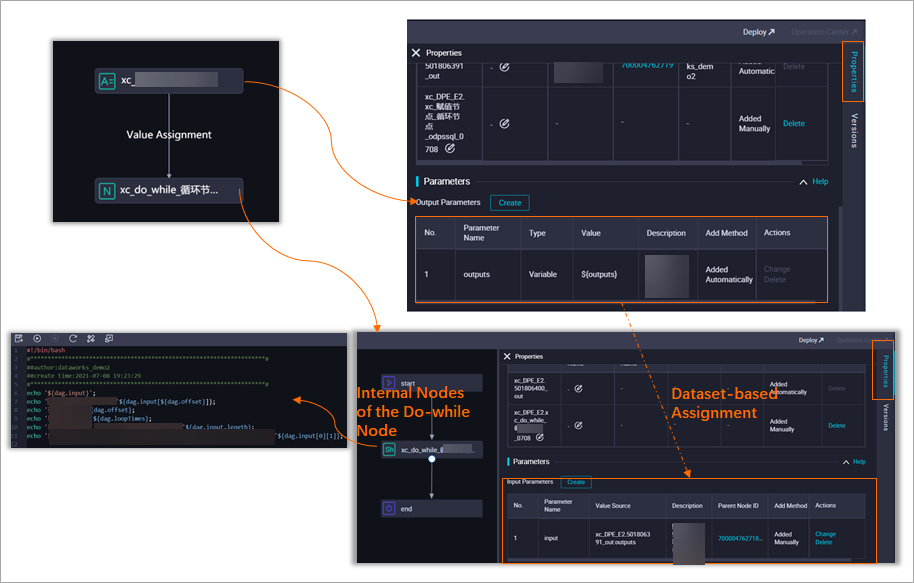
A for-each node must depend on an assignment node. For configuration details, see Create and configure a workflow.
-
Pass the result set
The built-in Parameters output parameter outputs of the assignment node must be used as the Parameters input parameter of the for-each node. For configuration details, see Configure an Assignment Node.
-
Retrieve parameters in inner nodes
Customize the inner workflow of the for-each node based on your business requirements. In the inner nodes, use built-in variables to retrieve parameter values and run the loop task. For more information about the built-in variables, see Built-in variables. For configuration details, see Configure a for-each node.
Create and configure a workflow
Create a workflow where an assignment node is the upstream node and a for-each node is the downstream node.
Go to the DataStudio page.
Log on to the DataWorks console. In the top navigation bar, select the desired region. In the left-side navigation pane, choose . On the page that appears, select the desired workspace from the drop-down list and click Go to Data Development.
-
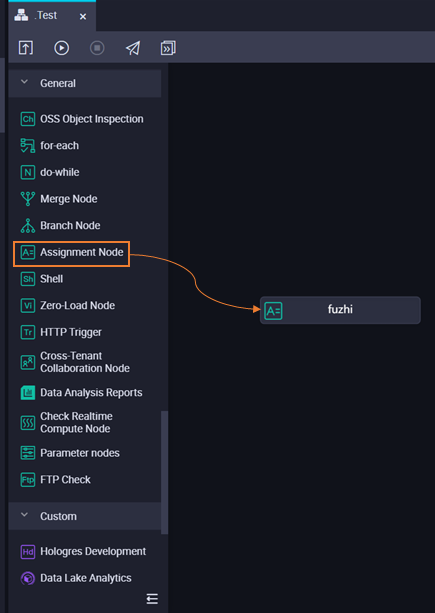
Create a for-each node.
-
Hover over the
 icon and click .
Alternatively, find the target workflow, right-click General, and select .
-
In the Create Node dialog box, set the node name and path.
-
Click OK.
-
-
Create an assignment node.
-
Double-click the workflow to open its configuration page. Click New Node and drag to the canvas on the right.
For more information about assignment nodes, see Assignment node.
-
In the Create Node dialog box, set the node name and path. By default, the node is created in the current workflow directory.
-
Click OK.
-
-
Drag a line from the assignment node to the for-each node to set their dependency.
Configure an assignment node
-
Double-click the assignment node to open its configuration page.
-
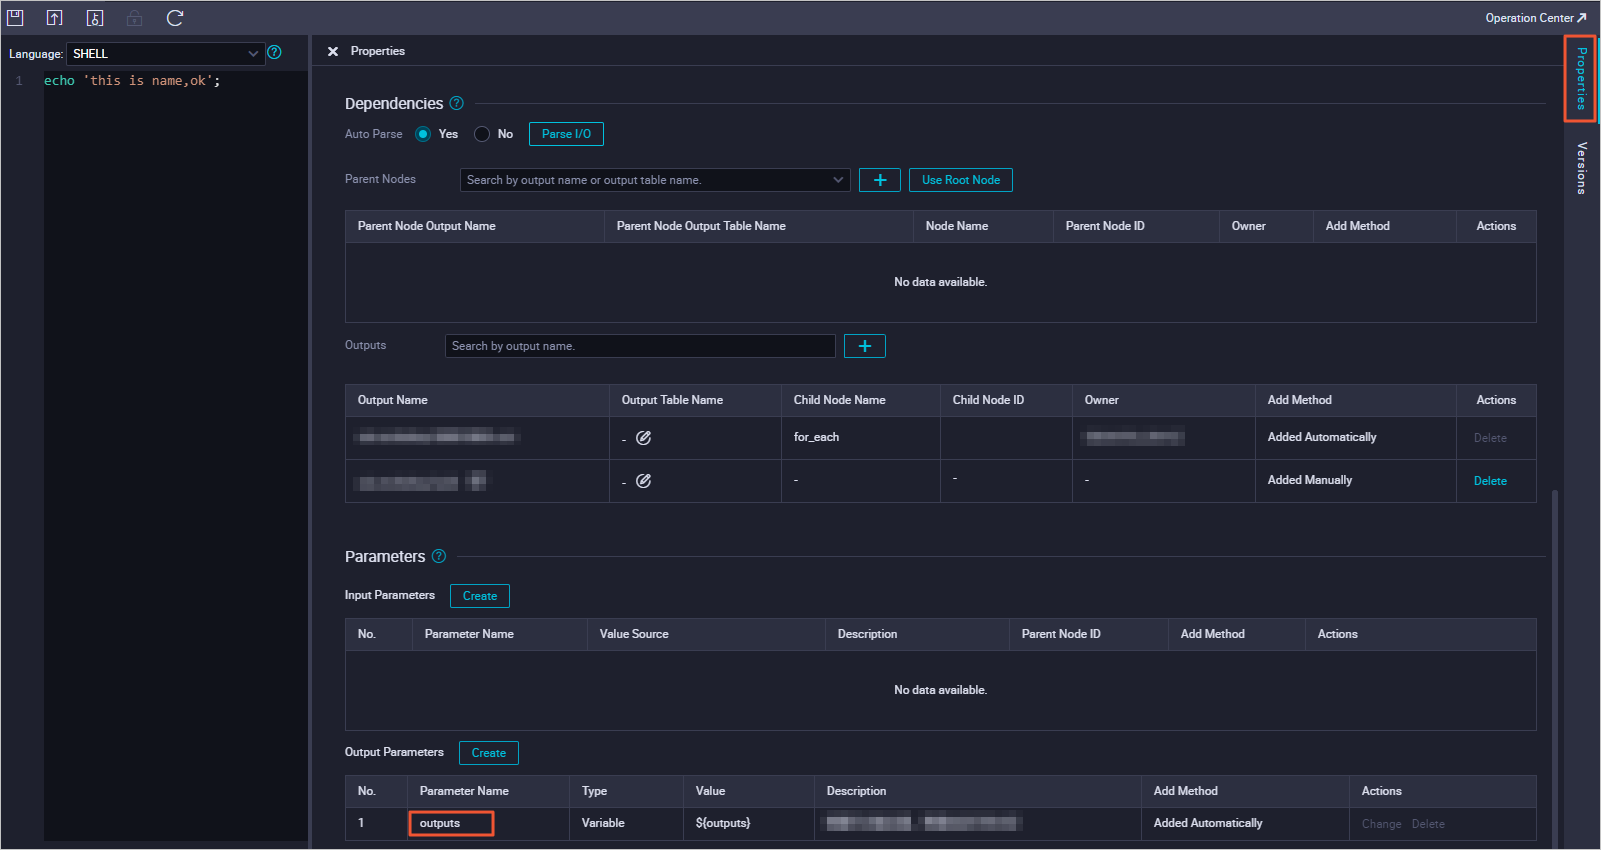
From the Language drop-down list, select Shell.
-
On the node configuration page, enter the following statement:
echo 'this is name,ok'; -
In the right-side pane, click Scheduling. In the .
-
Click the
 Save icon in the toolbar.
 -
Click the
Commit icon in the toolbar.In the Submission dialog box, enter a Change Description and choose whether to request a code review.
Important-
You must set the Rerun attribute and Parent Nodes properties for the node before you can commit it.
-
A code review helps control code quality and prevents errors caused by deploying incorrect code to the production environment without review. If you enable code review, the node can be deployed only after reviewers approve it. For more information, see Code review.
If your workspace is in standard mode, you must click Deploy in the upper-right corner of the node configuration page to deploy the task to the production environment after you commit it. For more information, see Deploy tasks.
-
Configure a for-each node
-
Double-click the for-each node to open its configuration page. By default, it contains a start node, a Shell node, and an end node.
You can replace the Shell node with another node type:
-
If you want to use a Shell node, you can configure it directly.
-
To use another node type, first delete the default Shell node and then create the node you need.
This example uses a Shell node.
-
-
Edit the Shell node.
-
Double-click the Shell node to open its configuration page.
-
Enter the following code:
echo ${dag.loopTimes} # Print the current loop count.Note-
The logic of the start and end nodes is fixed and cannot be edited.
-
After you modify the code in the Shell node, you must save your changes. DataWorks does not prompt you to save the changes when you commit the node. If you do not save, your changes will not take effect.
The for-each node supports the following four built-in variables:
-
${dag.foreach.current}: The current data row being iterated over.
-
${dag.loopDataArray}: The input dataset.
-
${dag.offset}: The offset.
-
${dag.loopTimes}: The current loop count. The value is ${dag.offset}+1.
For more information, see Built-in variables and Examples of built-in variable values.
-
-
-
Configure the for-each node.
-
On the configuration page of the for-each node, click Scheduling in the right-side pane.
-
In the , click Edit next to the default parameter name loopDataArray.
-
From the Value Source drop-down list, select the
outputsparameter of the upstream assignment node and click Save.NoteAfter you add the dependency on the upstream assignment node on the Properties tab, you must manually specify its value source. Otherwise, an error occurs when you commit the node.
-
-
Click the
Save icon in the toolbar to save the for-each node. -
Click the
Commit icon in the toolbar.ImportantYou must set the Rerun attribute and Parent Nodes properties for the node before you can commit it.
In the Submission dialog box, select the nodes that you want to commit and click Determine.
If your workspace is in standard mode, click Deploy in the upper-right corner after you successfully commit the node. For more information, see Deploy tasks.

Test the node and view the results
-
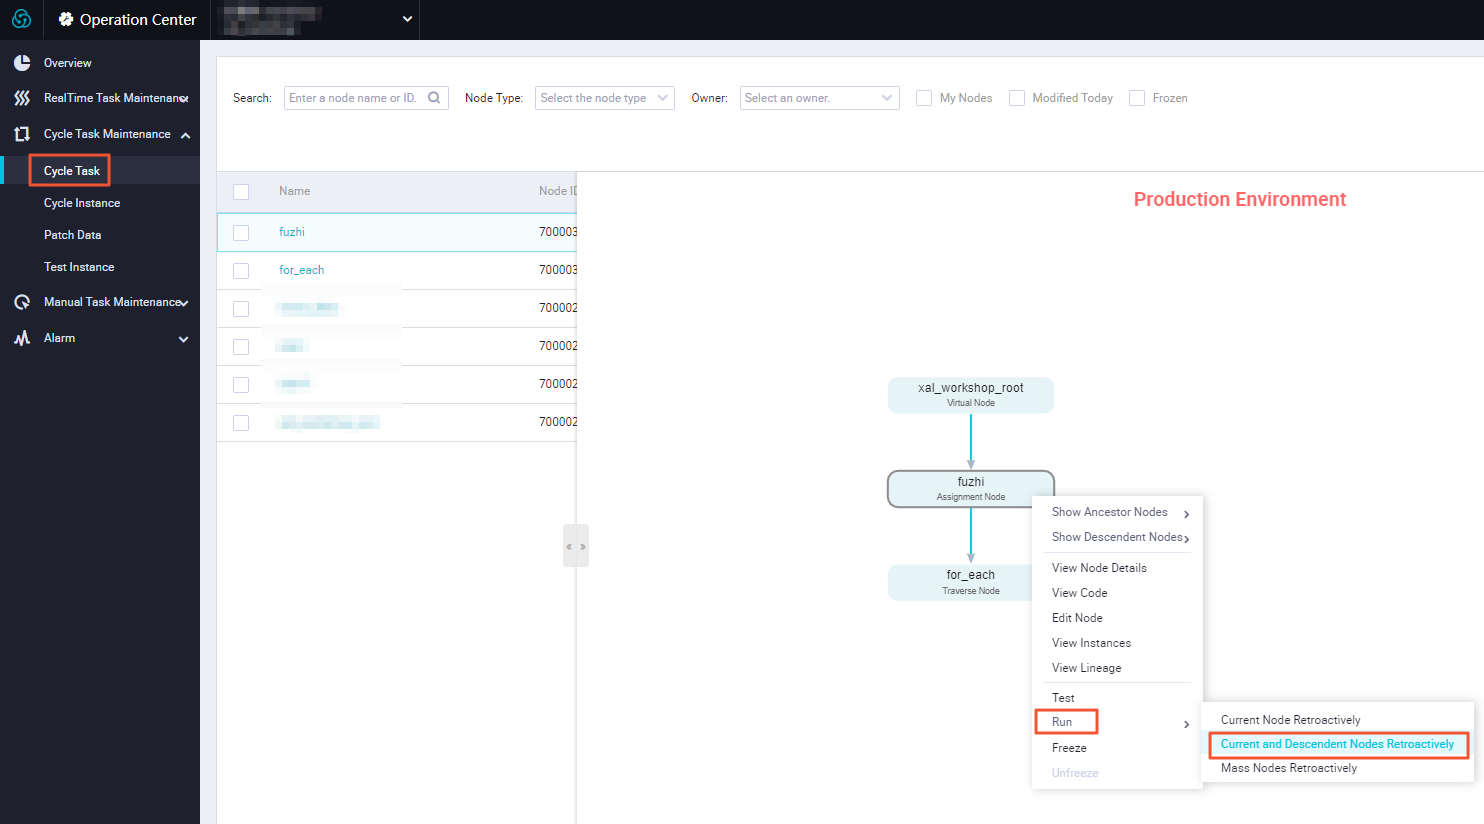
In the upper-right corner of the page, click O&M Personnel to go to Operation Center.
-
In the navigation pane on the left, click .
-
Find the node. In the DAG on the right, right-click the assignment node and select .
-
Refresh the Data Backfill Instance page. After the data backfill instance runs successfully, click View DAG next to the instance.
-
Right-click the assignment node and select View Runtime Log to check the result.
-
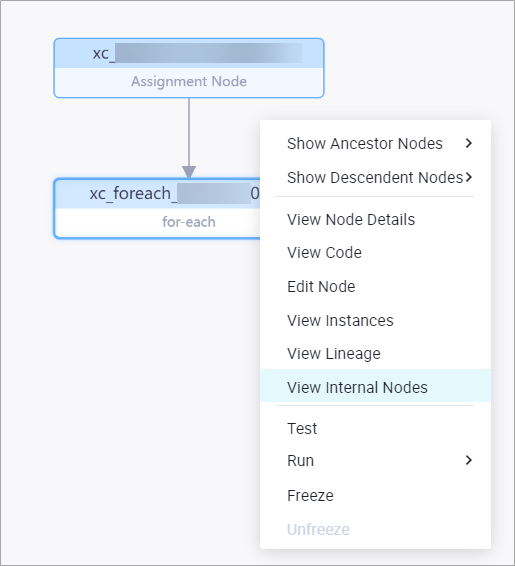
On the Data Backfill Instance page, right-click the for-each node and select View Inner Nodes.
-
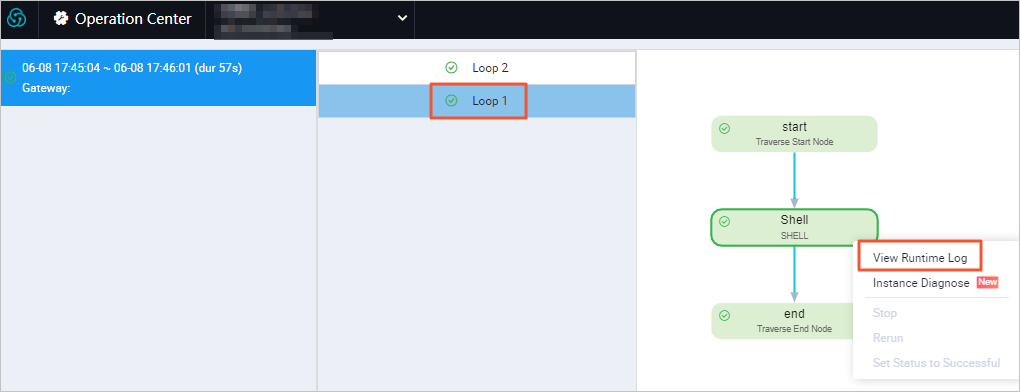
On the inner nodes page, click Loop 1 on the left. Then, right-click the Shell node and select View Runtime Log.
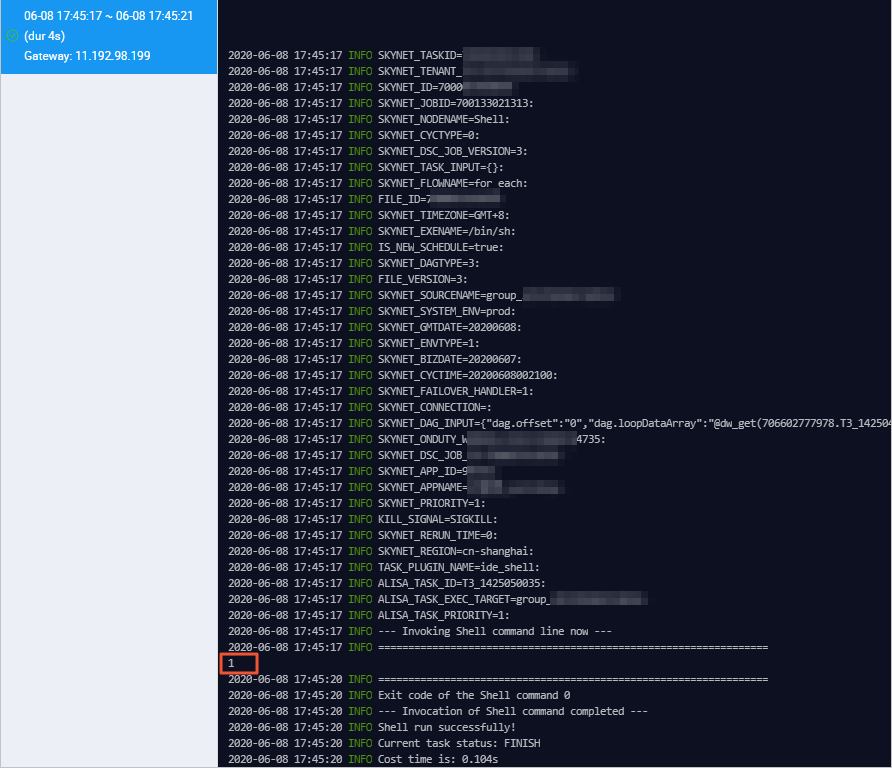
On the runtime log page, check the log of the Shell node for the first iteration.
-
Similarly, check the log of the Shell node for the second iteration.