This topic explains what a merge node is, how to create and configure it, and provides a practical example of its scheduling properties and runtime behavior.
Background information
A merge node is a type of logical control node in DataStudio. It merges the run statuses of upstream nodes to resolve dependency and triggering issues for the downstream nodes of a branch node.
Currently, a merge node can only be set to have a Successful run status. This allows downstream nodes to use the merge node as a single, reliable dependency.
For example, a branch node C has two mutually exclusive branches, C1 and C2. Each branch uses different logic to write to the same MaxCompute table. If a downstream node B depends on the output of this table, you must use a merge node J to consolidate the branches first, and then set J as the upstream dependency for B. If you set B to depend directly on both C1 and C2, one of them will always have an instance status of Branch Not Run because its branch condition is not met. Consequently, B will also be set to Branch Not Run and enter a dry-run state, meaning it will not execute. The same will happen to all subsequent downstream nodes.
Limitations
The merge node feature is available only in DataWorks Standard Edition and later. To purchase or upgrade your DataWorks edition, see Feature details for each DataWorks edition.
Create a merge node
-
Go to the DataStudio page.
Log on to the DataWorks console. In the target region, click in the left-side navigation pane. Select a workspace from the drop-down list and click Go to Data Development.
-
Hover over the
 icon, and click .
 -
In the Create Node dialog box, enter a Name for the node and select a Path.
-
Click OK.
Define the merge logic
After you create a merge node, its configuration page opens. Use this page to define the merge logic.
-
Add the upstream branch nodes to be merged. These nodes become the parents of the merge node.
In the Merged Branch area, search for the corresponding parent node by node name, node ID, or node output, and click the
 icon to add it as a branch node.Note
To merge multiple branch nodes, repeat this step for each node.
-
In the MERGE Condition section, configure the merge condition for the branch node.
Configure the merge logic and the required run status for each branch node.
-
The merge logic conditions include:
-
AND: The run status for the current node, which is configured in the Result area, takes effect only if all upstream branch nodes have finished running and meet their configured run statuses.
-
OR: The running state configured for this node in the Result area takes effect only if all upstream nodes are in a final state (i.e., have finished running) and any branch node meets its configured running state.
-
-
The available node run statuses after completion include:
-
Successful: The node ran successfully.
-
Failed: The node failed to run.
-
Branch Not Running: The node is not selected and is in a dry-run state. In this state, the node is marked as successful, but the task is not actually executed.
NoteThis status is effective only when the upstream node is a branch node.
-
-
-
In the Result section, configure the runtime status of the current node.
NoteYou can only set the running status of the current node to Successful.
For example:
-
Add branch nodes A and B as the upstream nodes for the current merge node.
-
The running status of Node A is set to Successful, Branch Not Running, or Failed, which means that Node A only needs to complete its run.
-
The run status of Node B is set to Successful and Branch Not Running, which means that the run of Node B is complete and did not fail.
-
The logical operator is set to AND.
Therefore, the Successful run status of the current merge node will take effect only when Node A completes its run and Node B completes its run AND is not Failed.
Click Scheduling Settings on the right side of the node configuration page to configure the scheduling properties for the merge node. For more information, see Configure basic properties.
Merge node example
In a downstream node, after you add a branch node as an upstream node, you can define different branch paths by selecting the corresponding branch node outputs. For example, in the business process shown in the following figure, Branch 1 and Branch 2 are two downstream nodes of a branch node.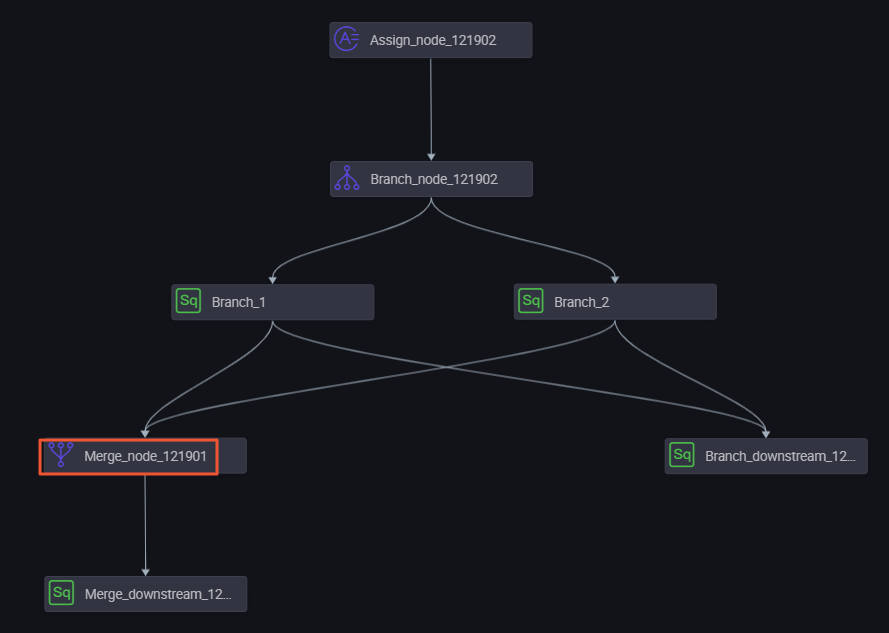
Branch 1 depends on the autotest.fenzhi121902_1 output. In the Dependencies configuration panel for the Branch 1 node, set Auto Parse to Yes and manually add an upstream dependency. Set Parent Node Output to autotest_fenzhi121902_1, which corresponds to the parent node branch_node_121902.
Branch 2 depends on the autotest.fenzhi121902_2 output.
Run results
In the Operational Logs, you can view the runtime status of the downstream nodes of the branch that meet the branch condition and are selected to run.
In the Operational Logs, you can see that downstream nodes of a branch that do not meet the branch conditions and are not selected for execution are marked as skipped.
The downstream node of the merge node runs as expected.