Configure MaxCompute Writer
MaxCompute (formerly known as ODPS) offers a comprehensive data import solution, enabling fast computation of large-scale data.
Prerequisites
Before you configure the MaxCompute Writer node, you must configure a corresponding source or transformation node.
Procedure
The writer does not support data deduplication. If a task is restarted after you reset the offset or after a failover, duplicate data may be written to the destination.
Log on to the DataWorks console. In the target region, click in the left-side navigation pane. Select a workspace from the drop-down list and click Go to Data Development.
Hover over the
 icon and choose .
 Alternatively, expand a scheduled workflow, right-click it, and choose .
In the Create Node dialog box, set Synchronization Method to Single Table (Topic) to Single Table (Topic) ETL, enter a Name, and select a Path.
Click Confirm.
-
In the real-time synchronization node editor, drag to the canvas. Then, connect it to a configured source or transformation node.
-
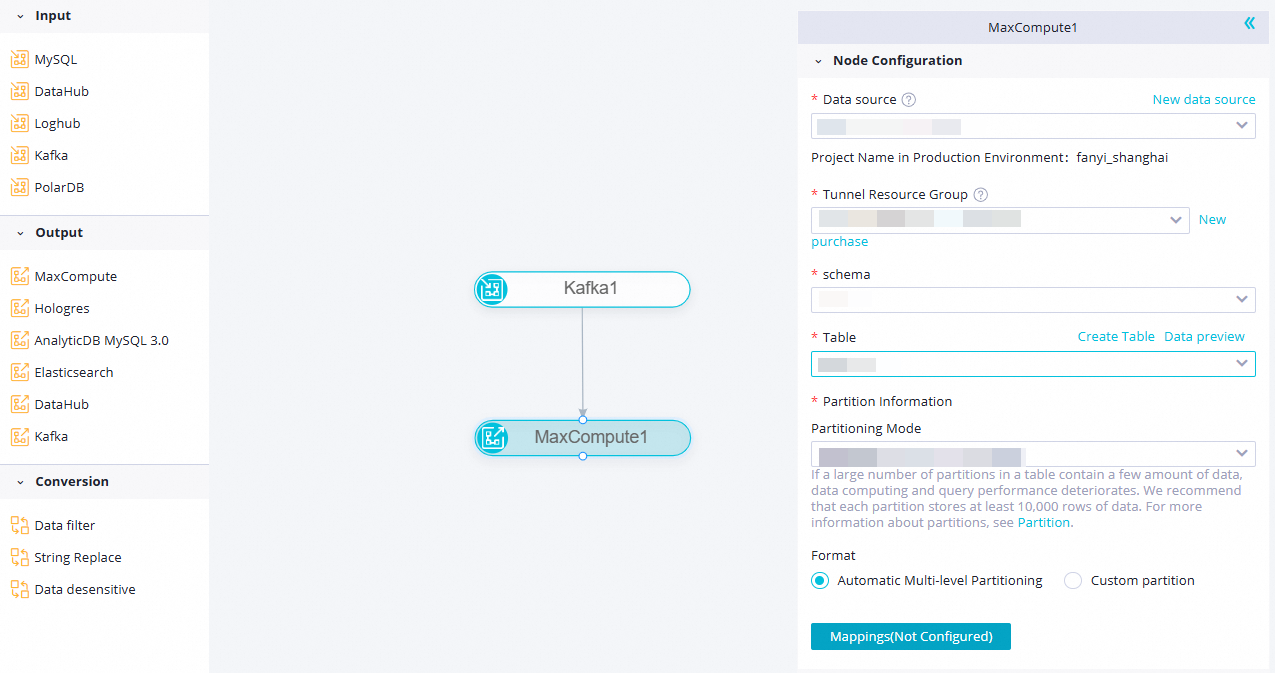
Click the MaxCompute node. In the Node Configuration that appears, configure the parameters.
Parameter
Description
Data Source
Select a configured MaxCompute data source. Only MaxCompute data sources are supported.
If no data source is available, click New data source on the right. This action redirects you to the page, where you can create a data source. For more information, see Configure a MaxCompute data source.
Tunnel Resource Group
The Tunnel quota to use. By default, common transmission resources is selected, which is a free quota from MaxCompute.
For more information about data transmission resources in MaxCompute, see Purchase and use exclusive data transmission resource groups.
NoteIf an exclusive Tunnel quota becomes unavailable due to overdue payments or expiration, the running task automatically switches to common transmission resources.
Schema
Select an existing schema in MaxCompute.
Table
Select the destination table from the current data source.
You can click Create Table with One Click on the right to create a new table, or click Data Preview to confirm your selection.
NoteBefore you create a destination table, connect the writer to a source node and ensure that output fields are defined.
Partition Information
Displays information about the partitions in the MaxCompute table.
Partition Method
The partitioning mode for the destination table. Valid values are Automatic Time Partition and Dynamic Partition based on Field Content. If you select Automatic Time Partition, data is written to partitions based on the _execute_time_ field. For more information, see Fields for real-time synchronization. If you select Dynamic Partition based on Field Content, you must map a source field to a partition field in the destination MaxCompute table to ensure that data is written to the correct partition based on the value of the source field.
Field Mapping
Click Field Mapping to map source fields to destination fields. The task writes data based on this mapping.
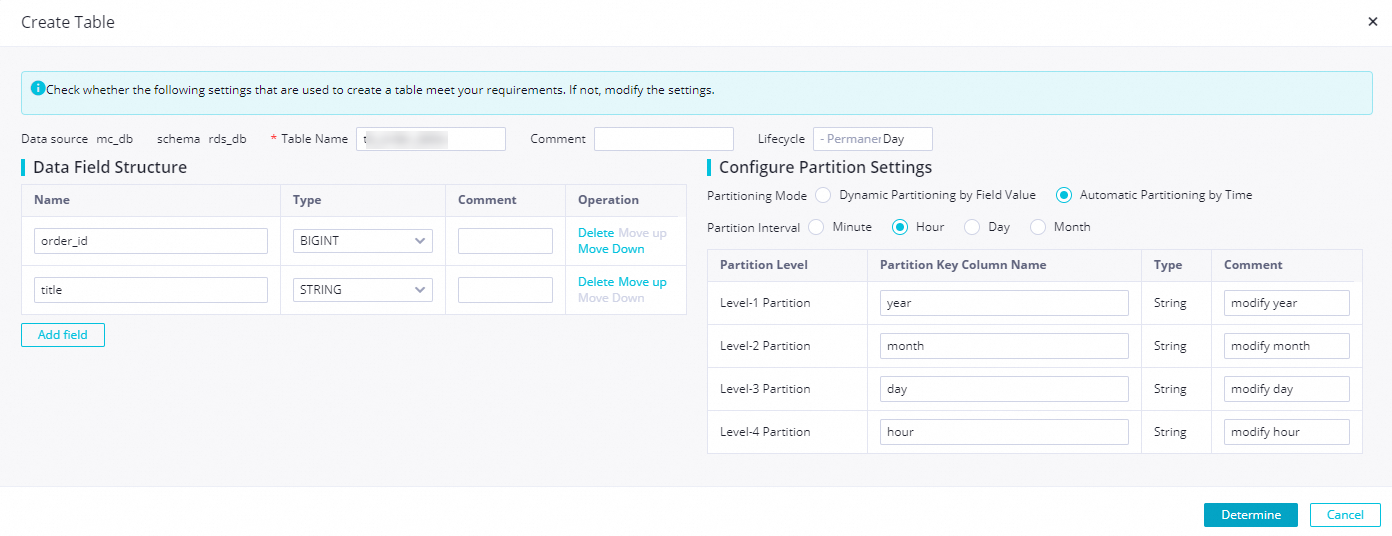
If you need to create a new table, click Create Table with One Click. In the New data table dialog box, configure the parameters.
Parameter
Description
Table Name
The name of the destination MaxCompute table.
Lifecycle
The lifecycle of the destination MaxCompute table, in days. For more information, see Lifecycle.
Data Field Structure
The field structure of the destination MaxCompute table. To add a field, click Add.
Partition Settings
The partition settings for the destination MaxCompute table. The MaxCompute Writer supports two partitioning modes: Automatic Time Partition and Dynamic Partition based on Field Content.
-
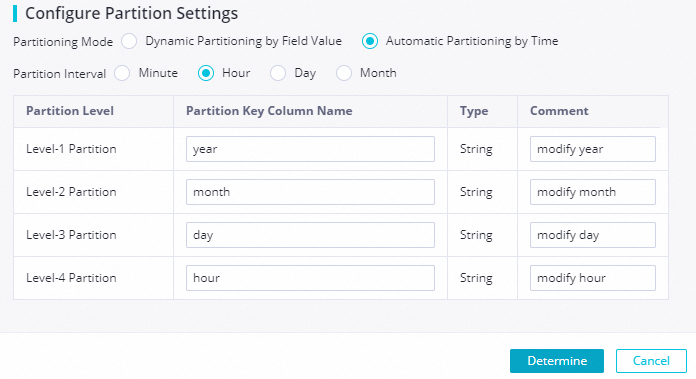
Automatic Time Partition: This mode writes data to partitions based on the value of the _execute_time_ field. For more information, see Fields for real-time synchronization.
 Important
-
You must configure at least two partition levels (month and year). A maximum of five levels are supported: minute, hour, day, month, and year.
-
For more information about MaxCompute tables, see Partitions.
-
-
Dynamic Partition based on Field Content: Maps a source field to a partition field in the destination table. This mode writes data to a specific partition based on the value of the mapped source field.
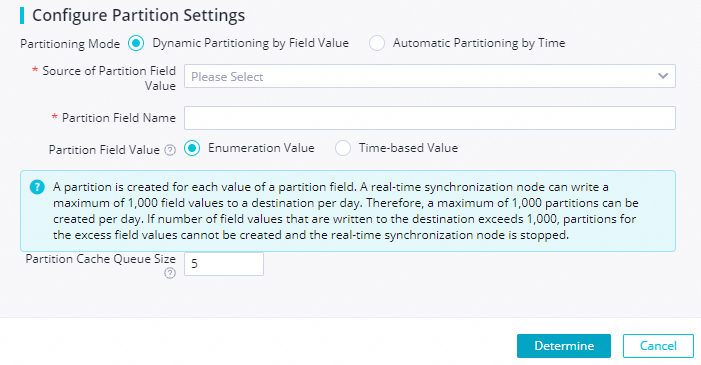 For example, if you map source field A to the partition key, rows with a value of 'aa' in field A are written to the 'aa' partition, and rows with a value of 'bb' are written to the 'bb' partition.
-
-
Click the
 icon in the toolbar.
 icon in the toolbar.