Create a sensitive data identification task
Create a sensitive data identification task and manually correct misidentified results to improve rule accuracy.
Manual correction results appear the next day.
Background
DataWorks lets you manually correct sensitive data misidentified by data identification rules. The following figure illustrates the manual correction workflow.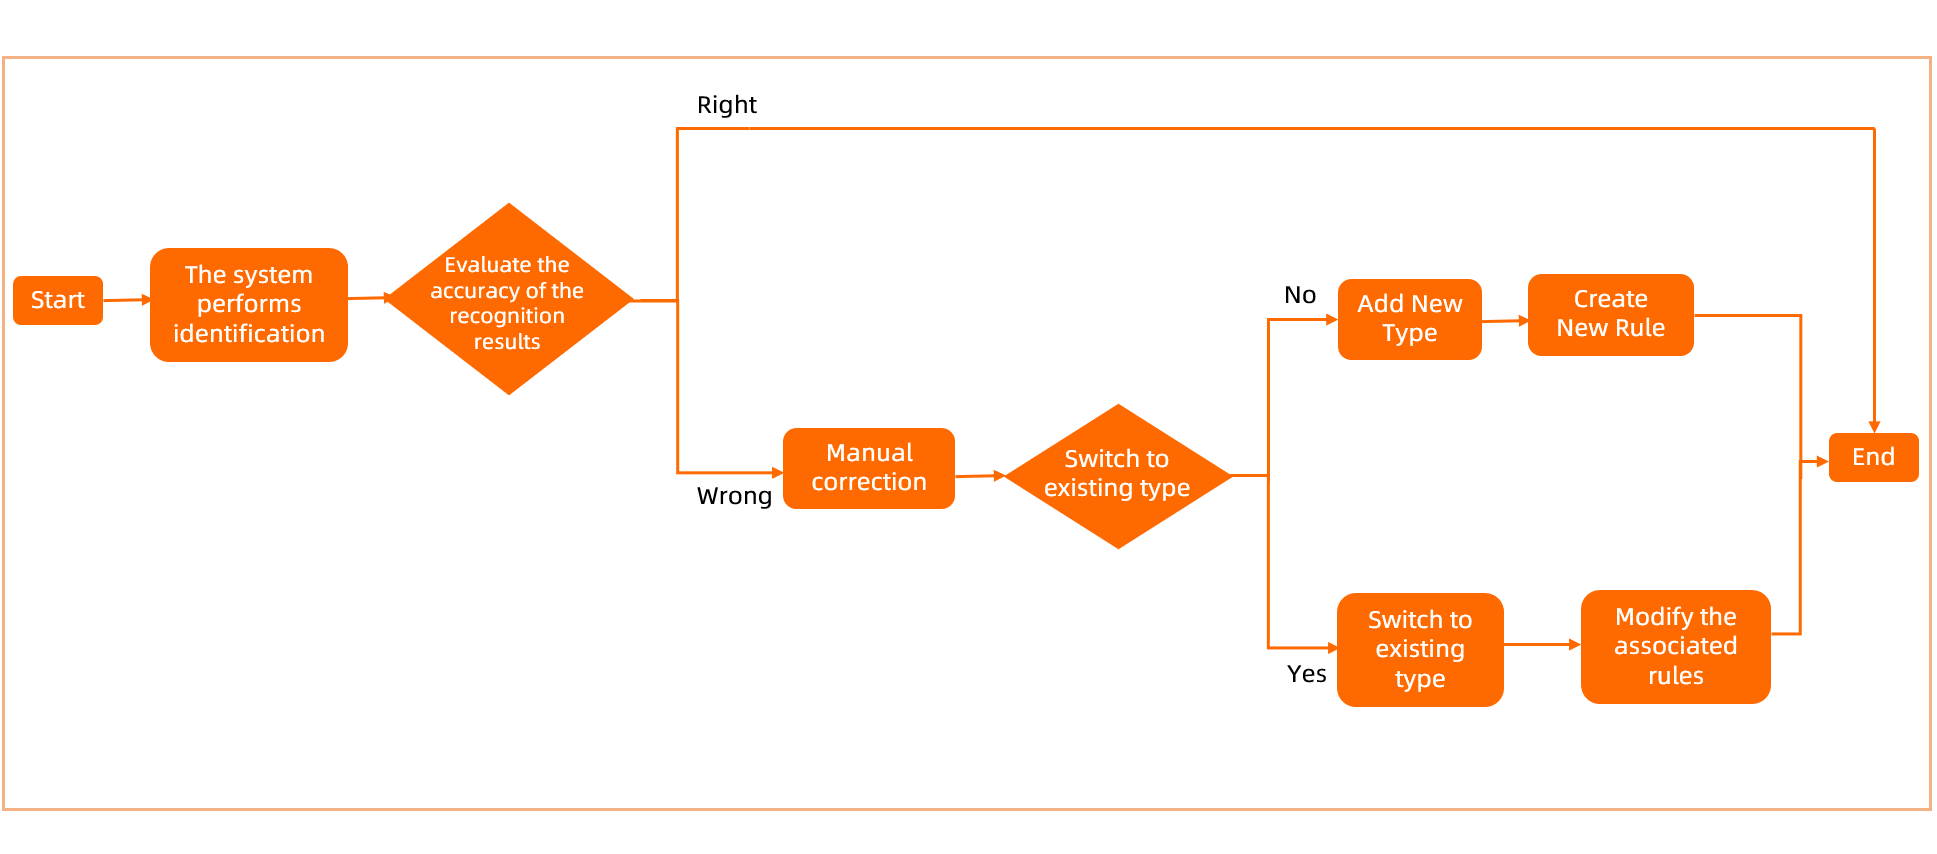
Create an identification task
-
Go to the data identification rule page. For more information, see Go to the data identification rule page.
-
Click the Identify Tasks tab to open the identification task page.
-
Start a sensitive data identification task.
-
Configure a sensitive data identification task.
In the Create Sensitive Data Identification Task dialog box, configure the task type, scan method, and scope. You can create a real-time, scheduled, or manual identification task.
-
Configure a real-time task.
The real-time task configuration includes the following parameters.
Parameter
Description
Identification account
Specify whether to use a main account or a sub-account to sample and scan data. The scope of data available for sampling depends on the selected account's permissions.
NoteIf you use a sub-account for identification, grant it permissions on the MaxCompute workspace.
Real-time identification
Only ODPS supports real-time identification. When ODPS metadata changes (such as adding a table or field, or modifying a field), Data Security Guard automatically scans the changed metadata for sensitive data.
Data Security Guard obtains metadata changes in real time. If a new table or field is added, it may be empty. In such cases, only metadata identification is performed.
-
Configure a scheduled task. The following table describes the parameters.
Parameter
Description
Execution
The task must be enabled manually.
Subsequent identification task scan and update policy
Select one of the following policies:
-
Scan only data affected by rule changes or data that has not been scanned.
-
Rescan all data and overwrite all existing results.
Choose the first option to preserve manual correction results.
Identification account
Specify whether to use a Alibaba Cloud Account or a Sub-account to sample and scan data. The scope of data available for sampling and scanning depends on the selected account's permissions.
NoteIf you use a sub-account for sampling and scanning, grant it permissions on the MaxCompute workspace.
Content identification
Specify whether to enable content identification and metadata identification rules. The task will only apply rules of the selected types.
NoteIf you disable content identification, Data Security Guard does not sample or scan data. This means content identification rules will not apply, but metadata identification rules (based on field names and comments) will still be effective.
Sampling quantity
Set the number of rows to sample for content identification. We recommend a value greater than 100.
This parameter is required if you enable content identification.
Scan frequency and Scan time
Define the scan cycle for the scheduled task.
This parameter applies only when the Task type is set to Scheduled Task.
The Scan frequency can be set to Once a week or Once a day. For weekly scans, you can select any day from Monday to Friday. The time can be set from 0:00 to 23:59.
Scan scope
Configure the scan scope for the sensitive data identification task.
-
Full Backup: Scan all data in the current tenant that the authorized account can access.
-
Partial data: Scan tables in specified workspaces.
Note-
By default, the scope includes all workspaces across all compute engines.
-
You can select specific tables from ODPS, EMR, and Hologres workspaces to scan.
-
A table name can contain
0 to 100characters of any type. If you leave this blank, all tables are scanned. -
The
.*wildcard is supported. For example,.*namematches table names that end withname, andprivate.*matches table names that start withprivate. -
Separate multiple table or field names with commas (,).
-
-
If you select Partial data, you can add multiple workspace or database scopes. The final scan scope is the union of all specified scopes.
-
You must manually select a workspace from the left panel.
-
After you select a workspace, the tables within that workspace or database are displayed on the right. You can select tables manually or select all tables at once. By default, all tables in the selected database are included.
-
Keyword search is supported for workspaces, databases, and tables. To search for tables by keyword, you must first select a workspace to search within.
-
-
-
-
Configure a manual task, which creates a new identification task. The following table describes the parameters.
Parameter
Description
Identification task scan and update policy
Select one of the following policies:
-
Scan only data affected by rule changes or data that has not been scanned.
-
Rescan all data and overwrite all existing results.
Choose the first option to preserve manual correction results.
Identification account
Specify whether to use a Alibaba Cloud Account or a Sub-account to sample and scan data. The scope of data available for sampling and scanning depends on the selected account's permissions.
NoteIf you use a sub-account for sampling and scanning, grant it permissions on the MaxCompute workspace.
Content identification
Specify whether to enable content identification and metadata identification rules. The task will only apply rules of the selected types.
NoteIf you disable content identification, Data Security Guard does not sample or scan data. This means content identification rules will not apply, but metadata identification rules (based on field names and comments) will still be effective.
Sampling quantity
Set the number of rows to sample for content identification. We recommend a value greater than 100.
This parameter is required if you enable content identification.
Scan scope
Configure the scan scope for the sensitive data identification task.
-
Full Backup: Scan all data in the current tenant that the authorized account can access.
-
Partial data: Scan tables in specified workspaces.
Note-
By default, the scope includes all workspaces across all compute engines.
-
You can select specific tables from ODPS, EMR, and Hologres workspaces to scan.
-
A table name can contain
0 to 100characters of any type. If you leave this blank, all tables are scanned. -
The
.*wildcard is supported. For example,.*namematches table names that end withname, andprivate.*matches table names that start withprivate. -
Separate multiple table or field names with commas (,).
-
-
If you select Partial data, you can add multiple workspace or database scopes. The final scan scope is the union of all specified scopes.
-
You must manually select a workspace from the left panel.
-
After you select a workspace, the tables within that workspace or database are displayed on the right. You can select tables manually or select all tables at once. By default, all tables in the selected database are included.
-
Keyword search is supported for workspaces, databases, and tables. To search for tables by keyword, you must first select a workspace to search within.
-
-
-
-
-
Click Enable to start the scan task.
After the task starts, the Node Status changes as follows:
-
Real-time task: The status changes to Enabling.
-
Scheduled task: The status changes to Enabling. At the scheduled time, the platform will automatically run the scan based on your configuration.
-
Manual task: The status displays a progress bar. The scan is complete when the progress reaches 100%. The progress is calculated as follows: (Number of tables identified in this task / Total number of tables to be identified in this task) × 100%.
Note-
Changes to a data identification rule take effect during the next scheduled scan. To apply the changes immediately, create and run a manual identification task.
-
After the scan task is complete, the Node Status is updated to No task.
-
-
Manually correct identification results
-
Go to the data identification rule page. For more information, see Go to the data identification rule page.
-
Click the Identification results tab to go to the identification results page.
-
Manually correct inaccurate identification results.
Actions
Description
Filter by compute engine type
On the identification results page, select a compute engine from the drop-down list to filter the results.
NoteYou can currently correct sensitive field identification results in ODPS, EMR, CDH_HIVE, and Hologres engines.
Filter
Use the filters to find specific identification results.
You can filter by Workspace, Table Name, and Field Name. You can also click Expand to show more filter conditions, such as Category, Sensitivity level, and Sensitive field type.
-
Category: The classification information from the default classification and sensitivity level template of the current tenant. For more information, see Configure sensitive data classification and sensitivity levels.
-
Sensitivity level: The sensitivity level information from the default classification and sensitivity level template of the current tenant.
Correct a single result
The identification results list is displayed. Click Display Field Settings to select the columns to display. By default, the list shows Workspace, Table Name, Field Name, Category, Sensitivity level, Sensitive field type, Manually Corrected, and Last Updated At.
For a field whose sensitive field type is incorrectly identified, click the drop-down list in the Sensitive Field Type column on the right. The list displays the Yes sensitive field types from the default classification and sensitivity level template for your tenant. You can then check whether an existing sensitive field type meets your needs:
-
If a suitable type exists: Select it from the list. To improve future scan accuracy, click the
 icon to go to the Data Recognition Rules page. Modify the rules for both the original and new sensitive field types to ensure the accuracy of future scans.
 -
If no suitable type exists: You need to create a new one. Click the
icon to go to the Data Recognition Rules page. Alternatively, scroll to the bottom of the drop-down list and click Manage sensitive field types. You are redirected to the Data Recognition Rules page, and the Create Sensitive Field Type dialog box appears. You can then add a new sensitive field type and configure its identification rule. For more information, see Configure data identification rules and run identification tasks.
Perform batch correction
To correct multiple fields at once, select them and click the Batch Correct button. In the Batch Correct Identification Results dialog box, select the correct type from the Sensitive field type drop-down list. This list displays all Yes sensitive field types from the default classification and sensitivity level template of the current tenant. Click Save to complete the batch correction.
-
Export identification results
Click Export Identification Results to download a local file containing the results that match the current filter criteria.
-
Export Identification Results: Click
 to automatically export the identification results that match the current filter criteria.Note
You can export a maximum of 100,000 records at a time.