This tutorial uses the ods_user_info_d table from a MySQL data source (containing basic user information) and the user_log.txt file from an HttpFile source (containing website access logs). It syncs both datasets to a private OSS bucket using offline data integration tasks, then accesses the OSS data by creating external tables with Spark SQL. This section focuses on completing the data sync operation.
Section objectives
This section uses Data Integration to sync basic user information from the MySQL data source and website access logs from the HttpFile data source into a private OSS object storage data source.
Source data source type
Source data to sync
Source table schema
Destination data source type
MySQL
Table: ods_user_info_d
Basic user information
uid username
Gender
age_range age segment
Zodiac
OSS
HttpFile
File: user_log.txt
User website access log data
Each line represents one user access record.
$remote_addr - $remote_user [$time_local] "$request" $status $body_bytes_sent"$http_referer" "$http_user_agent" [unknown_content];OSS
After completing the sync tasks, create external tables using EMR Spark SQL to access the data stored in private OSS.
1. Design the business flow
In this step, you combine data integration nodes and EMR Spark SQL nodes to form the data retrieval portion of the user profile analysis workflow. Specifically, you use the ods_raw_log_d_2oss_spark node to obtain log data from an HttpFile data source and store it in a private OSS data source, then use the ods_raw_log_d_spark node to create a simple log foreign table to retrieve user log data from private OSS data storage. Additionally, you use the ods_user_info_d_2oss_spark node to synchronize basic user information from a MySQL data source to a private OSS data source, and then use the ods_user_info_d_spark node to create a foreign table for retrieving basic user information from private OSS data storage.
Log on to the DataWorks console. In the target region, click in the left-side navigation pane. Select a workspace from the drop-down list and click Go to Data Development.
Design the business flow
Create a business flow.
Data development requires a business flow to use the appropriate development components. Before creating nodes, create a business flow first. For details, see Create a business flow.
Name the business flow:
User Profile Analysis_Spark.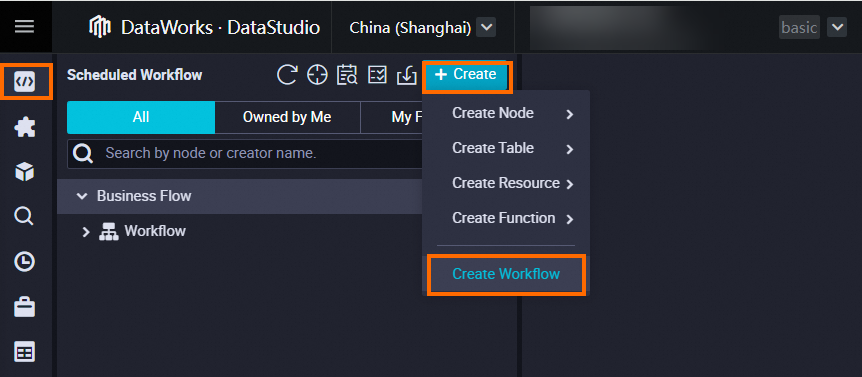
Design the business flow.
After creating the business flow, its canvas opens automatically. Follow the instructions in Business flow design. On the canvas, click New Node. Drag node components onto the canvas and connect them with lines to define upstream and downstream dependencies for the data sync phase.

In this tutorial, virtual nodes and sync nodes have no lineage relationship. Therefore, set node dependencies by drawing lines on the business flow canvas. For more information about dependency configuration methods, see Scheduling dependency configuration guide. The following table lists each node’s type, name, and purpose.
Node category
Node type
Node name
Node purpose
General
 virtual node
workshop_start_sparkManages the entire user profile analysis workflow—for example, by controlling when the workflow starts. In complex workflows, it clarifies data forwarding paths. This is a dry-run task and requires no code editing.
Data Integration
 Offline sync
ods_raw_log_d_2oss_sparkSyncs user website access records from the HttpFile data source to a private OSS data source using offline sync, making the data available for later Spark SQL processing.
Data Integration
 Offline sync
ods_user_info_d_2oss_sparkSyncs basic user information from the MySQL data source to a private OSS data source using offline sync, making the data available for later Spark SQL processing.
EMR
 EMR Spark SQL
ods_raw_log_d_sparkCreates the table
ods_raw_log_d_sparkin an EMR Spark SQL node and uses this external table to access user website access records stored in private OSS.EMR
EMR Spark SQLods_user_info_d_sparkCreates the table
ods_user_info_d_sparkin an EMR Spark SQL node and uses this external table to access basic user information stored in private OSS.
Configure scheduling logic
In this example, the zero load node workshop_start_Spark triggers the entire business flow to run daily at 00:30. The following table shows key scheduling settings for this zero load node. Leave other node scheduling settings unchanged. For implementation details, see Advanced time attribute configuration. For general scheduling configuration guidance, see Overview of task scheduling attribute configuration.
Scheduling configuration | Example | Description |
Scheduling time configuration | In the Time Attributes panel, set Scheduling Time to 00:30, Instance Generation Method to T+1 (generated the next day), Scheduling Type to Normal Scheduling, Rerun Attribute to Rerunnable after success or failure, and Effective Date to Permanent. Keep all other parameters at their defaults. | Setting the scheduling time to 00:30 causes the zero load node to trigger the current business flow daily at 00:30. |
Scheduling dependency configuration | In the Scheduling Dependency panel, under Upstream Nodes, check the Use Workspace Root Node check box. The system automatically adds the workspace root node as an upstream dependency. | Because the zero load node |
All nodes in DataWorks need to depend on ancestor nodes, and all tasks in the data synchronization phase depend on the zero load node workshop_start_spark, which triggers execution of the data synchronization workflow through the workshop_start_spark node.
2. Build the sync pipeline
After configuring the business flow, double-click the ods_user_info_d_2oss_spark and ods_raw_log_d_2oss_spark Data Integration nodes. Configure sync tasks to move user data and user logs to private OSS. Then, use the ods_raw_log_d_spark and ods_user_info_d_spark nodes with Spark SQL code to create external tables that access the OSS-stored data.
Sync user data and logs to OSS data source
Use Data Integration to sync the provided user data and user logs to a directory in your private OSS object storage Bucket.
Configure user log sync to OSS
Use an offline data integration task to fetch user log data from the platform’s HttpFile data source and sync it to a private OSS data source.
Synchronize log information from the HttpFile data source to the self-managed OSS.
On the DataStudio page, double-click the ods_raw_log_d_2oss_spark node to open its configuration page.
-
Configure the synchronization network connection.
After you complete the following network and resource configuration, click The next Step and complete the connectivity test as prompted.
Parameter
Description
Data source
-
Source: HttpFile.
-
Data source name: user_behavior_analysis_httpfile.
My Resource Group
Select the purchased serverless resource group.
Data going
-
Destination: OSS.
-
Data source name: Select the private OSS data source created earlier. In this example, select test_g.
-
-
Configure the synchronization task.
Parameter
Description
Data source
-
File Path: /user_log.txt.
-
File Type: Select text.
-
Field Delimiter: Enter | as the column delimiter.
-
Compression Format: Options include None, Gzip, Bzip2, and Zip. Select None.
-
Skip Header: Select No.
Data going
-
File Type: Select text.
-
Object Name (Path Included): Enter the path based on your self-managed OSS directory. In this example, enter ods_raw_log_d/log_${bizdate}/log_${bizdate}.txt. In this path, ods_raw_log_d is the directory name you created, and $bizdate represents the date of the previous day.
-
Field Delimiter: Enter | as the column delimiter.
-
Scheduling settings.
On the configuration page, click Scheduling Configuration on the right to open the Scheduling Configuration panel. Configure scheduling and node information as follows.
NoteDataWorks provides scheduling parameters. These let you write daily data to different OSS paths and files, naming directories and files by business date.
In practice, you can use the
${variable_name}format in the File name (with path) field to define path variables. Then, assign scheduling parameter values to these variables in the scheduling configuration panel. This dynamically generates destination paths and filenames during scheduling.Configuration item
Configuration content
Scheduling Parameters
In the Scheduling Parameters section, click Add Parameter and add:
Parameter name:
bizdateParameter value:
$[yyyymmdd-1]
For details, see Configure scheduling parameters.
Scheduling Dependency
In Scheduling Dependency, confirm that the output table is listed as this node’s output.
Format:
workspacename.nodename.For details, see Configure scheduling dependency.
After the configuration is complete, click the
icon in the toolbar to save the configuration.
Configure user data sync to OSS
Use an offline data integration task to fetch user data from the platform’s MySQL data source and sync it to a private OSS data source.
On the DataStudio page, double-click the ods_user_info_d_2oss_spark node to open its configuration page.
-
Configure the synchronization network connection.
After you complete the following network and resource configuration, click The next Step and complete the connectivity test as prompted.
Parameter
Description
Data source
-
Source: MySQL.
-
Data source name: user_behavior_analysis_mysql.
My Resource Group
Select the purchased serverless resource group.
Data going
-
Destination: OSS.
-
Data source name: Select the private OSS data source created earlier. In this example, select test_g.
-
-
Configure the synchronization task.
Parameter
Description
Data source
-
Table: Select ods_user_info_d from the data source.
-
Shard Key: We recommend that you use a primary key or an indexed column as the split key. Only integer columns are supported. Set the split key to uid.
Data going
-
File Type: Select text.
-
Object Name (Path Included): Enter the path based on your self-managed OSS directory. In this example, enter ods_user_info_d/user_${bizdate}/user_${bizdate}.txt. In this path, ods_user_info_d is the directory name you created, and $bizdate represents the date of the previous day.
-
Field Delimiter: Enter | as the column delimiter.
-
Scheduling settings
On the configuration page, click Scheduling Configuration on the right to open the Scheduling Configuration panel. Configure scheduling and node information as follows.
NoteDataWorks provides scheduling parameters. These let you write daily data to different OSS paths and files, naming directories and files by business date.
In practice, you can use the
${variable_name}format in the File name (with path) field to define path variables. Then, assign scheduling parameter values to these variables in the scheduling configuration panel. This dynamically generates destination paths and filenames during scheduling.Configuration item
Configuration content
Illustration
Scheduling Parameters
In the Scheduling Parameters section, click Add Parameter and add:
Parameter name:
bizdateParameter value:
$[yyyymmdd-1]
For details, see Configure scheduling parameters.
Set the node variable with parameter name
bizdateand parameter value$[yyyymmdd-1].Scheduling Dependency
In Scheduling Dependency, confirm that the output table is listed as this node’s output.
Format:
workspacename.nodename.For details, see Configure scheduling dependency.
This node’s output includes two entries:
User_portraits.520230740_out(added by default) andUser_portraits.ods_user_info_d_2oss_spark(added manually). Both follow theworkspacename.nodenameformat.After the configuration is complete, click the
icon in the toolbar.
Create Spark external tables to load OSS data
After syncing data to your private OSS data source using offline integration tasks, create the ods_raw_log_d_spark and ods_user_info_d_spark tables using Spark SQL’s create syntax. Use the LOCATION clause to access user information and log files in OSS for subsequent data transformation.
Configure the ods_raw_log_d_spark node
Create the external table ods_raw_log_d_spark using EMR Spark SQL. Use the LOCATION clause to access log data written by the offline data integration task to your private OSS object storage Bucket.
Code configuration.
-- Scenario: The following SQL uses Spark SQL to create the external table ods_raw_log_d_spark via EMR Spark SQL. -- The LOCATION clause accesses log data written by the offline data integration task to the private OSS object storage Bucket. -- A dt partition is added accordingly. -- Note: -- DataWorks provides scheduling parameters to write daily incremental data into the target table’s business-date partition during scheduling. -- In real-world development, define code variables using the ${variable_name} format. -- Assign scheduling parameter values to these variables in the scheduling configuration panel to enable dynamic code input during scheduling. CREATE EXTERNAL TABLE IF NOT EXISTS ods_raw_log_d_spark ( `col` STRING ) PARTITIONED BY ( dt STRING ) LOCATION 'oss://dw-emr-demo/ods_raw_log_d/log_${bizdate}/'; ALTER TABLE ods_raw_log_d_spark ADD IF NOT EXISTS PARTITION (dt = '${bizdate}') LOCATION 'oss://dw-emr-demo/ods_raw_log_d/log_${bizdate}/' ;NoteThe location in the preceding code is an example path that corresponds to the data destination configured in the batch synchronization task. Enter your own file path. In the path, dw-emr-demo is the OSS bucket domain name that you created during environment preparation.
Configure scheduling settings.
Configure task scheduling for the
ods_raw_log_d_sparknode. Use the configured scheduling parameters to fetch the private OSS log file for the corresponding business date and write it into the Spark table’s matching business-date partition.Configuration item
Configuration content
Scheduling Parameters
In the Scheduling Parameters section, click Add Parameter and add:
Parameter name:
bizdateParameter value:
$[yyyymmdd-1]. For details, see Configure scheduling parameters.Scheduling Dependency
In Scheduling Dependency, confirm that the output table is listed as this node’s output.
Format:
workspacename.nodename.For details, see Configure scheduling dependency.
NoteThis section configures the scheduling parameter
${bizdate}and sets its value toT-1. In offline computing scenarios, bizdate refers to the date when business transactions occurred—also known as the business date. For example, if you calculate yesterday’s revenue today, “yesterday” refers to the transaction date, which is the business date.After the configuration is complete, click
to save the node.
Configure the ods_user_info_d_spark node
Create the external table ods_user_info_d_spark using an EMR Spark SQL node. Use the LOCATION clause to access user information written by the offline data integration task to your private OSS object storage Bucket.
Code configuration.
-- Scenario: The following SQL uses Spark SQL in an EMR Spark SQL node to create the external table ods_user_info_d_spark. -- The LOCATION clause accesses user information written by the offline data integration task to the private OSS object storage Bucket. -- Data is written into the corresponding dt partition. -- Note: -- DataWorks provides scheduling parameters to write daily incremental data into the target table’s business-date partition during scheduling. -- In real-world development, define code variables using the ${variable_name} format. -- Assign scheduling parameter values to these variables in the scheduling configuration panel to enable dynamic code input during scheduling. CREATE EXTERNAL TABLE IF NOT EXISTS ods_user_info_d_spark ( `uid` STRING COMMENT 'User ID' ,`gender` STRING COMMENT 'Gender' ,`age_range` STRING COMMENT 'Age range' ,`zodiac` STRING COMMENT 'Zodiac sign' ) PARTITIONED BY ( dt STRING ) ROW FORMAT DELIMITED FIELDS TERMINATED BY'|' STORED AS TEXTFILE LOCATION 'oss://dw-emr-demo/ods_user_info_d/user_${bizdate}/' ; ALTER TABLE ods_user_info_d_spark ADD IF NOT EXISTS PARTITION (dt = '${bizdate}') LOCATION'oss://dw-emr-demo/ods_user_info_d/user_${bizdate}/' ;NoteThe location in the preceding code is an example path that corresponds to the data destination configured in the batch synchronization task. Enter your own file path. In the path, dw-emr-demo is the OSS bucket domain name that you created during environment preparation.
Configure scheduling settings.
Configure task scheduling for the
ods_user_info_d_sparknode. Use the configured scheduling parameters to fetch the private OSS user information file for the corresponding business date and write it into the Spark table’s matching business-date partition.Configuration item
Configuration content
Example
Scheduling Parameters
In the Scheduling Parameters section, click Add Parameter and add:
Parameter name:
bizdateParameter value:
$[yyyymmdd-1]. For details, see Configure scheduling parameters.In the variable configuration interface, enter
bizdateas the parameter name and$[yyyymmdd-1]as the parameter value.Scheduling Dependency
In Scheduling Dependency, confirm that the output table is listed as this node’s output.
Format:
workspacename.nodenameFor details, see Configure scheduling dependency.
In the Output Name section, review the output list to confirm the output table exists. If needed, manually add it by entering the output name and clicking Add.
After the configuration is complete, click
to save the node.
3. Verify synced data
After ensuring all nodes in this section run successfully, go to Ad Hoc Query in the navigation pane on the left. Create a new EMR Spark SQL ad-hoc query. Write SQL to verify that the external tables created by the EMR Spark SQL nodes produce data correctly.
-- Update the partition filter condition to your actual business date.
-- For example, if the task runs on 20240808, the business date is 20240807 (the day before the run date).
SELECT  * FROM  ods_raw_log_d_spark  WHERE dt ='business_date';-- Query ods_raw_log_d_spark table
SELECT * FROM ods_user_info_d_spark WHERE dt ='business_date';-- Query ods_user_info_d_spark tableIn the verification SQL, replace the WHERE condition with "dt = ${bizdate}". In the ad-hoc query task, click  to run with parameters. Assign a value to the SQL placeholder
 ${bizdate} and run the query.
What to do next
You have now completed data synchronization. Continue to the next tutorial to learn how to transform basic user information and website access log data in Spark. For details, see Transform data.