A task flow is a group of one or more orchestrated tasks represented as a directed acyclic graph (DAG). You can create highly complex scheduled tasks with simple drag-and-drop actions.
Prerequisites
Log on to a database instance.
NoteThis step is not required for database instances in Security Collaboration mode. For more information about control modes, see Control Modes.
The database type is supported. For more information, see Supported database types and features.
Design and orchestrate tasks
This section describes how to create a task flow and orchestrate its tasks by adding and arranging one or more task nodes.
Log in to DMS 5.0.
In the top navigation bar, choose .
NoteThe Task Orchestration (Old) feature is deprecated. Use the new Task Orchestration feature instead. For more information about the new feature, see Overview.
On the Task Orchestration page, in the Free orchestration tasks section, click New Task Flow.
In the New Task Flow dialog box, enter a Task Flow Name and Description, and then click OK.
From the task type list on the left, drag a task type to the canvas.
NoteFor more information about task types, see Task type overview.
For example, drag MySQL from the database type list on the left to the canvas on the right. A task node named MySQL-1 is automatically created on the canvas.
To rename a task node, click its Edit icon.
Click the target task node, and in the right-side pane, click the Content tab.
In the SQL editor, enter your SQL statement, such as a
CREATE TABLEstatement. After you finish, click Save.NoteDrag the button on the left of the pane to resize the editor.
If your SQL statement references a variable, click SQL Preview to verify that the statement is valid. For more information about variables, see Configure variables.
When you finish editing, click Validity Check to validate the SQL statement.
Write SQL that is compatible with the selected database type.
Click Save.
(Optional) If you have multiple task nodes, connect them. Hover over a source task node, click the circle, and then drag a line to the destination task node.

You can use this method to connect multiple task nodes and define their execution order. For example, in the following figure, task node
aruns first, followed by task nodeb. Finally, task nodescanderun in parallel.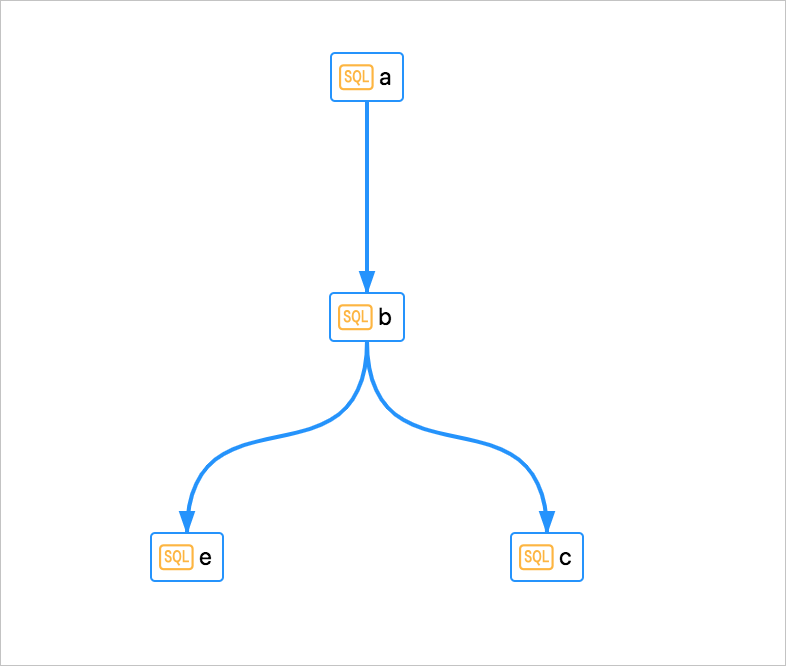
You can now configure a schedule to run the task flow periodically or at a specific time. For more information, see Configure a schedule.
You can also perform a trial run. For more information, see Publish a task flow.
Configure a schedule
You can configure the task flow to run on a monthly, weekly, or daily basis to meet your requirements.
On the task flow page, click a blank area on the canvas.
In the pane on the right, click the Scheduling Settings tab.
Configure the parameters based on the following table.
Table 1. Scheduling cycle parameters
Parameter
Description
Scheduling Type
Select a scheduling type:
Cyclic scheduling
Schedule once
NoteIf you select Schedule once, you only need to configure Specific Point in Time.
Effective Time
Select the time range for the schedule. The default is 1970-01-01 to 9999-01-01, which means the schedule is always active.
Scheduling Cycle
Select the cycle to run the task flow. Options include Hour, Day, Week, and Month.
NoteIf you set Scheduling Cycle to Hour, you must configure the Timed Scheduling parameter.
Timed Scheduling
Specify a Starting Time, Interval, and End Time. This method requires the following three parameters:
Starting Time: The time to start running the task flow.
Interval: The interval, in hours, at which to run the task flow.
End Time: The time to stop running the task flow.
For example, if you set Starting Time to 00:00, Interval to 6 hours, and End Time to 20:59, the system runs the task flow at 00:00, 06:00, 12:00, and 18:00.
Specified Time: Select the specific times of day to run the task flow.
This parameter is displayed only when Scheduling Cycle is set to Hour.
Specified Time
Select the execution time based on your chosen scheduling cycle.
This parameter is displayed only when Scheduling Cycle is set to Week or Month.
Specific Point in Time
Set the specific time to run the task flow.
This parameter is displayed only when Scheduling Cycle is set to Day, Week, or Month.
cron expression
The system automatically generates a cron expression based on your cycle and time settings.
For example, the following configuration runs the task at 5:00 AM on every workday.
Click Save to apply the settings.
Publish the task flow to apply the latest configurations to the production environment. For more information, see Publish a task flow.
Configure basic properties
This section describes how to configure basic properties for a task flow, such as the Task Flow Name, Owner, and Stakeholders.
On the task flow page, click a blank area on the canvas.
In the pane on the right, click the Properties tab.
Configure the parameters based on the following table.
Parameter
Description
Task Flow Name
The name of the task flow.
Owner
Configure the owner. The owner can edit the current task flow and related task configurations, perform a trial run of the task, and receive task run alerts.
NoteTo change the owner of a published task flow, you must republish the task flow after you change the owner. For more information, see Publish a task flow.
Stakeholders
Configure Stakeholders. Stakeholders can view the current task flow and permissions for task-related configurations, and perform trial runs of tasks, but they cannot edit the task flow.
NoteDMS administrators and database administrators (DBAs) have the default permissions of a Stakeholder. They can also edit the Owner of the task flow.
Enable message notification
Specifies whether to send message notifications for the task flow.
NoteTo use this feature, a database administrator (DBA) or an administrator must enable message notifications for task flows in the system settings. For more information, see Manage message notifications.
Click Save to apply the settings.
Publish the task flow to apply the latest configurations to the production environment. For more information, see Publish a task flow.
View operation history
This section describes how to view the change history of a task flow.
On the task flow page, click a blank area on the canvas.
In the pane on the right, click the Operations tab to view all changes made to the task flow.
This list details all changes made to the task flow, such as adding, updating, renaming, or deleting tasks. It includes the operation time, operator, and a description for each change.