Customize table templates
Overview
-
The custom table template feature extracts data from single-page, bordered tables with fixed layouts. Using a drag-and-drop interface, you can configure reference fields, recognition fields, or table areas with a single sample document, requiring no data labeling or model training. This process lets you extract structured data from any document with the same layout. After configuration and tuning, the template can achieve a recognition accuracy of over 85%.
-
Additionally, the toolbox offers tools for managing classifiers and field types. These tools let you automatically classify, route, and accurately recognize data from different layouts using a single API.
Benefits
-
Low cost: Set up a template with just one sample image. No data labeling is required.
-
Low barrier to entry: Define a template using a visual drag-and-drop interface. No secondary development is needed.
-
High efficiency: Configure a template in 3 to 5 minutes.
Use cases
-
Few-shot cold start: Ideal for scenarios where you have a small number of business samples (fewer than 20) and need to quickly launch and validate your service.
-
Fixed data layouts: Suitable for list-based and key-value tables with borders and fixed layouts. The styles, elements, and headers remain consistent, but cell height can be adjusted or the number of rows can be increased. Common applications include insurance claims (such as medical invoices and health checkup reports), bank transfers, annual audits, and business data structuring.
-
Table templates support both key-value and list-based table form data, as well as the recognition of fields outside the table borders.
-
The smallest recognizable unit in a table is a single cell. The service cannot recognize smaller areas.
-
Cross-page tables or fields are not supported.
-
For key-value tables, cell height can be adjusted, but adding, splitting, or deleting cells is not supported.
-
For list-based tables, the header area must remain unchanged. The recognition area can have a variable number of rows, but merged cells are not supported.
Related links
-
OCR Document Self-learning: console
-
Custom table template development guide: Online Debugging, API documentation, SDK documentation
Procedure
Custom table template demo
Create a custom table template
Follow the four steps shown in the figure below to create a template:
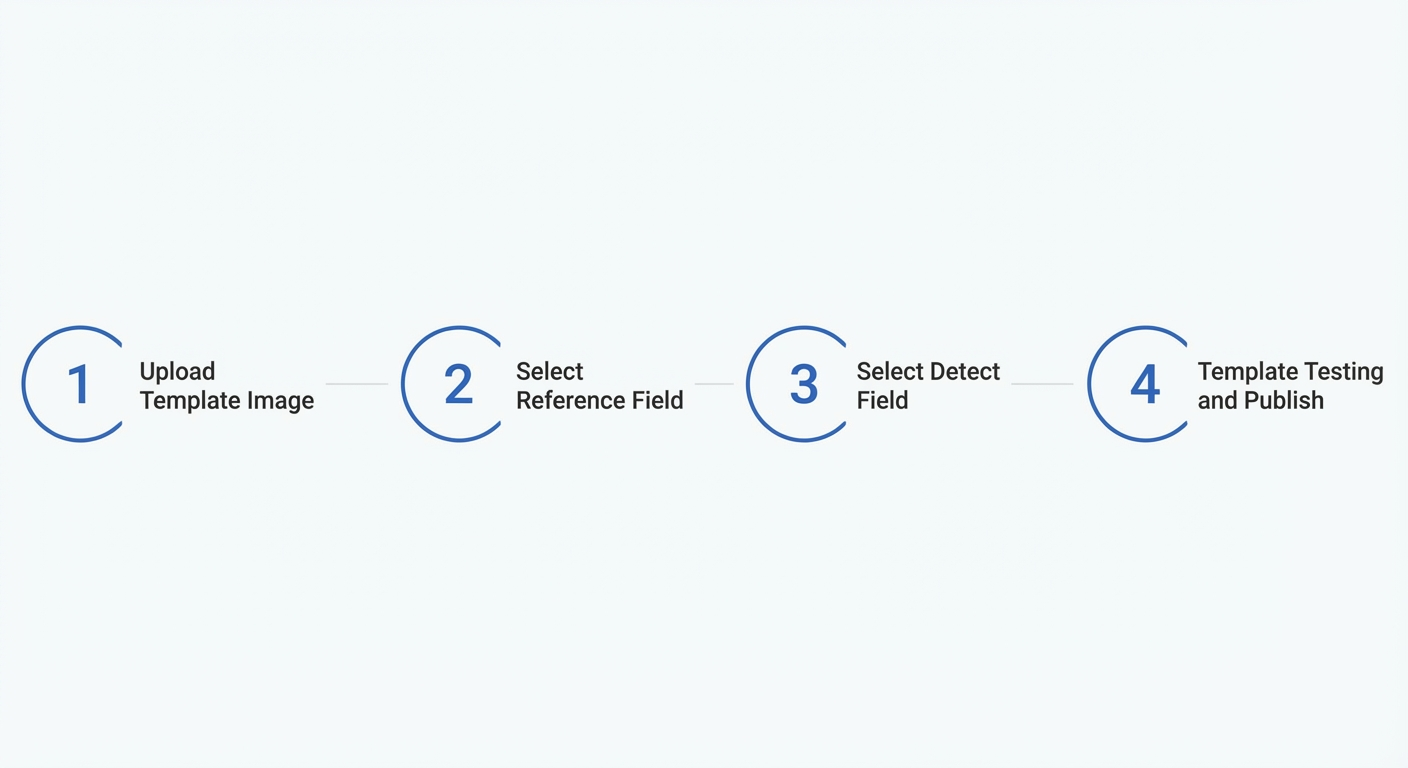
Step 1: Upload a template image
After you create a custom table template project, go to the project details page to create a template. On the Upload Template Image page, click Upload File to upload a clear and properly oriented template image. Then, configure the parameters based on the characteristics of your data.
You can select Chinese or English for Language, printed text or handwritten for Text Type, and enable auto-rotation for image processing. For red stamp processing, you can choose No Processing or Eliminate Red Stamp Impact.
Step 2: Select reference fields
Go to the reference field selection page. From the toolbar on the left, click the Select button to draw boxes around text or table cells in the template image that have fixed content and position, such as table headers.
For example, in a cash flow statement template, you can select header cells such as Prepared by, Item, Notes, 2021, and 2020 as reference fields. After you select the fields, the Reference Fields panel on the right lists all configured reference fields. In a scholarship application form template, you might select fields such as Name, Gender, Date of Birth, Household Registration, and Total Household Members as reference fields. The Reference Fields panel then displays the list of configured fields.
Reference fields
A reference field is an element with fixed content and position across documents of the same layout. We recommend selecting reference fields that are distributed around the edges of the page. Within a table, select the entire cell as a reference field. These fields also affect performance when using a combined classifier.
Step 3: Configure recognition fields
Go to the recognition field configuration page. From the toolbar on the left, use the Select button to draw boxes around the fields and tables to be recognized. For each selected field, you must enter a field name, verify its value, and choose a field type. You can also configure advanced settings to improve accuracy. For list-based tables, you must also define header fields and , providing a column name and verifying the header value for each header.
Recognition fields
A recognition field is an area on the image that you want to recognize. It contains the information you need for your business and is used to generate structured output. Each recognition field has required properties, including a field name, a value, and a field type. Each table has required properties, including header fields, recognition column fields, a column name, a header value, and a field type. Advanced settings are optional.
Field name: The externally exposed name for the recognition field, which corresponds to the name in the API. The field name must be globally unique.
Value
The content of the recognition field, which is automatically recognized and populated after you select the area. If you need to post-process a specific field (for example, normalizing a date, extracting only digits from an amount, or replacing symbols using a regular expression), you can use the field type and advanced settings. These settings are applied when you make an API call.
Column name: The externally exposed name for a column in a list-based table, which corresponds to the name in the API. To set it, click a header field. The column name must be globally unique.
Header value
The content of the header field, which is automatically recognized and populated after you select the area. To improve accuracy, you can apply post-processing rules using field types and advanced settings, which take effect during an API call.
Step 4: Test and release template
After selecting all reference and recognition fields, test and release the template. Click Upload File and upload an image with the same layout to test performance. If the results are satisfactory, click Publish template and start API call.
After the test completes, the test image appears on the left, with the recognition results in a panel on the right. View the extracted data for each field in a key-value table on the Structured information tab, or on the JSON response tab to see the output in JSON format. Use the Re-upload button in the lower-left corner to change the test image.
Template tuning
-
What should I do if the test image does not match the template?
-
Confirm that the uploaded test image and the template image have the same layout.
-
Adjust the selection area for the reference fields or choose different ones to improve template matching accuracy.
-
-
What should I do if the recognition results are incomplete?
-
Adjust the selection area for the recognition fields. To ensure complete extraction, make sure the box covers the largest possible area where the field's text might appear.
-
Check if the table borders in the test image are complete.
-
Check the field type selection. For example, if numbers are being recognized as letters, change the field type of this recognition field.
-
Check the advanced settings for the field.
-
-
What should I do if a recognition field is incorrect?
-
Check the field type selection. For example, changing the type from regular to numeric can improve the recognition accuracy for that field.
-
Check if the selection box for the recognition field aligns closely with the table cell area.
-
Check the advanced settings for the field.
-
-
What should I do if the selection boxes are offset in the test results?
-
Check if the reference fields and recognition fields are selected correctly.
-
Check if the template image meets the requirements.
-
Template management
After publishing the template, go to the project details page to view its overview, which includes the template's basic information, configuration details, and usage data. Published templates can be used via API calls or online.
Note:
-
You must activate the custom table template service to make calls to a published template. Usage data is available on the details dashboard. Both API calls and online use are billable. For details, see the billing overview document.
-
After a template is published, you can use the service via the online testing feature or API calls.