Basic audience features
On the Audience Management page, you can create audience folders and new audiences by uploading files, reading tables from data sources, or performing set operations. The My Audiences tab lets you edit, update, download, remove, and create snapshots for your audiences. The Public Audiences tab lets you copy and download public audiences.
For administrators, the My Audiences tab displays all audiences in the workspace, and the Public Audiences tab displays all public audiences.
For non-administrators, the My Audiences tab displays the audiences they created, and the Public Audiences tab displays all public audiences.
The following sections describe the operations on the My Audiences tab. The operations on the Public Audiences tab are similar.
Go to Workspace > User Insights > Audience Management > Audience Management. The My Audiences tab is displayed by default, as shown in the following figure. The list displays information such as the audience source, audience size, associated sub-activities, and the status of audience creation or update tasks.
In addition to audiences generated on the Audience Filter and Audience Management pages, audiences created using the following methods are also automatically added to the audience list:
Audiences generated in User Analysis. The audience source is displayed as Tag Filtering, RFM, or AIPL, which corresponds to the dataset type. You can perform operations that are supported for the corresponding audience type.
Audiences generated by the Generate Audience component in automated marketing tasks. This category also includes audiences filtered from the user acceptance results of marketing tasks, such as text messages, emails, PUSH notifications, and webhooks. The audience source is displayed as Manual Upload. You can perform the same operations on these audiences as you can on manually uploaded audiences.
Audiences generated in the Omnichannel Insights module, which are called omnichannel audiences. The audience source is displayed as Omnichannel Insights. You cannot perform basic audience operations, audience analysis, or automated marketing for omnichannel audiences on this page. You can only push them to Data Bank and use them for PUSH Marketing and Data Bank marketing tasks.
Audiences generated in Repurchase Prediction and Product Recommendation. The audience source is displayed as Repurchase Prediction and People-Product Analysis, respectively. You can perform operations such as analysis, deleting, moving, downloading, pushing, and using them in applications. However, you cannot edit, update, or copy them.
Audiences generated by selecting data in reports in the Analytics Dashboard. The audience source is displayed as Analytics Insight Report. You can perform operations such as updating, pushing, and using them in applications. However, you cannot edit them.
Create an audience folder
You can create audience folders to organize your audiences. Multi-level folders are supported.
Procedure:
On the Audience Management page, go to New > Folder. To create a subfolder, click a folder name in the list to open the folder, and then go to New > Folder.

In the dialog box that appears, enter a folder name and click Confirm.
To view audiences saved in a folder, click the folder name in the list to open the audience list within that folder.
You can use the keyword search to find audiences both inside and outside of folders.
You can rename and remove folders:
Rename: Click the
 icon, enter a new name in the dialog box, and click Confirm.
Remove: Click the
 icon and confirm the removal. You can only remove empty folders.
Upload an audience
You can add an audience by uploading a user ID list in a CSV or TXT file.
Procedure:
Go to New > Audience > Upload Audience.

Enter an audience name and a description. Specify whether the audience is public. Select the user ID type, the data source where the data will be saved, the destination folder, and any associated sub-activities. Then, upload the CSV or TXT file. To obtain a file template, click Get Upload Template.
NoteThe supported user ID types are OneID, UnionID, mobile phone number, email, Taobao ID, Taobao nickname, Taobao OUID, Alipay ID, Weibo ID, mobile IMEI, mobile IDFA, mobile IMSI, mobile OAID, MAC address, and OpenID. A total of 15 types are supported.
The maximum size for CSV and TXT audience files is 60 MB.
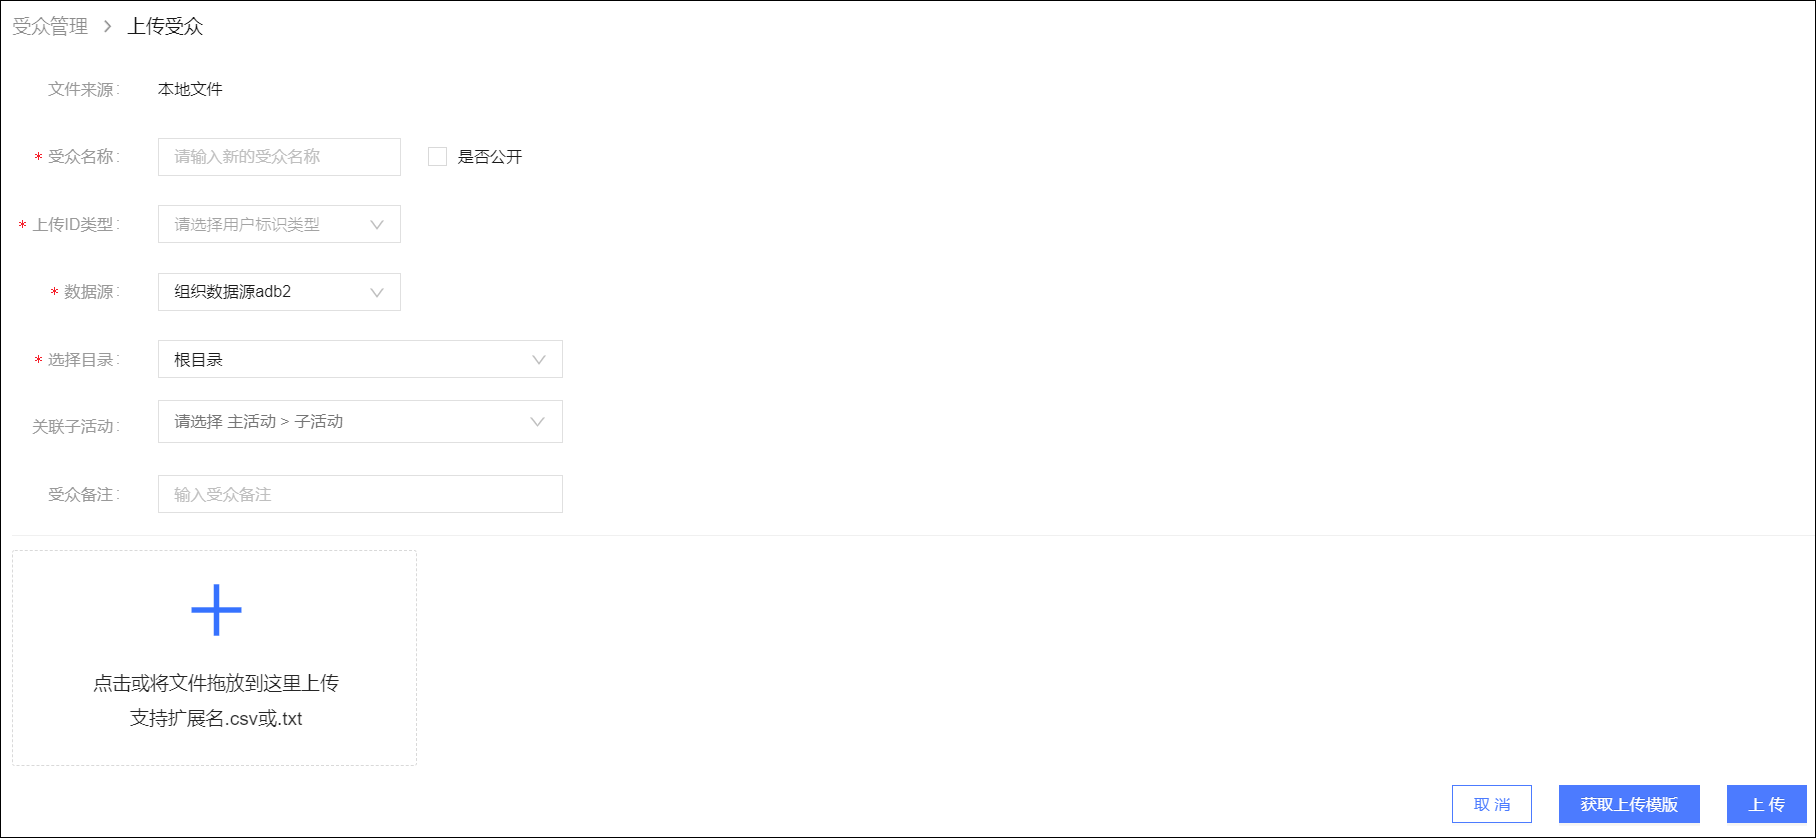
Click Upload to upload the audience.
Create an audience from a data source
You can save user IDs in a data table within a connected data source and then create an audience by reading from that table.
The table must meet the following format requirements:
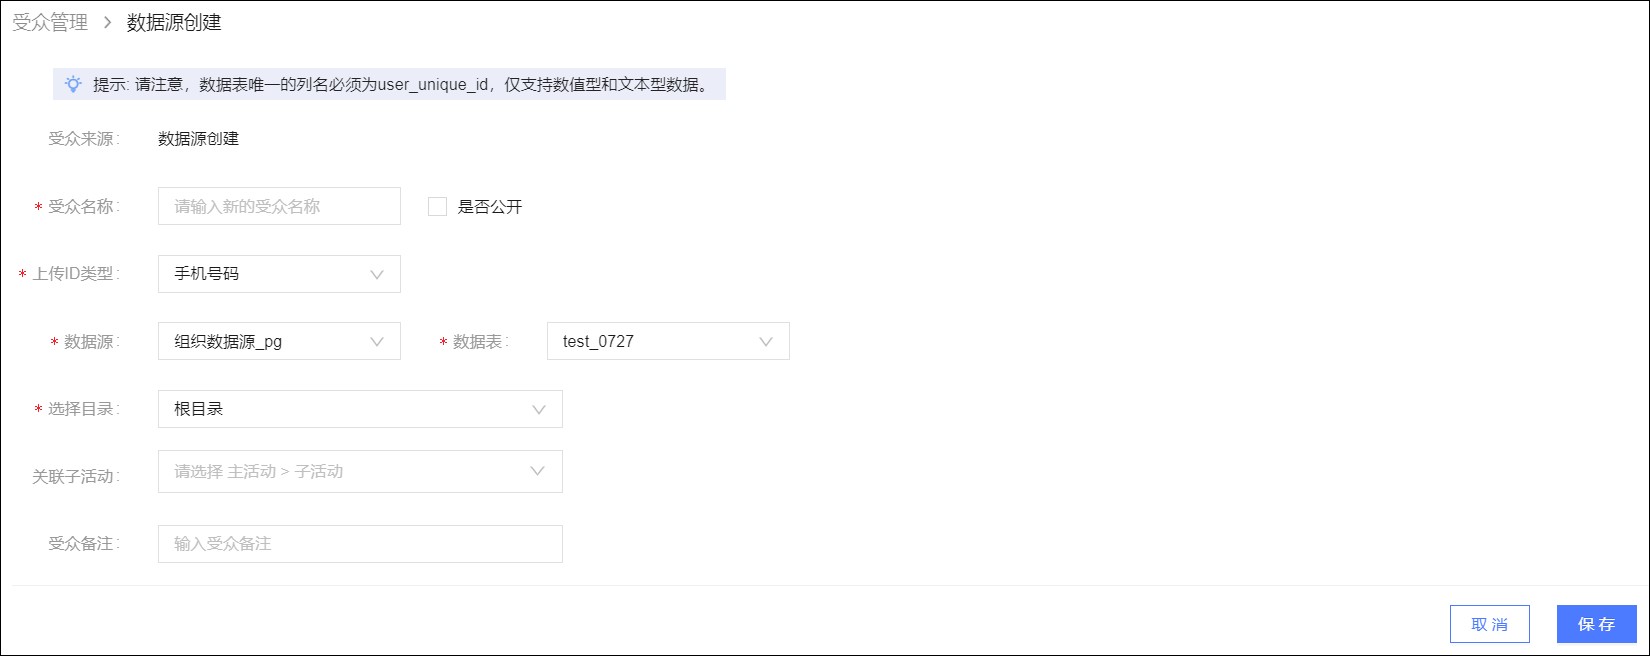
It must contain only one column named `user_unique_id` that stores user IDs. The data type can be numeric or text.
The supported user ID types are OneID, UnionID, mobile phone number, email, Taobao ID, Taobao nickname, Taobao OUID, Alipay ID, Weibo ID, mobile IMEI, mobile IDFA, mobile IMSI, mobile OAID, MAC address, and OpenID. A total of 15 types are supported.
User IDs cannot be duplicated or empty.
Procedure:
Go to New > Audience > Create from Data Source.

Select the data source that stores the user IDs, the data table, and the type of user IDs stored.
Enter an audience name and a description. Specify whether the audience is public. Select the destination folder and any associated sub-activities.
Click Save to create an audience from the data source.

Perform set operations on audiences
You can create a new audience by performing set operations on existing audiences. A new audience can be generated from the intersection, union, or difference of two or three existing audiences. You can also use a mix of these operations.
A maximum of three layers of audience set operations are supported. The number of layers is calculated as follows: If the current audience is generated from a set operation between audience A and audience B, it is counted as one layer. If audience A or B (or both) is also generated from a set operation, another layer is added, for a total of two layers, and so on.
Procedure:
Go to New > Audience > Audience Set Operation.
On the Audience Set Operation page, select a data source.
Click Click to add audience. From the list, select the audience category, the folder where the audience is located, the audience, and an optional audience snapshot.
NoteThe audiences used in the set operation must have the same ID type. Audiences with different ID types are grayed out and cannot be selected.
You can also use audience snapshots in set operations. As shown in the preceding figure, when you select an audience, its snapshots are listed to the right. You can select an audience snapshot or just the audience.
Select the set operation to perform: union
, intersection , or difference .Click Next.
Enter an audience name and a description. Specify whether the audience is public. Select the destination folder and any associated sub-activities. Click Create Audience to finish.
 , intersection
  , or difference
  .
.Query audience source
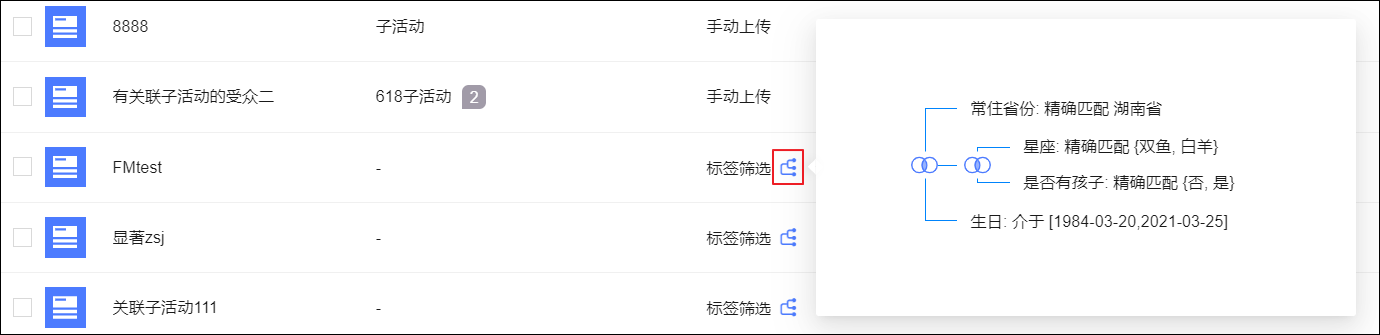
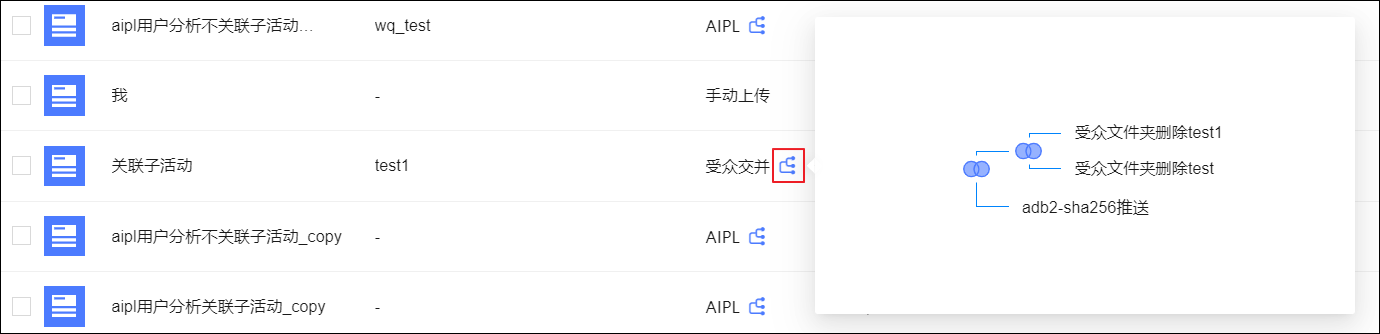
For audiences with a source of Audience Filter, Audience Set Operation, or Analytics Insight Report, you can hover over the  icon in the Audience Source column to view the following information:
For Audience Filter: The filter conditions and calculation method. To view the specific source dataset, go to the edit page.
For Audience Set Operation: The source audiences and calculation method.
For audiences generated by selecting data in an Analytics Insight Report: The source table and data source are displayed. Click View SQL to see the SQL statement that was used to generate the audience. The SQL statement provides information such as filter conditions and the ID type.
NoteWhen an audience is generated by selecting data in an Analytics Insight Report, a data table is created in the same data source that corresponds to the report's Quick BI data source in the current Quick Audience workspace. This table saves the ID field that is exported to Quick Audience. This data source and data table are displayed as the data source and source table.
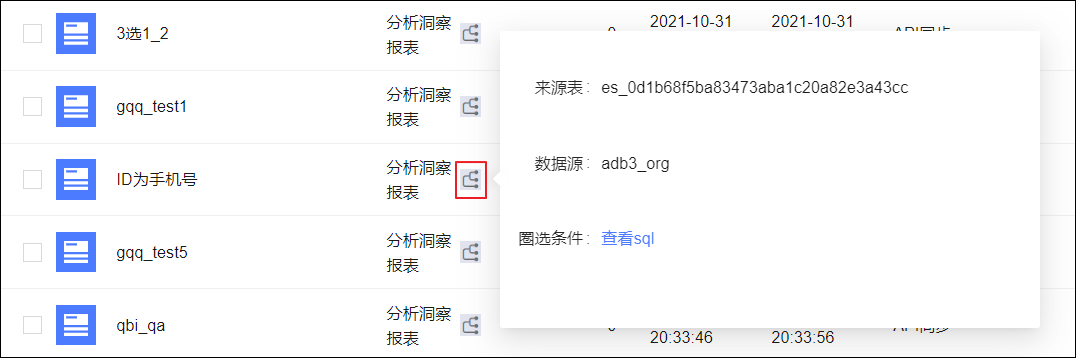
View audience table name
Hover over the  icon to display the name of the data table where the audience is stored in the data source.

Edit
For audiences created using Audience Filter or Audience Set Operation, you can click the  icon to edit the audience. The editing process is the same as the creation process. For more information, see the corresponding documents.
Analyze
Click the  icon to analyze the audience. For more information, see User Analysis.
Update and snapshot
You can manually update or set up scheduled updates to sync the latest data from the data source to the dataset. The latest filtered results are then synced to the audience based on its defined filter rules.
You can generate audience snapshots during manual updates to save historical versions of the audience. Snapshots cannot be generated during scheduled updates.
Because updating an audience does not automatically trigger an update of its source dataset, you must first update the dataset (either manually or through a scheduled update). After the dataset is updated, update the audience to successfully sync the latest data from the data source.
Only the following types of audiences can be updated:
Audiences generated using Audience Filter.
Audiences generated using Audience Set Operation, where at least one of the source audiences was generated using Audience Filter.
Audiences generated by selecting data in an Analytics Insight Report.
If an audience was generated using a set operation, the system automatically updates its source audiences before updating the main audience. However, snapshots are not created for the source audiences. The update settings configured for the source audiences will still proceed as scheduled.
If the update concurrency for the workspace is set in the Management Hub, scheduled audience updates that exceed the limit are queued. For more information about how to configure this setting, see Workspace System Settings.
Manual update
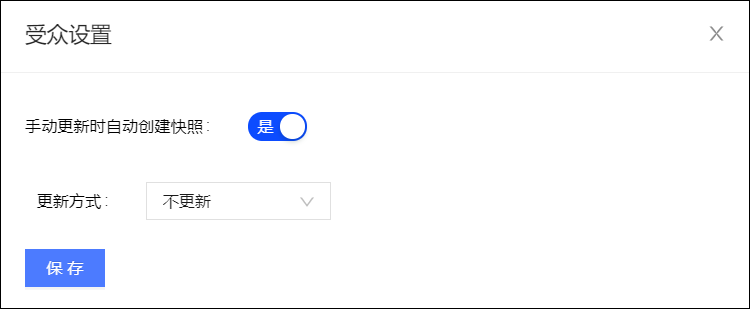
You can configure whether to automatically create a snapshot during a manual update.
Go to
> Update Settings.Select or clear Automatically create snapshot on manual update.
Click Save.
Single update: Go to
> Update.Batch update: Select the audiences to update from the list, and then click Batch Update at the bottom.
If all selected audiences are already configured to automatically create snapshots in step 1, a snapshot is created and the update begins.
If at least one selected audience is not configured to automatically create snapshots, a dialog box appears. You can then choose whether to create a snapshot for this update:
To create a snapshot during the update, click Archive and Update.
To update without creating a snapshot, click Cancel and Update.
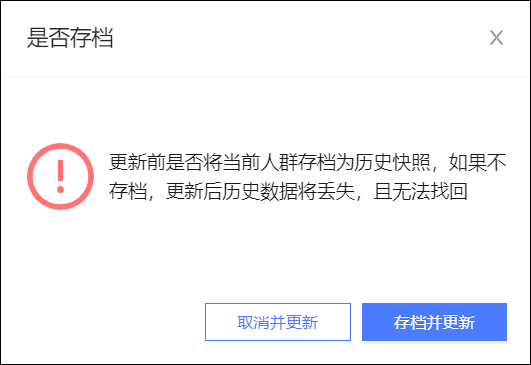
The selected audiences begin to update. When the update is complete, an "Update successful" message appears.
Scheduled update
Go to
> Update Settings.Set the automatic update period to daily or hourly, and specify a start time and an end time.
NoteHourly updates are supported only when all source datasets for the audience are user tag datasets.
To cancel a configured scheduled update, select Do not update.
Click Save to complete the settings.
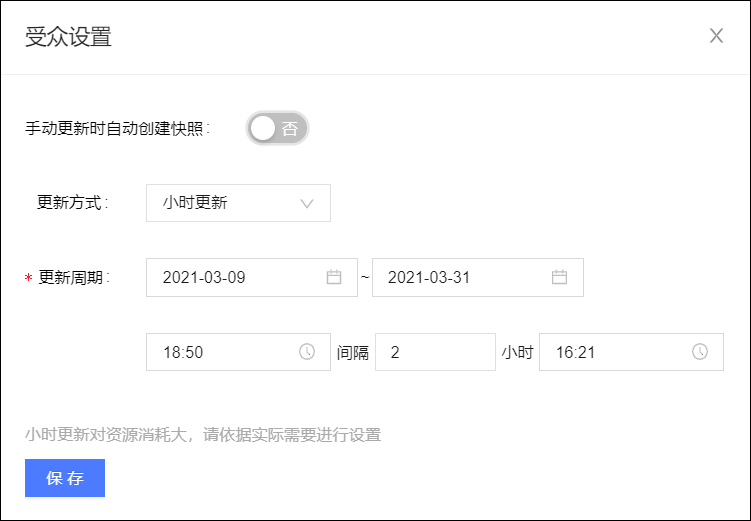
The audience displays a  icon in the Update Time column and automatically starts updating at the specified time.
Snapshot management
When an audience is updated on a schedule, the generated snapshot is named in the format: `Audience Name_Creation Time`.
Click the  icon next to an audience name to expand the list of its snapshots, as shown in the following figure.
Download a snapshot
To download audience snapshots, non-administrator users must have the 'User Insights-Audience Management-Audience Management-Download' permission. For more information about how to grant permissions, see Workspace Role Management.
Click Download next to a snapshot to download it to your local computer as a CSV file.
Remove a snapshot
Click Remove next to a snapshot and confirm the action to remove it.
Move an audience
You can move audiences to a specified folder.
To move a single audience: Go to  > Move to, select a folder, and click Save.
To move multiple audiences in a batch: Select the audiences from the list, click Batch Move at the bottom, select a folder, and click Save.
Copy an audience
Go to > Copy. In the dialog box that appears, set a new audience name, select any associated sub-activities, and click OK to copy the audience.
By default, the copied audience has the same update settings as the original audience. You can modify these settings.
Download an audience
To download audiences, non-administrator users must have the 'User Insights-Audience Management-Audience Management-Download' permission. For more information about how to grant permissions, see Workspace Role Management.
Go to > Download to download the audience to your local computer as a CSV file.
Audience Enters Application
Go to > Application. You can then create the following types of marketing tasks for this audience. You are redirected to the corresponding page:
Automated Marketing: Creating an automated marketing task for this audience creates a task triggered by a specific audience.
To be used in a marketing task, the audience must contain an ID type that is supported by the marketing channel. For more information about supported ID types, see the documents linked in the preceding list.
Remove an audience
To remove a single audience: Click the  icon and confirm the removal.
To remove multiple audiences in a batch: Select the audiences from the list, and then click Batch Remove at the bottom.
If other audiences are derived from this audience, it cannot be removed. This restriction prevents the derived audiences from failing to update.
If the audience is associated with any Repurchase Prediction or Product Recommendation tasks, it cannot be removed.