Use the scan feature with a custom UI
This topic describes how to create a custom UI and add the scan feature to your project.
To use the scan feature with a custom UI, see the code sample.
This procedure includes the following four steps:
Procedure
Create a dependency project
Click File > New > New Module.
Select Android Library and click Next.
Enter a Module name and click Finish.
Create and define the UI in the dependency project
In the
com.example.custompackage of thecustommodule, create awidgetpackage. In thewidgetpackage, add theAPSurfaceTextureclass that inherits from theSurfaceTextureclass to obtain the image stream.public class APSurfaceTexture extends SurfaceTexture { private static final String TAG = "APSurfaceTexture"; public SurfaceTexture mSurface; public APSurfaceTexture() { super(0); } @TargetApi(Build.VERSION_CODES.JELLY_BEAN) @Override public void attachToGLContext(int texName) { mSurface.attachToGLContext(texName); } @TargetApi(Build.VERSION_CODES.JELLY_BEAN) @Override public void detachFromGLContext() { try { mSurface.detachFromGLContext(); } catch (Exception ex) { try { Method nativeMethod = SurfaceTexture.class.getDeclaredMethod("nativeDetachFromGLContext"); nativeMethod.setAccessible(true); int retCode = (Integer) nativeMethod.invoke(mSurface); LoggerFactory.getTraceLogger().debug(TAG, "nativeDetachFromGLContext invoke retCode:" + retCode); } catch (Exception e) { LoggerFactory.getTraceLogger().error(TAG, "nativeDetachFromGLContext invoke exception:" + e.getMessage()); } LoggerFactory.getTraceLogger().error(TAG, "mSurface.detachFromGLContext() exception:" + ex.getMessage()); } } @Override public boolean equals(Object o) { return mSurface.equals(o); } @Override public long getTimestamp() { return mSurface.getTimestamp(); } @Override public void getTransformMatrix(float[] mtx) { mSurface.getTransformMatrix(mtx); } @Override public void release() { super.release(); mSurface.release(); } @Override public int hashCode() { return mSurface.hashCode(); } @TargetApi(Build.VERSION_CODES.KITKAT) @Override public void releaseTexImage() { mSurface.releaseTexImage(); } @TargetApi(Build.VERSION_CODES.ICE_CREAM_SANDWICH_MR1) @Override public void setDefaultBufferSize(int width, int height) { mSurface.setDefaultBufferSize(width, height); } @Override public void setOnFrameAvailableListener(OnFrameAvailableListener listener) { mSurface.setOnFrameAvailableListener(listener); } @Override public String toString() { return mSurface.toString(); } @Override public void updateTexImage() { mSurface.updateTexImage(); } }In the
widgetpackage of thecustommodule, add theAPTextureViewclass that inherits from theTextureViewclass to display the image stream.public class APTextureView extends TextureView { private static final String TAG = "APTextureView"; private Field mSurfaceField; public APTextureView(Context context) { super(context); } public APTextureView(Context context, AttributeSet attrs) { super(context, attrs); } public APTextureView(Context context, AttributeSet attrs, int defStyleAttr) { super(context, attrs, defStyleAttr); } @Override protected void onDetachedFromWindow() { try { super.onDetachedFromWindow(); } catch (Exception ex) { LoggerFactory.getTraceLogger().error(TAG, "onDetachedFromWindow exception:" + ex.getMessage()); } } @Override public void setSurfaceTexture(SurfaceTexture surfaceTexture) { super.setSurfaceTexture(surfaceTexture); afterSetSurfaceTexture(); } private void afterSetSurfaceTexture() { LoggerFactory.getTraceLogger().debug(TAG, "afterSetSurfaceTexture Build.VERSION.SDK_INT:" + Build.VERSION.SDK_INT); if (Build.VERSION.SDK_INT < 16 || Build.VERSION.SDK_INT > 20) { return; } try { if (mSurfaceField == null) { mSurfaceField = TextureView.class.getDeclaredField("mSurface"); mSurfaceField.setAccessible(true); } SurfaceTexture innerSurface = (SurfaceTexture) mSurfaceField.get(this); if (innerSurface != null) { if (!(innerSurface instanceof APSurfaceTexture)) { APSurfaceTexture wrapSurface = new APSurfaceTexture(); wrapSurface.mSurface = innerSurface; mSurfaceField.set(this, wrapSurface); LoggerFactory.getTraceLogger().debug(TAG, "afterSetSurfaceTexture wrap mSurface"); } } } catch (Exception ex) { LoggerFactory.getTraceLogger().error(TAG, "afterSetSurfaceTexture exception:" + ex.getMessage()); } } }In the
com.example.custompackage, create theUtilsclass to implement image transformation.public class Utils { private static String TAG = "Utils"; public static void toast(Context context, String msg) { Toast.makeText(context, msg, Toast.LENGTH_SHORT).show(); } public static Bitmap changeBitmapColor(Bitmap bitmap, int color) { int bitmap_w = bitmap.getWidth(); int bitmap_h = bitmap.getHeight(); int[] arrayColor = new int[bitmap_w * bitmap_h]; int count = 0; for (int i = 0; i < bitmap_h; i++) { for (int j = 0; j < bitmap_w; j++) { int originColor = bitmap.getPixel(j, i); // Non-transparent area if (originColor != 0) { originColor = color; } arrayColor[count] = originColor; count++; } } return Bitmap.createBitmap(arrayColor, bitmap_w, bitmap_h, Bitmap.Config.ARGB_8888); } public static Bitmap uri2Bitmap(Context context, Uri uri) { Bitmap bitmap = null; InputStream in; try { in = context.getContentResolver().openInputStream(uri); if (in != null) { bitmap = BitmapFactory.decodeStream(in); in.close(); } } catch (Exception e) { LoggerFactory.getTraceLogger().error(TAG, "uri2Bitmap: Exception " + e.getMessage()); } return bitmap; } }In the
custommodule, create theres/values/attrs.xmlfile and add the following code.<?xml version="1.0" encoding="utf-8"?> <resources> <declare-styleable name="scan"> <attr name="shadowColor" format="color" /> </declare-styleable> </resources>In the
res/drawablefolder of thecustommodule, paste the following resource files.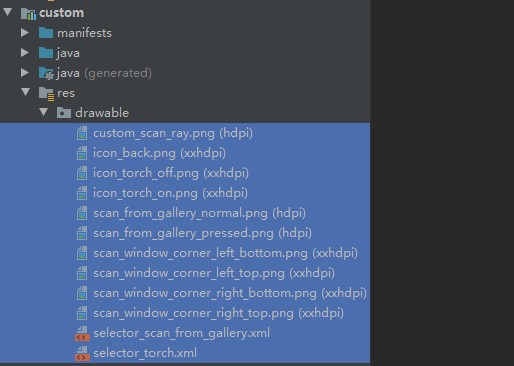
Add a
FinderViewclass that inherits from theViewclass to thewidgetpackage incustom. Then, add the following code to draw the scan window, its corners, and the surrounding shade.public class FinderView extends View { private static final int DEFAULT_SHADOW_COLOR = 0x96000000; private int scanWindowLeft, scanWindowTop, scanWindowRight, scanWindowBottom; private Bitmap leftTopCorner, rightTopCorner, leftBottomCorner, rightBottomCorner; private Paint paint; private int shadowColor; public FinderView(Context context, AttributeSet attrs, int defStyle) { super(context, attrs, defStyle); init(context, attrs); } public FinderView(Context context, AttributeSet attrs) { super(context, attrs); init(context, attrs); } private void init(Context context, AttributeSet attrs) { applyConfig(context, attrs); setVisibility(INVISIBLE); initCornerBitmap(context); paint = new Paint(); paint.setAntiAlias(true); } private void applyConfig(Context context, AttributeSet attrs) { if (attrs != null) { TypedArray typedArray = context.obtainStyledAttributes(attrs, R.styleable.scan); shadowColor = typedArray.getColor(R.styleable.scan_shadowColor, DEFAULT_SHADOW_COLOR); typedArray.recycle(); } } // Initialize the corner style of the scan window. private void initCornerBitmap(Context context) { Resources res = context.getResources(); leftTopCorner = BitmapFactory.decodeResource(res, R.drawable.scan_window_corner_left_top); rightTopCorner = BitmapFactory.decodeResource(res, R.drawable.scan_window_corner_right_top); leftBottomCorner = BitmapFactory.decodeResource(res, R.drawable.scan_window_corner_left_bottom); rightBottomCorner = BitmapFactory.decodeResource(res, R.drawable.scan_window_corner_right_bottom); } @Override public void draw(Canvas canvas) { super.draw(canvas); drawShadow(canvas); drawCorner(canvas); } // Draw the corner style of the scan window. private void drawCorner(Canvas canvas) { paint.setAlpha(255); canvas.drawBitmap(leftTopCorner, scanWindowLeft, scanWindowTop, paint); canvas.drawBitmap(rightTopCorner, scanWindowRight - rightTopCorner.getWidth(), scanWindowTop, paint); canvas.drawBitmap(leftBottomCorner, scanWindowLeft, scanWindowBottom - leftBottomCorner.getHeight(), paint); canvas.drawBitmap(rightBottomCorner, scanWindowRight - rightBottomCorner.getWidth(), scanWindowBottom - rightBottomCorner.getHeight(), paint); } // Draw the shade around the scan window. private void drawShadow(Canvas canvas) { paint.setColor(shadowColor); canvas.drawRect(0, 0, getWidth(), scanWindowTop, paint); canvas.drawRect(0, scanWindowTop, scanWindowLeft, scanWindowBottom, paint); canvas.drawRect(scanWindowRight, scanWindowTop, getWidth(), scanWindowBottom, paint); canvas.drawRect(0, scanWindowBottom, getWidth(), getHeight(), paint); } /** * Determine the position of the scan window based on the position of RayView. */ public void setScanWindowLocation(int left, int top, int right, int bottom) { scanWindowLeft = left; scanWindowTop = top; scanWindowRight = right; scanWindowBottom = bottom; invalidate(); setVisibility(VISIBLE); } public void setShadowColor(int shadowColor) { this.shadowColor = shadowColor; } // Set the corner color of the scan window. public void setCornerColor(int angleColor) { leftTopCorner = Utils.changeBitmapColor(leftTopCorner, angleColor); rightTopCorner = Utils.changeBitmapColor(rightTopCorner, angleColor); leftBottomCorner = Utils.changeBitmapColor(leftBottomCorner, angleColor); rightBottomCorner = Utils.changeBitmapColor(rightBottomCorner, angleColor); } }Add the
RayViewclass to thewidgetpackage incustom, make it inherit from theImageViewclass, and add the following code to implement the scanning ray feature.public class RayView extends ImageView { private FinderView mFinderView; private ScaleAnimation scanAnimation; private int[] location = new int[2]; public RayView(Context context, AttributeSet attrs) { super(context, attrs); } public RayView(Context context) { super(context); } @Override protected void onLayout(boolean changed, int left, int top, int right, int bottom) { super.onLayout(changed, left, top, right, bottom); // Set the position of the scan window in FinderView. getLocationOnScreen(location); if (mFinderView != null) { mFinderView.setScanWindowLocation(location[0], location[1], location[0] + getWidth(), location[1] + getHeight()); } } public void startScanAnimation() { setVisibility(VISIBLE); if (scanAnimation == null) { scanAnimation = new ScaleAnimation(1.0f, 1.0f, 0.0f, 1.0f); scanAnimation.setDuration(3000L); scanAnimation.setFillAfter(true); scanAnimation.setRepeatCount(Animation.INFINITE); scanAnimation.setInterpolator(new AccelerateDecelerateInterpolator()); } startAnimation(scanAnimation); } public void stopScanAnimation() { setVisibility(INVISIBLE); if (scanAnimation != null) { this.clearAnimation(); scanAnimation = null; } } public void setFinderView(FinderView FinderView) { mFinderView = FinderView; } }In the
resdirectory of thecustommodule, create thelayout/view_scan.xmlfile, and add the following code to define the layout of the scan page.<?xml version="1.0" encoding="utf-8"?> <merge xmlns:android="http://schemas.android.com/apk/res/android"> <com.example.custom.widget.FinderView android:id="@+id/finder_view" android:layout_width="match_parent" android:layout_height="match_parent" /> <LinearLayout android:layout_width="match_parent" android:layout_height="wrap_content" android:layout_marginTop="20dp" android:gravity="center_vertical" android:orientation="horizontal"> <ImageView android:id="@+id/back" android:layout_width="48dp" android:layout_height="48dp" android:scaleType="center" android:src="@drawable/icon_back" /> <TextView android:layout_width="0dp" android:layout_height="wrap_content" android:layout_weight="1" android:gravity="center" android:text="@string/custom_title" android:textColor="#ffffff" android:textSize="16sp" /> <ImageView android:id="@+id/gallery" android:layout_width="34dp" android:layout_height="34dp" android:layout_marginEnd="10dp" android:layout_marginRight="10dp" android:scaleType="fitXY" android:src="@drawable/selector_scan_from_gallery" /> <ImageView android:id="@+id/torch" android:layout_width="34dp" android:layout_height="34dp" android:layout_marginEnd="10dp" android:layout_marginRight="10dp" android:scaleType="fitXY" android:src="@drawable/selector_torch" /> </LinearLayout> <com.example.custom.widget.RayView android:id="@+id/ray_view" android:layout_width="270dp" android:layout_height="280dp" android:layout_centerInParent="true" android:background="@drawable/custom_scan_ray" /> <TextView android:id="@+id/tip_tv" android:layout_width="wrap_content" android:layout_height="wrap_content" android:layout_below="@+id/ray_view" android:layout_centerHorizontal="true" android:layout_marginTop="10dp" android:includeFontPadding="false" android:text="@string/scan_tip" android:textColor="#7fffffff" android:textSize="14sp" /> </merge>In the
widgetpackage, add theScanViewclass that inherits from theRelativeLayoutclass, and add the following code. This class handles the interaction between the scan-related View and the DPI engine.public class ScanView extends RelativeLayout { private RayView mRayView; public ScanView(Context context) { super(context); init(context); } public ScanView(Context context, AttributeSet attrs) { super(context, attrs); init(context); } public ScanView(Context context, AttributeSet attrs, int defStyle) { super(context, attrs, defStyle); init(context); } private void init(Context ctx) { LayoutInflater.from(ctx).inflate(R.layout.view_scan, this, true); FinderView finderView = (FinderView) findViewById(R.id.finder_view); mRayView = (RayView) findViewById(R.id.ray_view); mRayView.setFinderView(finderView); } public void onStartScan() { mRayView.startScanAnimation(); } public void onStopScan() { mRayView.stopScanAnimation(); } public float getCropWidth() { return mRayView.getWidth() * 1.1f; } public Rect getScanRect(Camera camera, int previewWidth, int previewHeight) { if (camera == null) { return null; } int[] location = new int[2]; mRayView.getLocationOnScreen(location); Rect r = new Rect(location[0], location[1], location[0] + mRayView.getWidth(), location[1] + mRayView.getHeight()); Camera.Size size; try { size = camera.getParameters().getPreviewSize(); } catch (Exception e) { return null; } if (size == null) { return null; } double rateX = (double) size.height / (double) previewWidth; double rateY = (double) size.width / (double) previewHeight; // Clipping box size = Grid animation box size * 1.1 int expandX = (int) (mRayView.getWidth() * 0.05); int expandY = (int) (mRayView.getHeight() * 0.05); Rect resRect = new Rect( (int) ((r.top - expandY) * rateY), (int) ((r.left - expandX) * rateX), (int) ((r.bottom + expandY) * rateY), (int) ((r.right + expandX) * rateX)); Rect finalRect = new Rect( resRect.left < 0 ? 0 : resRect.left, resRect.top < 0 ? 0 : resRect.top, resRect.width() > size.width ? size.width : resRect.width(), resRect.height() > size.height ? size.height : resRect.height()); Rect rect1 = new Rect( finalRect.left / 4 * 4, finalRect.top / 4 * 4, finalRect.right / 4 * 4, finalRect.bottom / 4 * 4); int max = Math.max(rect1.right, rect1.bottom); int diff = Math.abs(rect1.right - rect1.bottom) / 8 * 4; Rect rect2; if (rect1.right > rect1.bottom) { rect2 = new Rect(rect1.left, rect1.top - diff, max, max); } else { rect2 = new Rect(rect1.left - diff, rect1.top, max, max); } return rect2; } }In the
layoutfolder of thecustommodule, create theactivity_custom_scan.xmlfile and add the following code. This file defines the main interface for the custom scan feature.<?xml version="1.0" encoding="utf-8"?> <FrameLayout xmlns:android="http://schemas.android.com/apk/res/android" android:layout_width="match_parent" android:layout_height="match_parent"> <com.mpaas.aar.demo.custom.widget.APTextureView android:id="@+id/surface_view" android:layout_width="match_parent" android:layout_height="match_parent" /> <com.mpaas.aar.demo.custom.widget.ScanView android:id="@+id/scan_view" android:layout_width="match_parent" android:layout_height="match_parent" /> </FrameLayout>
Use the scan feature in the dependency project
In the
com.example.custompackage of thecustommodule, add theScanHelperclass and add the following code. This class calls the scan feature and retrieves the scan callback result.public class ScanHelper { private static class Holder { private static ScanHelper instance = new ScanHelper(); } private ScanCallback scanCallback; private ScanHelper() { } public static ScanHelper getInstance() { return Holder.instance; } public void scan(Context context, ScanCallback scanCallback) { if (context == null) { return; } this.scanCallback = scanCallback; context.startActivity(new Intent(context, CustomScanActivity.class)); } void notifyScanResult(boolean isProcessed, Intent resultData) { if (scanCallback != null) { scanCallback.onScanResult(isProcessed, resultData); scanCallback = null; } } public interface ScanCallback { void onScanResult(boolean isProcessed, Intent result); } }In the
com.example.custompackage of thecustommodule, add theCustomScanActivityclass that inherits from theActivityclass. Set the immersive mode for the interface and create theViewandButtonobjects that correspond to the resource files.public class CustomScanActivity extends Activity { private final String TAG = CustomScanActivity.class.getSimpleName(); private static final int REQUEST_CODE_PERMISSION = 1; private static final int REQUEST_CODE_PHOTO = 2; private ImageView mTorchBtn; private APTextureView mTextureView; private ScanView mScanView; private boolean isFirstStart = true; private boolean isPermissionGranted; private boolean isScanning; private boolean isPaused; private Rect scanRect; private MPScanner mpScanner; @Override protected void onCreate(Bundle savedInstanceState) { super.onCreate(savedInstanceState); setContentView(R.layout.activity_custom_scan); // Set the immersive mode. if (Build.VERSION.SDK_INT >= Build.VERSION_CODES.KITKAT) { getWindow().setFlags( WindowManager.LayoutParams.FLAG_TRANSLUCENT_STATUS, WindowManager.LayoutParams.FLAG_TRANSLUCENT_STATUS); } mTextureView = findViewById(R.id.surface_view); mScanView = findViewById(R.id.scan_view); mTorchBtn = findViewById(R.id.torch); } @Override public void onPause() { super.onPause(); } @Override public void onResume() { super.onResume(); } @Override public void onDestroy() { super.onDestroy(); } @Override public void onRequestPermissionsResult(int requestCode, @NonNull String[] permissions, @NonNull int[] grantResults) { super.onRequestPermissionsResult(requestCode, permissions, grantResults); } @Override public void onBackPressed() { super.onBackPressed(); } @Override public void onActivityResult(int requestCode, int resultCode, Intent data) { super.onActivityResult(requestCode, resultCode, data); } }Implement the feature to open the phone gallery.
In
CustomScanActivity, create thepickImageFromGallerymethod.private void pickImageFromGallery() { Intent intent = new Intent(Intent.ACTION_GET_CONTENT); intent.setType("image/*"); startActivityForResult(intent, REQUEST_CODE_PHOTO); }In the
onCreatemethod, add a click event forgalleryand call thepickImageFromGallerymethod.findViewById(R.id.gallery).setOnClickListener(new View.OnClickListener() { @Override public void onClick(View v) { pickImageFromGallery(); } });
Implement the feature to switch the torch on or off.
In
CustomScanActivity, create theswitchTorchmethod.private void switchTorch() { boolean torchOn = mpScanner.switchTorch(); mTorchBtn.setSelected(torchOn); }In the
onCreatemethod, add a click event formTorchBtnand call theswitchTorchmethod.mTorchBtn.setOnClickListener(new View.OnClickListener() { @Override public void onClick(View v) { switchTorch(); } });
In
CustomScanActivity, create thenotifyScanResultmethod and call it inonBackPressed.private void notifyScanResult(boolean isProcessed, Intent resultData) { ScanHelper.getInstance().notifyScanResult(isProcessed, resultData); } @Override public void onBackPressed() { super.onBackPressed(); notifyScanResult(false, null); }In the
onCreatemethod ofCustomScanActivity, add a click event forbackand call theonBackPressedmethod.findViewById(R.id.back).setOnClickListener(new View.OnClickListener() { @Override public void onClick(View v) { onBackPressed(); } });In
CustomScanActivity, create theinitMPScannermethod and use thesetRecognizeTypemethod of thempScannerobject to set the recognition type.private void initMPScanner() { mpScanner = new MPScanner(this); mpScanner.setRecognizeType( MPRecognizeType.QR_CODE, MPRecognizeType.BAR_CODE, MPRecognizeType.DM_CODE, MPRecognizeType.PDF417_CODE ); }In
CustomScanActivity, create theonScanSuccessmethod and implement the following code.private void onScanSuccess(final MPScanResult result) { runOnUiThread(new Runnable() { @Override public void run() { if (result == null) { notifyScanResult(true, null); } else { Intent intent = new Intent(); intent.setData(Uri.parse(result.getText())); notifyScanResult(true, intent); } CustomScanActivity.this.finish(); } }); }In
CustomScanActivity, create theinitScanRectmethod to initialize the scan feature.Call the
getCameramethod of thempScannerobject to obtain theCameraobject, and call thesetScanRegionmethod of thempScannerobject to set the scan area.private void initScanRect() { if (scanRect == null) { scanRect = mScanView.getScanRect( mpScanner.getCamera(), mTextureView.getWidth(), mTextureView.getHeight()); float cropWidth = mScanView.getCropWidth(); LoggerFactory.getTraceLogger().debug(TAG, "cropWidth: " + cropWidth); if (cropWidth > 0) { // Preview magnification = Screen width / Clipping box width WindowManager wm = (WindowManager) getSystemService(Context.WINDOW_SERVICE); float screenWith = wm.getDefaultDisplay().getWidth(); float screenHeight = wm.getDefaultDisplay().getHeight(); float previewScale = screenWith / cropWidth; if (previewScale < 1.0f) { previewScale = 1.0f; } if (previewScale > 1.5f) { previewScale = 1.5f; } LoggerFactory.getTraceLogger().debug(TAG, "previewScale: " + previewScale); Matrix transform = new Matrix(); transform.setScale(previewScale, previewScale, screenWith / 2, screenHeight / 2); mTextureView.setTransform(transform); } } mpScanner.setScanRegion(scanRect); }Use the
setMPScanListenermethod of thempScannerobject to implement the scan listener feature.mpScanner.setMPScanListener(new MPScanListener() { @Override public void onConfiguration() { mpScanner.setDisplayView(mTextureView); } @Override public void onStart() { if (!isPaused) { runOnUiThread(new Runnable() { @Override public void run() { if (!isFinishing()) { initScanRect(); mScanView.onStartScan(); } } }); } } @Override public void onSuccess(MPScanResult mpScanResult) { mpScanner.beep(); onScanSuccess(mpScanResult); } @Override public void onError(MPScanError mpScanError) { if (!isPaused) { runOnUiThread(new Runnable() { @Override public void run() { Utils.toast(CustomScanActivity.this, getString(R.string.camera_open_error)); } }); } } });Use the
setMPImageGrayListenermethod of thempScannerobject to implement the listener to detect the grayscale value of the image.mpScanner.setMPImageGrayListener(new MPImageGrayListener() { @Override public void onGetImageGray(int gray) { // Note: This callback may be executed multiple times in a dim environment. if (gray < MPImageGrayListener.LOW_IMAGE_GRAY) { runOnUiThread(new Runnable() { @Override public void run() { Utils.toast(CustomScanActivity.this, "The light is too dim. Turn on the flashlight."); } }); } } }); }
In
CustomScanActivity, create thestartScanandstopScanmethods to start and stop camera scanning.private void startScan() { try { mpScanner.openCameraAndStartScan(); isScanning = true; } catch (Exception e) { isScanning = false; LoggerFactory.getTraceLogger().error(TAG, "startScan: Exception " + e.getMessage()); } } private void stopScan() { mpScanner.closeCameraAndStopScan(); mScanView.onStopScan(); isScanning = false; if (isFirstStart) { isFirstStart = false; } }In
CustomScanActivity, create theonPermissionGranted,checkCameraPermission, andscanFromUrimethods.private void onPermissionGranted() { isPermissionGranted = true; startScan(); } private void checkCameraPermission() { if (PermissionChecker.checkSelfPermission( this, Manifest.permission.CAMERA) != PermissionChecker.PERMISSION_GRANTED) { ActivityCompat.requestPermissions(this, new String[]{Manifest.permission.CAMERA}, REQUEST_CODE_PERMISSION); } else { onPermissionGranted(); } } private void scanFromUri(Uri uri) { final Bitmap bitmap = Utils.uri2Bitmap(this, uri); if (bitmap == null) { notifyScanResult(true, null); finish(); } else { new Thread(new Runnable() { @Override public void run() { MPScanResult mpScanResult = mpScanner.scanFromBitmap(bitmap); mpScanner.beep(); onScanSuccess(mpScanResult); } }, "scanFromUri").start(); } }In the
onCreatemethod ofCustomScanActivity, call thecheckCameraPermissionmethod to check camera permissions.checkCameraPermission();In the
onPause,onResume,onDestroy,onRequestPermissionsResult, andonActivityResultmethods ofCustomScanActivity, add the following content.@Override public void onPause() { super.onPause(); isPaused = true; if (isScanning) { stopScan(); } } @Override public void onResume() { super.onResume(); isPaused = false; if (!isFirstStart && isPermissionGranted) { startScan(); } } @Override public void onDestroy() { super.onDestroy(); mpScanner.release(); } @Override public void onRequestPermissionsResult(int requestCode, @NonNull String[] permissions, @NonNull int[] grantResults) { super.onRequestPermissionsResult(requestCode, permissions, grantResults); if (requestCode == REQUEST_CODE_PERMISSION) { int length = Math.min(permissions.length, grantResults.length); for (int i = 0; i < length; i++) { if (TextUtils.equals(permissions[i], Manifest.permission.CAMERA)) { if (grantResults[i] != PackageManager.PERMISSION_GRANTED) { Utils.toast(this, getString(R.string.camera_no_permission)); } else { onPermissionGranted(); } break; } } } @Override public void onActivityResult(int requestCode, int resultCode, Intent data) { super.onActivityResult(requestCode, resultCode, data); if (data == null) { return; } if (requestCode == REQUEST_CODE_PHOTO) { scanFromUri(data.getData()); } } }In the
AndroidManifest.xmlfile of thecustommodule, setCustomScanActivityas the main entry point for the module.<?xml version="1.0" encoding="utf-8"?> <manifest xmlns:android="http://schemas.android.com/apk/res/android" package="com.mpaas.aar.demo.custom"> <application> <activity android:name=".CustomScanActivity" android:configChanges="orientation|keyboardHidden|navigation" android:exported="false" android:launchMode="singleTask" android:screenOrientation="portrait" android:theme="@android:style/Theme.NoTitleBar" android:windowSoftInputMode="adjustResize|stateHidden" /> </application> </manifest>
Call the scan feature with the custom UI from the main project
In the
activity_main.xmlfile, add aButtonand set its ID tocustom_ui_btn.<Button android:id="@+id/custom_ui_btn" android:layout_width="match_parent" android:layout_height="wrap_content" android:layout_marginTop="208dp" android:background="#108EE9" android:gravity="center" android:text="Scan with Custom UI" android:textColor="#ffffff" app:layout_constraintEnd_toEndOf="parent" app:layout_constraintHorizontal_bias="0.0" app:layout_constraintStart_toStartOf="parent" app:layout_constraintTop_toTopOf="parent" />In the
MainActivityclass, add a click event for thecustom_ui_btnbutton. This event retrieves the custom UI and uses its scan feature. The code is as follows:findViewById(R.id.custom_ui_btn).setOnClickListener(new View.OnClickListener() { @Override public void onClick(View v) { ScanHelper.getInstance().scan(MainActivity.this, new ScanHelper.ScanCallback() { @Override public void onScanResult(boolean isProcessed, Intent result) { if (!isProcessed) { // The physical Back button or the Back button in the upper-left corner is clicked on the scan screen. return; } if (result == null || result.getData() == null) { Toast.makeText(MainActivity.this, "Scan failed. Please retry.", Toast.LENGTH_SHORT).show(); return; } new AlertDialog.Builder(MainActivity.this) .setMessage(result.getData().toString()) .setPositiveButton(R.string.confirm, null) .create() .show(); } }); } });Compile and run the project. Then, click Scan with Custom UI to open the custom scan interface.
Scan a QR code. The information from the QR code is displayed.