In OceanBase, a tenant is a logical unit for resource allocation, database object management, and Resource Management. On the tenant details page, you can view information about the tenant, its connections, and its accounts.
Procedure
Log on to the OceanBase Management Console .
In the navigation pane on the left, click Instance List.
In the instance list, select the destination cluster instance. Click the name of the destination cluster to open the Cluster Instance Workspace.
In the navigation pane on the left, click Tenant Management. In the tenant list, click the destination tenant to open the Tenant Workspace page.
In the upper-right corner, you can perform the following operations:
For Oracle tenants: Create accounts, log on to the database, add endpoints, switch the primary zone, modify tenant resources, refresh the PlanCache, and delete tenants.
For MySQL tenants: Create accounts, log on to the database, create databases, add endpoints, switch the primary zone, modify tenant resources, refresh the PlanCache, and delete tenants.
NoteFor tenants in a Standard Edition (Key-Value) cluster, you can create accounts, log on to the database, create databases, switch the primary zone, modify tenant resources, and delete tenants.
In the Basic Information section, you can view information such as tenant mode, primary zone, CPU, memory, and disk usage.

Parameter
Description
Tenant mode
The mode of the current tenant. Valid values are Oracle and MySQL.
NoteThis parameter is not displayed in the tenant workspace for a Standard Edition (Key-Value) cluster.
Primary zone
The primary zone that you selected when you created the tenant. For more information, see Create a tenant.
Primary endpoint agent zone
The zone where the primary endpoint agent is located.
Parameter template
OLTP Simple Transaction: Suitable for core systems such as online order trading and payment systems, and Internet services with high-concurrency point queries. The SQL statements executed are simple and require fast responses.
OLTP Complex Transaction: Suitable for online transaction systems with complex transactions. Scenarios include complex join calculations, subqueries, and batch jobs written in PL. Long-running transactions and large transactions may exist. If the cluster instance is dedicated to OLTP workloads, optimize the
large_query_thresholdcluster parameter from the default 600s to 5s.HTAP Hybrid Workload: Suitable for hybrid workloads that run transactions and online analytics at the same time. This template provides OLTP capabilities and uses a vectorized engine to improve computing performance in online analytics scenarios.
OLAP Online Analytics: Suitable for real-time data warehouse scenarios for online analytical processing (OLAP). By default, tables are created in a columnar storage format and use an optimized vectorized engine to improve computing performance in complex analytics scenarios. If the cluster instance is dedicated to OLAP analytics, optimize system variables and cluster parameters. For example, enable automatic parallel computing, optimize memory space for SQL sorting, configure SQL and transaction timeout settings, and set a large query policy. Also, set the tenant character set to
utf8mb4_bin.
NoteParameter templates are supported only for newly created OceanBase clusters of V4.3.3 or later. For more information about the parameters and variables, see Parameter template description.
Character set
The database character set that you selected when you created the tenant.
Case-sensitive table names
Indicates whether table names for the current tenant are case-sensitive.
NoteThis field is supported only for tenants in MySQL mode.
Time zone
The time zone set for the current tenant.
Maximum available IOPS
The maximum input/output operations per second (IOPS) available to the tenant.
Binary logging service
The binary logging service collects transaction logs from OceanBase tenants in MySQL mode and converts them into MySQL binary logs. This service is mainly used for incremental data subscription. Enable this service as needed.
NoteThe binary logging service is available only to users on the whitelist. To enable this service, contact OceanBase technical support.
Data merge
The daily data merge time for the current tenant. Click Operation next to Data Merge to initiate a data merge or view data merge records.
NoteTenant-level data merge is supported only for clusters of V4.0 or later.
Transaction log
The earliest point in time of the transaction log.
Remark
Click the edit icon to add a remark. The remark cannot exceed 30 characters in length.
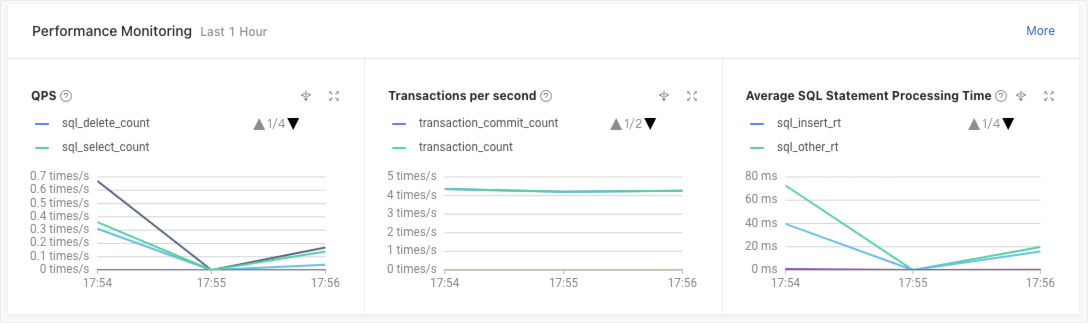
In the Performance Monitoring section, you can view the number of SQL statements processed per second, the number of transactions processed per second, and the average processing time of SQL statements in the last hour. Click More Monitoring to view complete performance monitoring information. For more information, see Overview of tenant performance monitoring.
Metric
Metric name
Description
QPS
sql_all_count
The number of SQL statements processed per second by the tenant database. Unit: times/s.
TPS
transaction_count
The number of transactions processed per second by the tenant database. Unit: times/s.
Average SQL processing time
sql_all_rt
The average processing time of SQL statements. Unit: ms.
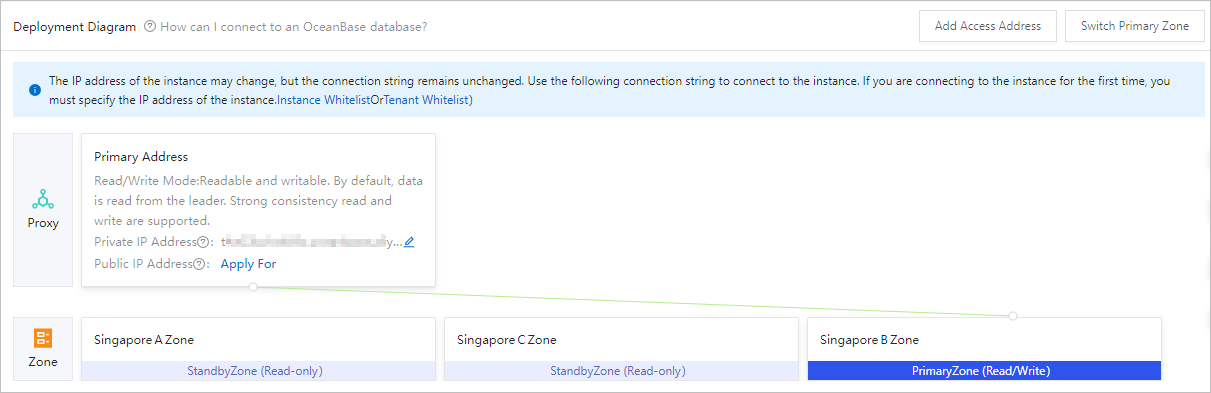
In the Deployment Diagram section, you can view the agent, replica, and zone information of the current tenant. You can also perform the following operations:
Add endpoints and switch the primary zone. For more information, see Add an endpoint and Switch the primary zone.
To learn how to connect to the database, click How to connect to the database. For more information, see Connect to an OceanBase database. For tenants in a Standard Edition (Key-Value) cluster, click How to use OBKV. For more information, see Connect to a tenant in Key-Value mode.
If you are connecting to an instance for the first time, you must add the instance IP address to the cluster or tenant whitelist. Click Instance Whitelist or Tenant Whitelist to open the whitelist settings page.
Click the edit icon for a private or public endpoint to modify it. Hover over a private or public endpoint to display the copy icon. Click the copy icon to copy the endpoint. If no public endpoint is available, click Request to request one.
Hover over the primary endpoint card to view the full private endpoint, public endpoint, and maximum connections. A settings icon appears in the upper-right corner of the card. Click the settings icon to edit the primary endpoint.
Hover over an endpoint card to view its full private endpoint and maximum connections. The settings and delete icons appear in the upper-right corner of the card. Click the settings icon to edit the endpoint. Click the delete icon to delete the endpoint.