You can use the Cloud Toolkit feature in Eclipse to connect local and cloud environments. This allows your local and cloud applications to call each other and improves development efficiency.
Prerequisites
Ensure that your Eclipse version is 4.5.0 or later.
- Cloud Toolkit 2020.9.1 and later lets you configure endpoint-to-cloud connections at the project and module level of your local project. To use this feature, you must upgrade Cloud Toolkit to version 2020.9.1 or later.
Note If you use Cloud Toolkit 2020.9.1 but the configuration granularity option is not available, uninstall and then reinstall the Cloud Toolkit plugin.
- Create an Elastic Compute Service (ECS) instance that you can log on to using the Secure Shell (SSH) protocol. This instance is used to establish the endpoint-to-cloud connection channel. For more information, see Create an ECS instance from the console (Quick Start).
Important
- Make sure that the ECS instance and the application that you want to connect are in the same Virtual Private Cloud (VPC).
- The SSH channel requires a password for logon. Logon with key pairs is not supported.
Step 1: Install Cloud Toolkit
Start Eclipse.
In the top menu bar, choose .
In the Eclipse Marketplace dialog box, enter Alibaba Cloud Toolkit in the text box to the right of Find.
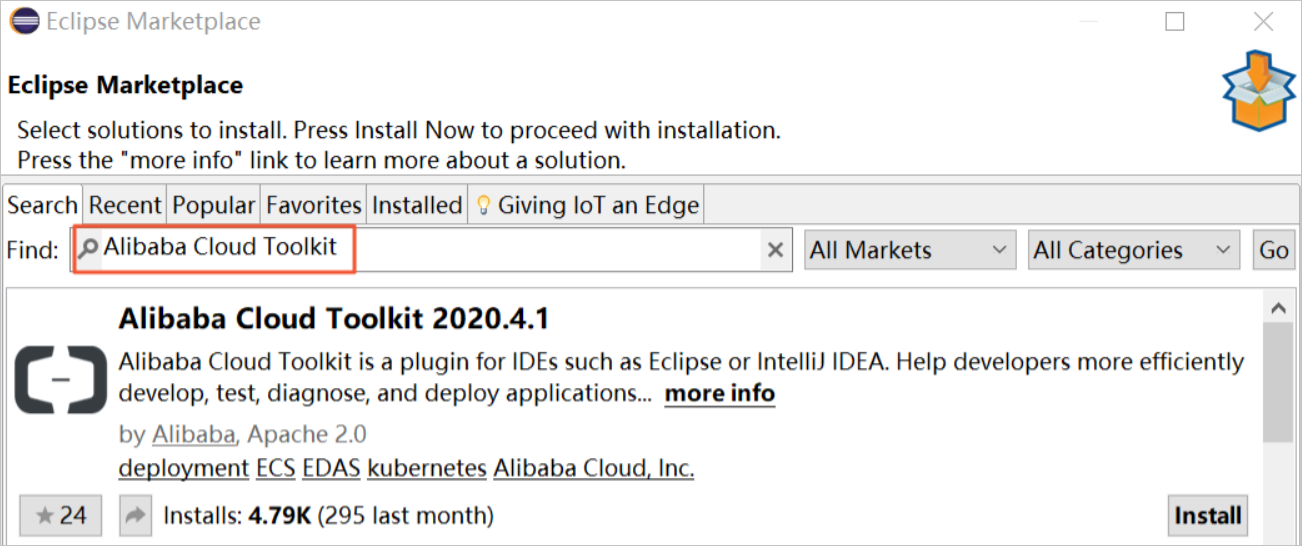
In the search results, click Install in the lower-right corner of the Alibaba Cloud Toolkit area.
Follow the prompts on the installation page to complete the installation.
After the installation is complete, restart Eclipse. The Alibaba Cloud Toolkit icon appears in the toolbar.
Step 2: Configure your Cloud Toolkit account
Configure your Cloud Toolkit account by providing an AccessKey ID and an AccessKey secret.
Start Eclipse.
In the toolbar, click the drop-down arrow next to the Alibaba Cloud Toolkit icon, and then click Preferences....
In the Preferences (Filtered) dialog box, click Accounts in the navigation pane on the left.
On the Accounts page, enter your AccessKey ID and AccessKey secret, and then click Apply.
ImportantIf you use the AccessKey ID and AccessKey secret of a Resource Access Management (RAM) user, ensure that the RAM user has at least the Deploy Applications permission. For more information, see RAM User Authorization.
If you have an Alibaba Cloud account, click Get existing AK/SK on the Accounts page. Log on to your account. You are then redirected to the security information management page to obtain your AccessKey ID and AccessKey secret.
If you do not have an Alibaba Cloud account, click Sign up on the Accounts page to create one. After you create the account, obtain the AccessKey ID and AccessKey secret as described in the previous step.
Step 3: Configure the local and cloud connection
In Eclipse, click the Alibaba Cloud Toolkit icon (
 ) in the toolbar, and then click Preferences… in the drop-down menu.
In the Preferences (Filtered) dialog box, choose in the navigation pane on the left. Configure the local and cloud connection in the settings area on the right.
Select Join EDAS Register to enable the local and cloud connection feature.
Set Region and Namespace to the region and namespace where the connected application is located.
For namespaces other than the default, you must manually enable the Allow remote debugging option.
Log on to the EDAS console.
Select a Region and go to .
In the namespace list, find the target namespace and click Edit in the Actions column.
In the Edit Namespace dialog box, turn on the Allow remote debugging switch.
In the SSH Configuration area, configure the following settings.
In the Gateway Host text box, enter the public IP address of the ECS instance that you created.
In the Username and Password text boxes, enter the credentials for the SSH connection. You can use the credentials for your ECS instance, or enter a new username and password and add the new credentials by clicking Add SSH Rule.
For Spring Cloud applications, enter the service port of the application in the Server Port text box. This field is not required for other application types.
Click Add SSH Rule to complete the configuration.
If you enter the root username and password for the ECS instance, the root account is used for the configuration. A Configuration added successfully message appears.
If you use a new or non-root account, root permissions are required to configure the agent for that account. In the Add SSH Rule dialog box, enter the root Password, and then click Add.
ImportantThe ECS instance password is used only to create a network agent. It is not used for any other purpose.
Use a new or non-root account for the connection. You can share the credentials of this account with other team members who need to connect. This practice helps prevent the exposure of root account information.
Click Apply, and then click OK.
ImportantIf you use EDAS on Apsara Stack Enterprise Edition, you must also configure the Endpoint in Cloud Toolkit. Contact EDAS technical support to obtain the Endpoint.
In the Preference (Filtered) dialog box, choose in the navigation pane on the left.
On the Endpoint page, enter the Endpoint. After the configuration is complete, click Apply and Close.
Step 4: Start the local application to connect to the cloud
In the project list, select the root directory of the project and start the application. If the connection is active, the following indicators appear:
A dialog box that indicates the local and cloud connection is available.
In the Console panel, a console with the title Join EDAS Register prints logs as it initializes the connection environment.
More information
If you encounter issues when you connect local and cloud environments using Cloud Toolkit, see Local and cloud connection issues.
You can purchase ECS instances through EDAS. For more information, see Purchase ECS instances in an ECS cluster.
To quickly deploy applications to EDAS using the Eclipse plugin, see Deploy applications to EDAS using Eclipse.