Background information
Data masking transforms sensitive information, such as names, ID card numbers, mobile phone numbers, landline numbers, bank card numbers, and email addresses, to protect private data. This transformation is performed using data masking algorithms.
Concepts
Data masking: Data masking processes, blurs, or replaces sensitive data during data processing and storage. It uses specific algorithms and techniques to make the data unrecognizable or difficult to recover. This protects data security and prevents data breaches.
Dynamic data masking: Dynamic data masking masks sensitive data in real time when a user queries a database. It does not modify the source data. Dynamic data masking is common in production environments because it maintains the integrity and accuracy of raw data and prevents data breaches. However, its processing speed is slower, which can negatively affect query efficiency.
Static data masking: Static data masking pre-processes sensitive data and replaces the raw data in storage mediums, such as databases. Static data masking is common in testing, development, and demo environments. It protects sensitive data from unauthorized access and helps avoid legal liability from data breaches. Static data masking is fast and improves query efficiency. However, you cannot recover the raw data, which can affect data accuracy.
Masking algorithm: A masking algorithm is an algorithm used to mask sensitive data. It protects data security and prevents information leakage. It also preserves the data's format and structure, which makes the data easy to query and use.
Detection rule: A detection rule is a rule used to automatically detect sensitive data in a database. When you scan to add sensitive columns, the system uses these rules to find matching columns.
Sensitive column: A sensitive column is a column in a database table that contains sensitive data.
How it works
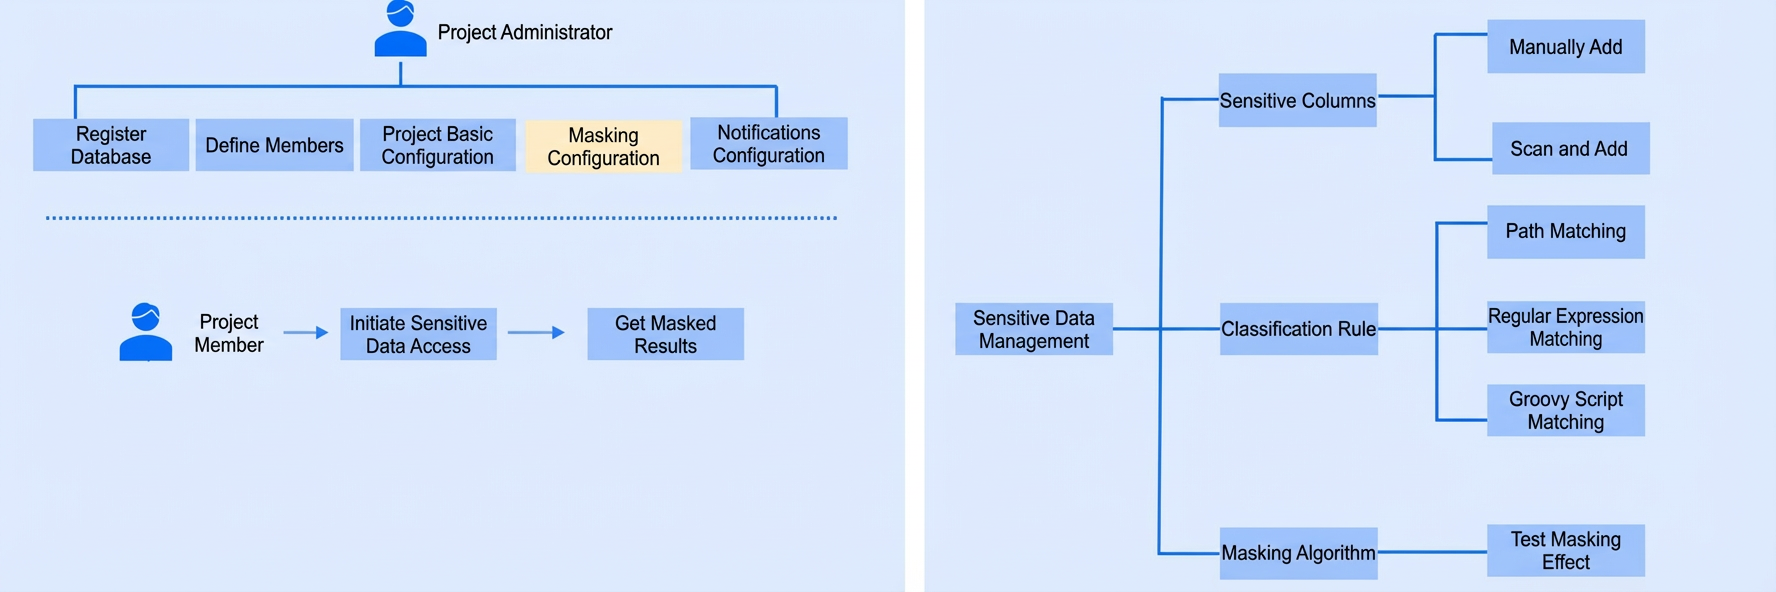
Procedure
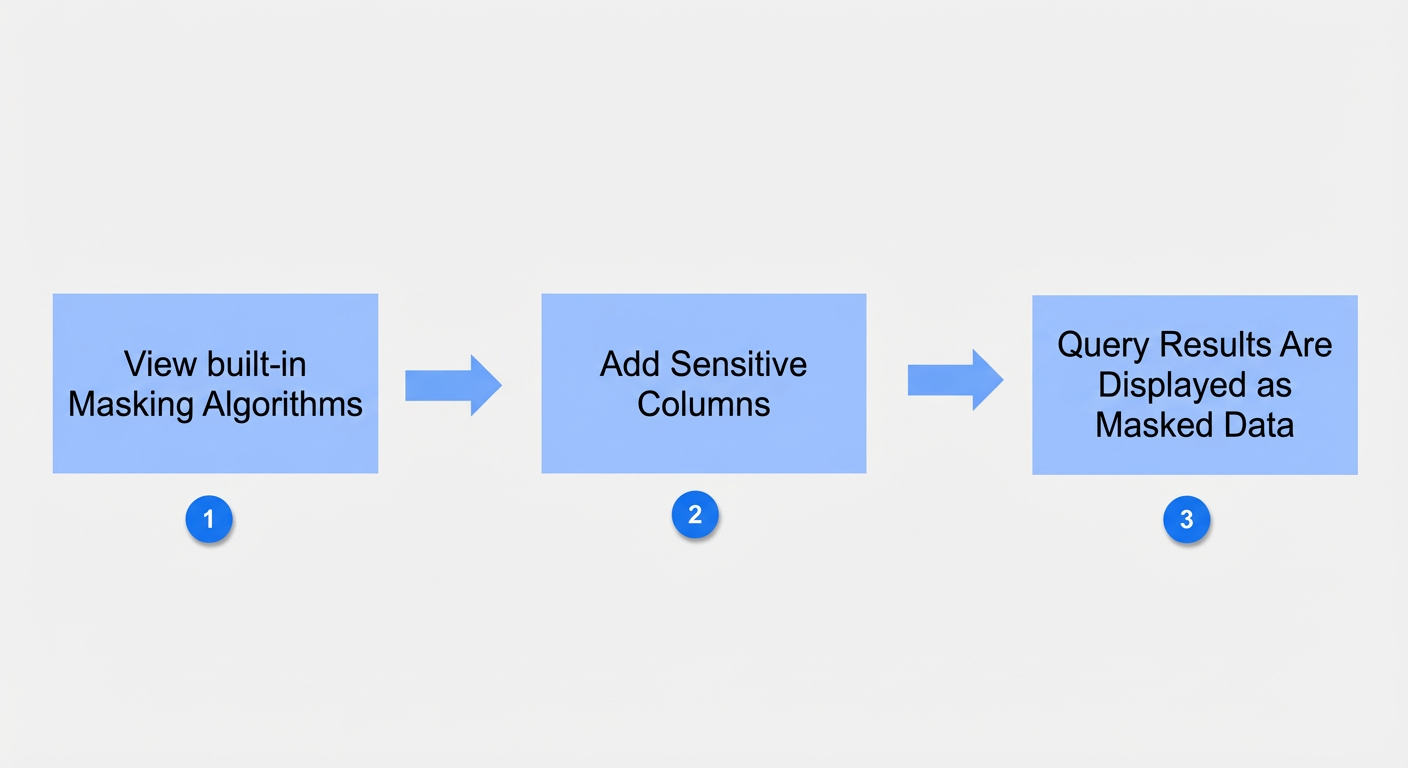
The project administrator views the built-in masking algorithms and tests their effects on the Security Specifications > Masking Algorithm page.
The project administrator manually adds sensitive columns in the target ODC project on the Sensitive Data page. To add sensitive columns by automatic scanning, you must create detection rules first.
When a user views table data, runs queries in the SQL window, exports result sets, creates export tickets, or creates database change tickets, the output for sensitive columns is masked data.
Prerequisites
Project administrators or Database Administrators (DBAs) can manage sensitive columns and detection rules.
All users can view and test masking effects. However, users cannot create, edit, or delete masking algorithms.
Notes
Data masking is not yet supported in the command line window.
Data masking is not yet supported for PL execution.
When you configure detection rule scripts, Groovy only lets you use the Objects and String classes in Java.
When you configure detection rule scripts, Groovy closures and built-in closure functions are not supported.
Manage sensitive columns
Add a sensitive column
Example: Mask the data in the `name` column of the `employee` table in the `odc_test` database.
Item |
Example value |
Data source |
mysql_4.2.0 |
Source database name |
odc_test |
Table name |
employee |
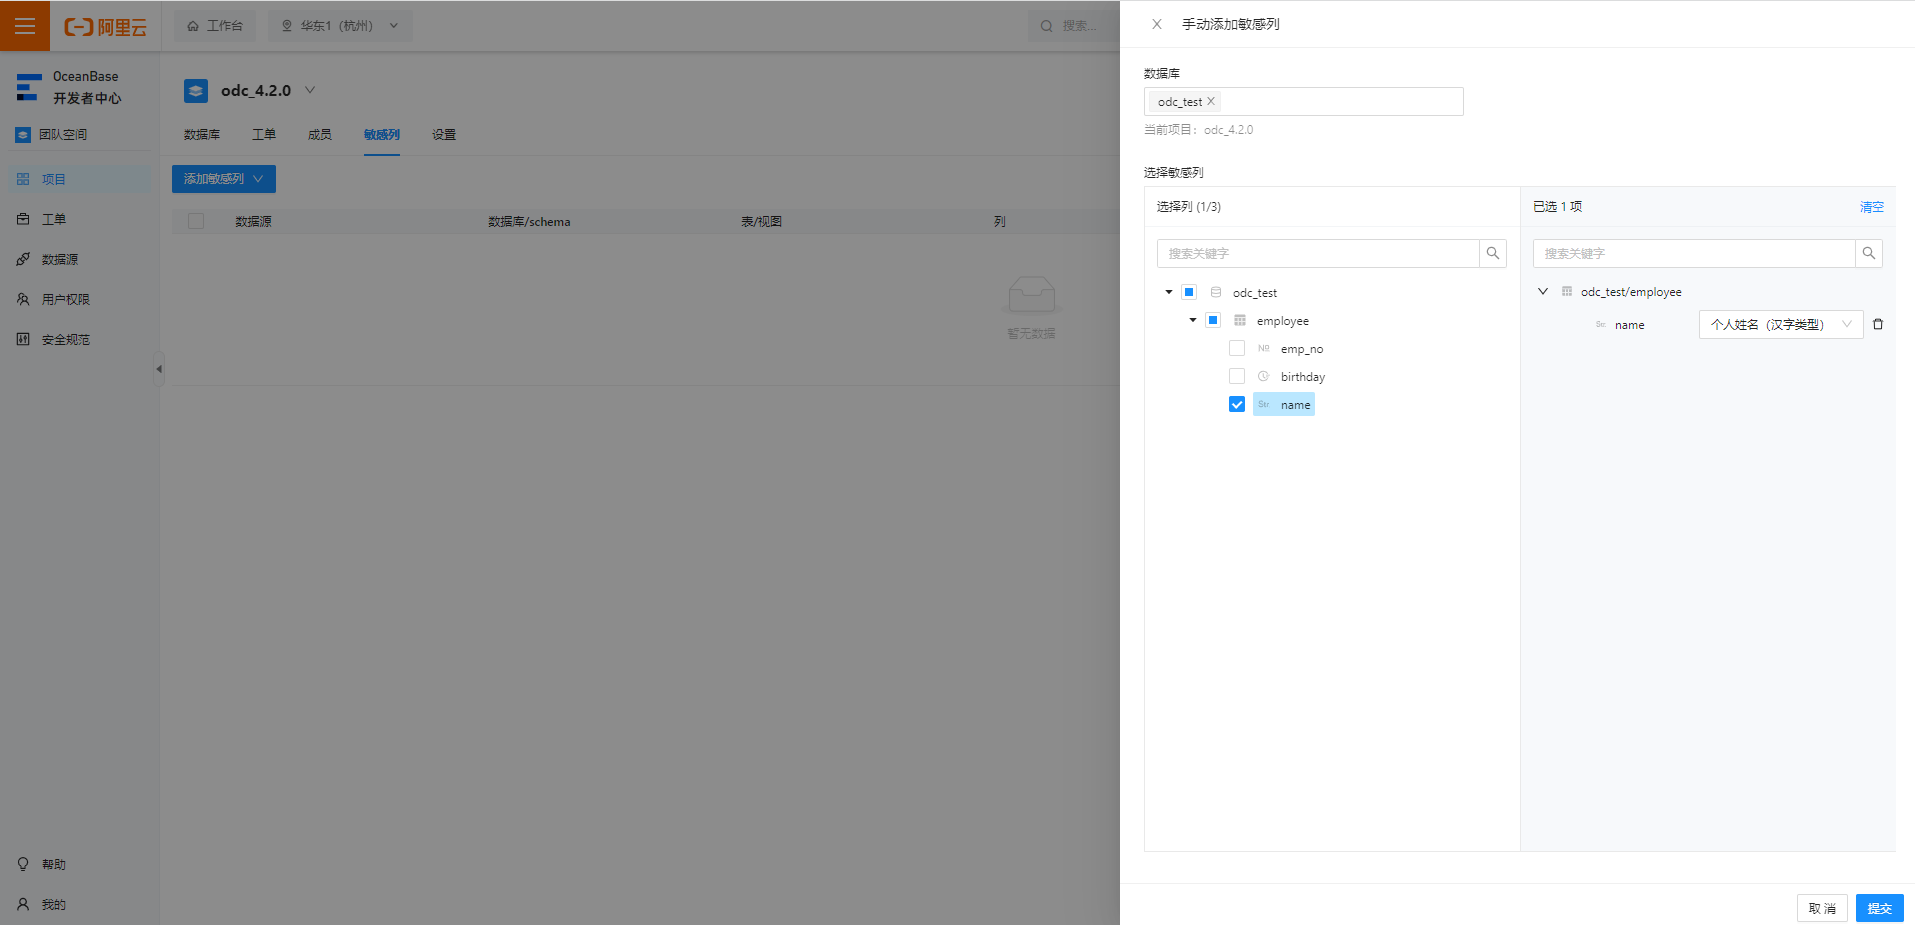
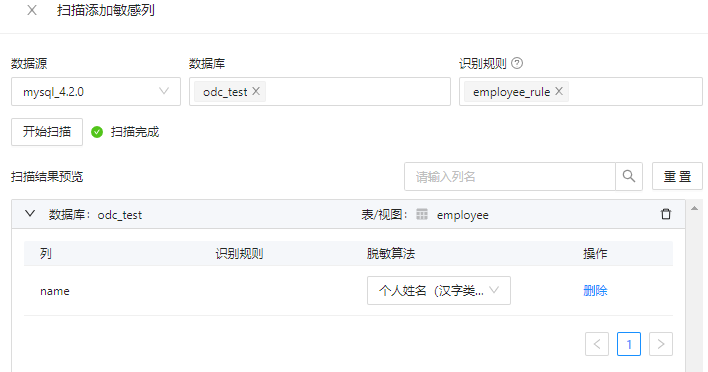
In the project collaboration window, click Project > Sensitive Column > Add Sensitive Column and then select Add Manually or Add by Scanning.

After you add a sensitive column using Add Manually or Add by Scanning, click Submit.
Method 1: Add a sensitive column manually.
Method 2: Scan for sensitive columns automatically.
NoteBefore you scan for sensitive columns automatically, you must create a detection rule. For more information, see the Manage detection rules section in this topic.
In the Sensitive Data list, view and enable the added sensitive columns.


Edit a sensitive column
As shown in the preceding figure, in the Sensitive Data list, click Edit in the Actions column to modify the masking algorithm for the sensitive column.
Delete a sensitive column
In the Sensitive Data list, click Delete in the Actions column to delete the sensitive column.
Manage detection rules
Detection rules extend the sensitive data management feature. You can use custom detection rules to automatically scan for and find sensitive columns. A detection rule defines matching conditions. ODC identifies data columns that meet these conditions as sensitive data. ODC provides three types of detection rules: path, regular expression, and script.
Path: The path rule uses the database name, table name, and column name of the sensitive column as the detection object. You can enter a path expression as the detection rule. Use periods (.) to separate database, table, and column names. Use asterisks (*) as wildcard characters. Use commas (,) to separate multiple matching rules.
Configuration item
Required
Description
Rule name
Yes
The name of the detection rule. The name can be up to 64 characters long.
Rule status
Yes
The status of the detection rule: Enabled/Disabled.
Matching rule
Yes
The rule used to match data columns as sensitive columns.
Example: `*.*.mobile_phone` matches a column named `mobile_phone` in any database and table.
Exclusion rule
No
The rule used to exclude data columns from being identified as sensitive.
ImportantWhen determining if a data column is sensitive, the exclusion rule is applied before the matching rule.
Masking algorithm
Yes
The default masking algorithm used for detected sensitive columns.
Rule description
No
The description of the detection rule.
Regular expression: The regular expression rule uses the database name, table name, column name, and column comment of the sensitive column as detection objects. You can enter a regular expression as the detection rule.
Configuration item
Required
Description
Rule name
Yes
The name of the detection rule. The name can be up to 64 characters long.
Rule status
Yes
The status of the detection rule: Enabled/Disabled.
Detection object - Database name
No
The regular expression used to match the database name.
Example:
*matches any database name.Detection object - Table name
No
The regular expression used to match the table name.
Example:
e[a-z]?.*matches any lowercase English table name that starts with the letter 'e'.Detection object - Column name
No
The regular expression used to match the column name.
Detection object - Column comment
No
The regular expression used to match the column comment.
Masking algorithm
Yes
The default masking algorithm used for detected sensitive columns.
Rule description
No
The description of the detection rule.
Script: The script rule uses the database name, table name, column name, column comment, and data type of the sensitive column as detection objects. You can enter a Groovy script as the detection rule.
ImportantThe script output must be a Boolean value:
TrueorFalse.Configuration item
Required
Description
Rule name
Yes
The name of the detection rule. The name can be up to 64 characters long.
Rule status
Yes
The status of the detection rule: Enabled/Disabled.
Groovy script
Yes
A script that conforms to Groovy syntax to determine if a column is sensitive.
Masking algorithm
No
The default masking algorithm used for detected sensitive columns.
Rule description
No
The description of the detection rule.
ODC has a built-in object named `column` that you can reference in Groovy scripts. The properties of the object are described in the following table:
Property
Type
Description
schema
String
The name of the database to which the column belongs.
table
String
The name of the table to which the column belongs.
name
String
The name of the column.
comment
String
The comment of the column.
type
String
The data type of the column.
Examples of common script-based detection rules:
Address
if (("varchar".equals(column.type) || "char".equals(column.type))) {
 if (column.name.indexOf("address") >= 0) {
 return true;
 }
 if (column.comment != null &&
 (column.comment.toLowerCase().indexOf("address") >= 0
 || column.comment.indexOf("residence") >= 0
 || column.comment.indexOf("location") >= 0)) {
 return true;
 }
}
return false;
Mobile phone number
if (column.name.length() == 11 && ("varchar".equals(column.type) || "char".equals(column.type))) {
 if (column.name.indexOf("phone") >= 0 || column.name.indexOf("mobile") >= 0) {
 return true;
 }
 if (column.comment != null &&
 (column.comment.toLowerCase().indexOf("phone") >= 0
 || column.comment.indexOf("telephone") >= 0
 || column.comment.indexOf("mobile") >= 0)) {
 return true;
 }
}
return false;
ID card number
if (column.name.length() >= 15 && ("varchar".equals(column.type) || "char".equals(column.type))) {
 if (column.name.indexOf("id_number") >= 0 || column.name.indexOf("identity_card") >= 0) {
 return true;
 }
 if (column.comment != null &&
 (column.comment.toLowerCase().indexOf("identity card") >= 0
 || column.comment.indexOf("ID card") >= 0)) {
 return true;
 }
}
return false;
Add a detection rule
Example: An administrator adds a detection rule for the `name` column of the `employee` table in the `odc_test` database.
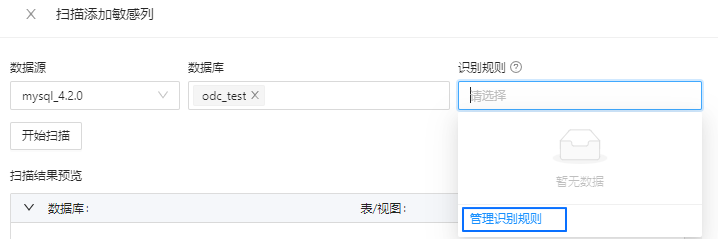
In the project collaboration window, click Project > Sensitive Column > Add Sensitive Column > Add by Scanning.
On the Add Sensitive Columns by Scanning page, select Detection Rule > Manage Detection Rules.
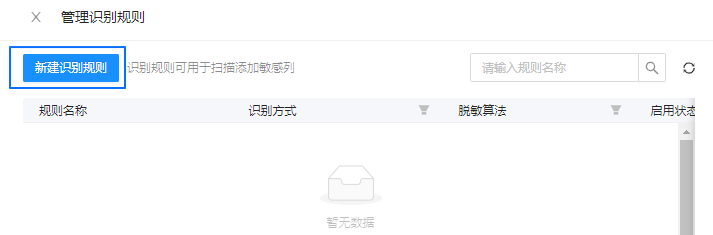
On the Manage Detection Rules page, click Create Detection Rule.
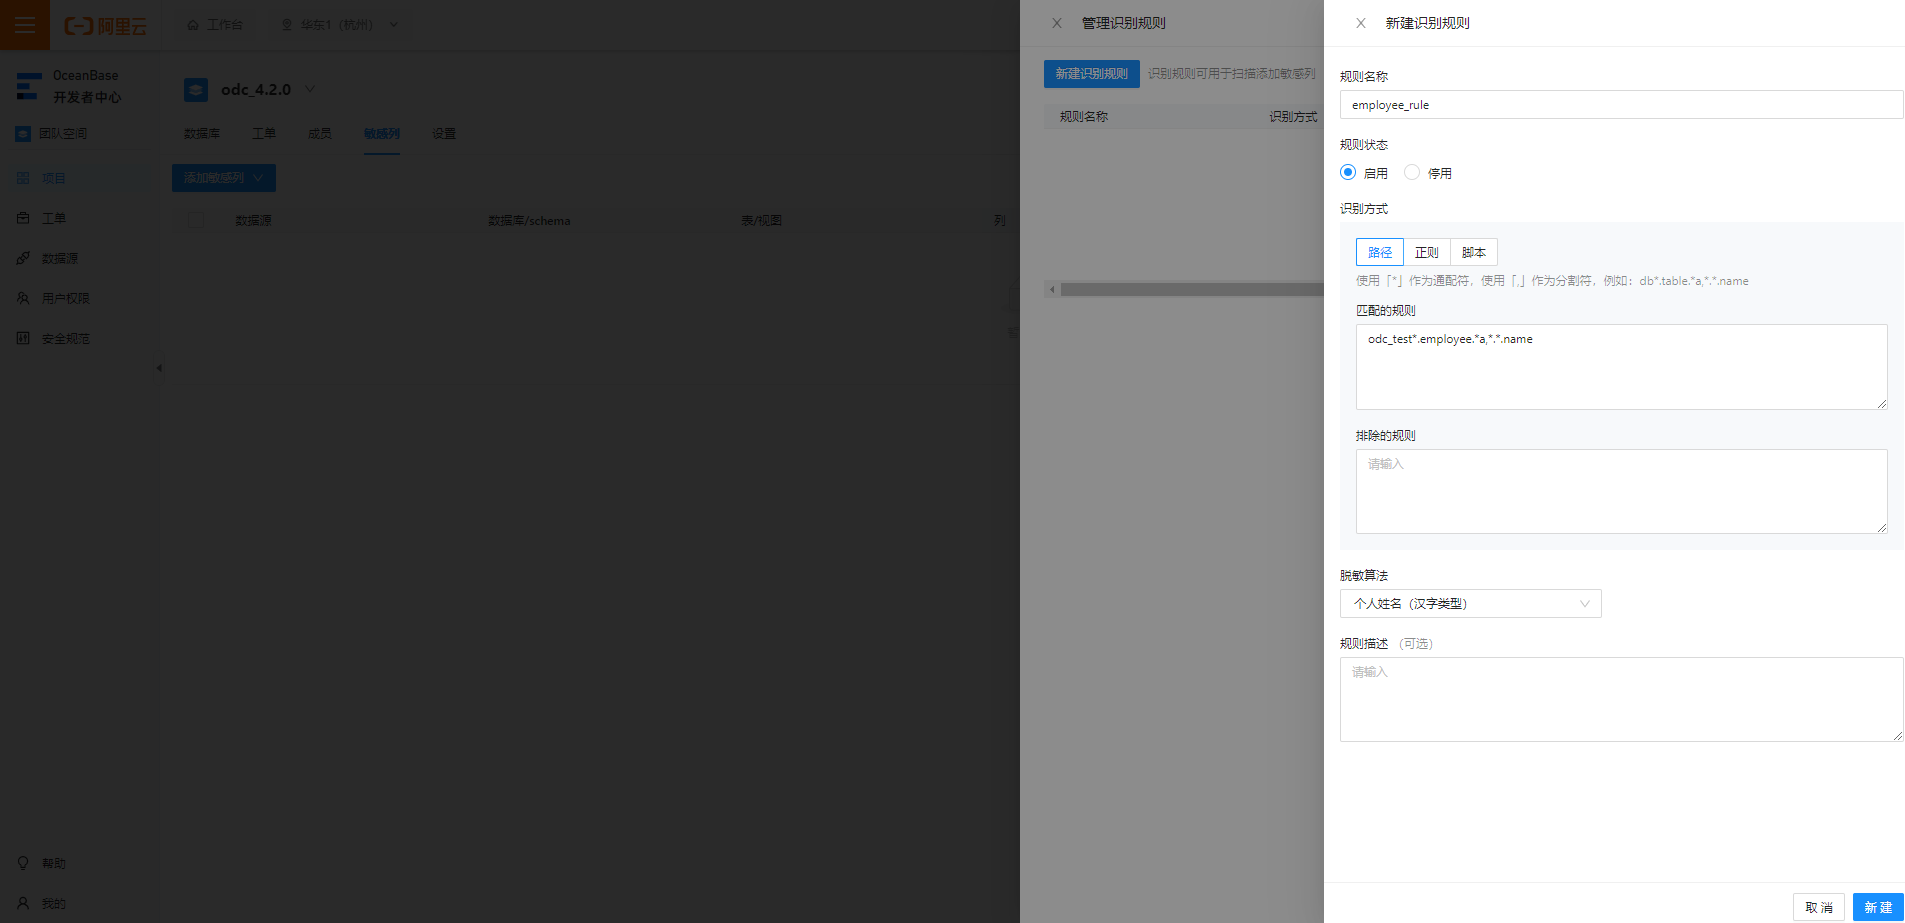
On the Create Detection Rule page, enter or select the rule name, rule status, detection method, and masking algorithm. Then, click Create.
Path example:
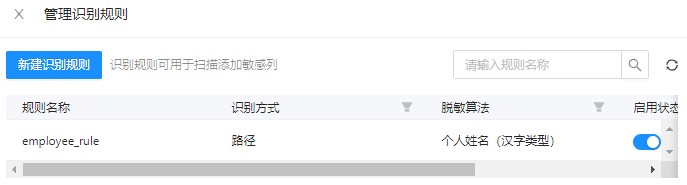
odc_test*.employee.*a,*.*.namematches the `name` column of the `employee` table in the `odc_test` database.In the Detection Rules list, view and enable the added detection rule.

Manage a detection rule
As shown in the preceding figure, click Edit or Delete in the Actions column to modify or delete a detection rule.
View masking algorithms
You can view the masking algorithms that ODC supports in the project collaboration window on the Security Specifications > Masking Algorithm page.
ODC supports the following masking algorithms:
Algorithm name |
Test data |
Result preview |
Full masking (system default) |
test value |
***** |
Personal name (Chinese characters) |
Personal Name |
**Name |
Personal name (letters) |
Personal Name |
P** |
Nickname |
Nickname |
N***e |
Mailbox |
***@oceanbase.com |
***@oceanbase.com |
Address |
Hangzhou, Zhejiang Province, China |
Hangzhou, Z*** |
Mobile phone number |
1350000**** |
135******00 |
Landline number |
010-12345678 |
**********78 |
Certificate number |
123456789 |
1*******9 |
Bank card number |
1234 5678 5678 1234 |
***************1234 |
License plate number |
ZheAB1234 |
ZheA**234 |
Unique device identifier |
AB123456789CD |
****89CD |
IP address |
10.123.456.789 |
10...* |
MAC address |
ab:cd:ef:gh:hi:jk |
ab:*:*:*:*:* |
MD5 |
default |
c21f969b5f03d33d43e04f8f136e7682 |
SHA256 |
default |
37a8eec1ce19687d132fe29051dca629d164e2c4958ba141d5f4133a33f0688f |
SHA512 |
default |
1625cdb75d25d9f699fd2779f44095b6e320767f606f095eb7edab5581e9e3441adbb0d628832f7dc4574a77a382973ce22911b7e4df2a9d2c693826bbd125bc |
SM3 |
default |
40c357923156504f734717d8b4f5623e75209e9572701f4b51ef2a03d9ced863 |
Round number |
123.456 |
123 |
Set to empty |
default |
- |
Default rule |
abcd1234 |
abc**234 |
Scenarios
Masking for added sensitive columns is active during data export, database changes, and SQL statement execution in the SQL window.
Scenario 1: Enable data masking during data export
Example: When you export the `student` table from the `odc_test` database, data masking is automatically enabled.
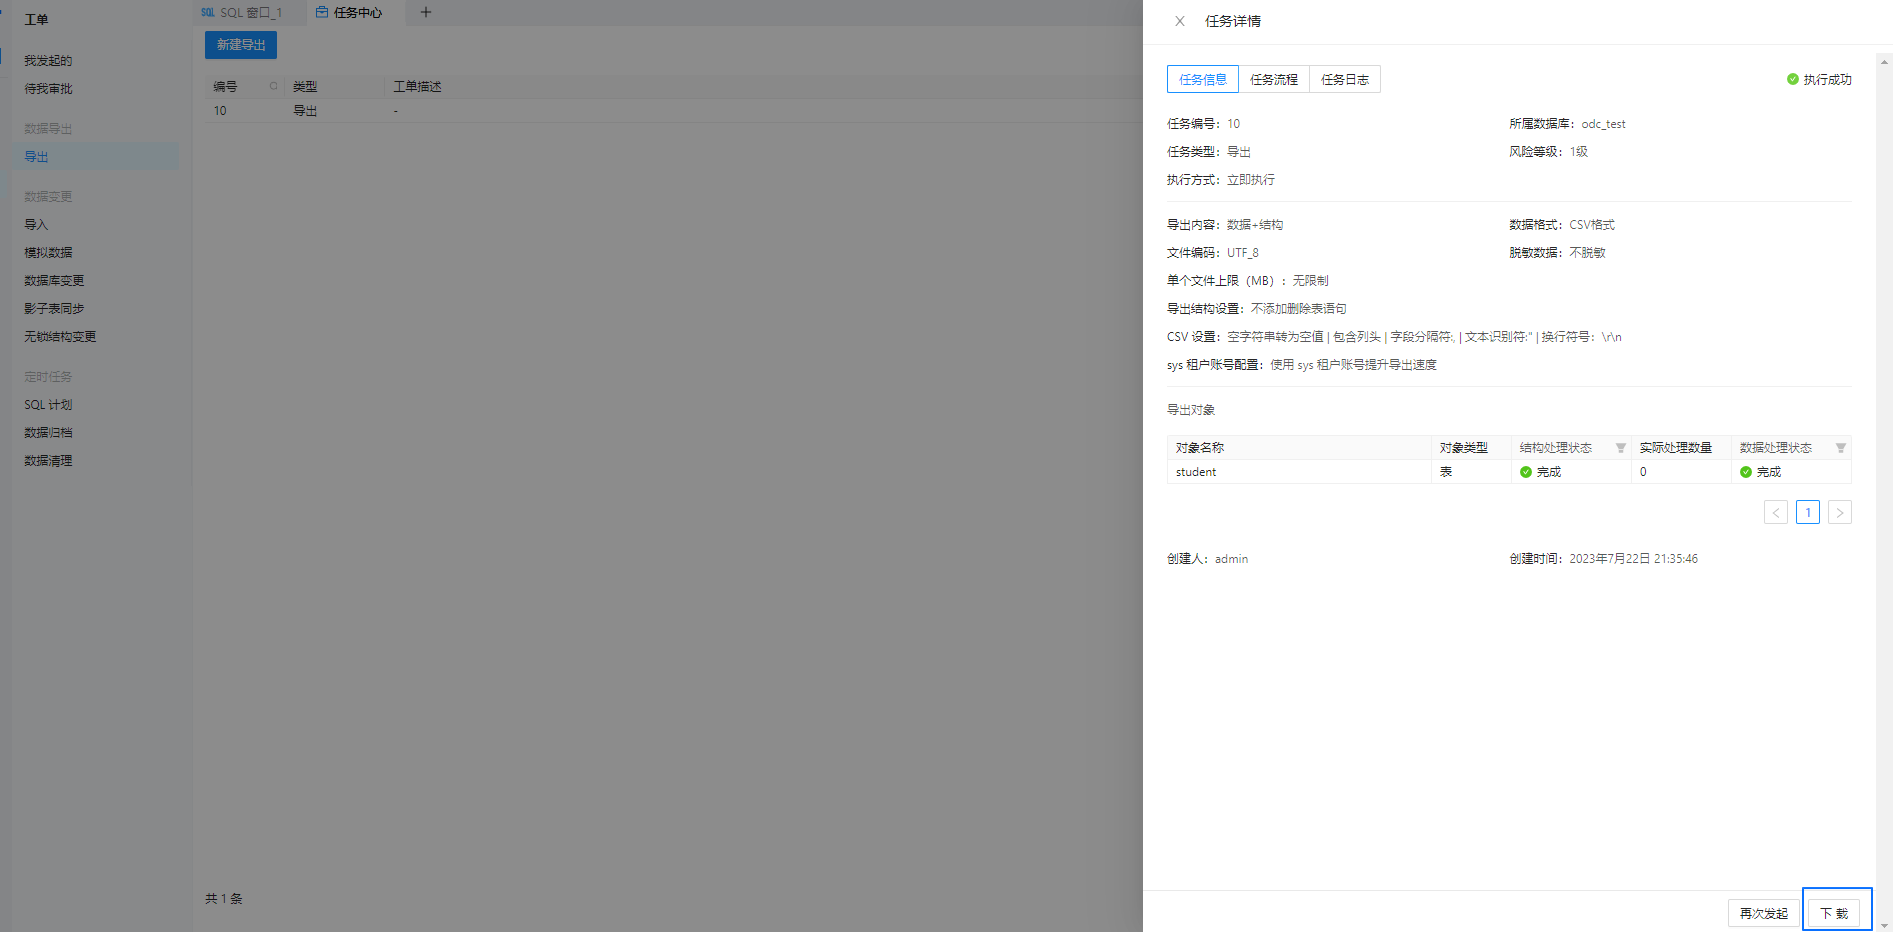
In the navigation pane on the left of the SQL development window, use a ticket to export the structure and data of the `student` table. Then, in the export list, click View in the Actions column.
On the export task details page, click Download in the lower-right corner.
You can view the downloaded `student` table on your local disk.


Scenario 2: Database change
Example: When you insert data into the `student` table, data masking is automatically enabled.
In the navigation pane on the left of the SQL development window, use a ticket to create a database change and insert data into the `student` table.
In the navigation pane on the left of the SQL developer window, under
, you can view the masked data from the student table in the odc_test database.
 , you can view the masked data from the student table in the odc_test database.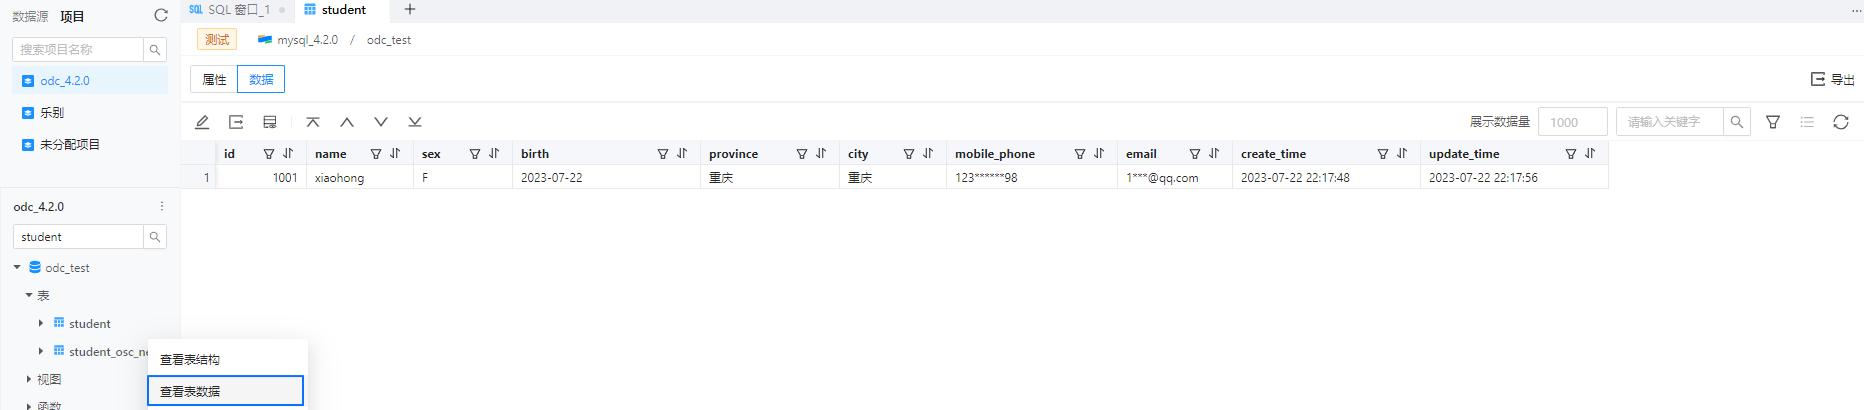
Scenario 3: Execute statements in the SQL window
For example, if you insert data into the student table, data masking is automatically applied.
In the SQL window, you can edit the SQL statement to insert data into the student table.
In the Result tab, you can view the masked data from the `student` table.
