Create a user and grant permissions for an OceanBase Serverless instance
This topic describes how to create a standard account for an OceanBase Serverless instance and the minimum permissions required for the account during different data migration stages.
Background information
Currently, Serverless for MySQL is the only supported instance type for Serverless instances. Supported database accounts include standard accounts, super accounts, and read-only accounts. When you use Data Transmission Service (DTS) to migrate data from a Serverless instance:
If you use a standard account, grant permissions as described in this topic.
If you use a super account, it has read and write permissions on all databases by default.
If you use a read-only account, it has read-only permissions on all databases by default.
The standard account created in this topic is used for the Username field when you create a data source for an OceanBase Serverless instance.

To migrate tables without unique keys, you must also create the __oceanbase_inner_drc_user user with read-only permissions before you execute the data migration task. The password for this user is required for the __oceanbase_inner_drc_user Password field when you create the OceanBase data source.
Create a standard account for a Serverless instance
Go to the Serverless Instance Workbench page.
Log on to the OceanBase Management Console .
In the upper-left corner of the console, select the region where the destination instance is located.
In the navigation pane on the left, click Instance List. Click the name of the destination instance that has an Instance Type of Serverless.
For more information about how to create a Serverless instance, see Create a Serverless instance.
On the Serverless Workbench page, click Account Management in the navigation pane on the left.
On the Account Management page, click Create Account in the upper-right corner.

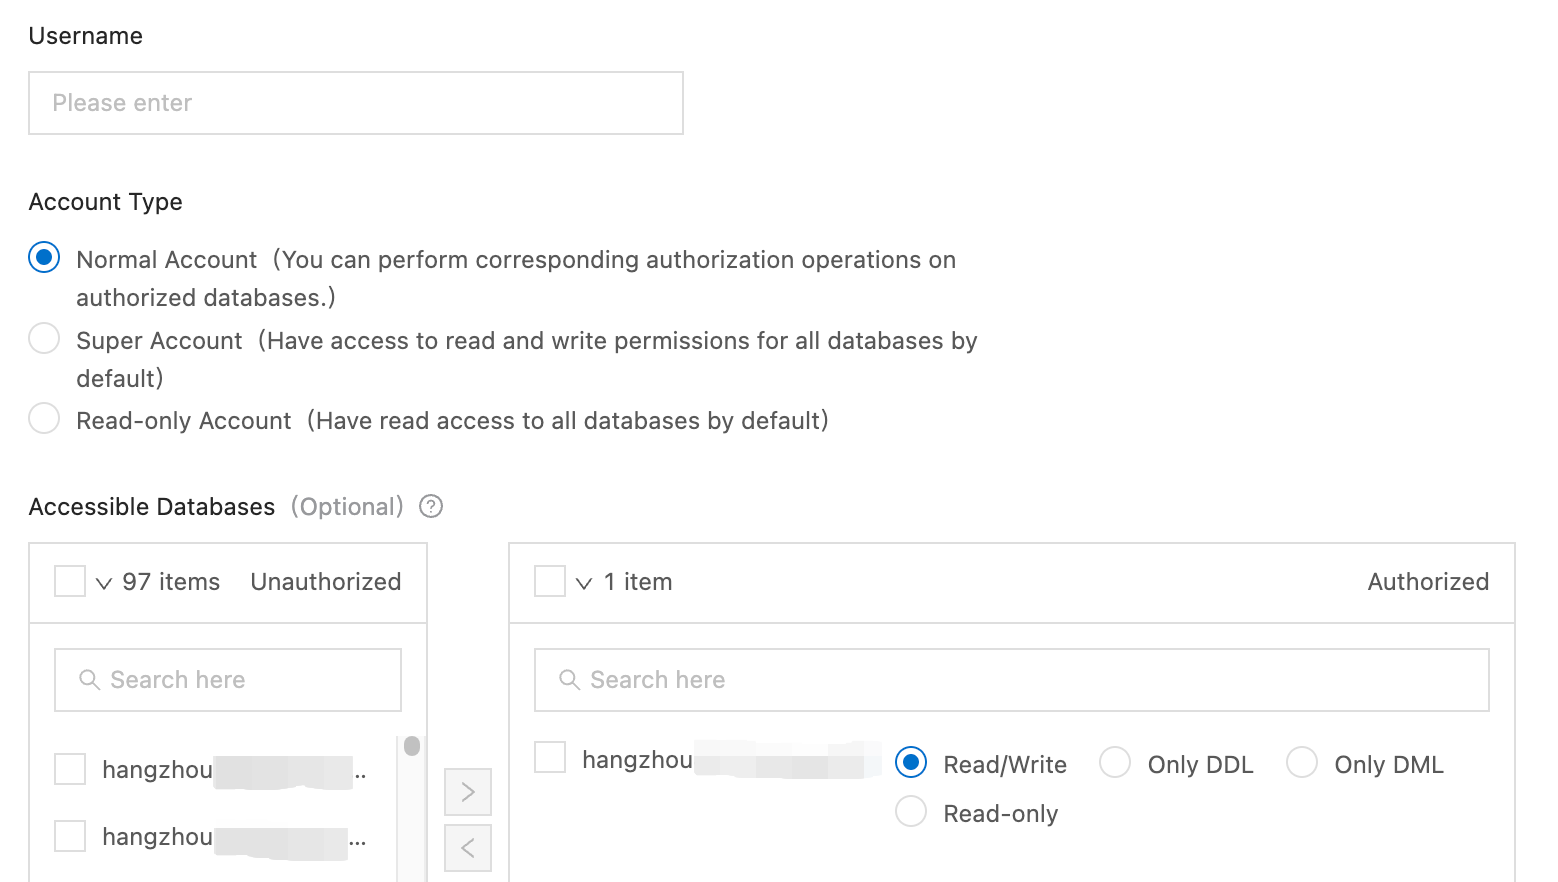
In the Create Account dialog box, configure the parameters.
Parameter
Description
Username
Must consist of letters, digits, and underscores (_). It must start with a letter and end with a letter or digit. The username can be up to 32 characters long.
Account Type
Select Standard Account.
Authorized Databases (Optional)
Grant the account permissions on one or more databases.
In the Unauthorize list on the left, select one or more databases to authorize and click > to add them to the list on the right.
In the Authorized list on the right, grant Read/Write, DDL Only, DML Only, or Read-only permissions to a database.
Password
The password must be 10 to 32 characters long and contain at least three of the following character types: uppercase letters, lowercase letters, digits, and special characters, including !@#$%^&*()_+-=. You can also click Randomly Generate to automatically fill in a password.
NoteYou can click Copy Password to copy the password. Save it in a secure location.
Remarks (Optional)
Enter remarks for the account.
Click OK.
Permissions for a standard account of a source Serverless instance
The following table describes the minimum permissions required for a standard account on a Serverless instance when the instance is used as a data source during different data migration stages.
Table classification | Schema migration | Full migration | Incremental DML synchronization | Incremental DDL synchronization | Full verification | Reverse Incremental |
Tables with primary keys or non-empty unique keys | Read-only | Read-only | Read-only | Read-only | Read-only |
|
Tables without primary keys or non-empty unique keys | Read-only |
| Read-only | Read-only | The __oceanbase_inner_drc_user user is required. |
|
Permissions for a standard account of a destination Serverless instance
The following table describes the minimum permissions required for a standard account on a Serverless instance when the instance is used as a destination during different data migration stages.
Table classification | Schema migration | Full migration | Incremental DML synchronization | Incremental DDL synchronization | Full verification | Reverse Incremental DML | Reverse incremental DDL synchronization |
Tables with primary keys or non-empty unique keys | DDL Only | Read/Write | Read/Write | DDL Only | Read-only | Read-only | Read-only |
Tables without primary keys or non-empty unique keys | DDL Only | Read/Write | Read/Write | DDL Only | Not supported | Read-only | Read-only |
Create and grant permissions to the __oceanbase_inner_drc_user user
Go to the Tenant Workbench page of the OceanBase Management Console.
On the Tenant Workbench page, click Log On to Database in the upper-right corner.
You can also go to the Database Management page to log on.

In the Select Database Account dialog box, enter the name of the database that you want to log on to, and click OK.
In the Enter Connection Password dialog box, enter the password for the database account, and click OK.
After you log on to the database, execute the following command to create the
__oceanbase_inner_drc_useruser.create user __oceanbase_inner_drc_user identified by '<password>';After the user is created, execute the following command to grant permissions to the user.
grant select on *.* to __oceanbase_inner_drc_user;