This guide explains how to use ACS LLM inference container images to create workloads on an ACS cluster and quickly build an LLM inference environment.
Prerequisites
You have created an ACS cluster.
You have created a NAS storage volume that contains the model files.
ACS LLM inference container images
Use one of the following ACS LLM inference container images when you configure workloads on your ACS instances.
ACS AI container images are standard, free-to-use images provided by Lingjun products. For the latest image releases, see ACS Container Image Release Notes.
We recommend using a VPC to accelerate image pulls and reduce pull times.
Image name | Image tag | Public image address | VPC image address | Description |
inference-xpu-pytorch | 25.03-v1.4.3-hotfix-vllm0.7.3-torch2.5-cu123-20250331 | egslingjun-registry.cn-wulanchabu.cr.aliyuncs.com/egslingjun/inference-xpu-pytorch:25.03-v1.4.3-hotfix-vllm0.7.3-torch2.5-cu123-20250331 |
|
|
This image supports the vLLM framework for building large language model inference services. For more information, see vLLM.
You can build your own images based on this image and store them in your ACR repository to accelerate image pulls. This may incur additional fees.
For a list of the core AI libraries built into the image, see the latest image component list.
Deploy an LLM inference workload
Step 1: Configure a Deployment
Use the kubectl command-line tool or the ACS console to create a Deployment for the LLM inference workload.
When you create the workload for the first time, the system pulls the image, which takes approximately 20 minutes. You can check the pod status on the Workloads > Pods > Events page of the destination cluster. The Qwen2.5-7B-Instruct model takes about 5 to 10 minutes to load. The actual time may vary depending on your deployment environment.
You can also create a pod directly for testing. The following sample YAML can be used to quickly start a Zhenwu-810E pod.
Console
The following steps show how to create a Deployment. The procedure is similar for other types of workloads.
Log on to the ACS console. In the left navigation pane, click Clusters.
On the Clusters page, click the name of the target cluster. In the left navigation pane, choose Workloads > Deployments.
Click Create from YAML, use the following YAML to create a Deployment, and then click Create.
apiVersion: apps/v1
kind: Deployment
metadata:
  labels:
    app: llm-test
  name: llm-test
  namespace: default
spec:
  progressDeadlineSeconds: 600
  replicas: 1
  revisionHistoryLimit: 10
  selector:
    matchLabels:
      app: llm-test
  template:
    metadata:
      labels:
        alibabacloud.com/hpn-type: rdma
        alibabacloud.com/compute-class: gpu-hpn
        app: llm-test
    spec:
      containers:
        - command:
          - sh
          - -c
          - python3 -m vllm.entrypoints.openai.api_server --model /mnt/Qwen2.5-7B-Instruct --trust-remote-code  --tensor-parallel-size 8  --disable-custom-all-reduce
          # --tensor-parallel-size 8 enables 8-GPU parallelism.
          # /mnt/Qwen2.5-7B-Instruct is the model path in the pod.
          image: acs-registry-vpc.cn-wulanchabu.cr.aliyuncs.com/egslingjun/inference-xpu-pytorch:25.03-v1.4.3-hotfix-vllm0.7.3-torch2.5-cu123-20250331
          imagePullPolicy: IfNotPresent
          name: llm-test
          resources:
            limits:
              cpu: 176
              memory: 1800G
              alibabacloud.com/ppu: 16
            requests:
              cpu: 176
              memory: 1800G
              alibabacloud.com/ppu: 16
          terminationMessagePath: /dev/termination-log
          terminationMessagePolicy: File
          volumeMounts:
            - mountPath: /mnt # NAS mount path
              name: data
            - mountPath: /dev/shm
              name: cache-volume
      dnsPolicy: ClusterFirst
      restartPolicy: Always
      schedulerName: default-scheduler
      securityContext: {}
      terminationGracePeriodSeconds: 30
      volumes:
        - name: data
          persistentVolumeClaim:
            claimName: nas-pvc-fs # nas-pvc-fs is the persistent volume claim created from NAS.
        - name: cache-volume
          emptyDir:
            medium: Memory
            sizeLimit: 500G
Return to the Deployments page to view the new Deployment.
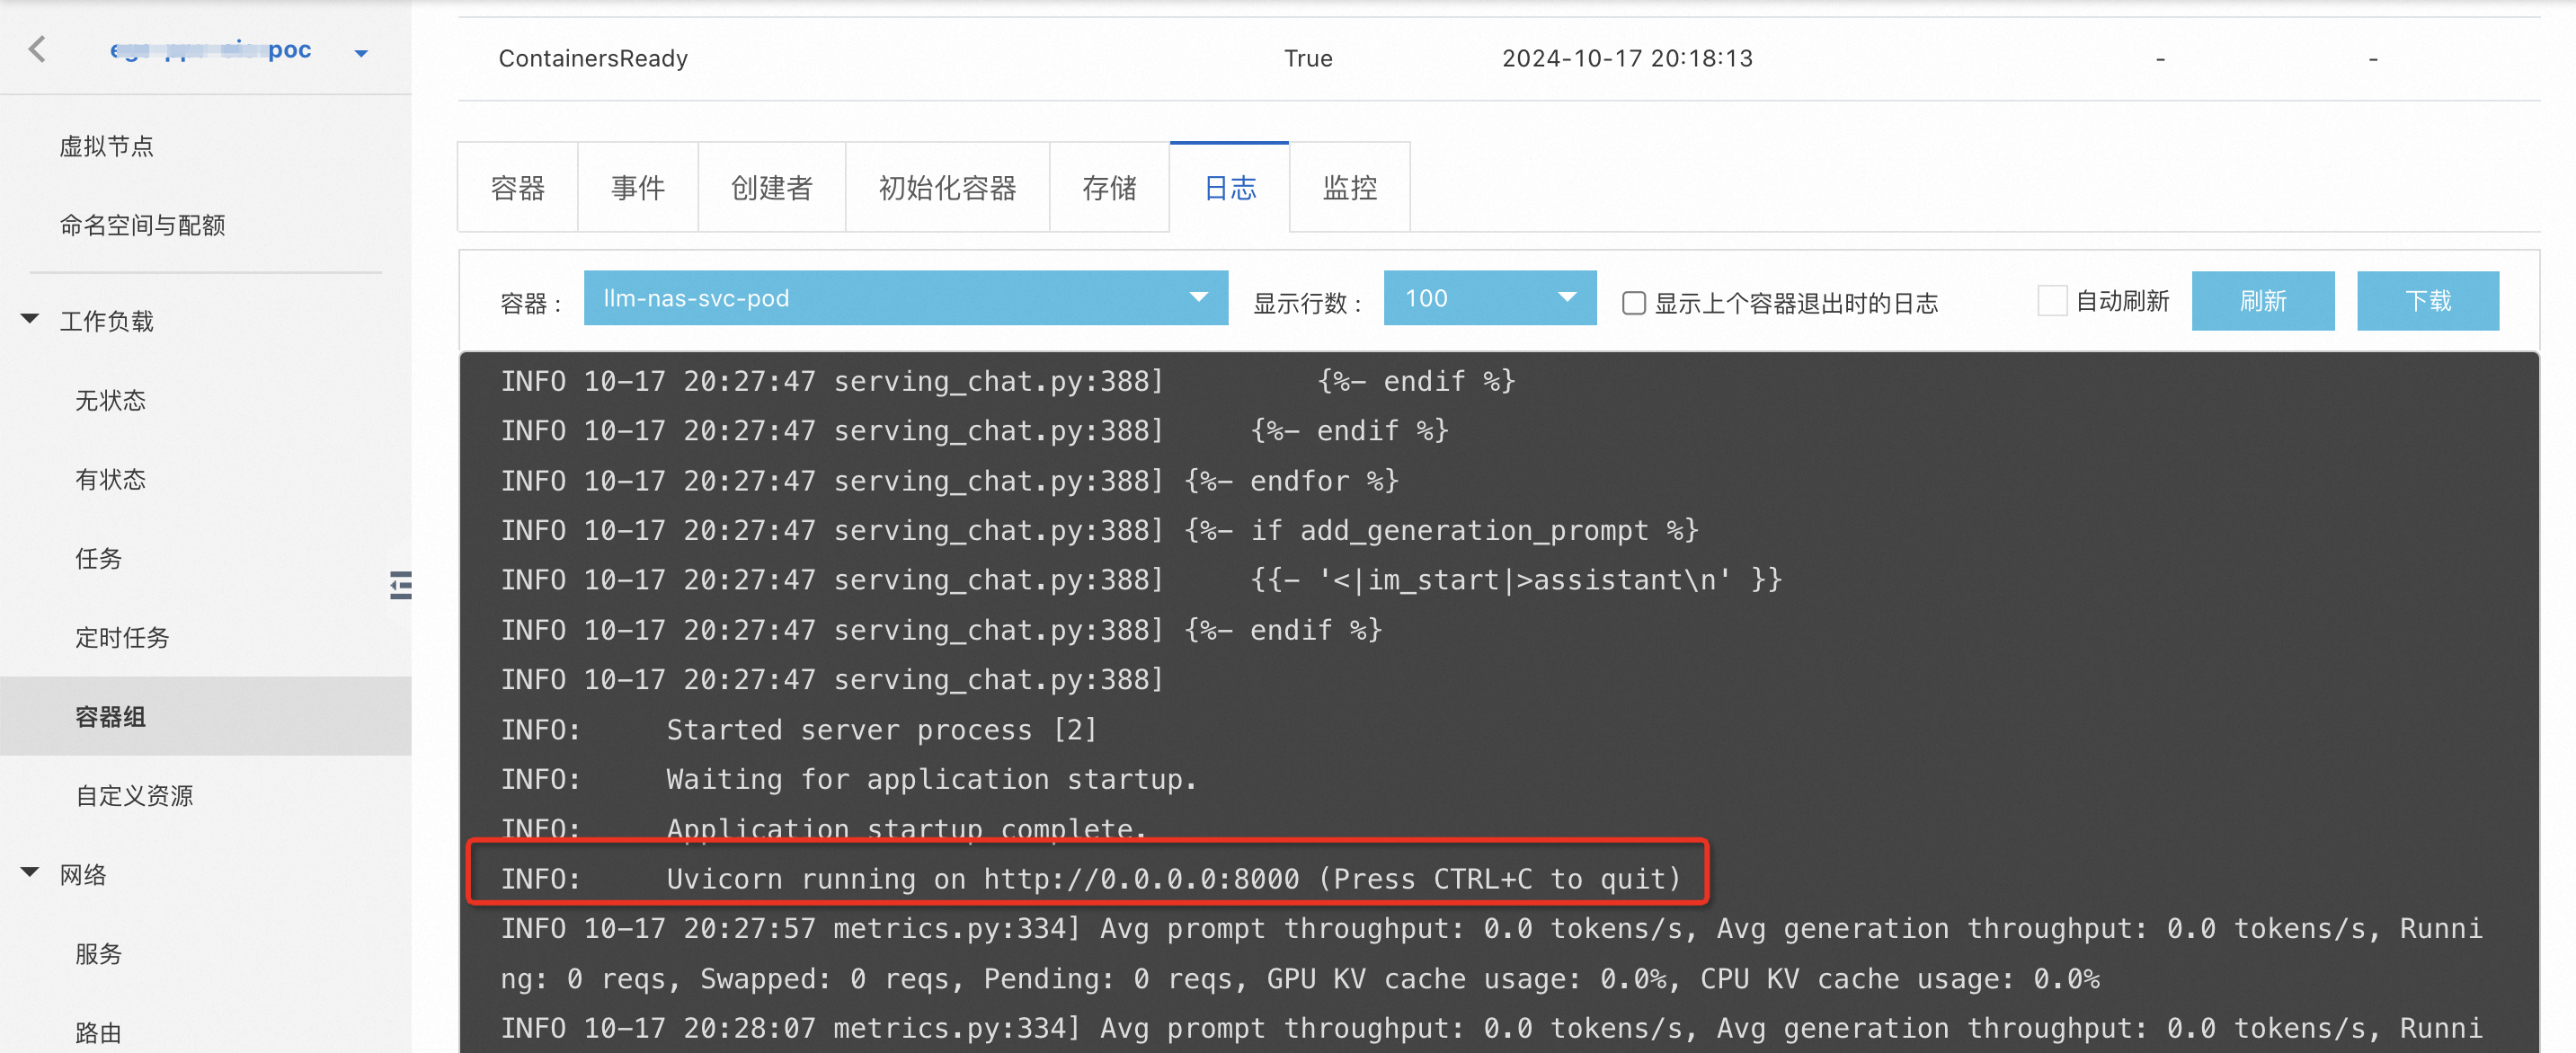
The Deployment is created successfully when the pod status changes to Running. After the pod starts, the vLLM serving service starts automatically.
On the workload's tab, view the service logs. If output similar to the following is displayed, the service has started successfully.
kubectl
Connect to the cluster by using kubectl. For more information, see Obtain the kubeconfig file of a cluster and use kubectl to connect to the cluster.
Save the following sample YAML content to a file named llm-test.yaml.
apiVersion: apps/v1
kind: Deployment
metadata:
  labels:
    app: llm-test
  name: llm-test
  namespace: default
spec:
  progressDeadlineSeconds: 600
  replicas: 1
  revisionHistoryLimit: 10
  selector:
    matchLabels:
      app: llm-test
  template:
    metadata:
      labels:
        alibabacloud.com/hpn-type: rdma
        alibabacloud.com/compute-class: gpu-hpn
        app: llm-test
    spec:
      containers:
        - command:
          - sh
          - -c
          - python3 -m vllm.entrypoints.openai.api_server --model /mnt/Qwen2.5-7B-Instruct --trust-remote-code  --tensor-parallel-size 8  --disable-custom-all-reduce
          # --tensor-parallel-size 8 enables 8-GPU parallelism.
          # /mnt/Qwen2.5-7B-Instruct is the model path in the pod.
          image: acs-registry-vpc.cn-wulanchabu.cr.aliyuncs.com/egslingjun/inference-xpu-pytorch:25.03-v1.4.3-hotfix-vllm0.7.3-torch2.5-cu123-20250331
          imagePullPolicy: IfNotPresent
          name: llm-test
          resources:
            limits:
              cpu: 176
              memory: 1800G
              alibabacloud.com/ppu: 16
            requests:
              cpu: 176
              memory: 1800G
              alibabacloud.com/ppu: 16
          terminationMessagePath: /dev/termination-log
          terminationMessagePolicy: File
          volumeMounts:
            - mountPath: /mnt # NAS mount path
              name: data
            - mountPath: /dev/shm
              name: cache-volume
      dnsPolicy: ClusterFirst
      restartPolicy: Always
      schedulerName: default-scheduler
      securityContext: {}
      terminationGracePeriodSeconds: 30
      volumes:
        - name: data
          persistentVolumeClaim:
            claimName: nas-pvc-fs # nas-pvc-fs is the persistent volume claim created from NAS.
        - name: cache-volume
          emptyDir:
            medium: Memory
            sizeLimit: 500G
Run the following command to deploy the Deployment from the YAML file:
kubectl --kubeconfig config apply -f llm-test.yamlAfter the Deployment is created, run the following command to check if the pod has started successfully:
The pod has started successfully if its status is Running.
kubectl --kubeconfig config get podsAfter the pod starts, run the
kubectl logscommand to check if the vLLM service has started successfully.kubectl --kubeconfig config logs llm-test-68xxxxx9r5tf
Step 2: Create a service
Log on to the ACS console. In the left navigation pane, click Clusters.
On the Clusters page, click the name of the target cluster. In the left navigation pane, choose Network > Services.
Click Create. Configure the
llm-svcservice with the following settings, associate it with the workload from the previous step, and then click OK.Associated workload:
app: llm-testPort mapping:
Name:
servingService port:
8000Container port:
8000Protocol:
TCP
Return to the services list to view the
llm-svcservice.
Step 3: Test LLM inference
The following example uses the Qwen2.5-7B-Instruct model to test the vLLM chat inference feature:
# Replace IP with the external IP address of the service created in the previous step.
# The 'model' parameter specifies the model path in the pod.

curl http://IP:8000/v1/chat/completions \
    -H "Content-Type: application/json" \
    -d '{
    "model": "/mnt/Qwen2.5-7B-Instruct",
    "messages": [
    {"role": "system", "content": "You are a friendly AI assistant."},
    {"role": "user", "content": "Tell me about deep learning."}
    ]}'
Clean up resources
Use the kubectl command-line tool or the ACS console to clean up the resources.
Log on to the Container Compute Service console. On the Deployments, StorageClasses, and Persistent Volume Claims pages, delete the corresponding resources.
Use the
kubectlcommand-line tool to delete the Deployment, persistent volume claim (PVC), and storage class.# Deleting the Deployment automatically cleans up the pods. kubectl --kubeconfig config delete deployment llm-test # Delete the persistent volume claim. kubectl --kubeconfig config delete pvc nas-pvc-fs # Delete the storage class. kubectl --kubeconfig config delete sc alicloud-nas-fs