When you first use Alibaba Container Compute Service (ACS), you must grant the default system role to your service account. This allows ACS to access other services, such as ECS, OSS, NAS, CPFS, and SLB, to create clusters and save logs. This topic shows you how to quickly deploy an AI inference service using Zhenwu 810E in ACS.
Prerequisites
You have registered an Alibaba Cloud account and completed individual real-name verification.
You have completed the first-time setup for Alibaba Container Compute Service. This includes activating ACS and granting it permissions to access required cloud resources.
You have activated the NAS service. This topic uses a NAS storage volume to persist model files.
Solution overview
To deploy an AI inference service on ACS, you first activate and authorize Alibaba Container Compute Service (ACS) and then create an ACS cluster. After the cluster is created, you will create a storage volume, deploy Zhenwu 810E GPU compute resources to the cluster, and finally deploy a large language model and start the inference service.

Create an ACS cluster
This section shows how to quickly create an ACS cluster using only essential parameters.
For detailed information about all cluster configuration parameters, see Create an ACS cluster.
-
Log on to the ACS console. In the left navigation pane, click Clusters.
-
On the Clusters page, click Create Kubernetes Cluster in the upper-left corner.
On the Create Cluster page, configure the following parameters and use the default settings for the rest.
Parameter
Description
Example
Cluster name
Enter a name for the cluster.
ACS-PPU-InferenceRegion
Select the region where the cluster will be located.
China (Wulanchabu)Click Confirm Configuration. After all dependency checks pass, click Create Cluster.
The cluster creation process takes about 5 to 10 minutes.
Create a storage volume
This section shows how to create a NAS file system to use as a persistent storage volume for model files.
For more information about using NAS or OSS storage volumes to persist model files, see Quickly build a data storage volume for large language models by using ACS.
On the Cluster List page, click the cluster name
ACS-PPU-Inferenceto go to the Basic Information page, and then obtain the cluster's VPC and vSwitch IDs.In the Network section, under VPC, obtain the VPC ID of the cluster.

In the Control Plane vSwitch section on the right, click Edit. Using China (Wulanchabu) Zone C as an example, obtain the vSwitch ID.
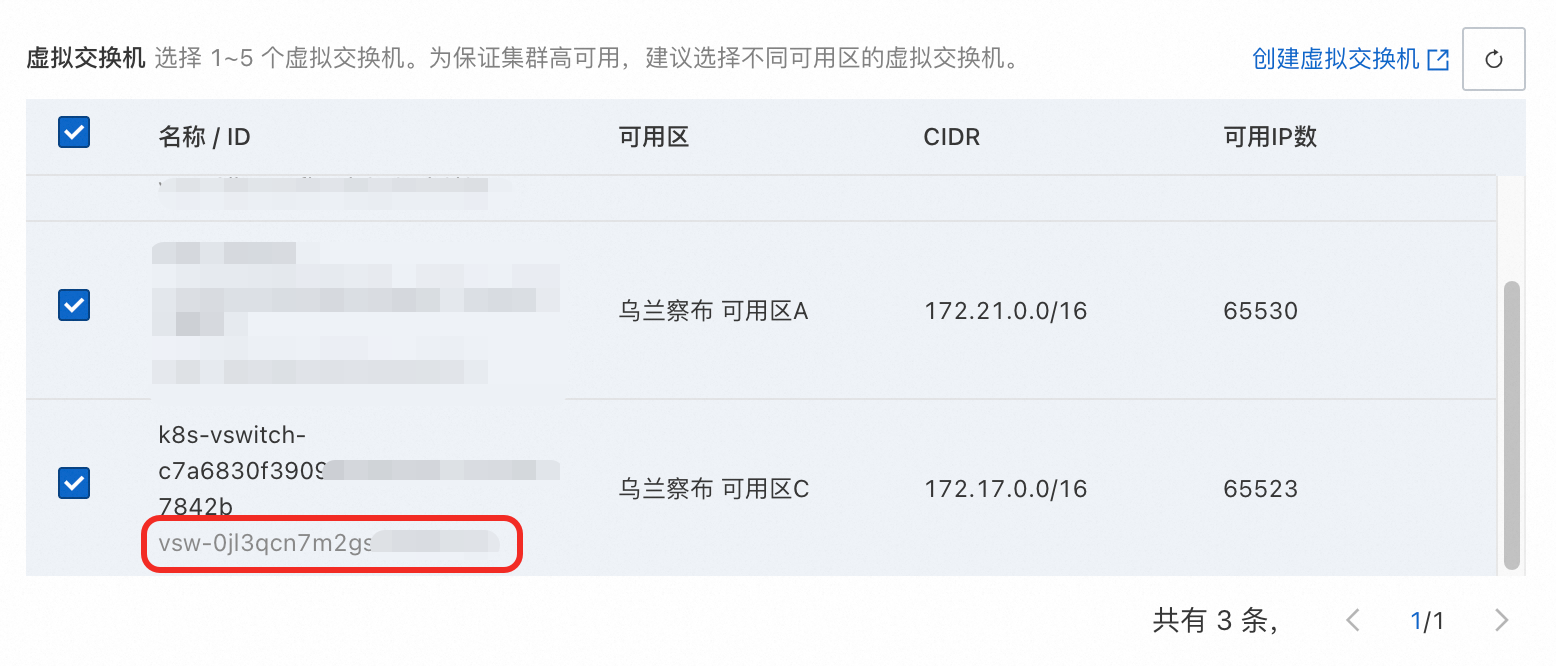
In the left-side navigation pane, choose Workloads > Custom Resources. Select the CustomResourceDefinition tab, click Create from YAML, paste the following YAML, and then click Create.
Replace
vpcIdandvSwitchIdin the YAML with the VPC and vSwitch IDs from the previous step.apiVersion: storage.k8s.io/v1 kind: StorageClass metadata: name: nas-llm-sc mountOptions: - nolock,tcp,noresvport - vers=3 parameters: volumeAs: filesystem fileSystemType: standard storageType: Performance regionId: cn-wulanchabu zoneId: cn-wulanchabu-c # This example uses China (Wulanchabu) Zone C. Ensure it matches the availability zone of your vSwitchId. vpcId: "vpc-0jljd55jeie816cxxxxxx" # Replace this with the VPC ID of your cluster. vSwitchId: "vsw-0jl3qcn7m2gs449lxxxxx" # Replace this with the vSwitch ID of your cluster. accessGroupName: DEFAULT_VPC_GROUP_NAME deleteVolume: "false" provisioner: nasplugin.csi.alibabacloud.com --- kind: PersistentVolumeClaim apiVersion: v1 metadata: name: nas-llm-pvc spec: accessModes: - ReadWriteMany storageClassName: nas-llm-sc resources: requests: storage: 30GiAfter a success message appears, click nas-llm-pvc to view its status. A status of Bound indicates the NAS storage volume has been successfully created and bound.

Deploy Zhenwu 810E GPU resources
This section shows how to use the inference-xpu-pytorch inference image to create a workload that uses Zhenwu 810E GPU compute resources, mounts the NAS storage volume, and exposes it publicly with a LoadBalancer Service.
In the left-side navigation pane, choose , click Create from YAML, paste the following YAML, and then click Create.
apiVersion: apps/v1
kind: Deployment
metadata:
  labels:
    app: llm-test
  name: llm-test
  namespace: default
spec:
  progressDeadlineSeconds: 600
  replicas: 1
  revisionHistoryLimit: 10
  selector:
    matchLabels:
      app: llm-test
  template:
    metadata:
      labels:
        alibabacloud.com/compute-class: gpu
        alibabacloud.com/gpu-model-series: PPU810E
        alibabacloud.com/compute-qos: default
        app: llm-test
    spec:
      containers:
        - command:
          - sh
          - -c
          - sleep infinity
          image: acs-registry-vpc.cn-wulanchabu.cr.aliyuncs.com/egslingjun/inference-xpu-pytorch:25.06-v1.5.2-vllm0.8.5-torch2.6-cu126-20250610
          imagePullPolicy: IfNotPresent
          name: llm-test
          resources:
            limits:
              cpu: 8
              memory: 16G
              alibabacloud.com/ppu: 1
              ephemeral-storage: 30Gi
            requests:
              cpu: 8
              memory: 16G
              alibabacloud.com/ppu: 1
              ephemeral-storage: 30Gi
          terminationMessagePath: /dev/termination-log
          terminationMessagePolicy: File
          volumeMounts:
            - mountPath: /mnt # NAS mount path
              name: data
            - mountPath: /ppu-data
              name: ephemeral
      dnsPolicy: ClusterFirst
      restartPolicy: Always
      schedulerName: default-scheduler
      securityContext: {}
      terminationGracePeriodSeconds: 30
      volumes:
        - name: data
          persistentVolumeClaim:
            claimName: nas-llm-pvc # nas-llm-pvc is the PersistentVolumeClaim for the NAS storage you created.
        - name: ephemeral
          emptyDir:
            sizeLimit: 30G
---
apiVersion: v1
kind: Service
metadata:
  annotations:
    service.beta.kubernetes.io/alibaba-cloud-loadbalancer-address-type: "internet"
    service.beta.kubernetes.io/alibaba-cloud-loadbalancer-ip-version: ipv4
  labels:
    app: llm-test
  name: svc-llm
  namespace: default
spec:
  externalTrafficPolicy: Local
  ports:
  - name: serving
    port: 8000
    protocol: TCP
    targetPort: 8000
  selector:
    app: llm-test
  type: LoadBalancer
After a success message appears, click llm-test to view its status.
The pod takes about 5 minutes to reach the Running state, as it first needs to pull the container image.
Deploy the large language model
This section uses the Qwen2.5-1.5B-Instruct large language model as an example to show how to download and use model files in the container.
To speed up the download, you can increase your network bandwidth. For more information, see How do I speed up model downloads?.
Find the pod named
llm-test-xxxxxxxxx-xxxxxand click Terminal in the Actions column to open a terminal session for the llm-test container.Run the following commands to install ModelScope and download the model files to the specified directory.
The model download takes about 5 minutes.
pip install modelscope
modelscope download --model Qwen/Qwen2.5-1.5B-Instruct --local_dir /mnt/Qwen2.5-1.5B-Instruct
Expected output:
...
Installing collected packages: modelscope
Successfully installed modelscope-1.27.1
...
Successfully Downloaded from model Qwen/Qwen2.5-1.5B-Instruct.                                                                                                                  | 1.00M/2.88G [00:00<16:35, 3.10MB/s]
Start the inference service
This section describes how to start the large language model inference service from the command line inside the container.
After the model is downloaded, run the model startup command.
python3 -m vllm.entrypoints.openai.api_server --model /mnt/Qwen2.5-1.5B-Instruct/ --trust-remote-code --gpu-memory-utilization 0.95Expected output:
... INFO: Started server process [150] INFO: Waiting for application startup. INFO: Application startup complete.NoteBecause you started the inference service manually in the terminal, keep the terminal session open. To configure the inference service to start automatically, proceed to the next step.
(Optional) In the ACS console, choose . Find the
llm-testworkload and click Edit in the Actions column. In the Lifecycle section, replace the Command for Startup with the following content. Then, click Update on the right side of the page and confirm.["sh","-c","python3 -m vllm.entrypoints.openai.api_server --model /mnt/Qwen2.5-1.5B-Instruct/ --trust-remote-code --gpu-memory-utilization 0.95"]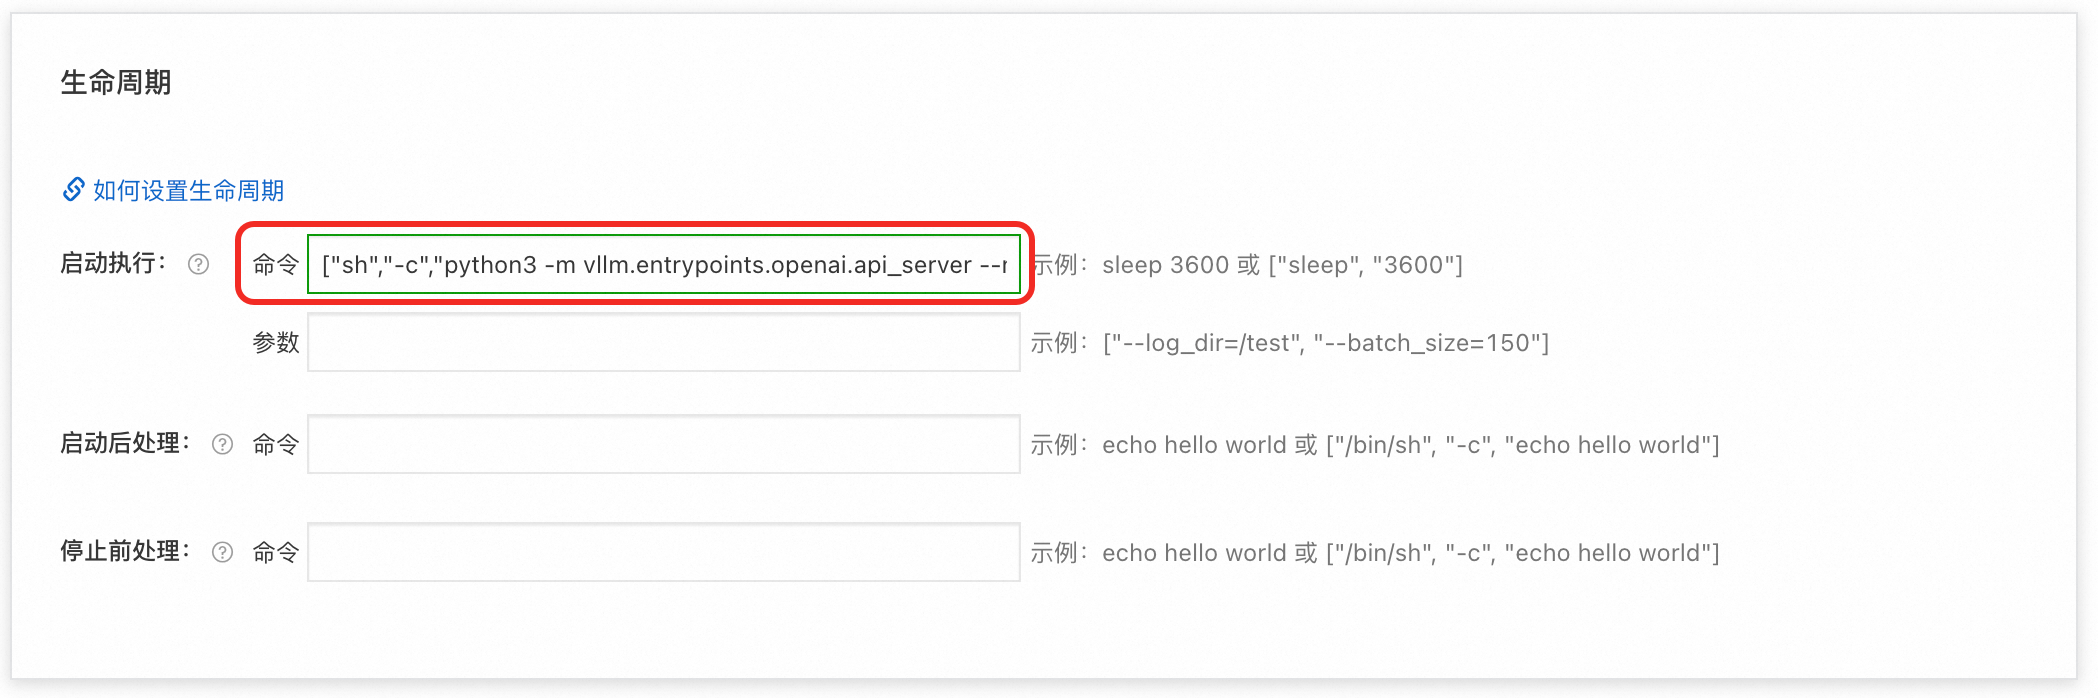
In the ACS console, choose Network > Services from the left-side navigation pane. Find the svc-llm service that you created. The External IP is the public IP address for your inference service.
Run the following
curlcommand from your local machine to verify the inference service's chat completion capability.Replace
<IP>with the external IP address of the service that you obtained in the previous step.curl http://<IP>:8000/v1/chat/completions \ -H "Content-Type: application/json" \ -d '{ "model": "/mnt/Qwen2.5-1.5B-Instruct/", "messages": [ {"role": "system", "content": "You are a friendly AI assistant."}, {"role": "user", "content": "Tell me about some tourist attractions in Hangzhou."} ]}'Expected output:


You have successfully deployed an AI inference service on ACS using Zhenwu 810E.
FAQ
PPU costs and savings in ACS
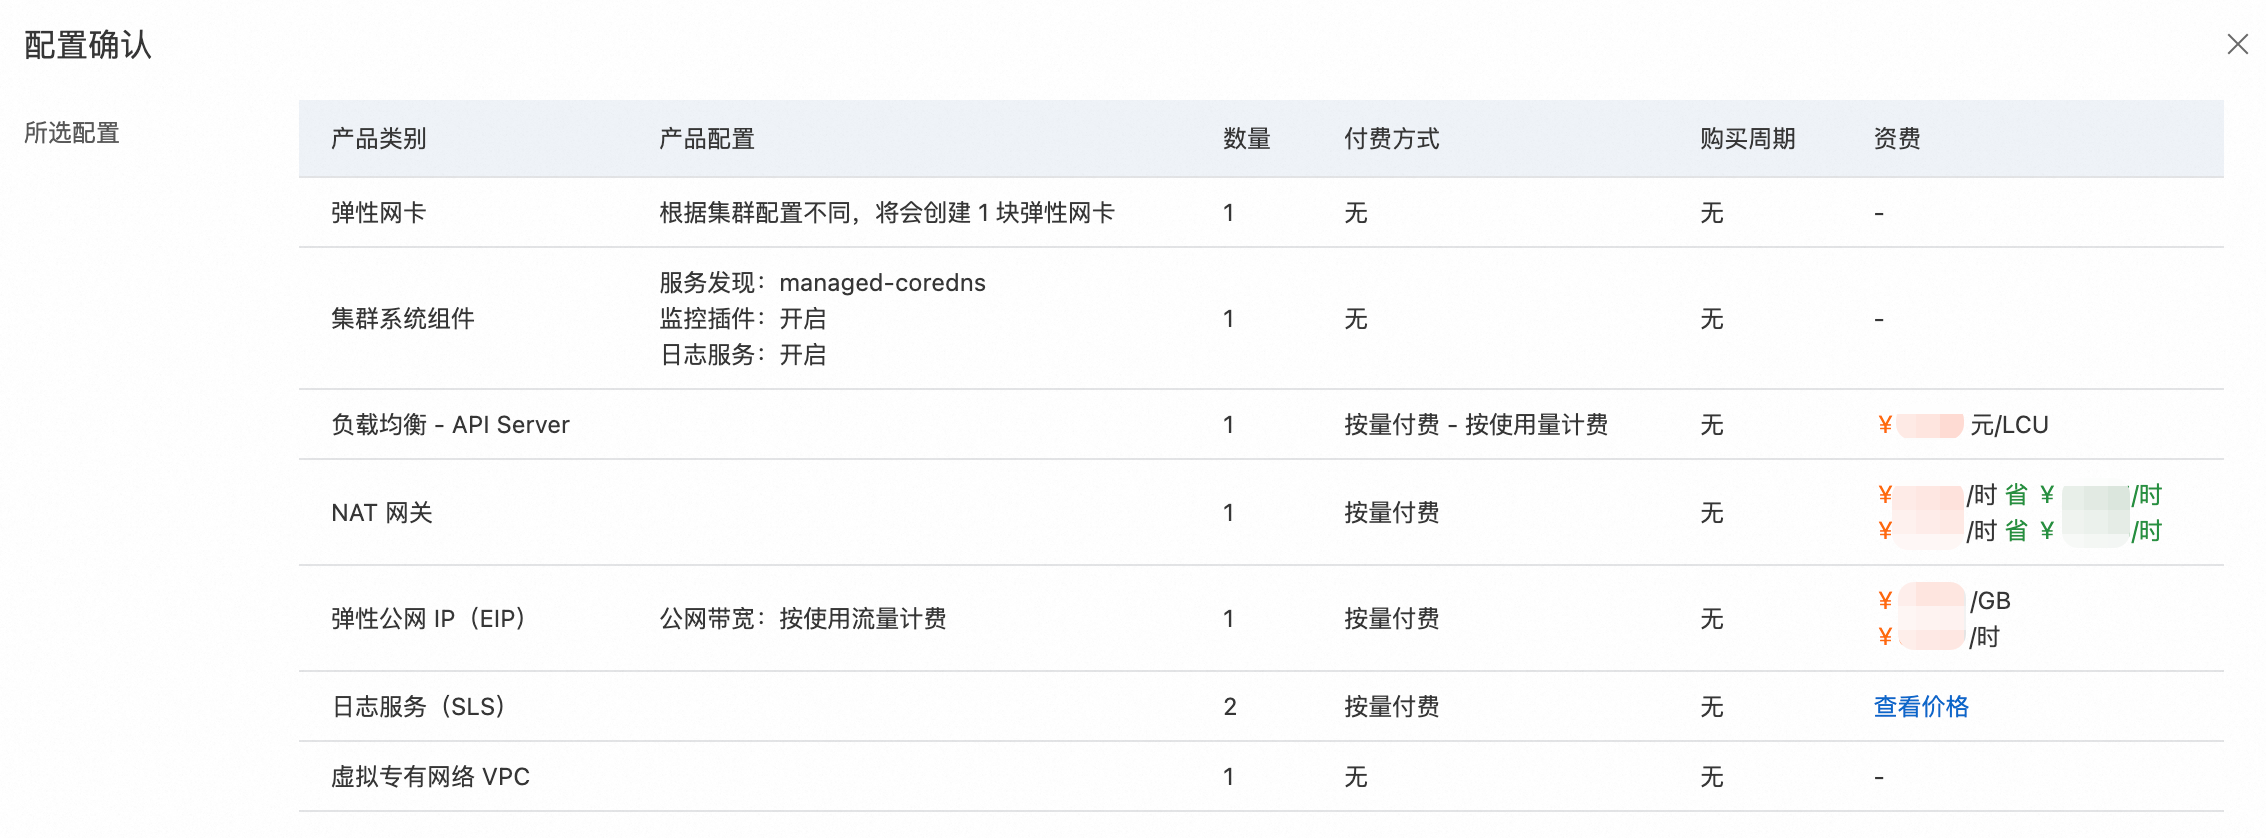
ACS clusters do not have a management fee. The costs of using PPU resources in ACS include cluster configuration and PPU compute resources. For detailed billing, see Billing.
Cluster configuration costs: These include pay-as-you-go fees for the API Server load balancer, NAT Gateway, the EIP bound to the NAT Gateway, public network traffic, Log Service (SLS), and NAS storage for models. These resources are billed based on usage duration or volume. You can choose to delete these associated resources when deleting the ACS cluster.
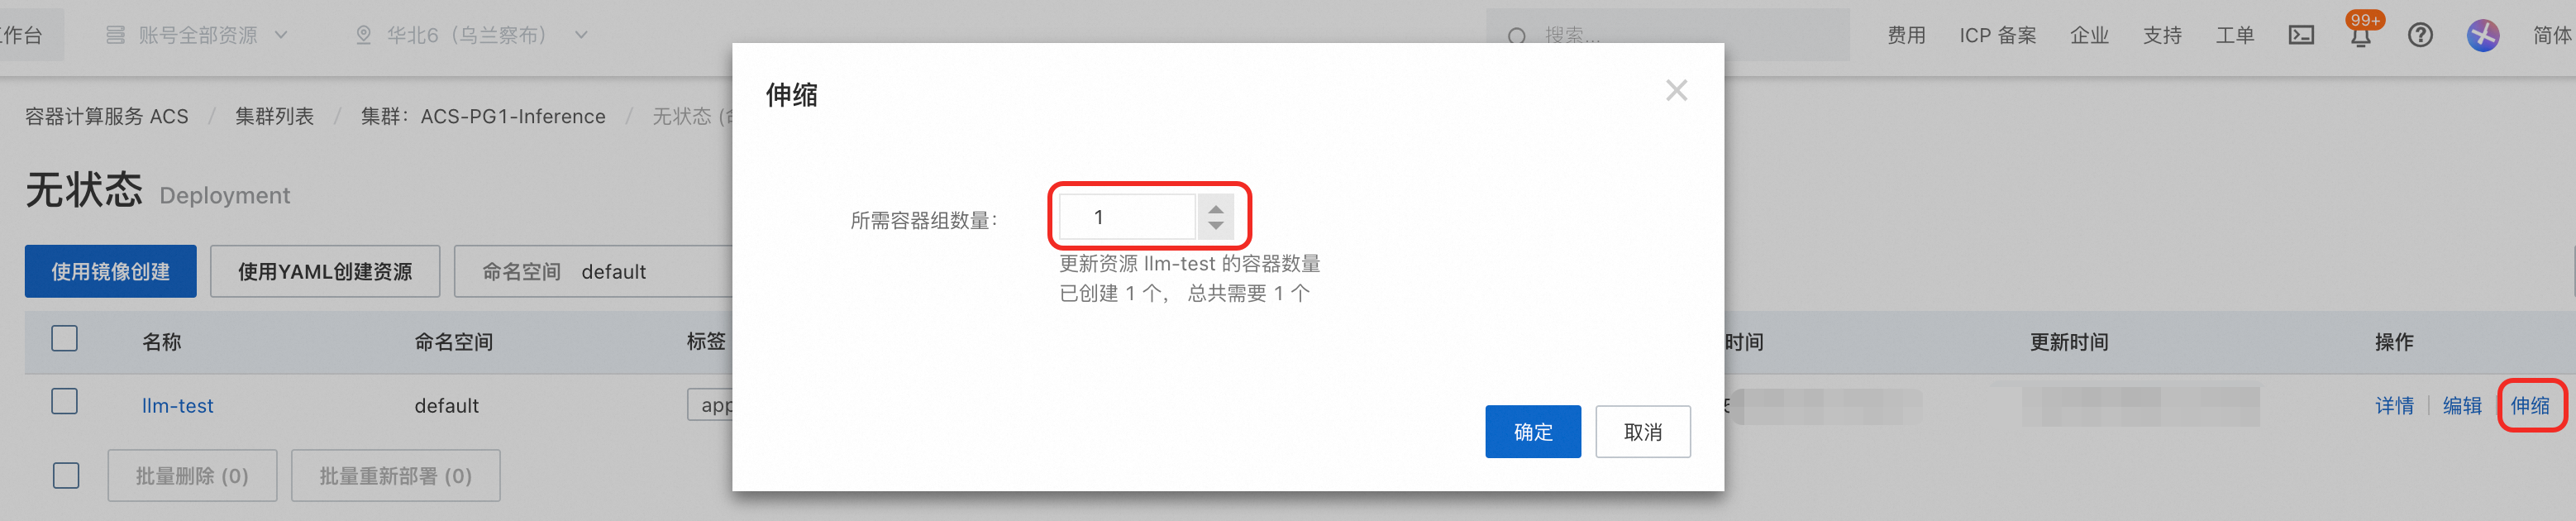
PPU compute resource costs: These include fees for the PPU cards, CPU, and memory used by the containers running the model service. Billing starts when the container image begins to download (Pending state) and ends when the instance stops running (Succeeded or Failed state). To minimize costs, you can scale the stateless workload to zero replicas to quickly delete the containers, and then scale it back to one or more replicas to quickly restart them.
Access control for the public inference service
The inference service in this topic is exposed using a LoadBalancer type Service. This LoadBalancer corresponds to a Server Load Balancer (SLB) instance that is bound to a public IP address.
Refer to Configure an access control policy group for Server Load Balancer to set up an access control policy for the listener of the corresponding SLB instance. Access control supports IP address whitelists and blacklists.
How do I speed up model downloads?
By default, the EIP bound to the cluster's NAT Gateway has a 100 Mbps bandwidth. To speed up model downloads, you can increase the peak bandwidth by following these steps.
Go to the Internet NAT Gateway Console. Select the target instance and click the Associated EIPs tab.
Click the instance ID to go to the instance details page of the EIP.
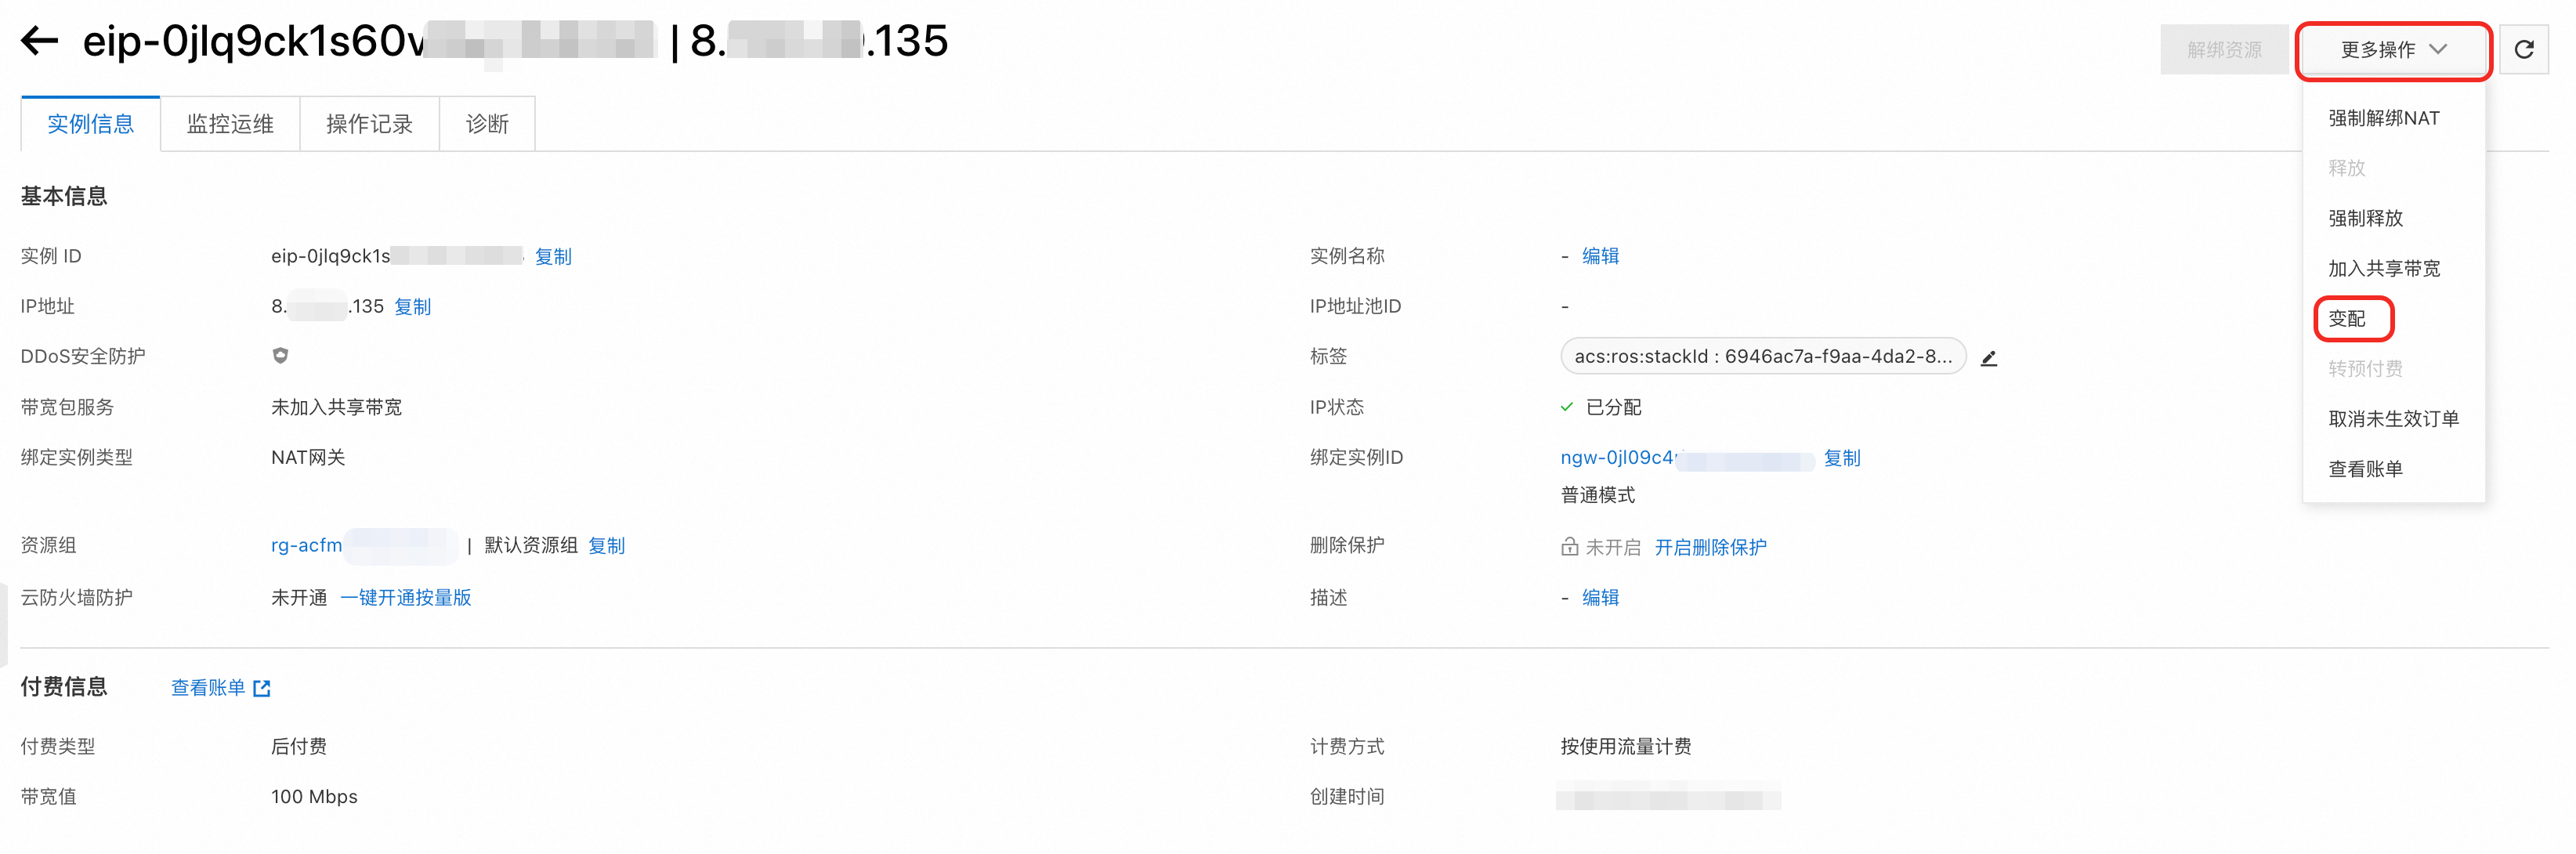
In the upper-right corner, choose More Actions > Modify Configuration. Increase the peak bandwidth to 200 Mbps and click Buy Now. This change does not affect your bill.
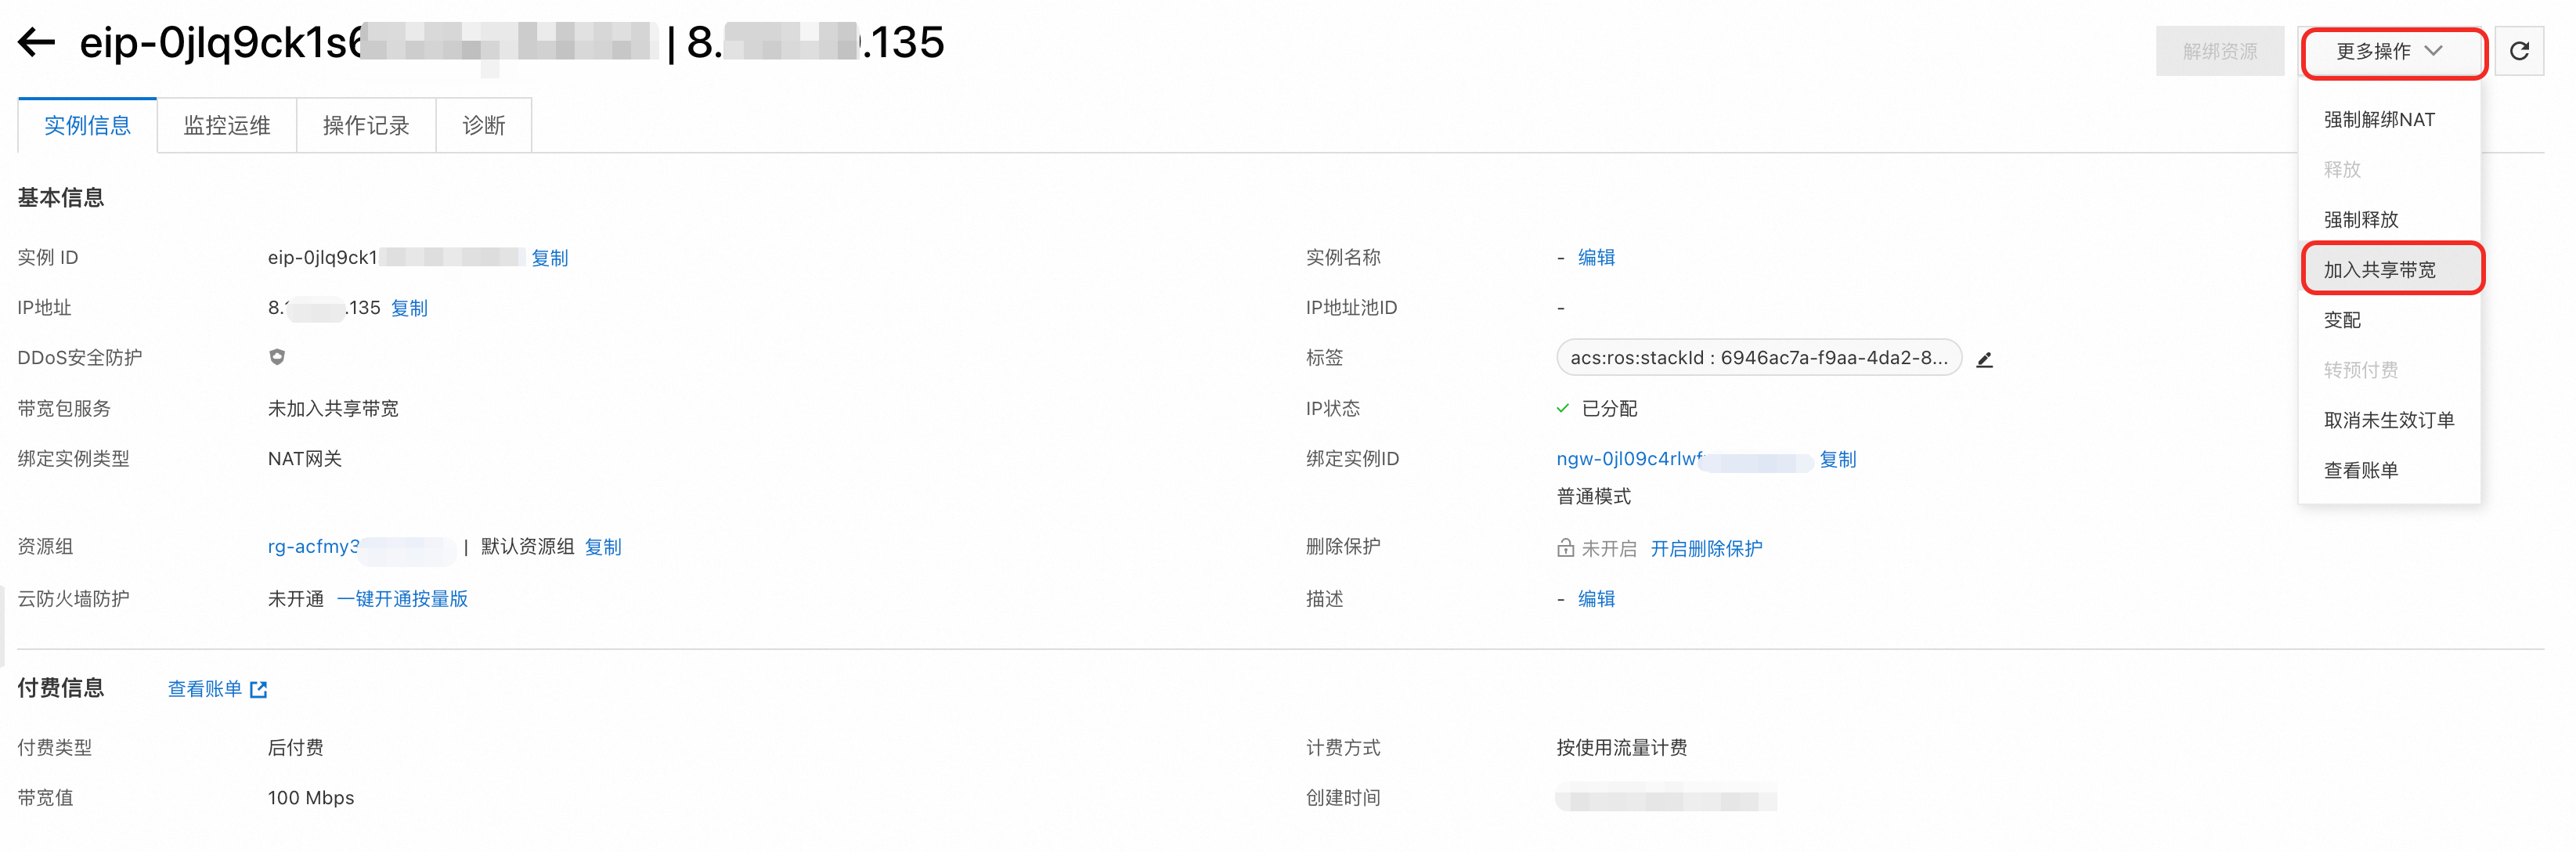
If the model is large, you can Add to Shared Bandwidth for the EIP. A shared bandwidth instance can provide speeds of up to 2,000 Mbps. This action incurs additional charges. Please review the billing information carefully.

Related topics
PPU pod specifications
Pay-as-you-go, reserved capacity, and BestEffort instances share the same specification table.
Instance family | PPU (cards) | vCPU | Memory (GiB) | Memory increment (GiB) | System disk size | Storage billing |
Single-node family | 1 | 2 | 2 to 16 | 1 | 30 GB to 384 GB |
|
4 | 4 to 32 | 1 | ||||
6 | 6 to 48 | 1 | ||||
8 | 8 to 64 | 1 | ||||
10 | 10 to 80 | 1 | ||||
2 | 4 | 4 to 32 | 1 | 30 GB to 768 GB | ||
6 | 6 to 48 | 1 | ||||
8 | 8 to 64 | 1 | ||||
16 | 16 to 128 | 1 | ||||
22 | 32, 64, 128, 225 | N/A | ||||
4 | 8 | 8 to 64 | 1 | 30 GB to 1.5 TB | ||
16 | 16 to 128 | 1 | ||||
32 | 32, 64, 128, 256 | N/A | ||||
46 | 64, 128, 256, 450 | N/A | ||||
8 | 16 | 16 to 128 | 1 | 30 GB to 3 TB | ||
32 | 32, 64, 128, 256 | N/A | ||||
64 | 64, 128, 256, 512 | N/A | ||||
92 | 128, 256, 512, 900 | N/A | ||||
16 | 32 | 32, 64, 128, 256 | N/A | 30 GB to 6 TB | ||
64 | 64, 128, 256, 512 | N/A | ||||
128 | 128, 256, 512, 1024 | N/A | ||||
184 | 256, 512, 1024, 1800 | N/A |